
This is the first of a series of Flutter Tutorials. During the series, you will learn how to build cross-platform apps without worrying about the backend.
In the first part, I will show you how to build a chat application, where users can sign up and talk to other users in a single chat room. The exchange of messages will happen in real time, meaning that you do not have to refresh the page to load new messages.
In the second part, I will show you how to implement Authentication and Authorization (with RLS) to the chat app.
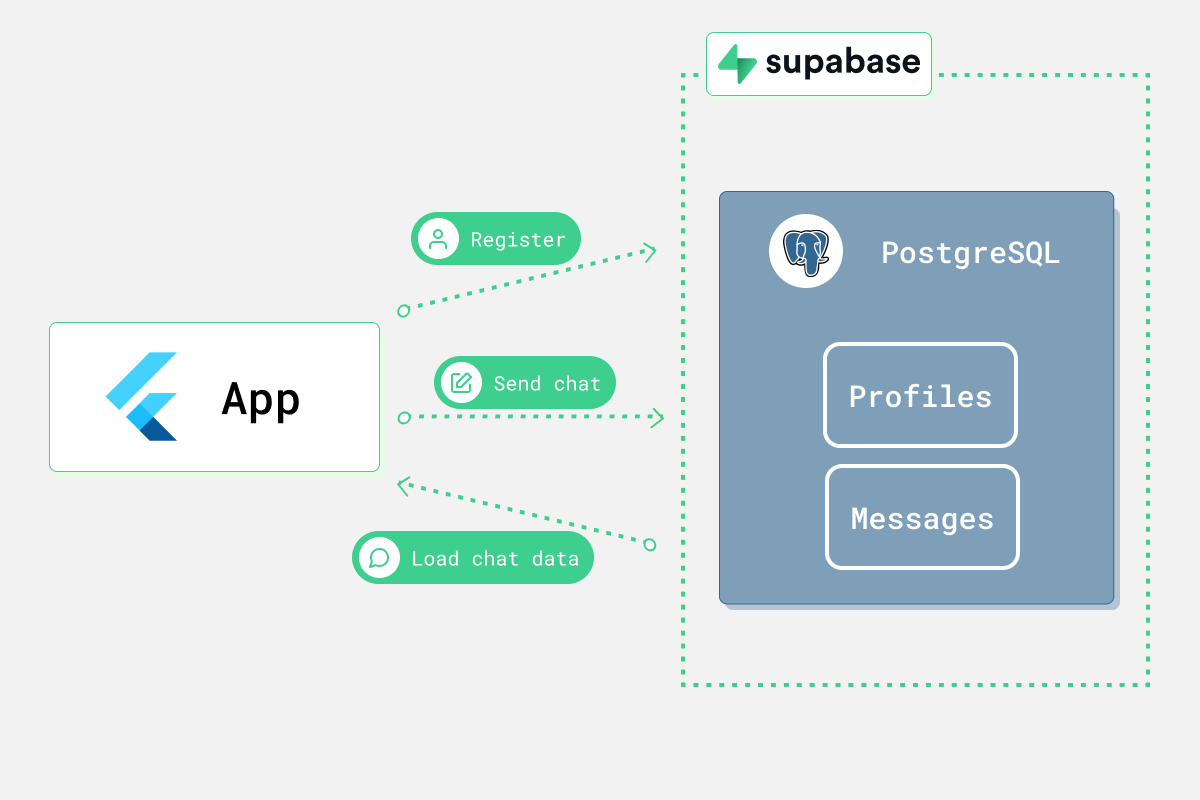
In order to build this chat app, we will need a database to store all of the chat information. We will be using Supabase to store the chat information. Supabase is a back end as a service that provides auth, database, storage and functions to easily create a scalable application. Supabase is a suitable backend for this app, because it provides a nice set of APIs on Postgres database that we can easily call by using the SDK. It is also perfect for chat apps like the one we are about to create, because we can subscribe to real time changes on the database.
This article also assumes that you have installed Flutter already on your machine. If not, you can go to the official Flutter page to start the installation.
You can find the complete version of this app in this Github repository.
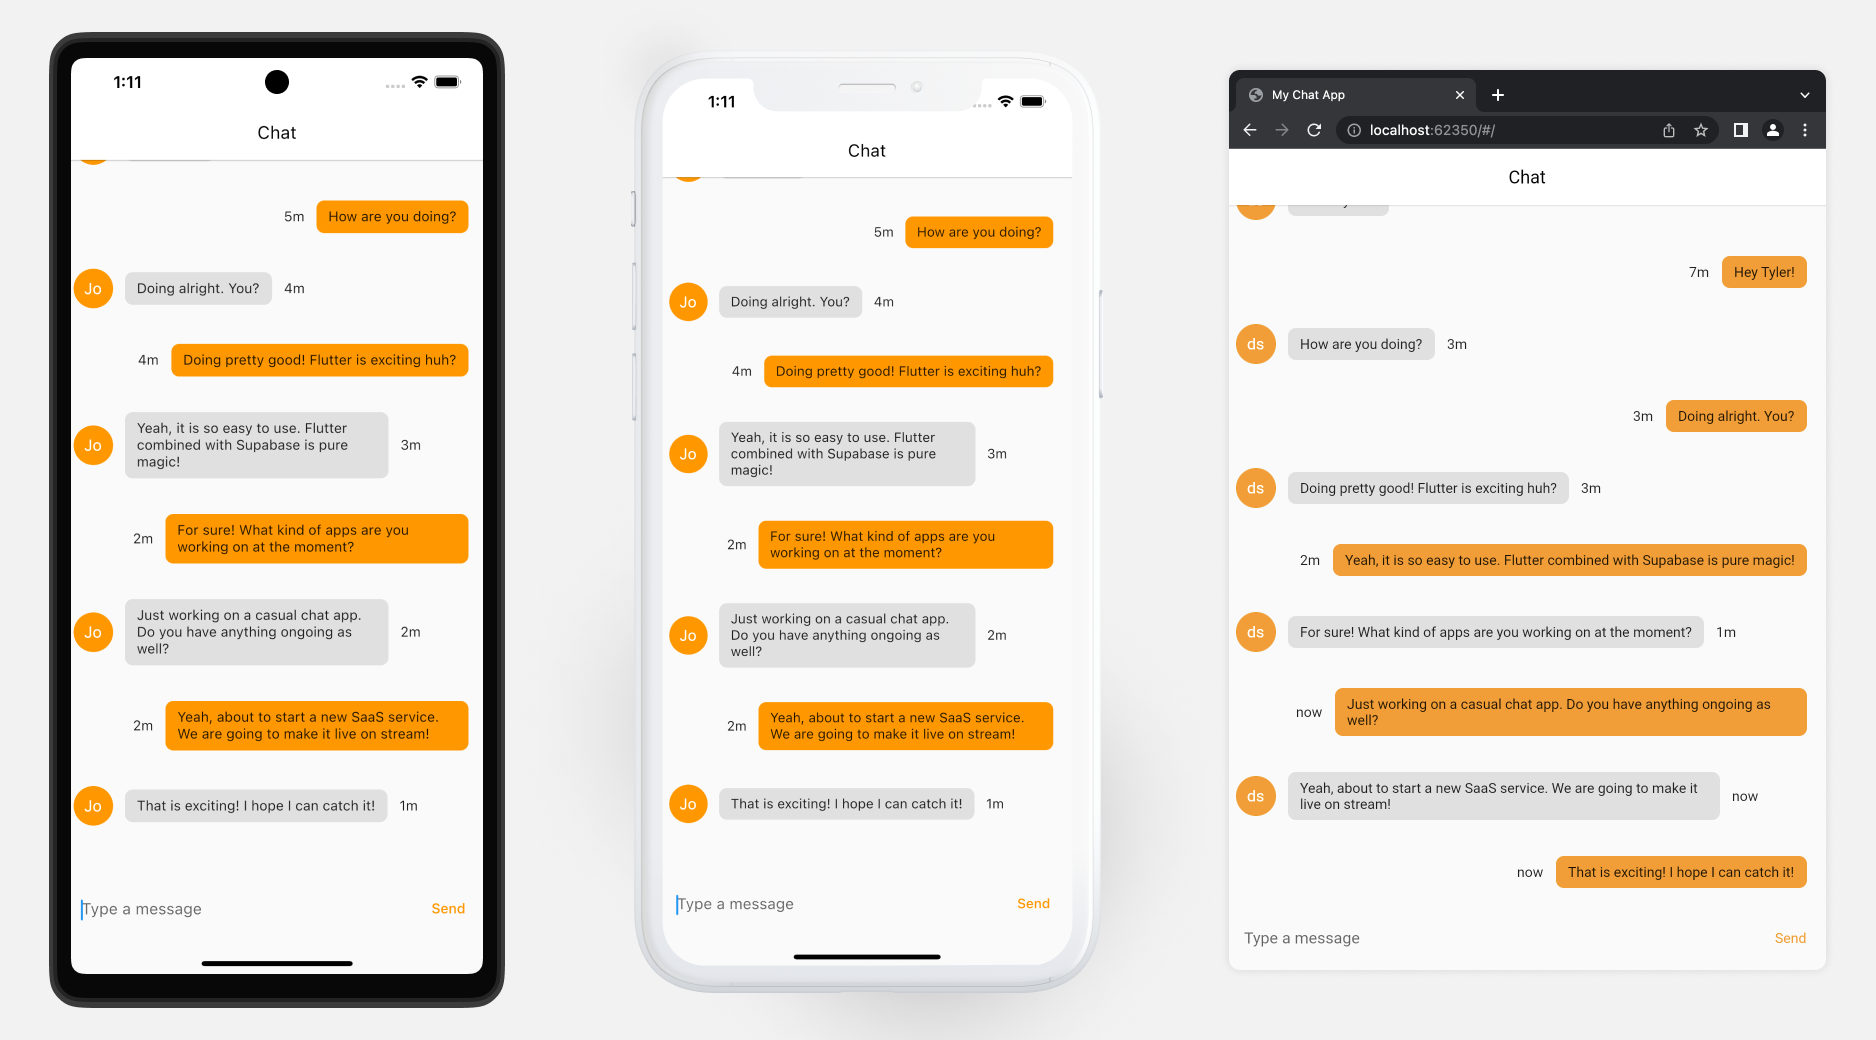
Overview of the final chat app
The application we are creating today is a simple real time chat application. Users can sign up/ sign in using email and password. Once they are in, they can read and send messages to a shared room across all users of the application. Because we are using Flutter, the app can run on iOS, Android, or on the web.
Techstack will be fairly simple. We have Flutter on the frontend, Supabase on the backend and that is it! Since Supabase provides nice APIs to access the Postgres database, we don't need to create our own. We will access Supabase through the supabase_flutter package, which provides an intuitive way of reading and writing data to the database.
Setting up the scene
Create a blank Flutter application
We will start out by creating an empty Flutter project.
First, open your terminal and type
_10flutter create my_chat_app
Once it is done, you can go into your app and run it.
_10cd my_chat_app_10flutter run
You should be able to now see the default counter app that every Flutter project starts with. With that, let's open the app in your favorite code editor and get started with coding!
Install dependencies
Open pubspec.yaml file and let's install a few dependencies of this app.
_10supabase_flutter: ^1.0.0_10timeago: ^3.1.0
supabase_flutter will provide us easy access to our Postgres database hosted on Supabase. timeago is a simple library that takes a DateTime and returns nice strings displaying how long ago the time was. This will be used to display the timestamps of each chat bubble.
Run flutter pub get to install the packages. Note that you will have to terminate flutter run and re-run it again after this package installation.
Creating a new Supabase project
If you do not have a Supabase account yet, do not worry, you can get started for free.
You will be prompted to sign in using your Github account with a big green button, so let's go ahead and press it. Proceed with the sign up process and once you are done, you will be taken to a list of projects. You can go ahead and create a new project by pressing the “New Project” button at the top.

You will be entering a few things here like the name of the project. You can call it “chat” for now. For the database password, go ahead and hit the “Generate a password” button to generate a random password. We won't use this password in this app, but if you ever need it, you can always override it later to whatever you want it to be. You can leave the pricing plan for free as Supabase has a very generous free plan that will be way more than enough for our chat app. Once you have entered everything, you can press the “Create new Project” button. Spinning up a brand new Supabase project could take a few minutes.
Once your project is ready, we can dive into setting up our project!
Setting up tables in Supabase
Once your project is ready, we can dive into setting up our project!
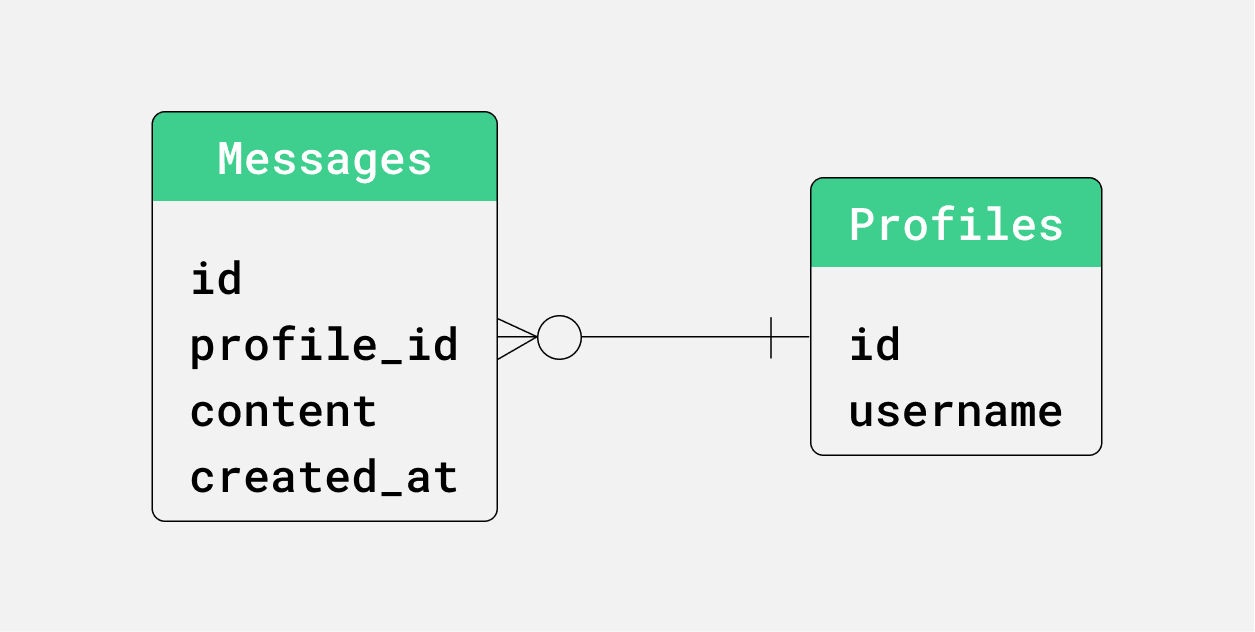
In order to create the chat app, we will create 2 tables.
- profiles - stores user profile data
- messages - contains the contents of each message along with who sent it.
Each message is associated with one profile to represent who posted the message.
You can run the following SQL in your SQL editor of your Supabase dashboard.
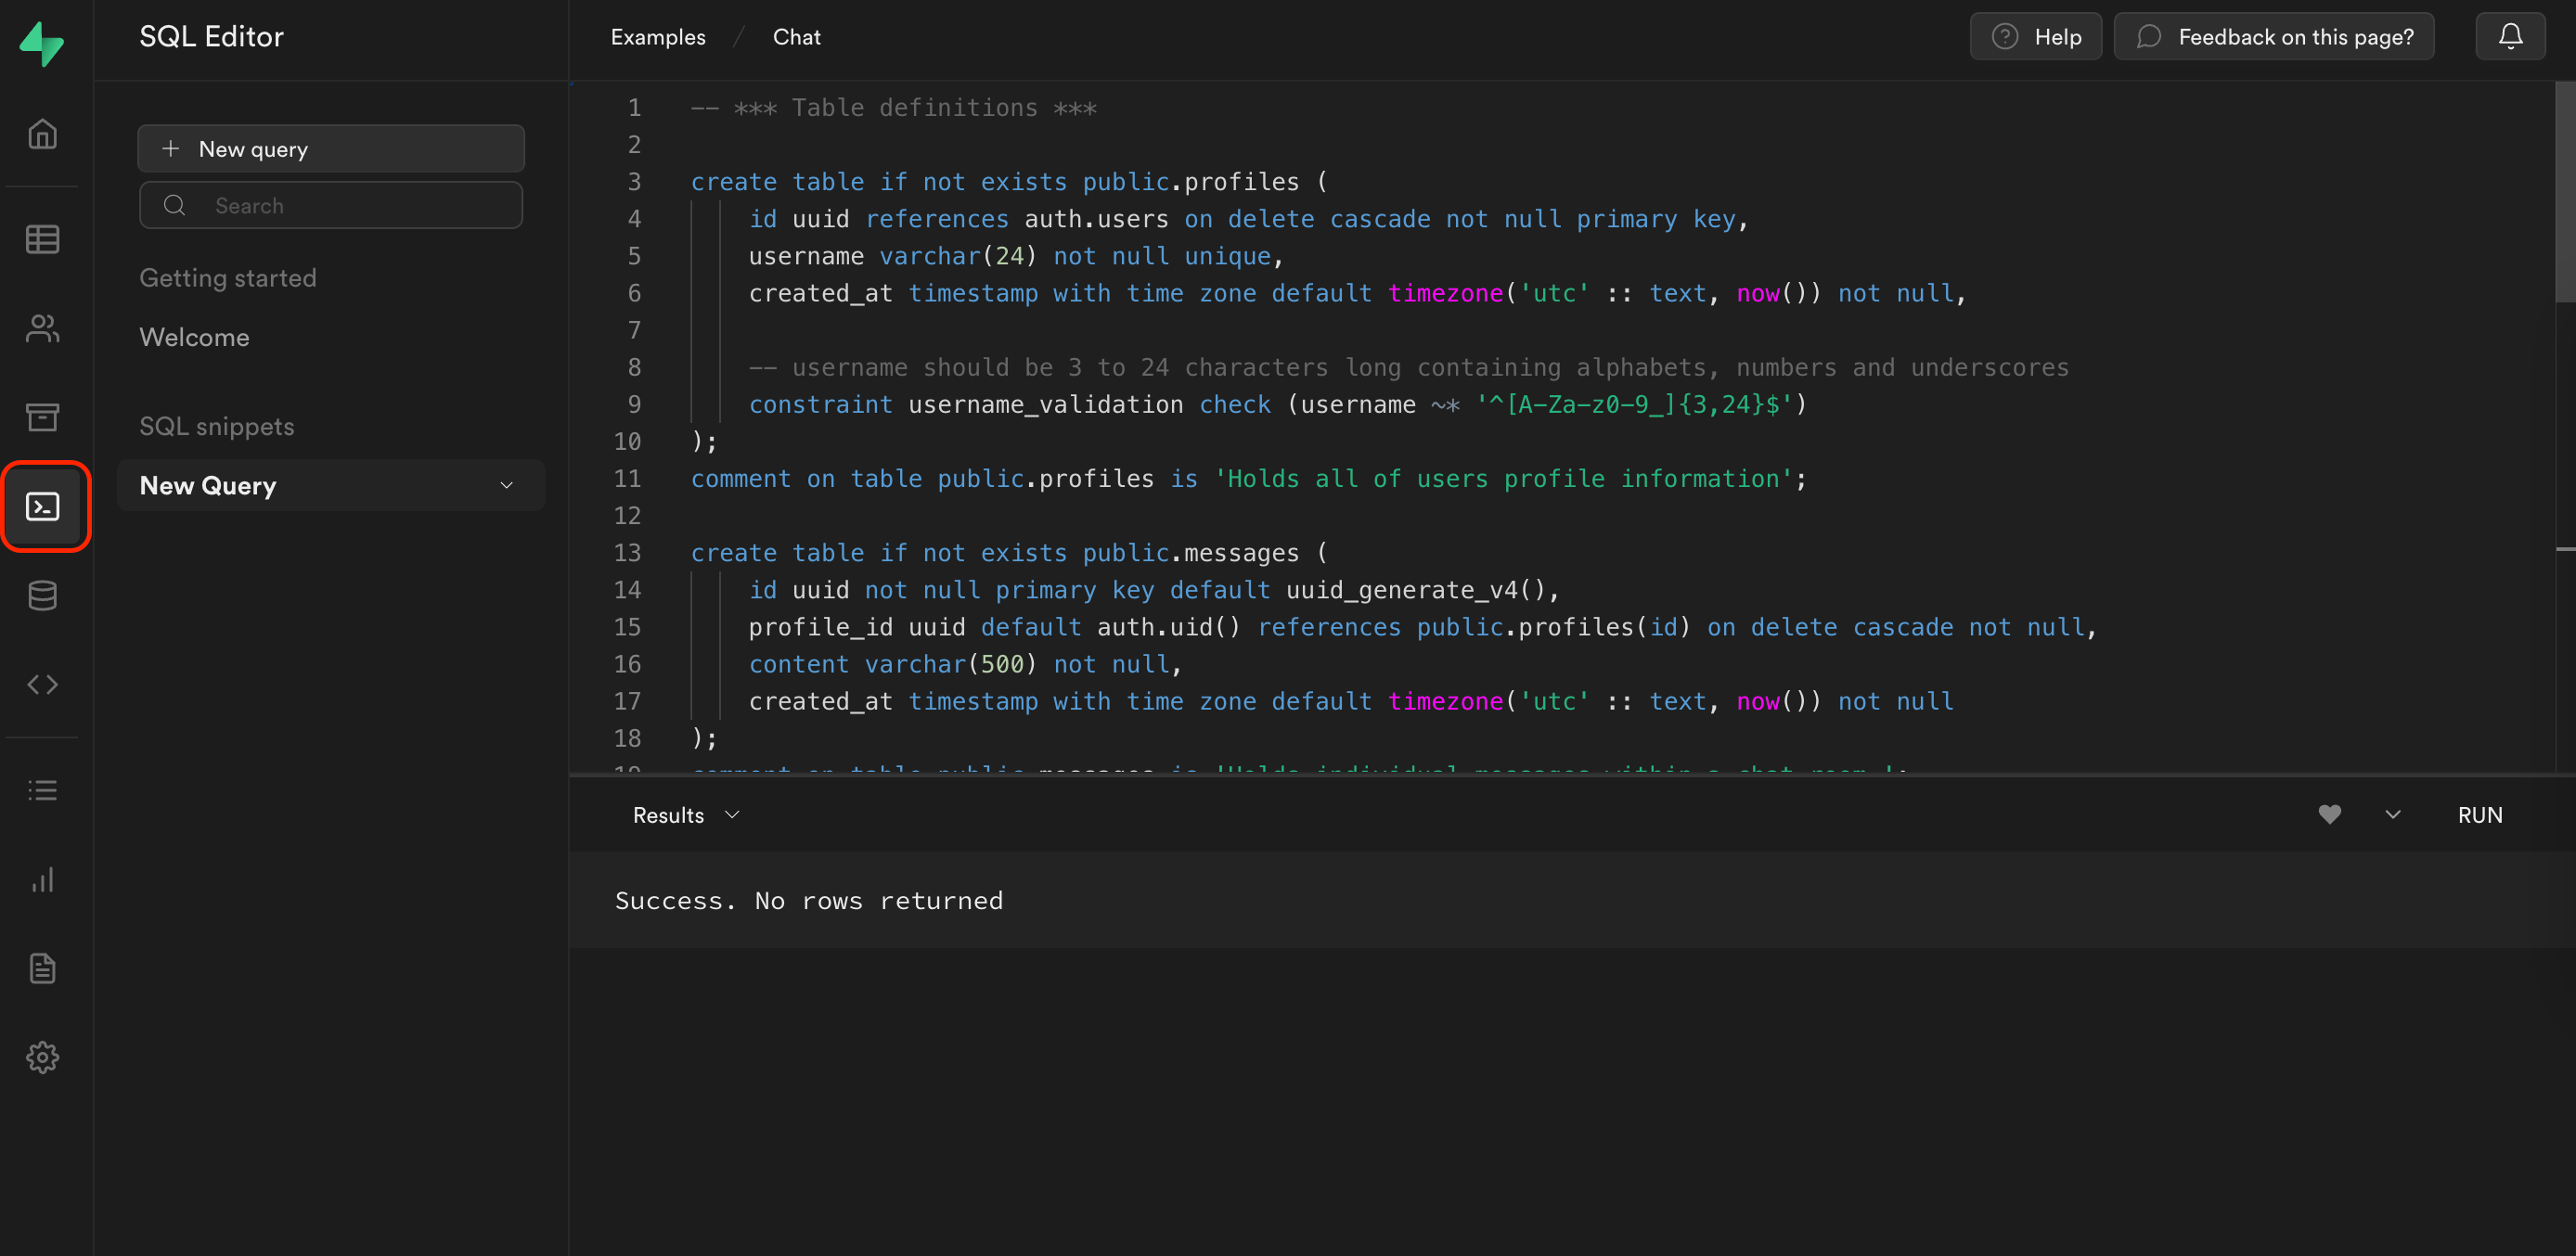
_17create table if not exists public.profiles (_17 id uuid references auth.users on delete cascade not null primary key,_17 username varchar(24) not null unique,_17 created_at timestamp with time zone default timezone('utc' :: text, now()) not null,_17_17 -- username should be 3 to 24 characters long containing alphabets, numbers and underscores_17 constraint username_validation check (username ~* '^[A-Za-z0-9_]{3,24}$')_17);_17comment on table public.profiles is 'Holds all of users profile information';_17_17create table if not exists public.messages (_17 id uuid not null primary key default gen_random_uuid(),_17 profile_id uuid default auth.uid() references public.profiles(id) on delete cascade not null,_17 content varchar(500) not null,_17 created_at timestamp with time zone default timezone('utc' :: text, now()) not null_17);_17comment on table public.messages is 'Holds individual messages sent on the app.';
After running the SQL, you should see the tables in your table editor on your Supabase dashboard. You can click any of the tables to view the stored data, note that all of the tables should be empty at this point.

Supabase allows us to listen to real time changes on the database with additional configuration. We want to enable real time on our messages table, so that we can display the chats when new data is added. Go back to SQL editor and run the following SQL to enable real time for messages.
_10-- *** Add tables to the publication to enable real time subscription ***_10alter publication supabase_realtime add table public.messages;
Now that we have defined what our data looks like, let’s have some fun writing Flutter code!
Building the Flutter chat application
Step 1: Define constants that to be used throughout the application
We will start out by creating a constants.dart file and define a few constants that will make things easier down the line. We will use the supabase variable to access our database and auth features.
_83import 'package:flutter/material.dart';_83import 'package:supabase_flutter/supabase_flutter.dart';_83_83/// Supabase client_83final supabase = Supabase.instance.client;_83_83/// Simple preloader inside a Center widget_83const preloader =_83 Center(child: CircularProgressIndicator(color: Colors.orange));_83_83/// Simple sized box to space out form elements_83const formSpacer = SizedBox(width: 16, height: 16);_83_83/// Some padding for all the forms to use_83const formPadding = EdgeInsets.symmetric(vertical: 20, horizontal: 16);_83_83/// Error message to display the user when unexpected error occurs._83const unexpectedErrorMessage = 'Unexpected error occurred.';_83_83/// Basic theme to change the look and feel of the app_83final appTheme = ThemeData.light().copyWith(_83 primaryColorDark: Colors.orange,_83 appBarTheme: const AppBarTheme(_83 elevation: 1,_83 backgroundColor: Colors.white,_83 iconTheme: IconThemeData(color: Colors.black),_83 titleTextStyle: TextStyle(_83 color: Colors.black,_83 fontSize: 18,_83 ),_83 ),_83 primaryColor: Colors.orange,_83 textButtonTheme: TextButtonThemeData(_83 style: TextButton.styleFrom(_83 foregroundColor: Colors.orange,_83 ),_83 ),_83 elevatedButtonTheme: ElevatedButtonThemeData(_83 style: ElevatedButton.styleFrom(_83 foregroundColor: Colors.white,_83 backgroundColor: Colors.orange,_83 ),_83 ),_83 inputDecorationTheme: InputDecorationTheme(_83 floatingLabelStyle: const TextStyle(_83 color: Colors.orange,_83 ),_83 border: OutlineInputBorder(_83 borderRadius: BorderRadius.circular(12),_83 borderSide: const BorderSide(_83 color: Colors.grey,_83 width: 2,_83 ),_83 ),_83 focusColor: Colors.orange,_83 focusedBorder: OutlineInputBorder(_83 borderRadius: BorderRadius.circular(12),_83 borderSide: const BorderSide(_83 color: Colors.orange,_83 width: 2,_83 ),_83 ),_83 ),_83);_83_83/// Set of extension methods to easily display a snackbar_83extension ShowSnackBar on BuildContext {_83 /// Displays a basic snackbar_83 void showSnackBar({_83 required String message,_83 Color backgroundColor = Colors.white,_83 }) {_83 ScaffoldMessenger.of(this).showSnackBar(SnackBar(_83 content: Text(message),_83 backgroundColor: backgroundColor,_83 ));_83 }_83_83 /// Displays a red snackbar indicating error_83 void showErrorSnackBar({required String message}) {_83 showSnackBar(message: message, backgroundColor: Colors.red);_83 }_83}
Step 2: Initialize Supabase
In order to use Supabase, we need to initialize it at the top of the main function. Let’s edit the main.dart file so that we can initialize Supabase. Note that within the build method of MyApp, we are loading the theme data created in the constants.dart file and the home is set to SplashPage(), which we will create in later sections.
You can find your Supabase URL and Supabase anon key under settings -> API in your dashboard.
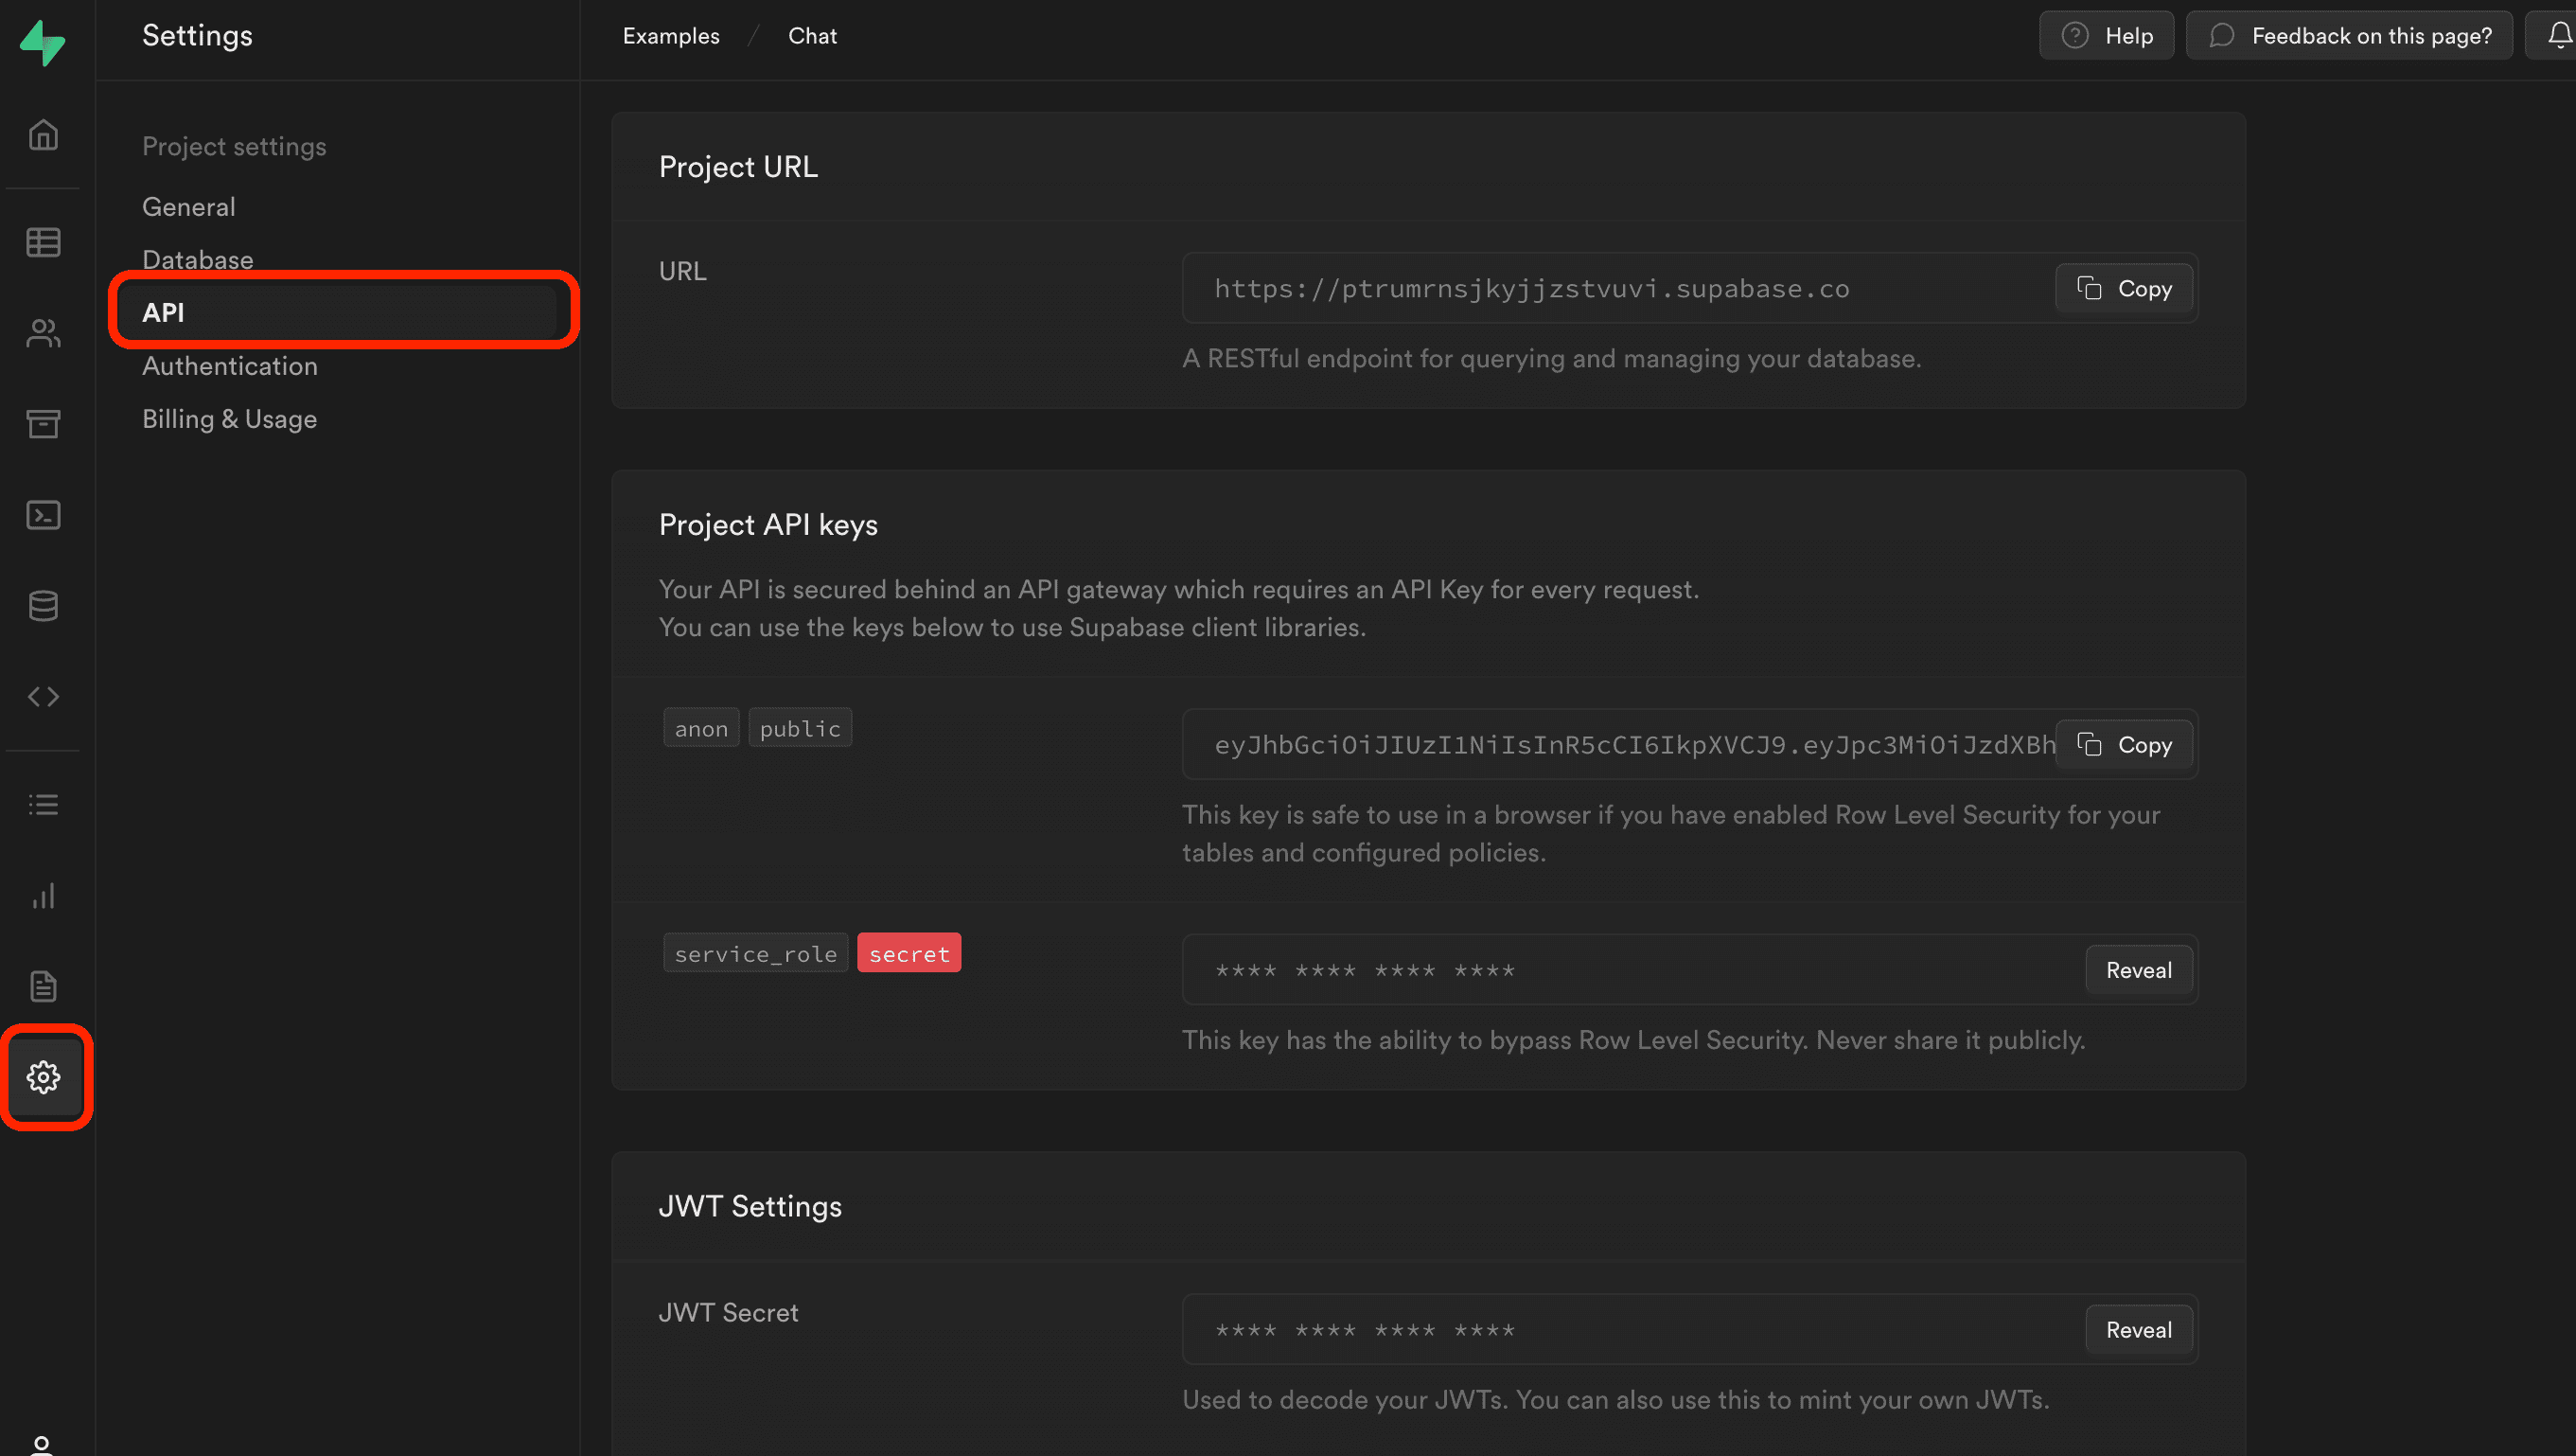
_29import 'package:flutter/material.dart';_29import 'package:my_chat_app/utils/constants.dart';_29import 'package:supabase_flutter/supabase_flutter.dart';_29import 'package:my_chat_app/pages/splash_page.dart';_29_29Future<void> main() async {_29 WidgetsFlutterBinding.ensureInitialized();_29_29 await Supabase.initialize(_29 // TODO: Replace credentials with your own_29 url: 'SUPABASE_URL',_29 anonKey: 'SUPABASE_ANON_KEY',_29 );_29 runApp(const MyApp());_29}_29_29class MyApp extends StatelessWidget {_29 const MyApp({Key? key}) : super(key: key);_29_29 @override_29 Widget build(BuildContext context) {_29 return MaterialApp(_29 debugShowCheckedModeBanner: false,_29 title: 'My Chat App',_29 theme: appTheme,_29 home: const SplashPage(),_29 );_29 }_29}
Step 3: Redirect users depending on auth state using splash page
When a user launches the app, we want to redirect those who have already signed in to the Chat page and those who have not signed in yet to the register page.
In order to achieve this, we will create a splash page, which is just a page with a preloader at the middle from the user, but takes care of fetching auth state and redirects users accordingly behind the scenes.
Within the _redirect() method, we are fetching the auth state and navigating the user accordingly.
_39import 'package:flutter/material.dart';_39import 'package:my_chat_app/pages/chat_page.dart';_39import 'package:my_chat_app/pages/register_page.dart';_39import 'package:my_chat_app/utils/constants.dart';_39_39/// Page to redirect users to the appropriate page depending on the initial auth state_39class SplashPage extends StatefulWidget {_39 const SplashPage({Key? key}) : super(key: key);_39_39 @override_39 SplashPageState createState() => SplashPageState();_39}_39_39class SplashPageState extends State<SplashPage> {_39 @override_39 void initState() {_39 super.initState();_39 _redirect();_39 }_39_39 Future<void> _redirect() async {_39 // await for for the widget to mount_39 await Future.delayed(Duration.zero);_39_39 final session = supabase.auth.currentSession;_39 if (session == null) {_39 Navigator.of(context)_39 .pushAndRemoveUntil(RegisterPage.route(), (route) => false);_39 } else {_39 Navigator.of(context)_39 .pushAndRemoveUntil(ChatPage.route(), (route) => false);_39 }_39 }_39_39 @override_39 Widget build(BuildContext context) {_39 return const Scaffold(body: preloader);_39 }_39}
Step 4 : Define data models to be used within the app
We need to create data model classes that we will use within our app. We will map the tables we had creating Profile and Message class. They will also contain a fromMap constructor to easily create them from the return value of Supabase.
_21class Profile {_21 Profile({_21 required this.id,_21 required this.username,_21 required this.createdAt,_21 });_21_21 /// User ID of the profile_21 final String id;_21_21 /// Username of the profile_21 final String username;_21_21 /// Date and time when the profile was created_21 final DateTime createdAt;_21_21 Profile.fromMap(Map<String, dynamic> map)_21 : id = map['id'],_21 username = map['username'],_21 createdAt = DateTime.parse(map['created_at']);_21}
_33class Message {_33 Message({_33 required this.id,_33 required this.profileId,_33 required this.content,_33 required this.createdAt,_33 required this.isMine,_33 });_33_33 /// ID of the message_33 final String id;_33_33 /// ID of the user who posted the message_33 final String profileId;_33_33 /// Text content of the message_33 final String content;_33_33 /// Date and time when the message was created_33 final DateTime createdAt;_33_33 /// Whether the message is sent by the user or not._33 final bool isMine;_33_33 Message.fromMap({_33 required Map<String, dynamic> map,_33 required String myUserId,_33 }) : id = map['id'],_33 profileId = map['profile_id'],_33 content = map['content'],_33 createdAt = DateTime.parse(map['created_at']),_33 isMine = myUserId == map['profile_id'];_33}
Step 5: Create register page with email, password and username
Now that we have defined a few handy constants, it is time to dive into creating pages.
The first page we will create is the register page.
This page will take an email address, password, and username within a form widget.
The username will be the primary identifier when users search for other users within the app.
Once a user performs registration, they will be taken to the chat page. Let's create a lib/pages/register_page.dart file and paste the following code.
_126import 'package:flutter/material.dart';_126import 'package:my_chat_app/pages/chat_page.dart';_126import 'package:my_chat_app/pages/login_page.dart';_126import 'package:my_chat_app/utils/constants.dart';_126import 'package:supabase_flutter/supabase_flutter.dart';_126_126class RegisterPage extends StatefulWidget {_126 const RegisterPage({Key? key, required this.isRegistering}) : super(key: key);_126_126 static Route<void> route({bool isRegistering = false}) {_126 return MaterialPageRoute(_126 builder: (context) => RegisterPage(isRegistering: isRegistering),_126 );_126 }_126_126 final bool isRegistering;_126_126 @override_126 State<RegisterPage> createState() => _RegisterPageState();_126}_126_126class _RegisterPageState extends State<RegisterPage> {_126 final bool _isLoading = false;_126_126 final _formKey = GlobalKey<FormState>();_126_126 final _emailController = TextEditingController();_126 final _passwordController = TextEditingController();_126 final _usernameController = TextEditingController();_126_126 Future<void> _signUp() async {_126 final isValid = _formKey.currentState!.validate();_126 if (!isValid) {_126 return;_126 }_126 final email = _emailController.text;_126 final password = _passwordController.text;_126 final username = _usernameController.text;_126 try {_126 await supabase.auth.signUp(_126 email: email, password: password, data: {'username': username});_126 Navigator.of(context)_126 .pushAndRemoveUntil(ChatPage.route(), (route) => false);_126 } on AuthException catch (error) {_126 context.showErrorSnackBar(message: error.message);_126 } catch (error) {_126 context.showErrorSnackBar(message: unexpectedErrorMessage);_126 }_126 }_126_126 @override_126 Widget build(BuildContext context) {_126 return Scaffold(_126 appBar: AppBar(_126 title: const Text('Register'),_126 ),_126 body: Form(_126 key: _formKey,_126 child: ListView(_126 padding: formPadding,_126 children: [_126 TextFormField(_126 controller: _emailController,_126 decoration: const InputDecoration(_126 label: Text('Email'),_126 ),_126 validator: (val) {_126 if (val == null || val.isEmpty) {_126 return 'Required';_126 }_126 return null;_126 },_126 keyboardType: TextInputType.emailAddress,_126 ),_126 formSpacer,_126 TextFormField(_126 controller: _passwordController,_126 obscureText: true,_126 decoration: const InputDecoration(_126 label: Text('Password'),_126 ),_126 validator: (val) {_126 if (val == null || val.isEmpty) {_126 return 'Required';_126 }_126 if (val.length < 6) {_126 return '6 characters minimum';_126 }_126 return null;_126 },_126 ),_126 formSpacer,_126 TextFormField(_126 controller: _usernameController,_126 decoration: const InputDecoration(_126 label: Text('Username'),_126 ),_126 validator: (val) {_126 if (val == null || val.isEmpty) {_126 return 'Required';_126 }_126 final isValid = RegExp(r'^[A-Za-z0-9_]{3,24}$').hasMatch(val);_126 if (!isValid) {_126 return '3-24 long with alphanumeric or underscore';_126 }_126 return null;_126 },_126 ),_126 formSpacer,_126 ElevatedButton(_126 onPressed: _isLoading ? null : _signUp,_126 child: const Text('Register'),_126 ),_126 formSpacer,_126 TextButton(_126 onPressed: () {_126 Navigator.of(context).push(LoginPage.route());_126 },_126 child: const Text('I already have an account'),_126 )_126 ],_126 ),_126 ),_126 );_126 }_126}
If you look at the validator function of the username field, you notice that we are enforcing the same regular expression check as what we defined in our table definition of profiles.
If you take a closer look at the _signup() method, you notice that the username is passed as a data.
By passing data to your sign up method, you can populate the meta data field of your authenticated users.
We will need to copy this username into our profiles table so that other users can find you.
In order to do this, we will utilize a Postgres function and Postgres trigger.
Run the following SQL to create a Postgres function that will automatically run when a new user signs up to our application.
Since we have set a unique constraint on the username column of our profiles table, the sign up will fail if a user chooses a username that is already taken.
_16-- Function to create a new row in profiles table upon signup_16-- Also copies the username value from metadata_16create or replace function handle_new_user() returns trigger as $$_16 begin_16 insert into public.profiles(id, username)_16 values(new.id, new.raw_user_meta_data->>'username');_16_16 return new;_16 end;_16$$ language plpgsql security definer;_16_16-- Trigger to call `handle_new_user` when new user signs up_16create trigger on_auth_user_created_16 after insert on auth.users_16 for each row_16 execute function handle_new_user();
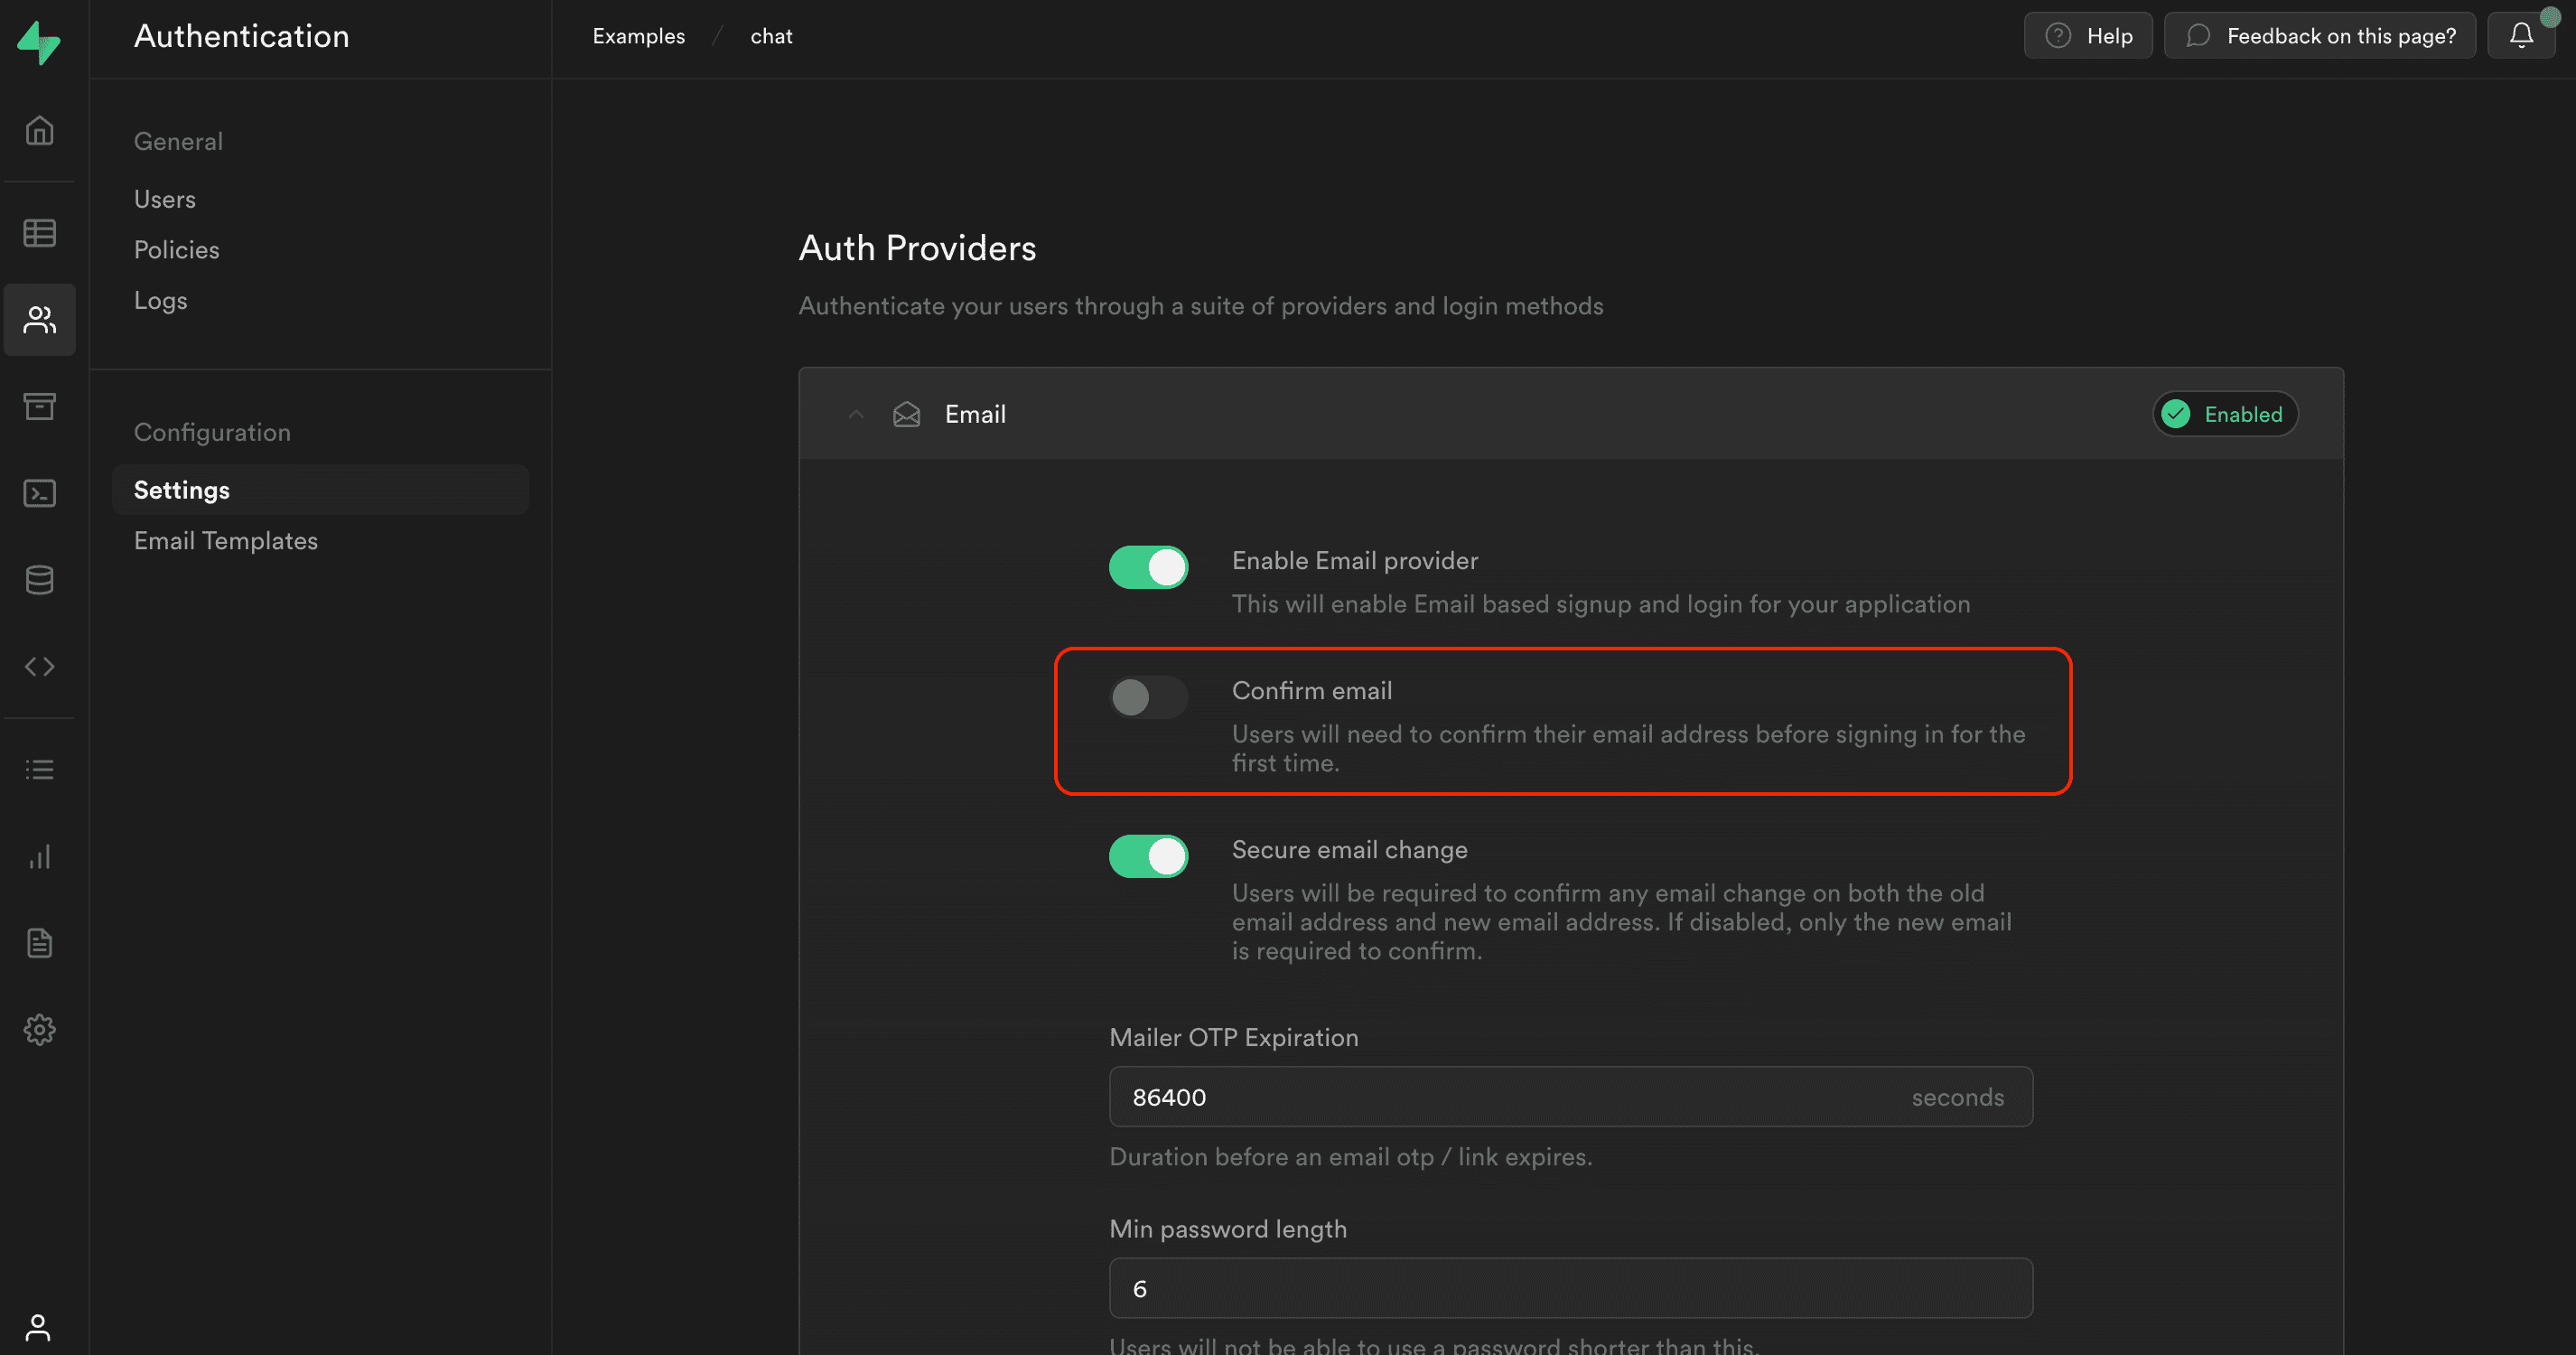
Also, Supabase has email confirmation turned on by default, meaning that every time someone signs up, they have to click the confirmation link they receive in their email.
This is ideal for a production app, but for our sample app, we can turn it off since we want to get up and running with building a functioning chat app.
We will cover secure authentications using Supabase in later articles.
Go to authentication → settings and turn off the switch of Enable email confirmations.
Step 6: Create login page
Login page will also be a simple page with an email and password field. Once they have signed in, the user will be taken to the rooms page.
_79import 'package:flutter/material.dart';_79import 'package:my_chat_app/pages/chat_page.dart';_79import 'package:my_chat_app/utils/constants.dart';_79import 'package:supabase_flutter/supabase_flutter.dart';_79_79class LoginPage extends StatefulWidget {_79 const LoginPage({Key? key}) : super(key: key);_79_79 static Route<void> route() {_79 return MaterialPageRoute(builder: (context) => const LoginPage());_79 }_79_79 @override_79 _LoginPageState createState() => _LoginPageState();_79}_79_79class _LoginPageState extends State<LoginPage> {_79 bool _isLoading = false;_79 final _emailController = TextEditingController();_79 final _passwordController = TextEditingController();_79_79 Future<void> _signIn() async {_79 setState(() {_79 _isLoading = true;_79 });_79 try {_79 await supabase.auth.signInWithPassword(_79 email: _emailController.text,_79 password: _passwordController.text,_79 );_79 Navigator.of(context)_79 .pushAndRemoveUntil(ChatPage.route(), (route) => false);_79 } on AuthException catch (error) {_79 context.showErrorSnackBar(message: error.message);_79 } catch (_) {_79 context.showErrorSnackBar(message: unexpectedErrorMessage);_79 }_79 if (mounted) {_79 setState(() {_79 _isLoading = true;_79 });_79 }_79 }_79_79 @override_79 void dispose() {_79 _emailController.dispose();_79 _passwordController.dispose();_79 super.dispose();_79 }_79_79 @override_79 Widget build(BuildContext context) {_79 return Scaffold(_79 appBar: AppBar(title: const Text('Sign In')),_79 body: ListView(_79 padding: formPadding,_79 children: [_79 TextFormField(_79 controller: _emailController,_79 decoration: const InputDecoration(labelText: 'Email'),_79 keyboardType: TextInputType.emailAddress,_79 ),_79 formSpacer,_79 TextFormField(_79 controller: _passwordController,_79 decoration: const InputDecoration(labelText: 'Password'),_79 obscureText: true,_79 ),_79 formSpacer,_79 ElevatedButton(_79 onPressed: _isLoading ? null : _signIn,_79 child: const Text('Login'),_79 ),_79 ],_79 ),_79 );_79 }_79}
Step 7: Create a chat page to receive and send real time messages
Last, we create the Chat page. This page will load the messages in real time and display them to the users. Users will also be able to send messages to everyone else using the app. We are using the stream() method on Supabase SDK to load the messages in realtime. As those messages come in, we are lazily loading the profiles of each message’s sender. We will display the user icon as soon as their profile data is available.
_232import 'dart:async';_232_232import 'package:flutter/material.dart';_232_232import 'package:my_chat_app/models/message.dart';_232import 'package:my_chat_app/models/profile.dart';_232import 'package:my_chat_app/utils/constants.dart';_232import 'package:supabase_flutter/supabase_flutter.dart';_232import 'package:timeago/timeago.dart';_232_232/// Page to chat with someone._232///_232/// Displays chat bubbles as a ListView and TextField to enter new chat._232class ChatPage extends StatefulWidget {_232 const ChatPage({Key? key}) : super(key: key);_232_232 static Route<void> route() {_232 return MaterialPageRoute(_232 builder: (context) => const ChatPage(),_232 );_232 }_232_232 @override_232 State<ChatPage> createState() => _ChatPageState();_232}_232_232class _ChatPageState extends State<ChatPage> {_232 late final Stream<List<Message>> _messagesStream;_232 final Map<String, Profile> _profileCache = {};_232_232 @override_232 void initState() {_232 final myUserId = supabase.auth.currentUser!.id;_232 _messagesStream = supabase_232 .from('messages')_232 .stream(primaryKey: ['id'])_232 .order('created_at')_232 .map((maps) => maps_232 .map((map) => Message.fromMap(map: map, myUserId: myUserId))_232 .toList());_232 super.initState();_232 }_232_232 Future<void> _loadProfileCache(String profileId) async {_232 if (_profileCache[profileId] != null) {_232 return;_232 }_232 final data =_232 await supabase.from('profiles').select().eq('id', profileId).single();_232 final profile = Profile.fromMap(data);_232 setState(() {_232 _profileCache[profileId] = profile;_232 });_232 }_232_232 @override_232 Widget build(BuildContext context) {_232 return Scaffold(_232 appBar: AppBar(title: const Text('Chat')),_232 body: StreamBuilder<List<Message>>(_232 stream: _messagesStream,_232 builder: (context, snapshot) {_232 if (snapshot.hasData) {_232 final messages = snapshot.data!;_232 return Column(_232 children: [_232 Expanded(_232 child: messages.isEmpty_232 ? const Center(_232 child: Text('Start your conversation now :)'),_232 )_232 : ListView.builder(_232 reverse: true,_232 itemCount: messages.length,_232 itemBuilder: (context, index) {_232 final message = messages[index];_232_232 /// I know it's not good to include code that is not related_232 /// to rendering the widget inside build method, but for_232 /// creating an app quick and dirty, it's fine 😂_232 _loadProfileCache(message.profileId);_232_232 return _ChatBubble(_232 message: message,_232 profile: _profileCache[message.profileId],_232 );_232 },_232 ),_232 ),_232 const _MessageBar(),_232 ],_232 );_232 } else {_232 return preloader;_232 }_232 },_232 ),_232 );_232 }_232}_232_232/// Set of widget that contains TextField and Button to submit message_232class _MessageBar extends StatefulWidget {_232 const _MessageBar({_232 Key? key,_232 }) : super(key: key);_232_232 @override_232 State<_MessageBar> createState() => _MessageBarState();_232}_232_232class _MessageBarState extends State<_MessageBar> {_232 late final TextEditingController _textController;_232_232 @override_232 Widget build(BuildContext context) {_232 return Material(_232 color: Colors.grey[200],_232 child: SafeArea(_232 child: Padding(_232 padding: const EdgeInsets.all(8.0),_232 child: Row(_232 children: [_232 Expanded(_232 child: TextFormField(_232 keyboardType: TextInputType.text,_232 maxLines: null,_232 autofocus: true,_232 controller: _textController,_232 decoration: const InputDecoration(_232 hintText: 'Type a message',_232 border: InputBorder.none,_232 focusedBorder: InputBorder.none,_232 contentPadding: EdgeInsets.all(8),_232 ),_232 ),_232 ),_232 TextButton(_232 onPressed: () => _submitMessage(),_232 child: const Text('Send'),_232 ),_232 ],_232 ),_232 ),_232 ),_232 );_232 }_232_232 @override_232 void initState() {_232 _textController = TextEditingController();_232 super.initState();_232 }_232_232 @override_232 void dispose() {_232 _textController.dispose();_232 super.dispose();_232 }_232_232 void _submitMessage() async {_232 final text = _textController.text;_232 final myUserId = supabase.auth.currentUser!.id;_232 if (text.isEmpty) {_232 return;_232 }_232 _textController.clear();_232 try {_232 await supabase.from('messages').insert({_232 'profile_id': myUserId,_232 'content': text,_232 });_232 } on PostgrestException catch (error) {_232 context.showErrorSnackBar(message: error.message);_232 } catch (_) {_232 context.showErrorSnackBar(message: unexpectedErrorMessage);_232 }_232 }_232}_232_232class _ChatBubble extends StatelessWidget {_232 const _ChatBubble({_232 Key? key,_232 required this.message,_232 required this.profile,_232 }) : super(key: key);_232_232 final Message message;_232 final Profile? profile;_232_232 @override_232 Widget build(BuildContext context) {_232 List<Widget> chatContents = [_232 if (!message.isMine)_232 CircleAvatar(_232 child: profile == null_232 ? preloader_232 : Text(profile!.username.substring(0, 2)),_232 ),_232 const SizedBox(width: 12),_232 Flexible(_232 child: Container(_232 padding: const EdgeInsets.symmetric(_232 vertical: 8,_232 horizontal: 12,_232 ),_232 decoration: BoxDecoration(_232 color: message.isMine_232 ? Theme.of(context).primaryColor_232 : Colors.grey[300],_232 borderRadius: BorderRadius.circular(8),_232 ),_232 child: Text(message.content),_232 ),_232 ),_232 const SizedBox(width: 12),_232 Text(format(message.createdAt, locale: 'en_short')),_232 const SizedBox(width: 60),_232 ];_232 if (message.isMine) {_232 chatContents = chatContents.reversed.toList();_232 }_232 return Padding(_232 padding: const EdgeInsets.symmetric(horizontal: 8, vertical: 18),_232 child: Row(_232 mainAxisAlignment:_232 message.isMine ? MainAxisAlignment.end : MainAxisAlignment.start,_232 children: chatContents,_232 ),_232 );_232 }_232}
With that, we are done creating our application. If you kept your flutter run running, you should now see a fully functional application on your device or simulator. You can install it on another device or simulator to chat with each other in real time.
Conclusion / Future improvements
We saw how easily it is to create a chat application when you combine amazing tools like Flutter and Supabase. One thing that was missing from this chat application is authorization. We did implement registration, but that was only to distinguish different users. In the coming up article, we will cover how you can add authorization using row level security in Supabase to secure this chat application. With authorization, we can create private chat rooms so that messages can only be seen by those inside those rooms.
If you have any questions please reach out via Twitter or join our Discord.
More Flutter Resources
- Part 2: Flutter Authentication and Authorization with RLS
- Flutter Supabase Quick Starter Guide
- supabase-flutter v1.0 released
- How to build a real-time multiplayer game with Flutter Flame
- Open source map based Flutter app with CI/CD and scalable statemanagement example
- Build a Flutter app with Very Good CLI and Supabase