Everyone can code up a little hello world example quickly with a platform like Supabase - but what about a real world project of bigger scale?
That's exactly what you will learn in this article:
We are building a Trello board with Supabase, Angular and Tailwind!
Along our jurney we will:
- write some advanced SQL to create our tables
- implement magic link sign in and user authentication with Angular
- make use of the realtime capabilities!
Watch the video version of the tutorial.
Since there are quite some code snippets we need I've put together the full source code on Github so you can easily run the project yourself!
If you are not familiar with Trello, it's a way to manage projects with different boards, lists and cards!
Ready for a wild adventure? Then let's begin inside our Supabase account!
Creating the Supabase Project
First of all we need a new Supabase project. If you don't have a Supabase account yet, you can get started for free!
In your dashboard, click "New Project" and leave it to the default settings, but make sure you keep a copy o your Database password!
The only thing we will change manually for now is disabling the email confirmation step. By doing this, users will be directly able to sign in when using the magic link, so go to the Authentication tab of your project, select Settings and scroll down to your Auth Providers where you can disable it.
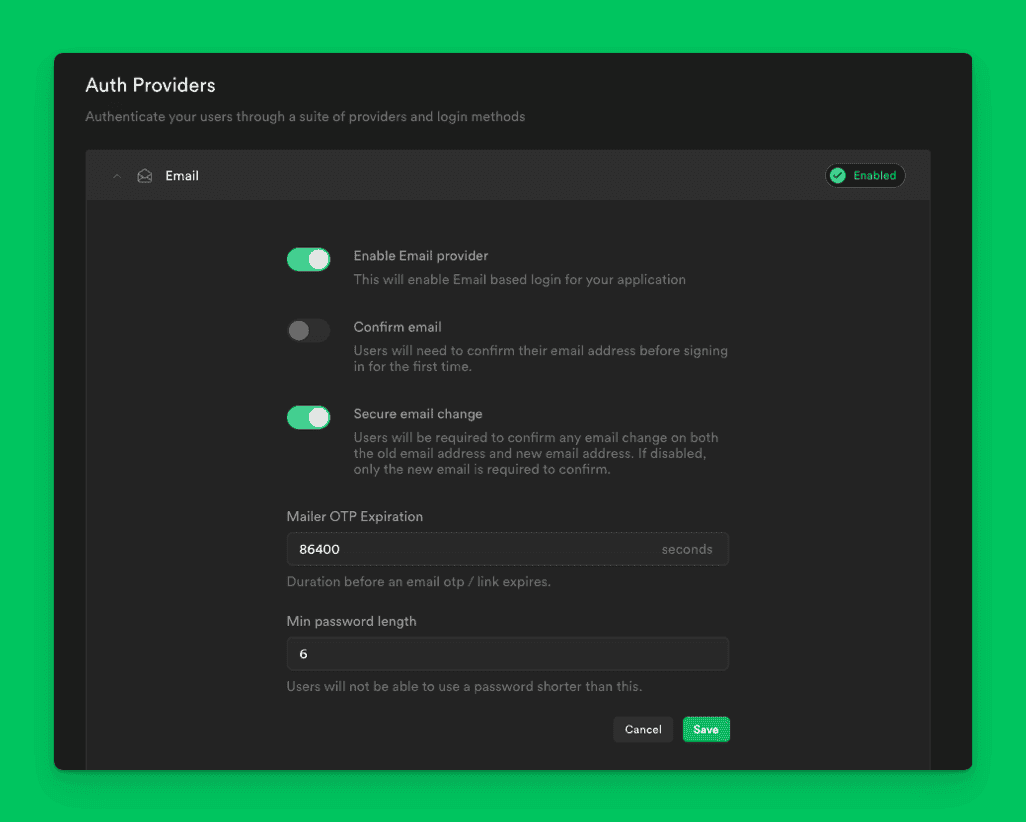
Everything else regarding authentication[https://supabase.com/docs/guides/auth] is handled by Supabase and we don't need to worry about it at the moment!
Defining your Tables with SQL
Since Supabase uses Postgres under the hood, we need to write some SQL to define our tables.
Let's start with something easy, which is the general definition of our tables:
boards: Keep track of user created boardslists: The lists within one boardcards: The cards with tasks within one listssers: A table to keep track of all registered usersuser_boards: A many to many table to keep track which boards a user is part of
We're not going into SQL details, but you should be able to paste the following snippets into the SQL Editor of your project.
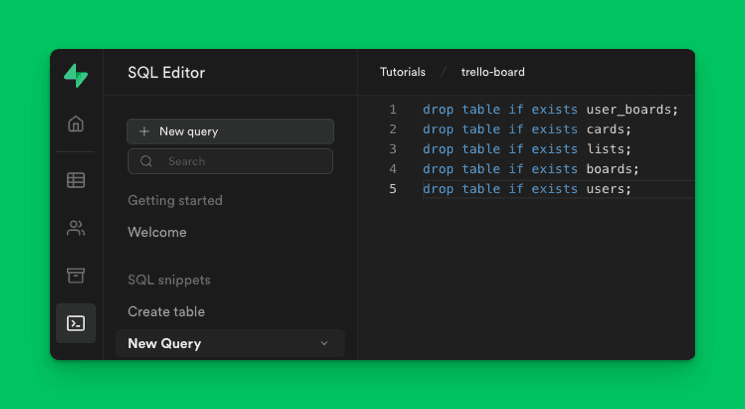
Simply navigate to the menu item and click on + New query, paste in the SQL and hit RUN which hopefully executes without issues:
_65drop table if exists user_boards;_65drop table if exists cards;_65drop table if exists lists;_65drop table if exists boards;_65drop table if exists users;_65_65-- Create boards table_65create table boards (_65 id bigint generated by default as identity primary key,_65 creator uuid references auth.users not null default auth.uid(),_65 title text default 'Untitled Board',_65 created_at timestamp with time zone default timezone('utc'::text, now()) not null_65);_65_65-- Create lists table_65create table lists (_65 id bigint generated by default as identity primary key,_65 board_id bigint references boards ON DELETE CASCADE not null,_65 title text default '',_65 position int not null default 0,_65 created_at timestamp with time zone default timezone('utc'::text, now()) not null_65);_65_65-- Create Cards table_65create table cards (_65 id bigint generated by default as identity primary key,_65 list_id bigint references lists ON DELETE CASCADE not null,_65 board_id bigint references boards ON DELETE CASCADE not null,_65 position int not null default 0,_65 title text default '',_65 description text check (char_length(description) > 0),_65 assigned_to uuid references auth.users,_65 done boolean default false,_65 created_at timestamp with time zone default timezone('utc'::text, now()) not null_65);_65_65-- Many to many table for user <-> boards relationship_65create table user_boards (_65 id bigint generated by default as identity primary key,_65 user_id uuid references auth.users ON DELETE CASCADE not null default auth.uid(),_65 board_id bigint references boards ON DELETE CASCADE_65);_65_65-- User ID lookup table_65create table users (_65 id uuid not null primary key,_65 email text_65);_65_65-- Make sure deleted records are included in realtime_65alter table cards replica identity full;_65alter table lists replica identity full;_65_65-- Function to get all user boards_65create or replace function get_boards_for_authenticated_user()_65returns setof bigint_65language sql_65security definer_65set search_path = public_65stable_65as $$_65 select board_id_65 from user_boards_65 where user_id = auth.uid()_65$$;
Besides the creation of tables we also changed the replica identity, which helps to alter retrieve records when a row is deleted.
Finally we defined a very important function that we will use to make the table secure using Row Level Security.
This function will retrieve all boards of a user from the user_boards table and will be used in our policies now.
We now enabled the row level security for the different tables and define some policies so only users with the right access can read/update/delete rows.
Go ahead and run another SQL query in the editor now:
_57-- boards row level security_57alter table boards enable row level security;_57_57-- Policies_57create policy "Users can create boards" on boards for_57 insert to authenticated with CHECK (true);_57_57create policy "Users can view their boards" on boards for_57 select using (_57 id in (_57 select get_boards_for_authenticated_user()_57 )_57 );_57_57create policy "Users can update their boards" on boards for_57 update using (_57 id in (_57 select get_boards_for_authenticated_user()_57 )_57 );_57_57create policy "Users can delete their created boards" on boards for_57 delete using ((select auth.uid()) = creator);_57_57-- user_boards row level security_57alter table user_boards enable row level security;_57_57create policy "Users can add their boards" on user_boards for_57 insert to authenticated with check (true);_57_57create policy "Users can view boards" on user_boards for_57 select using ((select auth.uid()) = user_id);_57_57create policy "Users can delete their boards" on user_boards for_57 delete using ((select auth.uid()) = user_id);_57_57-- lists row level security_57alter table lists enable row level security;_57_57-- Policies_57create policy "Users can edit lists if they are part of the board" on lists for_57 all using (_57 board_id in (_57 select get_boards_for_authenticated_user()_57 )_57 );_57_57-- cards row level security_57alter table cards enable row level security;_57_57-- Policies_57create policy "Users can edit cards if they are part of the board" on cards for_57 all using (_57 board_id in (_57 select get_boards_for_authenticated_user()_57 )_57 );
Finally we need a trigger that reacts to changes in our database.
In our case we want to listen to the creation of new boards, which will automatically create the board < - > user connection in the user_boards table.
Additionally we will also add every new authenticated user to our users table since you later don't have access to the internal auth table of Supabase!
Therefore run one last query:
_31-- inserts a row into user_boards_31create function public.handle_board_added()_31returns trigger_31language plpgsql_31security definer_31as $$_31begin_31 insert into public.user_boards (board_id, user_id)_31 values (new.id, auth.uid());_31 return new;_31end;_31$$;_31_31-- trigger the function every time a board is created_31create trigger on_board_created_31 after insert on boards_31 for each row execute procedure public.handle_board_added();_31_31_31create or replace function public.handle_new_user()_31returns trigger as $$_31begin_31 insert into public.users (id, email)_31 values (new.id, new.email);_31 return new;_31end;_31$$ language plpgsql security definer;_31_31create trigger on_auth_user_created_31 after insert on auth.users_31 for each row execute procedure public.handle_new_user();
At this point our Supabase project is configured correctly and we can move into the actual application!
Creating the Angular Project
We are not bound to any framework, but in this article we are using Angular to build a robust web application.
Get started by using the Angular CLI to generate a new project and then add some components and services that we will need.
Finally we can install the Supabase JS package and two additional helper packages for some cool functionality, so go ahead and run:
_14ng new trelloBoard --routing --style=scss_14cd ./trelloBoard_14_14# Generate components and services_14ng generate component components/login_14ng generate component components/inside/workspace_14ng generate component components/inside/board_14_14ng generate service services/auth_14ng generate service services/data_14_14# Install Supabase and additional packages_14npm install @supabase/supabase-js_14npm install ngx-spinner ngx-gravatar
To import the installed packages we can quickly change our src/app/app.module.ts to:
_27import { NgModule } from '@angular/core'_27import { BrowserModule } from '@angular/platform-browser'_27_27import { AppRoutingModule } from './app-routing.module'_27import { AppComponent } from './app.component'_27import { LoginComponent } from './components/login/login.component'_27import { BoardComponent } from './components/inside/board/board.component'_27import { WorkspaceComponent } from './components/inside/workspace/workspace.component'_27import { BrowserAnimationsModule } from '@angular/platform-browser/animations'_27import { NgxSpinnerModule } from 'ngx-spinner'_27import { FormsModule } from '@angular/forms'_27import { GravatarModule } from 'ngx-gravatar'_27_27@NgModule({_27 declarations: [AppComponent, LoginComponent, BoardComponent, WorkspaceComponent],_27 imports: [_27 FormsModule,_27 BrowserModule,_27 AppRoutingModule,_27 BrowserAnimationsModule,_27 NgxSpinnerModule,_27 GravatarModule,_27 ],_27 providers: [],_27 bootstrap: [AppComponent],_27})_27export class AppModule {}
On top of that the ngx-spinner needs another entry in the angular.json to copy over resources so we can later easily display a loading indicator, so open it and change the styles array to this:
_10"styles": [_10 "src/styles.scss",_10 "node_modules/ngx-spinner/animations/ball-scale-multiple.css"_10 ],
Since we have already generated some components, we can also change our app routing to inlcude the new pages in the src/app/app-routing.module.ts now:
_30import { BoardComponent } from './components/inside/board/board.component'_30import { WorkspaceComponent } from './components/inside/workspace/workspace.component'_30import { LoginComponent } from './components/login/login.component'_30import { NgModule } from '@angular/core'_30import { RouterModule, Routes } from '@angular/router'_30_30const routes: Routes = [_30 {_30 path: '',_30 component: LoginComponent,_30 },_30 {_30 path: 'workspace',_30 component: WorkspaceComponent,_30 },_30 {_30 path: 'workspace/:id',_30 component: BoardComponent,_30 },_30 {_30 path: '**',_30 redirectTo: '/',_30 },_30]_30_30@NgModule({_30 imports: [RouterModule.forRoot(routes, {})],_30 exports: [RouterModule],_30})_30export class AppRoutingModule {}
Our app will start with the login screen, after which we can move to the workspace with our boards and finally dive into one specific board to show all its lists and cards.
To correctly use the Angular router we can now update the src/app/app.component.html so it only holds one line:
_10<router-outlet></router-outlet>
Finally the most important configuration step: Adding our Supabase credentials to the src/environments/environment.ts like this:
_10export const environment = {_10 production: false,_10 supabaseUrl: 'YOUR-URL',_10 supabaseKey: 'YOUR-ANON-KEY',_10}
You can find those values in your Supabase project by clicking on the Settings icon and then navigating to API where it shows your Project API keys.
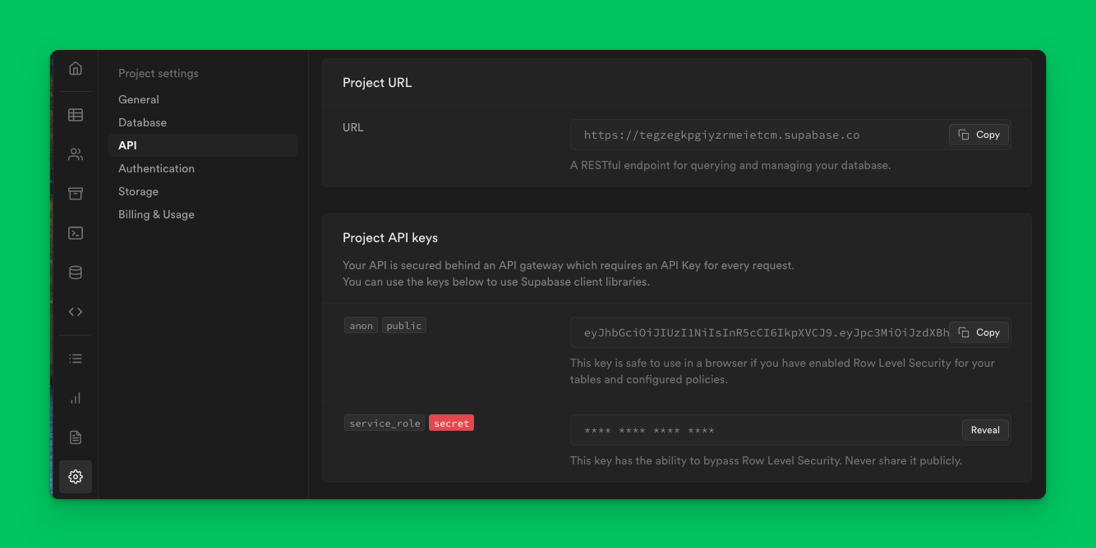
The anon key is safe to use in a frontend project since we have enabled RLS on our database anyway!
Adding Tailwind for Styling
We could build an ugly project or easily make it look awesome by installing Tailwind CSS - we opt for the second in this article!
There are certainly other styling libraries that you can use, so this step is completely optional but required in order to make code of this tutorial work.
Therefore we follow the Angular guide and install Tailwind like this:
_10npm install -D tailwindcss postcss autoprefixer @tailwindcss/forms_10npx tailwindcss init
Now we also need to update our tailwind.config.js to this:
_10/** @type {import('tailwindcss').Config} */_10module.exports = {_10 content: ['./src/**/*.{html,ts}'],_10 theme: {_10 extend: {},_10 },_10 plugins: [require('@tailwindcss/forms')],_10}
Finally we include the styling in our src/styles.scss:
_10@tailwind base;_10@tailwind components;_10@tailwind utilities;
And with that the whole project configuration is done and we can focus 100% on the functionality of our Trello clone!
Building a Magic Link Sign In
We could now add all sorts of authetnication using the auth providers that Supabase provides, but we will simply use a magic link sign in where users only need to pass their email.
To kick this off we will implement a simple authentication service that keeps track of our current user with a BehaviourSubject so we can easily emit new values later when the user session changes.
We are also loading the session once "by hand" using getUser() since the onAuthStateChange event is usually not broadcasted when the page loads, and we want to load a stored session in that case as well.
In order to send an email to the user we only need to call signIn() and only pass an email - Supabase takes care of the rest for us!
Therefore get started by changing the src/app/services/auth.service.ts to this now:
_50import { Injectable } from '@angular/core'_50import { Router } from '@angular/router'_50import { createClient, SupabaseClient, User } from '@supabase/supabase-js'_50import { BehaviorSubject } from 'rxjs'_50import { environment } from 'src/environments/environment'_50_50@Injectable({_50 providedIn: 'root',_50})_50export class AuthService {_50 private supabase: SupabaseClient_50 private _currentUser: BehaviorSubject<boolean | User | any> = new BehaviorSubject(null)_50_50 constructor(private router: Router) {_50 this.supabase = createClient(environment.supabaseUrl, environment.supabaseKey)_50_50 // Manually load user session once on page load_50 // Note: This becomes a promise with getUser() in the next version!_50 const user = this.supabase.auth.user()_50 if (user) {_50 this._currentUser.next(user)_50 } else {_50 this._currentUser.next(false)_50 }_50_50 this.supabase.auth.onAuthStateChange((event, session) => {_50 if (event == 'SIGNED_IN') {_50 this._currentUser.next(session!.user)_50 } else {_50 this._currentUser.next(false)_50 this.router.navigateByUrl('/', { replaceUrl: true })_50 }_50 })_50 }_50_50 signInWithEmail(email: string) {_50 // Note: This becomes signInWithOTP() in the next version!_50 return this.supabase.auth.signIn({_50 email,_50 })_50 }_50_50 logout() {_50 this.supabase.auth.signOut()_50 }_50_50 get currentUser() {_50 return this._currentUser.asObservable()_50 }_50}
That's a solid starting point for our authetnication logic, and now we just need to use those functions on our login page.
Additionally we will also listen to user changes here since this is the page a user will load when clicking on the magic link. We can use the currentUser from our service so we don't need any additional logic for that.
Once we start the sign in we can also use our cool spinner package to show a little indicator and afterwards flip the value of linkSuccess so we can present a little text in our UI.
We're keeping it fairly easy, so let's change the src/app/components/login/login.component.ts to:
_40import { Router } from '@angular/router'_40import { AuthService } from './../../services/auth.service'_40import { Component, OnInit } from '@angular/core'_40import { NgxSpinnerService } from 'ngx-spinner'_40_40@Component({_40 selector: 'app-login',_40 templateUrl: './login.component.html',_40 styleUrls: ['./login.component.scss'],_40})_40export class LoginComponent implements OnInit {_40 email = ''_40 linkSuccess = false_40_40 constructor(_40 private auth: AuthService,_40 private spinner: NgxSpinnerService,_40 private router: Router_40 ) {_40 this.auth.currentUser.subscribe((user) => {_40 if (user) {_40 this.router.navigateByUrl('/workspace', { replaceUrl: true })_40 }_40 })_40 }_40_40 ngOnInit(): void {}_40_40 async signIn() {_40 this.spinner.show()_40 const result = await this.auth.signInWithEmail(this.email)_40_40 this.spinner.hide()_40 if (!result.error) {_40 this.linkSuccess = true_40 } else {_40 alert(result.error.message)_40 }_40 }_40}
Last piece is our UI now, and since we are using Tailwind the HTML snippets won't look very beautiful.
Nonetheless, it's just some CSS and connecting our fields and buttons to the right functions, so go ahead and change the src/app/components/login/login.component.html to:
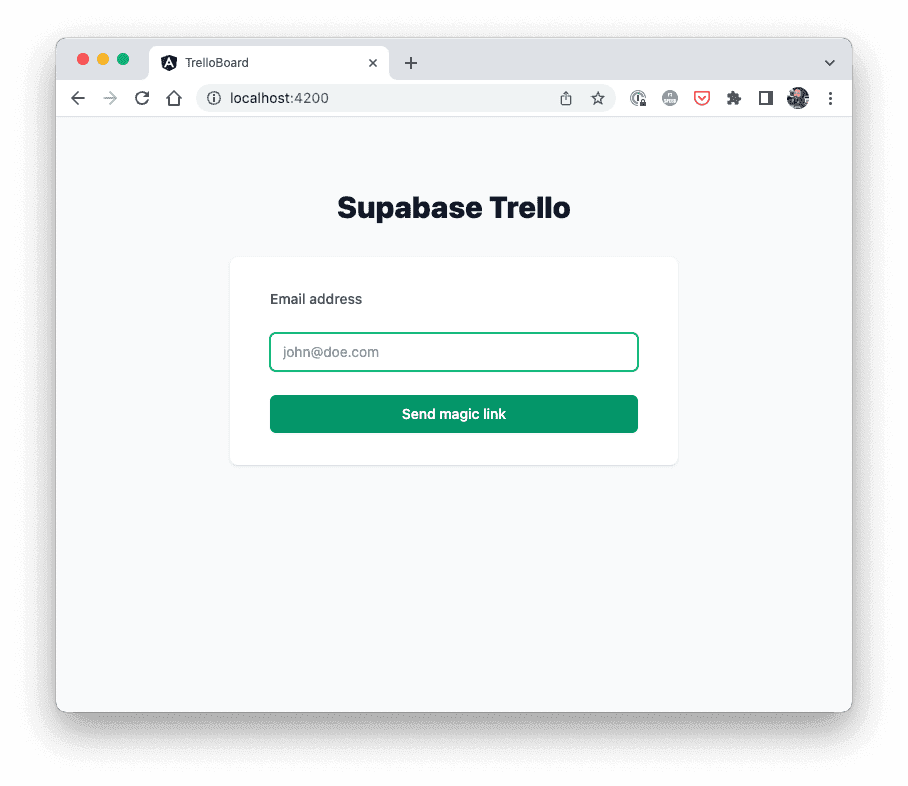
_37<ngx-spinner type="ball-scale-multiple"></ngx-spinner>_37_37<div class="flex min-h-full flex-col justify-center py-12 sm:px-6 lg:px-8">_37 <div class="sm:mx-auto sm:w-full sm:max-w-md">_37 <h2 class="mt-6 text-center text-3xl font-extrabold text-gray-900">Supabase Trello</h2>_37 </div>_37_37 <div class="mt-8 sm:mx-auto sm:w-full sm:max-w-md">_37 <div class="bg-white py-8 px-4 shadow sm:rounded-lg sm:px-10">_37 <div class="space-y-6" *ngIf="!linkSuccess; else check_mails">_37 <div class="space-y-6">_37 <label for="email" class="block text-sm font-medium text-gray-700"> Email address </label>_37 <div class="mt-1">_37 <input_37 type="email"_37 [(ngModel)]="email"_37 autocomplete="email"_37 placeholder="[email protected]"_37 class="block w-full rounded-md border border-gray-300 px-3 py-2 placeholder-gray-400 shadow-sm focus:border-emerald-500 focus:outline-none focus:ring-emerald-500 sm:text-sm"_37 />_37 </div>_37 </div>_37_37 <div>_37 <button_37 (click)="signIn()"_37 class="flex w-full justify-center rounded-md border border-transparent bg-emerald-600 py-2 px-4 text-sm font-medium text-white shadow-sm hover:bg-emerald-700 focus:outline-none focus:ring-2 focus:ring-emerald-500 focus:ring-offset-2"_37 >_37 Send magic link_37 </button>_37 </div>_37 </div>_37_37 <ng-template #check_mails> Please check your emails! </ng-template>_37 </div>_37 </div>_37</div>
Once you are done you should have a stylish login page!
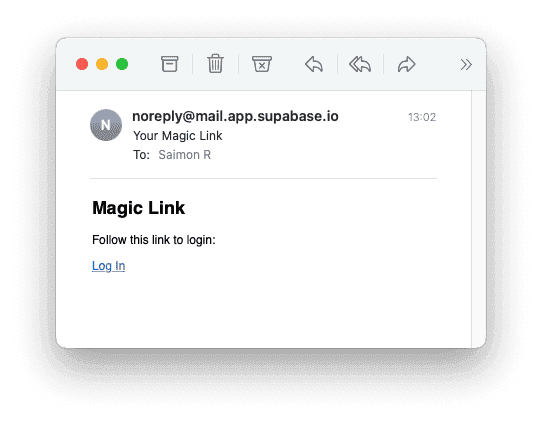
When you enter your email and click the button, you should automatically receive an email with a link that will open up your app in the browser again - and this time it should actually forward you to the workspace area immediately.
Now at this point we could also enter that internal page manually by changing the URL without being authorized, so let's add a mechanism to prevent that.
Protecting your Pages with a Guard
In Angular we protect pages with a guard, and because we already keep track of the user in our authentication service it's gonna be super easy to protect pages that only authorized users should see.
Get started by generating a new guard:
_10ng generate guard guards/auth --implements CanActivate
That guard will now check the Observable of our service, filter out the initial state and then see if a user is allowed to access a page or not.
Bring up the new src/app/guards/auth.guard.ts and change it to this:
_29import { AuthService } from './../services/auth.service'_29import { Injectable } from '@angular/core'_29import { CanActivate, Router, UrlTree } from '@angular/router'_29import { Observable } from 'rxjs'_29import { filter, map, take } from 'rxjs/operators'_29_29@Injectable({_29 providedIn: 'root',_29})_29export class AuthGuard implements CanActivate {_29 constructor(_29 private auth: AuthService,_29 private router: Router_29 ) {}_29_29 canActivate(): Observable<boolean | UrlTree> {_29 return this.auth.currentUser.pipe(_29 filter((val) => val !== null), // Filter out initial Behaviour subject value_29 take(1), // Otherwise the Observable doesn't complete!_29 map((isAuthenticated) => {_29 if (isAuthenticated) {_29 return true_29 } else {_29 return this.router.createUrlTree(['/'])_29 }_29 })_29 )_29 }_29}
Now we can apply this guard to all routes that we want to protect, so open up our src/app/app-routing.module.ts and add it to the two internal pages we want to protect:
_33import { AuthGuard } from './guards/auth.guard'_33import { BoardComponent } from './components/inside/board/board.component'_33import { WorkspaceComponent } from './components/inside/workspace/workspace.component'_33import { LoginComponent } from './components/login/login.component'_33import { NgModule } from '@angular/core'_33import { RouterModule, Routes } from '@angular/router'_33_33const routes: Routes = [_33 {_33 path: '',_33 component: LoginComponent,_33 },_33 {_33 path: 'workspace',_33 component: WorkspaceComponent,_33 canActivate: [AuthGuard],_33 },_33 {_33 path: 'workspace/:id',_33 component: BoardComponent,_33 canActivate: [AuthGuard],_33 },_33 {_33 path: '**',_33 redirectTo: '/',_33 },_33]_33_33@NgModule({_33 imports: [RouterModule.forRoot(routes, {})],_33 exports: [RouterModule],_33})_33export class AppRoutingModule {}
Now only signed in users can access those pages, and we can move a step forward to the boards logic.
Creating the Workspace
Once a user arrives at the workspace page, we want to list all boards of a user and implement the ability to add boards.
To do so, we start off within a service again which takes care of all the interaction between our code and Supabase, so the view can focus on the data presentation.
Our first function will simplye insert an empty object into the boards table, which we define as a const so we can't add any typos to our code.
Because we defined a default value for new rows in our SQL in the beginning, we don't have to pass any other data here.
To load all tables of a user could simply query the user_boards table, but we might want more information about the related board so we can also query referenced tables to load the board information!
Go ahead and begin the src/app/services/data.service.ts with this:
_32import { Injectable } from '@angular/core'_32import { SupabaseClient, createClient } from '@supabase/supabase-js'_32import { environment } from 'src/environments/environment'_32_32export const BOARDS_TABLE = 'boards'_32export const USER_BOARDS_TABLE = 'user_boards'_32export const LISTS_TABLE = 'lists'_32export const CARDS_TABLE = 'cards'_32export const USERS_TABLE = 'users'_32_32@Injectable({_32 providedIn: 'root',_32})_32export class DataService {_32 private supabase: SupabaseClient_32_32 constructor() {_32 this.supabase = createClient(environment.supabaseUrl, environment.supabaseKey)_32 }_32_32 async startBoard() {_32 // Minimal return will be the default in the next version and can be removed here!_32 return await this.supabase.from(BOARDS_TABLE).insert({}, { returning: 'minimal' })_32 }_32_32 async getBoards() {_32 const boards = await this.supabase.from(USER_BOARDS_TABLE).select(`_32 boards:board_id ( title, id )_32 `)_32 return boards.data || []_32 }_32}
In fact that's enough for our first interaction with our Supabase tables, so we can move on to our view again and load the user boards when the page loads.
Additionally we want to add a board, and here we encounter one of those real world problems:
Because we have a database trigger that adds an entry when a new table is added, the user is not immediately authorized to access the new board row! Only once the trigger has finished, the RLS that checks user boards can confirm that this user is part of the board.
Therefore we add another line to load the boards again and pop the last added element so we can automatically navigate into its details page.
Now open the src/app/components/inside/workspace/workspace.component.ts and change it to:
_45import { AuthService } from './../../../services/auth.service'_45import { Router } from '@angular/router'_45import { DataService } from './../../../services/data.service'_45import { Component, OnInit } from '@angular/core'_45_45@Component({_45 selector: 'app-workspace',_45 templateUrl: './workspace.component.html',_45 styleUrls: ['./workspace.component.scss'],_45})_45export class WorkspaceComponent implements OnInit {_45 boards: any[] = []_45 user = this.auth.currentUser_45_45 constructor(_45 private dataService: DataService,_45 private router: Router,_45 private auth: AuthService_45 ) {}_45_45 async ngOnInit() {_45 this.boards = await this.dataService.getBoards()_45 }_45_45 async startBoard() {_45 const data = await this.dataService.startBoard()_45_45 // Load all boards because we only get back minimal data_45 // Trigger needs to run first_45 // Otherwise RLS would fail_45 this.boards = await this.dataService.getBoards()_45_45 if (this.boards.length > 0) {_45 const newBoard = this.boards.pop()_45_45 if (newBoard.boards) {_45 this.router.navigateByUrl(`/workspace/${newBoard.boards.id}`)_45 }_45 }_45 }_45_45 signOut() {_45 this.auth.logout()_45 }_45}
To display all of this we build up another view with Tailwind and also use the Gravatar package to display a little image of the current user based on the email.
Besides that we simply iterate all boards, add the router link to a board based on the ID and add a button to create new boards, so bring up the src/app/components/inside/workspace/workspace.component.html and change it to:
_46<header class="bg-emerald-600">_46 <nav class="mx-auto max-w-7xl px-4 sm:px-6 lg:px-8">_46 <div_46 class="flex w-full items-center justify-between border-b border-emerald-500 py-6 lg:border-none"_46 >_46 <div class="flex items-center">_46 <a routerLink="/workspace">_46 <img class="h-6 w-auto" src="https://supabase.com/docs/supabase-dark.svg" alt="" />_46 </a>_46 </div>_46 <div class="ml-10 flex items-center space-x-4">_46 <span class="text-white">{{ (user | async)?.email }}</span>_46 <img ngxGravatar [email]="(user | async)?.email" />_46_46 <button_46 (click)="signOut()"_46 class="inline-block rounded-md border border-transparent bg-white py-1 px-4 text-base font-medium text-emerald-600 hover:bg-emerald-50"_46 >_46 Logout_46 </button>_46 </div>_46 </div>_46 </nav>_46</header>_46_46<main class="mx-auto max-w-7xl px-4 py-8 sm:px-6 lg:px-8">_46 <ul_46 role="list"_46 class="grid grid-cols-2 gap-x-4 gap-y-8 sm:grid-cols-3 sm:gap-x-6 lg:grid-cols-4 xl:gap-x-8"_46 >_46 <li_46 *ngFor="let board of boards"_46 [routerLink]="board.boards.id"_46 class="relative h-52 rounded bg-emerald-200 py-4 px-4 text-lg font-semibold hover:cursor-pointer hover:bg-emerald-300"_46 >_46 {{ board.boards.title }}_46 </li>_46_46 <li_46 (click)="startBoard()"_46 class="relative h-52 rounded bg-emerald-500 py-4 px-4 text-lg font-semibold hover:cursor-pointer"_46 >_46 + New board_46 </li>_46 </ul>_46</main>
At this point we have a functional board logic and actually already route to the following details page.

The logout functionality will also remove our session and guide us back to the login, so we have covered that flow at the same time already.
Time for some more interaction with our Supabase tables!
Adding CRUD Functions for the Database
On our board details page we now need to interact with all the tables and mostly perform CRUD functionality - Create, read, update or delete records of our database.
Since there's no real value in discussing every line, let's quickly add the following bunch of functions to our src/app/services/data.service.ts:
_90// CRUD Board_90 async getBoardInfo(boardId: string) {_90 return await this.supabase_90 .from(BOARDS_TABLE)_90 .select('*')_90 .match({ id: boardId })_90 .single();_90 }_90_90 async updateBoard(board: any) {_90 return await this.supabase_90 .from(BOARDS_TABLE)_90 .update(board)_90 .match({ id: board.id });_90 }_90_90 async deleteBoard(board: any) {_90 return await this.supabase_90 .from(BOARDS_TABLE)_90 .delete()_90 .match({ id: board.id });_90 }_90_90 // CRUD Lists_90 async getBoardLists(boardId: string) {_90 const lists = await this.supabase_90 .from(LISTS_TABLE)_90 .select('*')_90 .eq('board_id', boardId)_90 .order('position');_90_90 return lists.data || [];_90 }_90_90 async addBoardList(boardId: string, position = 0) {_90 return await this.supabase_90 .from(LISTS_TABLE)_90 .insert({ board_id: boardId, position, title: 'New List' })_90 .select('*')_90 .single();_90 }_90_90 async updateBoardList(list: any) {_90 return await this.supabase_90 .from(LISTS_TABLE)_90 .update(list)_90 .match({ id: list.id });_90 }_90_90 async deleteBoardList(list: any) {_90 return await this.supabase_90 .from(LISTS_TABLE)_90 .delete()_90 .match({ id: list.id });_90 }_90_90 // CRUD Cards_90 async addListCard(listId: string, boardId: string, position = 0) {_90 return await this.supabase_90 .from(CARDS_TABLE)_90 .insert(_90 { board_id: boardId, list_id: listId, position }_90 )_90 .select('*')_90 .single();_90 }_90_90 async getListCards(listId: string) {_90 const lists = await this.supabase_90 .from(CARDS_TABLE)_90 .select('*')_90 .eq('list_id', listId)_90 .order('position');_90_90 return lists.data || [];_90 }_90_90 async updateCard(card: any) {_90 return await this.supabase_90 .from(CARDS_TABLE)_90 .update(card)_90 .match({ id: card.id });_90 }_90_90 async deleteCard(card: any) {_90 return await this.supabase_90 .from(CARDS_TABLE)_90 .delete()_90 .match({ id: card.id });_90 }
Most if not all of this is basic SQL as described in the Supabase docs for Database
One additional function is missing, and that's a simple invitation logic. However we gonna skip the "Ok I want to join this board" step and simply add invited users to a new board. Sometimes users need to be forced to do what's good for them.
Therfore we will try to find the user ID of a user based on the entered email, and if it exists we will create a new entry in the user_boards table for that user:
_19 // Invite others_19 async addUserToBoard(boardId: string, email: string) {_19 const user = await this.supabase_19 .from(USERS_TABLE)_19 .select('id')_19 .match({ email })_19 .single();_19_19 if (user.data?.id) {_19 const userId = user.data.id;_19 const userBoard = await this.supabase.from(USER_BOARDS_TABLE).insert({_19 user_id: userId,_19 board_id: boardId,_19 });_19 return userBoard;_19 } else {_19 return null;_19 }_19 }
With those functions in place I think we are more than ready to create a powerful board page.
Creating the Boards View
This page is the most essential and most challenging part of our app, as it's the place where the actual work happens and users collaborate on boards.
However, we will begin by setting up the basic stuff and introduce realtime functionality and presence in a separate step afterwards.
Because it would be tedious to split the page into multiple code snippets we'll go with one big and I'll explain what's going on:
- We first need to load some general board info like the title using
getBoardInfo()and the passed ID of the board - We then need to load all lists of a board using
getBoardLists() - We then need to load every card for every list using
getListCards()
To keep track of data and changes we hold all cards in the listCards object that stores all cards under the related list ID key.
In terms of additional logic we might want to update or delete the board, which we can do simply with the previously created service functions.
Same is true for lists and cards, which can be added, updated or removed.
However, this will not (yet) update our local data, since we want to implement this with realtime updates later.
For now go ahead and change the src/app/components/inside/board/board.component.ts to:
_109import { DataService } from './../../../services/data.service'_109import { Component, HostListener, OnInit } from '@angular/core'_109import { ActivatedRoute, Router } from '@angular/router'_109_109@Component({_109 selector: 'app-board',_109 templateUrl: './board.component.html',_109 styleUrls: ['./board.component.scss'],_109})_109export class BoardComponent implements OnInit {_109 lists: any[] = []_109 boardId: string | null = null_109 editTitle: any = {}_109 editCard: any = {}_109 boardInfo: any = null_109 titleChanged = false_109_109 listCards: any = {}_109 addUserEmail = ''_109_109 constructor(_109 private route: ActivatedRoute,_109 private dataService: DataService,_109 private router: Router_109 ) {}_109_109 async ngOnInit() {_109 this.boardId = this.route.snapshot.paramMap.get('id')_109 if (this.boardId) {_109 // Load general board information_109 const board = await this.dataService.getBoardInfo(this.boardId)_109 this.boardInfo = board.data_109_109 // Retrieve all lists_109 this.lists = await this.dataService.getBoardLists(this.boardId)_109_109 // Retrieve cards for each list_109 for (let list of this.lists) {_109 this.listCards[list.id] = await this.dataService.getListCards(list.id)_109 }_109_109 // For later..._109 this.handleRealtimeUpdates()_109 }_109 }_109_109 //_109 // BOARD logic_109 //_109 async saveBoardTitle() {_109 await this.dataService.updateBoard(this.boardInfo)_109 this.titleChanged = false_109 }_109_109 async deleteBoard() {_109 await this.dataService.deleteBoard(this.boardInfo)_109 this.router.navigateByUrl('/workspace')_109 }_109_109 //_109 // LISTS logic_109 //_109 async addList() {_109 const newList = await this.dataService.addBoardList(this.boardId!, this.lists.length)_109 }_109_109 editingTitle(list: any, edit = false) {_109 this.editTitle[list.id] = edit_109 }_109_109 async updateListTitle(list: any) {_109 await this.dataService.updateBoardList(list)_109 this.editingTitle(list, false)_109 }_109_109 async deleteBoardList(list: any) {_109 await this.dataService.deleteBoardList(list)_109 }_109_109 //_109 // CARDS logic_109 //_109 async addCard(list: any) {_109 await this.dataService.addListCard(list.id, this.boardId!, this.listCards[list.id].length)_109 }_109_109 editingCard(card: any, edit = false) {_109 this.editCard[card.id] = edit_109 }_109_109 async updateCard(card: any) {_109 await this.dataService.updateCard(card)_109 this.editingCard(card, false)_109 }_109_109 async deleteCard(card: any) {_109 await this.dataService.deleteCard(card)_109 }_109_109 // Invites_109 async addUser() {_109 await this.dataService.addUserToBoard(this.boardId!, this.addUserEmail)_109 this.addUserEmail = ''_109 }_109_109 handleRealtimeUpdates() {_109 // TODO_109 }_109}
That was a massive file - make sure you take the time to go through it at least once or twice to better understand the differetn functions we added.
Now we need to tackle the view of that page, and because it's Tailwind the snippets won't be shorter.
We can begin with the easier part, which is the header area that displays a back button, the board information that can be updated on click and a delete button to well, you know what.
Bring up the src/app/components/inside/board/board.component.html and add this first:
_26<header class="bg-emerald-600">_26 <nav class="mx-auto max-w-7xl px-4 sm:px-6 lg:px-8">_26 <div_26 class="flex w-full items-center justify-between border-b border-emerald-500 py-6 lg:border-none"_26 >_26 <div class="flex items-center">_26 <a routerLink="/workspace" class="font-semibold text-emerald-900"> < Back </a>_26 </div>_26 <div class="flex gap-4">_26 <input_26 *ngIf="boardInfo"_26 (ngModelChange)="titleChanged = true"_26 class="ml-10 space-x-4 bg-emerald-600 font-bold text-white"_26 [(ngModel)]="boardInfo.title"_26 />_26 <button class="font-medium" *ngIf="titleChanged" (click)="saveBoardTitle()">Save</button>_26 </div>_26_26 <div class="flex">_26 <button class="text-small font-medium text-red-700" (click)="deleteBoard()">_26 Delete board_26 </button>_26 </div>_26 </div>_26 </nav>_26</header>
Since we will have more of these update input fields later, let's quickly add a col HostListener to our app so we can detect at least the ESC key event and then close all of those edit input fields in our src/app/components/inside/board/board.component.ts
_18 @HostListener('document:keydown', ['$event']) onKeydownHandler(_18 event: KeyboardEvent_18 ) {_18 if (event.keyCode === 27) {_18 // Close whatever needs to be closed!_18 this.titleChanged = false;_18_18 Object.keys(this.editCard).map((item) => {_18 this.editCard[item] = false;_18 return item;_18 });_18_18 Object.keys(this.editTitle).map((item) => {_18 this.editTitle[item] = false;_18 return item;_18 });_18 }_18 }
Finally we need to iterate all lists, and for every list display all cards.
Actually a pretty simple task, but since we need more buttons to control the elements so we can delete, add and update them to whole code becomes a bit more bloated.
Nonetheless we can continue below the previous code in our src/app/components/inside/board/board.component.html and add this:
_69<main class="mx-auto max-w-7xl px-4 py-8 sm:px-6 lg:px-8">_69 <div class="grid grid-cols-2 gap-x-4 gap-y-8 sm:grid-cols-3 sm:gap-x-6 lg:grid-cols-4 xl:gap-x-8">_69 <!-- ITERATE ALL LISTS -->_69 <div_69 *ngFor="let list of lists"_69 class="min-h-52 relative h-auto rounded bg-emerald-200 py-4 px-4 text-sm font-semibold"_69 >_69 <div class="flex gap-2 pb-4">_69 <p_69 (click)="editingTitle(list, true)"_69 class="hover:cursor-pointer"_69 *ngIf="!editTitle[list.id]"_69 >_69 {{ list.title }}_69 </p>_69 <input_69 [(ngModel)]="list.title"_69 *ngIf="editTitle[list.id]"_69 class="block w-full rounded-md border border-gray-300 px-3 py-2 shadow-sm focus:border-emerald-500 focus:outline-none focus:ring-emerald-500 sm:text-sm"_69 />_69 <button class="font-medium" *ngIf="editTitle[list.id]" (click)="updateListTitle(list)">_69 Save_69 </button>_69 </div>_69_69 <!-- ITERATE LIST CARDS -->_69 <div class="flex flex-col items-center gap-2">_69 <div_69 class="flex h-auto w-full flex-col gap-2 hover:cursor-pointer"_69 *ngFor="let card of listCards[list.id]"_69 (click)="editingCard(card, true)"_69 >_69 <p class="h-10 bg-white py-2 px-2" *ngIf="!editCard[card.id]">{{ card.title }}</p>_69 <input_69 [(ngModel)]="card.title"_69 *ngIf="editCard[card.id]"_69 class="block rounded-md border border-gray-300 px-3 py-2 shadow-sm focus:border-emerald-500 focus:outline-none focus:ring-emerald-500 sm:text-sm"_69 />_69 <div class="align-items-center flex justify-between">_69 <button class="font-medium" *ngIf="editCard[card.id]" (click)="updateCard(card)">_69 Update_69 </button>_69_69 <button_69 class="font-medium text-red-600"_69 *ngIf="editCard[card.id]"_69 (click)="deleteCard(card)"_69 >_69 Delete_69 </button>_69 </div>_69 </div>_69 <div (click)="addCard(list)" class="pt-8 text-gray-500 hover:cursor-pointer">_69 + Add a card_69 </div>_69 <button class="text-small font-medium text-red-700" (click)="deleteBoardList(list)">_69 Delete list_69 </button>_69 </div>_69 </div>_69_69 <div_69 (click)="addList()"_69 class="relative h-16 rounded bg-emerald-500 py-4 px-4 text-lg font-semibold hover:cursor-pointer"_69 >_69 + New list_69 </div>_69 </div>_69</main>
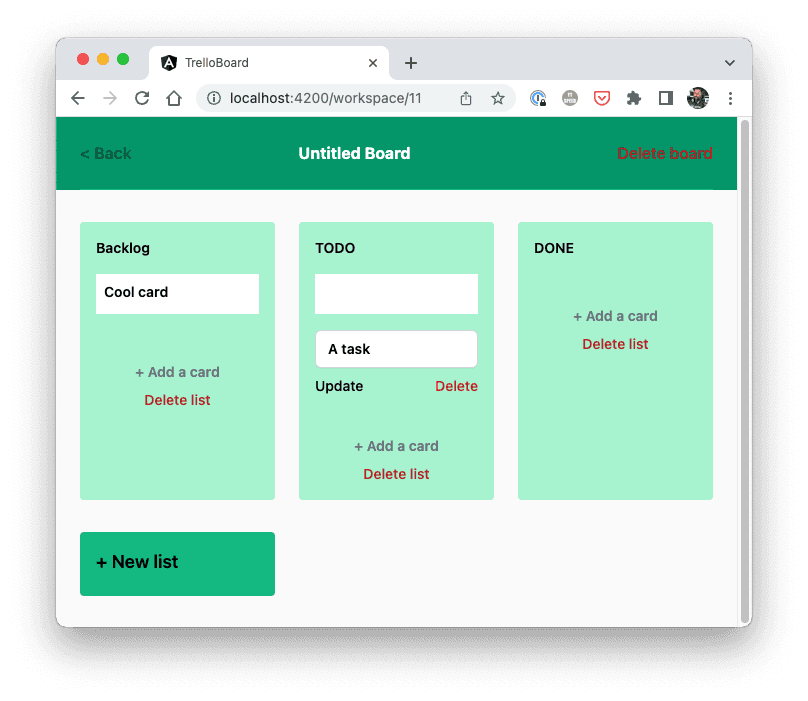
At this point we are able to add a list, add a new card in that list and finally update or delete all of that!
Most of this won't update the view since we will handle this with realtime updates in a minute, so you need to refresh your page after adding a card or list right now!
But we can actually already add our invitation logic, which just needs another input field so we can invite another email to work with us on the board.
Add the following in the <main> tag of our src/app/components/inside/board/board.component.html at the bottom:
_15<div class="flex items-center gap-4 py-12">_15 <span class="block text-3xl font-extrabold text-gray-900">Invite</span>_15_15 <input_15 [(ngModel)]="addUserEmail"_15 placeholder="[email protected]"_15 class="block rounded-md border border-gray-300 px-3 py-2 shadow-sm focus:border-emerald-500 focus:outline-none focus:ring-emerald-500 sm:text-sm"_15 />_15 <button_15 (click)="addUser()"_15 class="inline-flex items-center rounded border border-transparent bg-emerald-600 px-2.5 py-1.5 text-xs font-medium text-white shadow-sm hover:bg-emerald-700 focus:outline-none focus:ring-2 focus:ring-emerald-500 focus:ring-offset-2"_15 >_15 Invite_15 </button>_15</div>
The required function in our class and service already exists, so you can now already invite other users (who are already signed up!) and from their account see the same board as you have.
Handling Realtime Table Changes
The cool thing is is how easy we are now able to implement real time functionality - the only thing required for this is to turn it on.
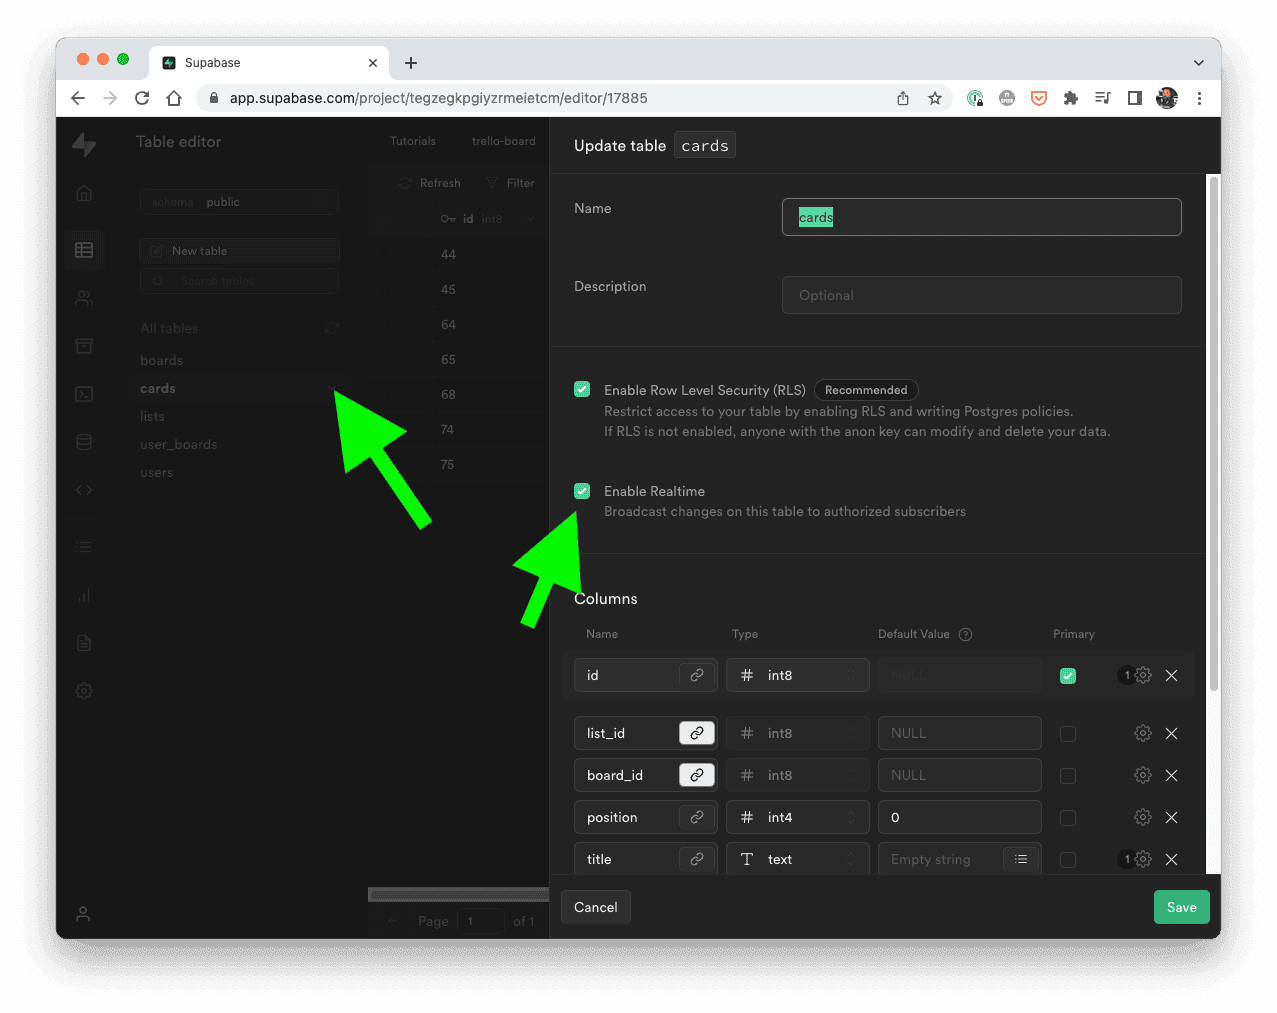
We can do this right inside the table editor of Supabase, so go to your tables, click that little arrow next to edi so you can edit the table and then enable realtime for bot cards and lists!
Now we are able to retrieve those updates if we listen for them, and while the API for this might slightly change with the next Supabase JS update, the general idea can still be applied:
We create a new Subject and return it as an Observable, and then listen to changes of our tables by using on().
Whenever we get an update, we emit that change to the Subject so we have one stream of updates that we can return to our view.
To continue, bring up the src/app/services/data.service.ts and add this additional function:
_19 getTableChanges() {_19 const changes = new Subject();_19_19 this.supabase_19 .from(CARDS_TABLE)_19 .on('*', (payload: any) => {_19 changes.next(payload);_19 })_19 .subscribe();_19_19 this.supabase_19 .from(LISTS_TABLE)_19 .on('*', (payload: any) => {_19 changes.next(payload);_19 })_19 .subscribe();_19_19 return changes.asObservable();_19 }
Now that we can easily get all the updates to our relevant tables in realtime, we just need to handle them accordingly.
This is just a matter of finding out which event occurred (INSERT, UPDATE, DELETE) and then applying the changes to our local data to add, change or remove data.
Go ahead by finally implementing our function in the src/app/components/inside/board/board.component.ts that we left open until now:
_30 handleRealtimeUpdates() {_30 this.dataService.getTableChanges().subscribe((update: any) => {_30 const record = update.new?.id ? update.new : update.old;_30 const event = update.eventType;_30_30 if (!record) return;_30_30 if (update.table == 'cards') {_30 if (event === 'INSERT') {_30 this.listCards[record.list_id].push(record);_30 } else if (event === 'UPDATE') {_30 const newArr = [];_30_30 for (let card of this.listCards[record.list_id]) {_30 if (card.id == record.id) {_30 card = record;_30 }_30 newArr.push(card);_30 }_30 this.listCards[record.list_id] = newArr;_30 } else if (event === 'DELETE') {_30 this.listCards[record.list_id] = this.listCards[_30 record.list_id_30 ].filter((card: any) => card.id !== record.id);_30 }_30 } else if (update.table == 'lists') {_30 // TODO_30 }_30 });_30 }
This handles the events if the table of our event is cards, buzt the second part is somewhat similar.
I simply put the code for the else case in a second block, to not make the first handling look that big - but it's pretty much the same logic of handling the different cases and now updating everything related to lists:
_20else if (update.table == 'lists') {_20 if (event === 'INSERT') {_20 this.lists.push(record);_20 this.listCards[record.id] = [];_20 } else if (event === 'UPDATE') {_20 this.lists.filter((list: any) => list.id === record.id)[0] = record;_20_20 const newArr = [];_20_20 for (let list of this.lists) {_20 if (list.id == record.id) {_20 list = record;_20 }_20 newArr.push(list);_20 }_20 this.lists = newArr;_20 } else if (event === 'DELETE') {_20 this.lists = this.lists.filter((list: any) => list.id !== record.id);_20 }_20}
With that final piece of code we are completely done with our Supabase Angular Trello clone, and you can enjoy the fruits of your hard work!
Conclusion
Building projects with Supabase is awesome, and hopefully this real world clone example gave you insight into different areas that you need to think about.
You can find the full code of this tutorial on Github where you just need to insert your own Supabase instance and then create the tables with the included SQL file.
If you enjoyed the tutorial, you can find many more tutorials on my YouTube channel where I help web developers build awesome mobile apps.
Until next time and happy coding with Supabase!