Passage by 1Password


Overview
Passage is a passwordless authentication service that enables you to add passkey sign-in experiences to your apps and websites with just two lines of code. As a full stack solution, Passage comes with robust backend infrastructure and pre-built UI elements, letting you implement secure and frictionless logins in minutes.
Check out this guide to learn how to add Passage to your Supabase powered site and plug into RLS.
Documentation
This guide steps through building a Next.js application with Passage and Supabase. We will use Passage to authenticate users and manage tokens, while using Supabase for storing data and enforcing authorization logic using Row Level Security policies.
The full code example for this guide can be found here.
Passage is a passwordless authentication platform that makes it simple for developers to add passkey authentication to their apps and websites, providing better security and simpler sign in for your users. They provide simple frontend components that handle all of the complexity of passwordless login for developers in just two lines of codes. Passage also provides session management, user management, and in-depth customization capabilities.
Next.js is a web application framework built on top of React. We will be using it for this example, as it allows us to write server-side logic within our application. Passage’s frontend elements and Node.js SDK are designed to work for Next.js.
For this guide, you will need a Passage account which can be created here, and a Supabase account which can be created here.
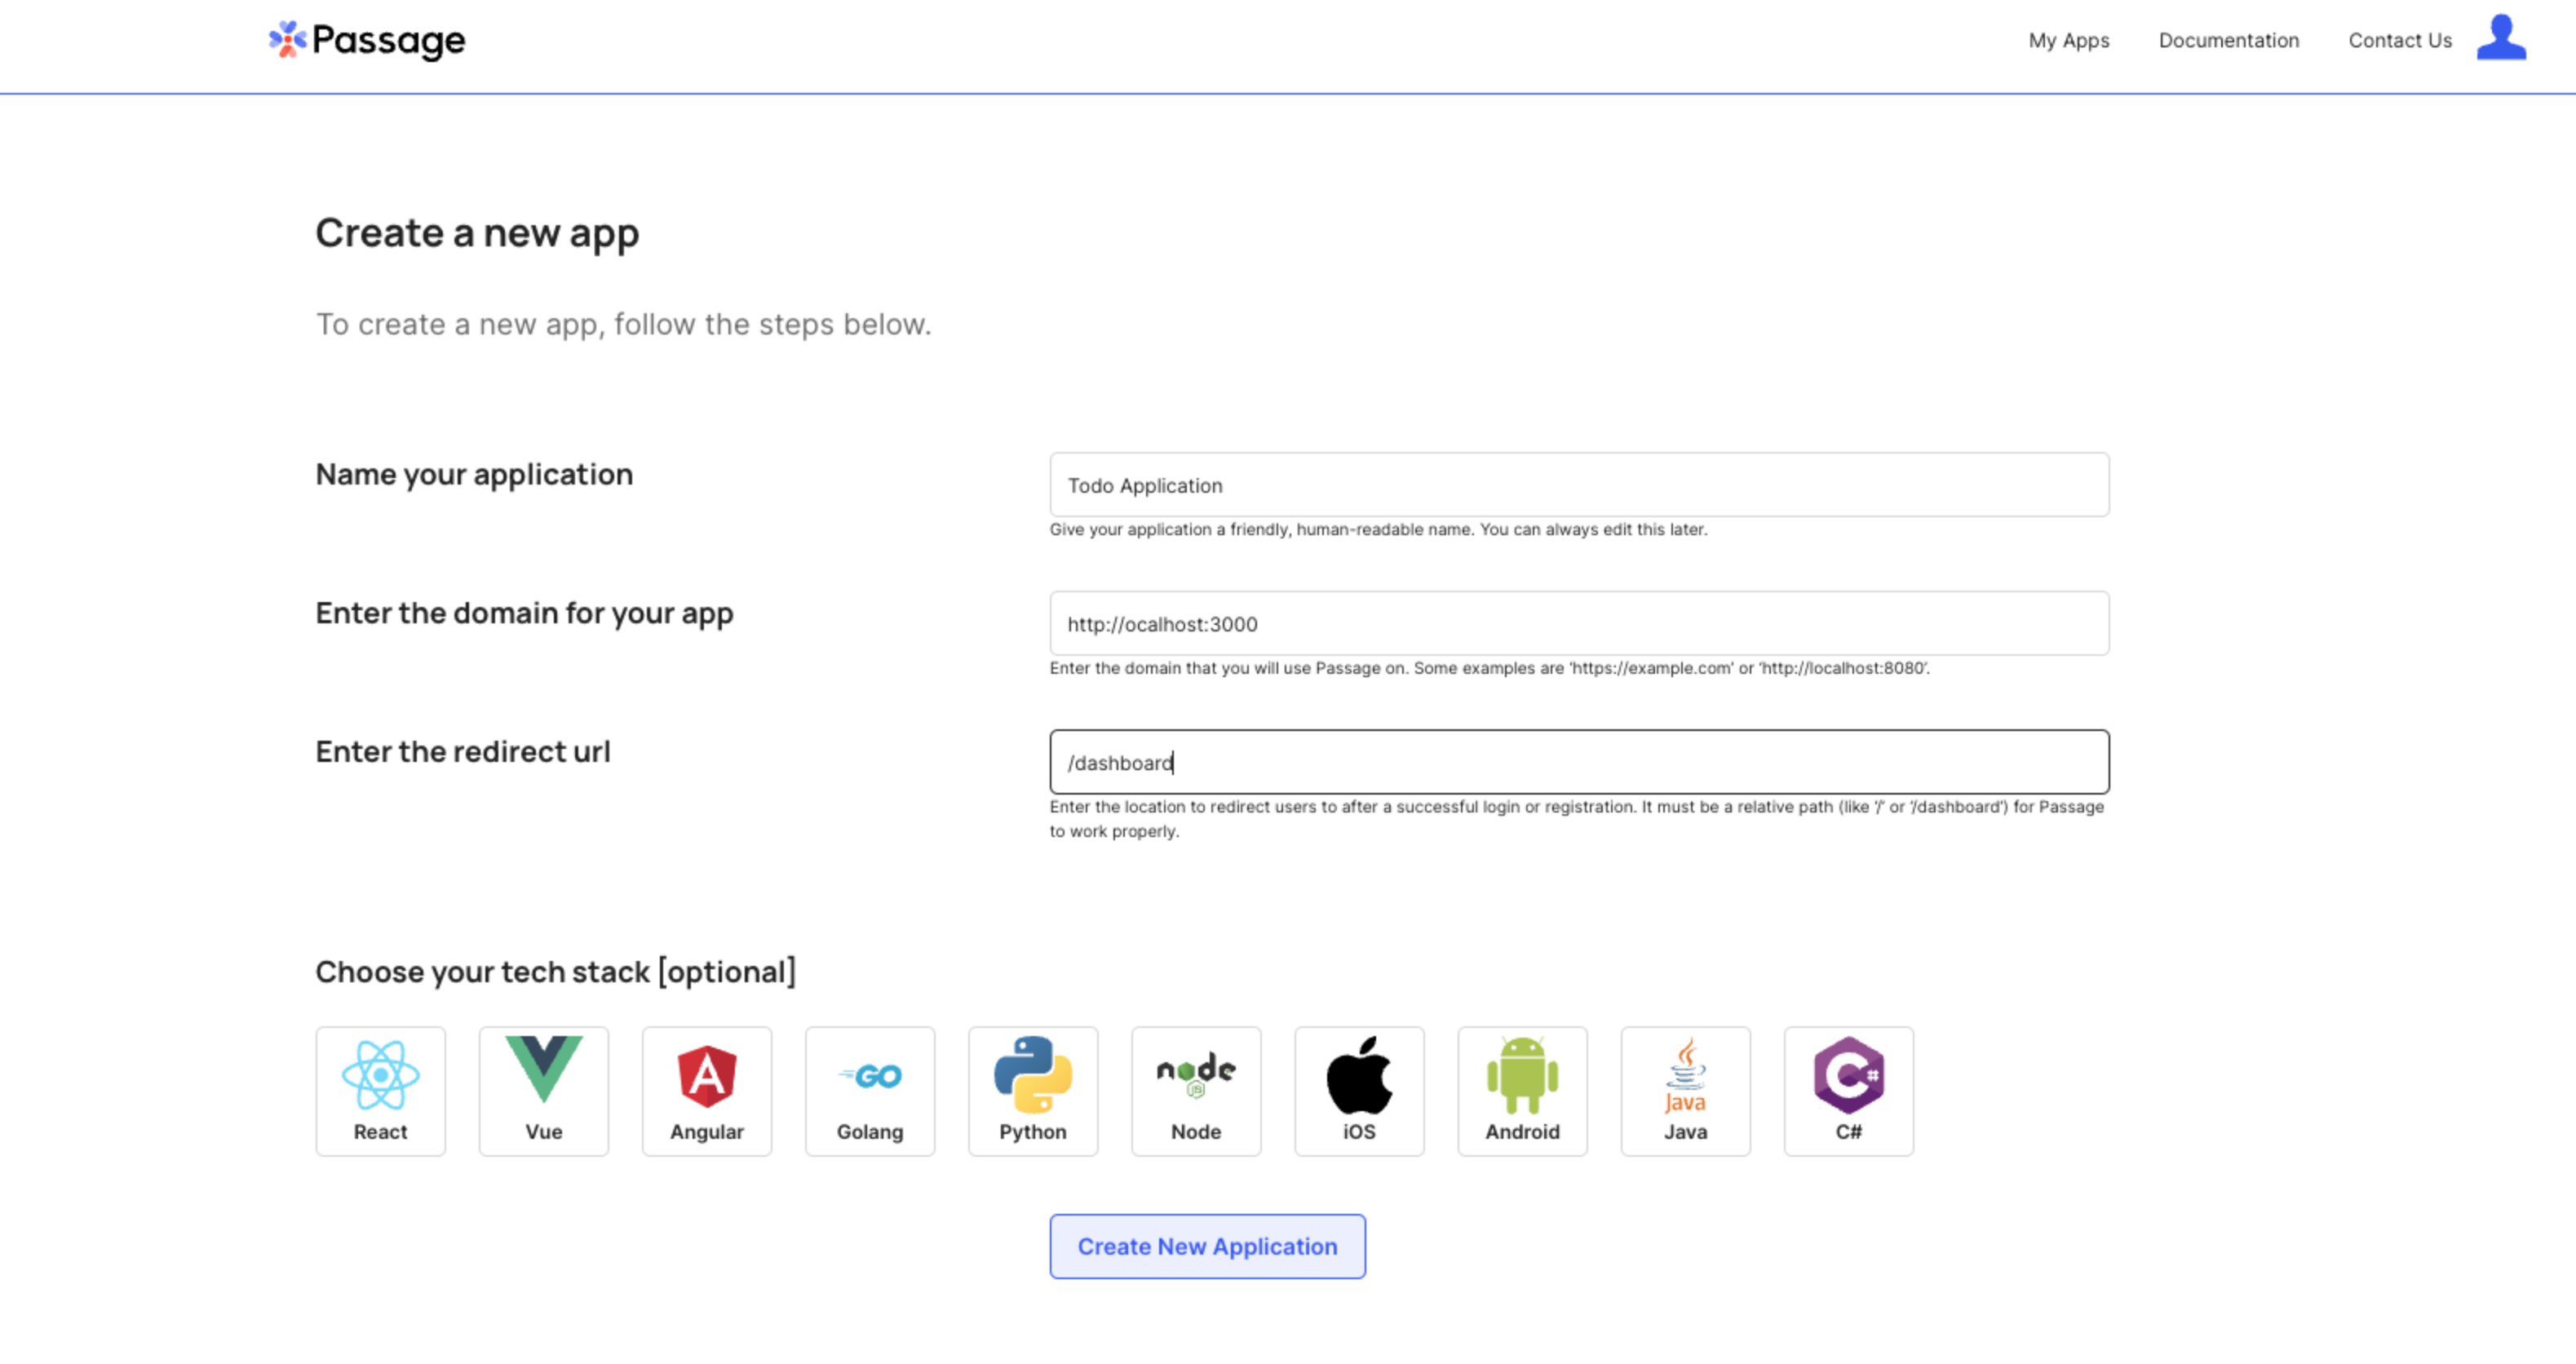
1. Create a Passage application
In the Passage Console, create a new application with the following configuration:
- Application name: Todo Application
- Authentication origin: http://localhost:3000
- Redirect URL: /dashboard
2. Create and configure a Supabase project
Create a new project
In the Supabase dashboard, click New Project.
Enter a name for your project and create a secure database password.
Create a table schema
We are building Todo list application, similar to the Supabase demo application so we will need a table for the todo list items.
Create a new table in the Table Editor view.
Set the Name field to todo.
Select Enable Row Level Security (RLS).
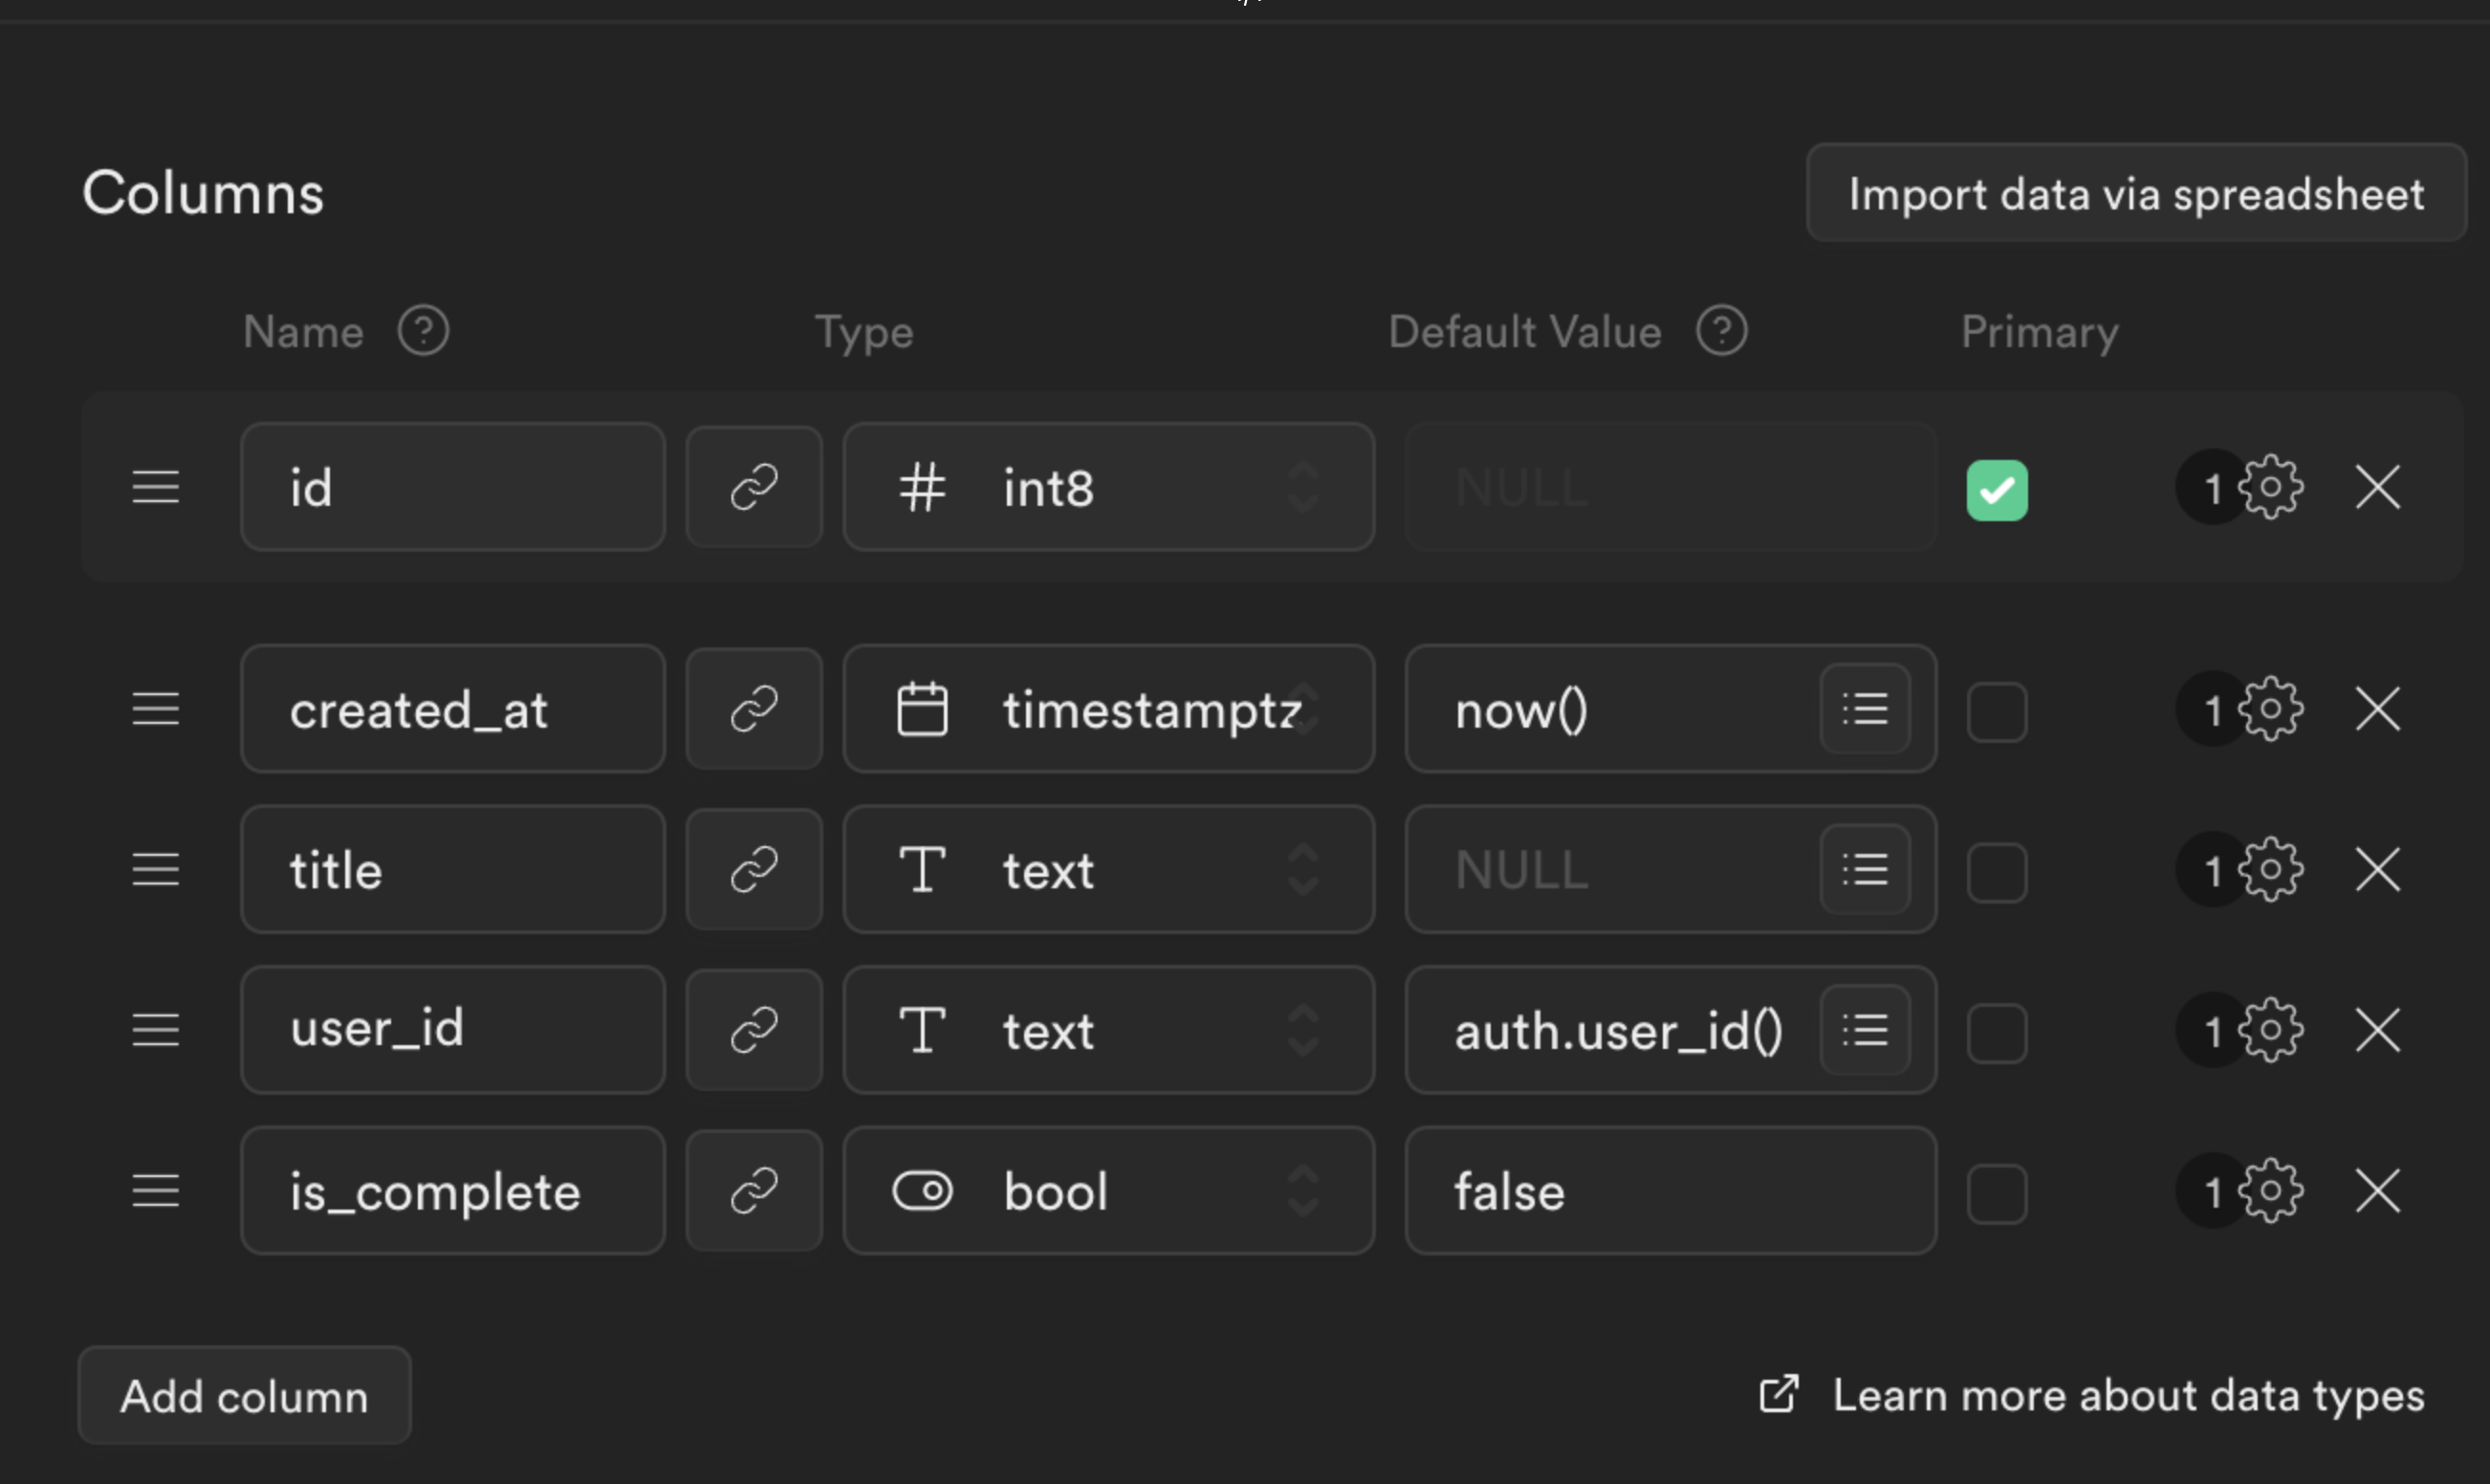
Create the following new columns.
titleastextuser_idastextwith a default value ofauth.user_id()is_completeasboolwith a default value offalse
Click Save to create the table.
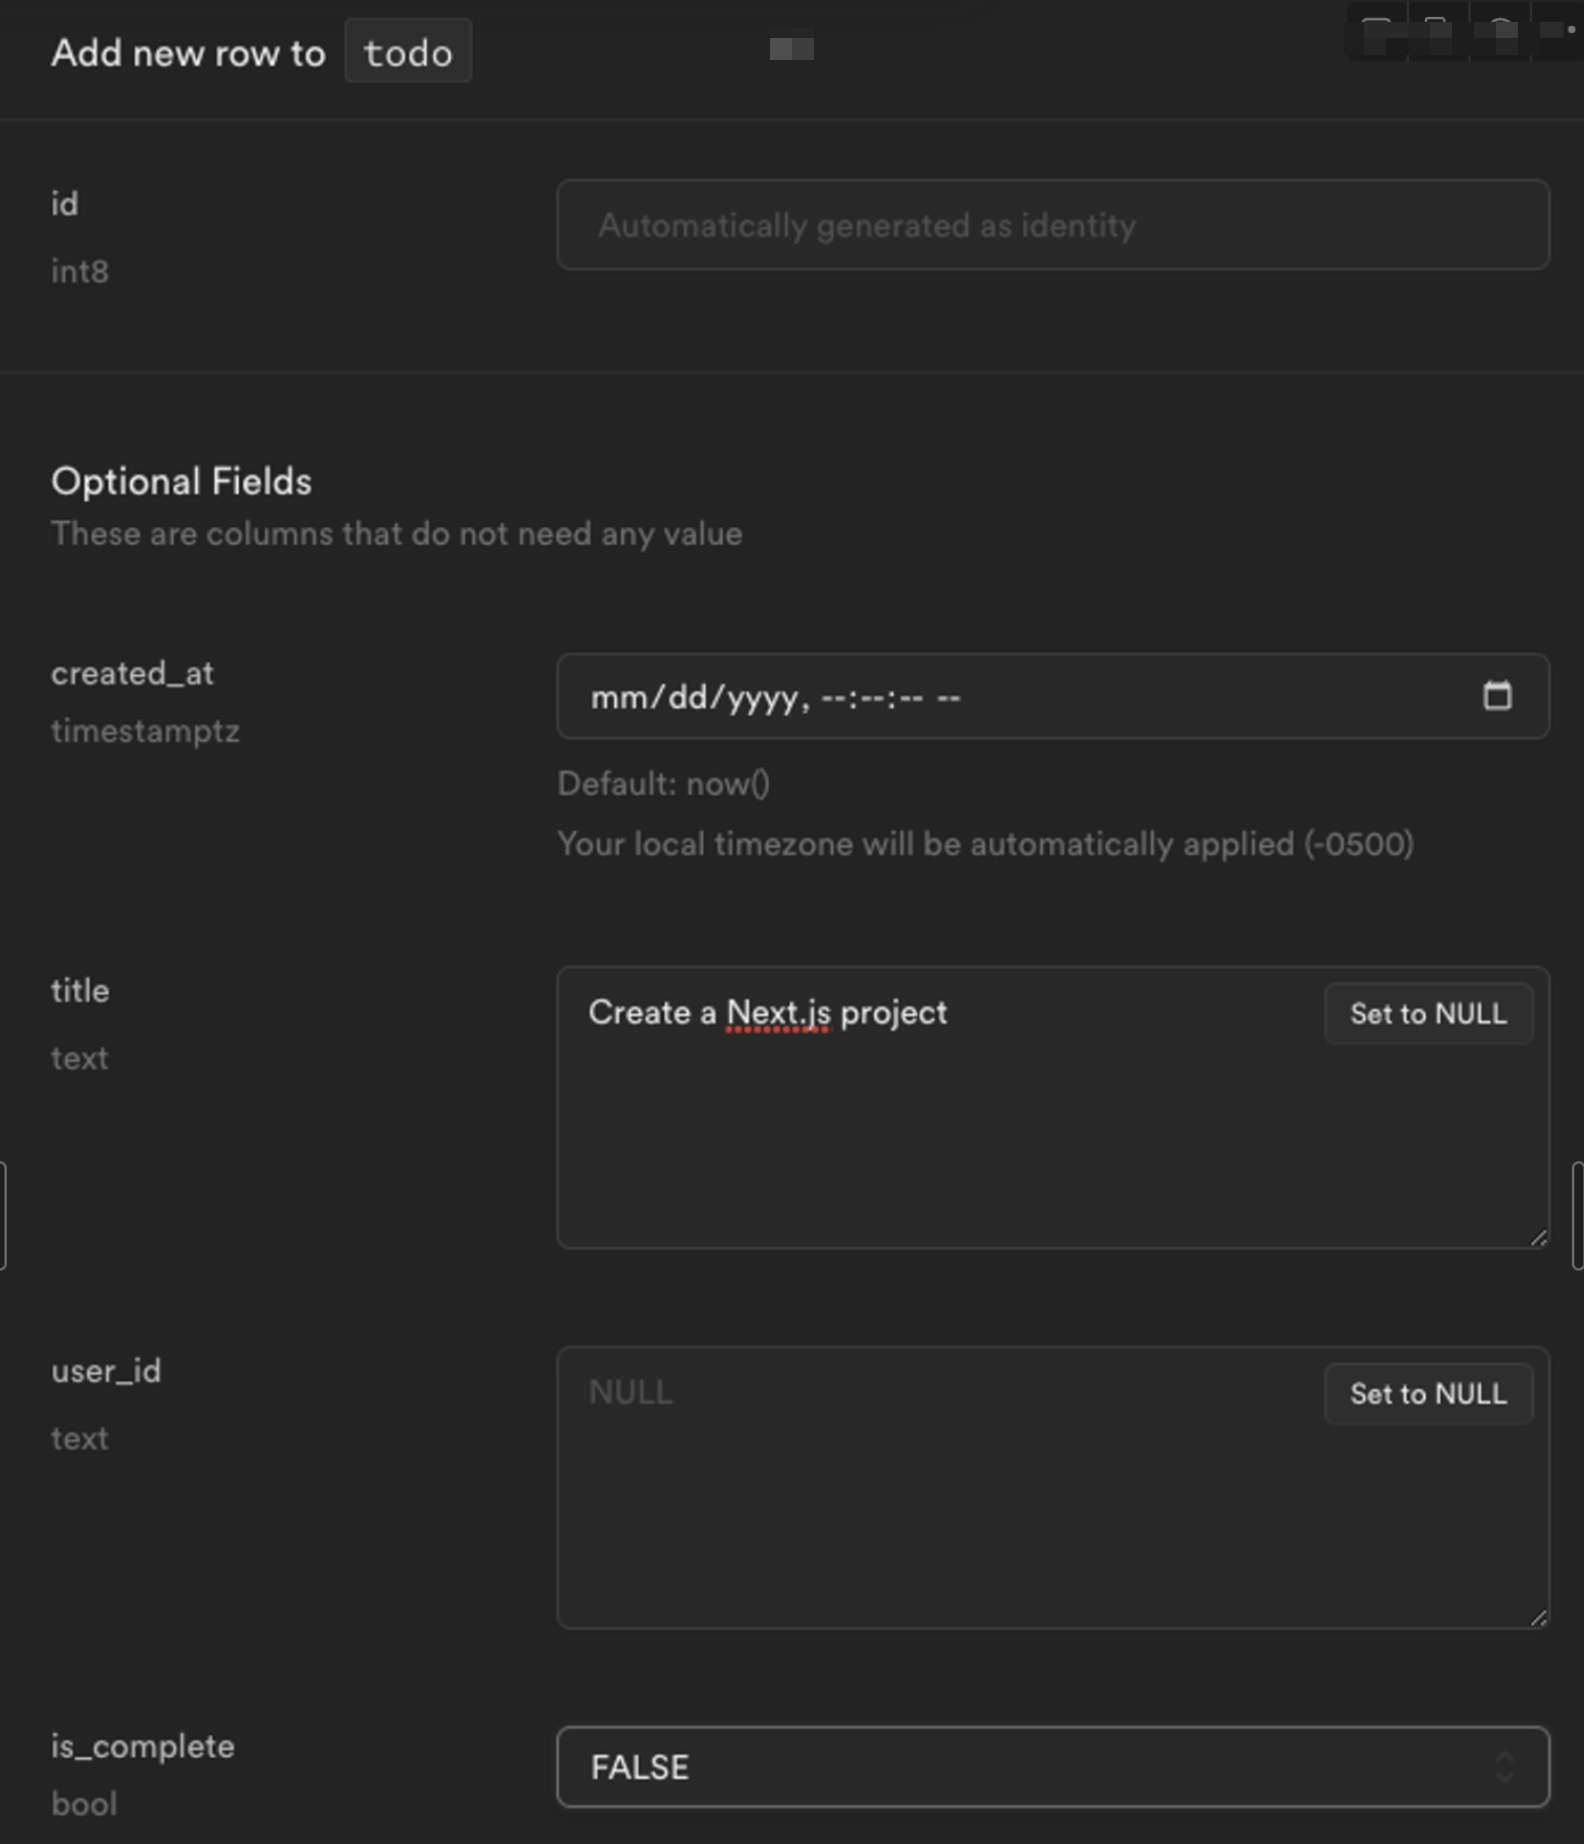
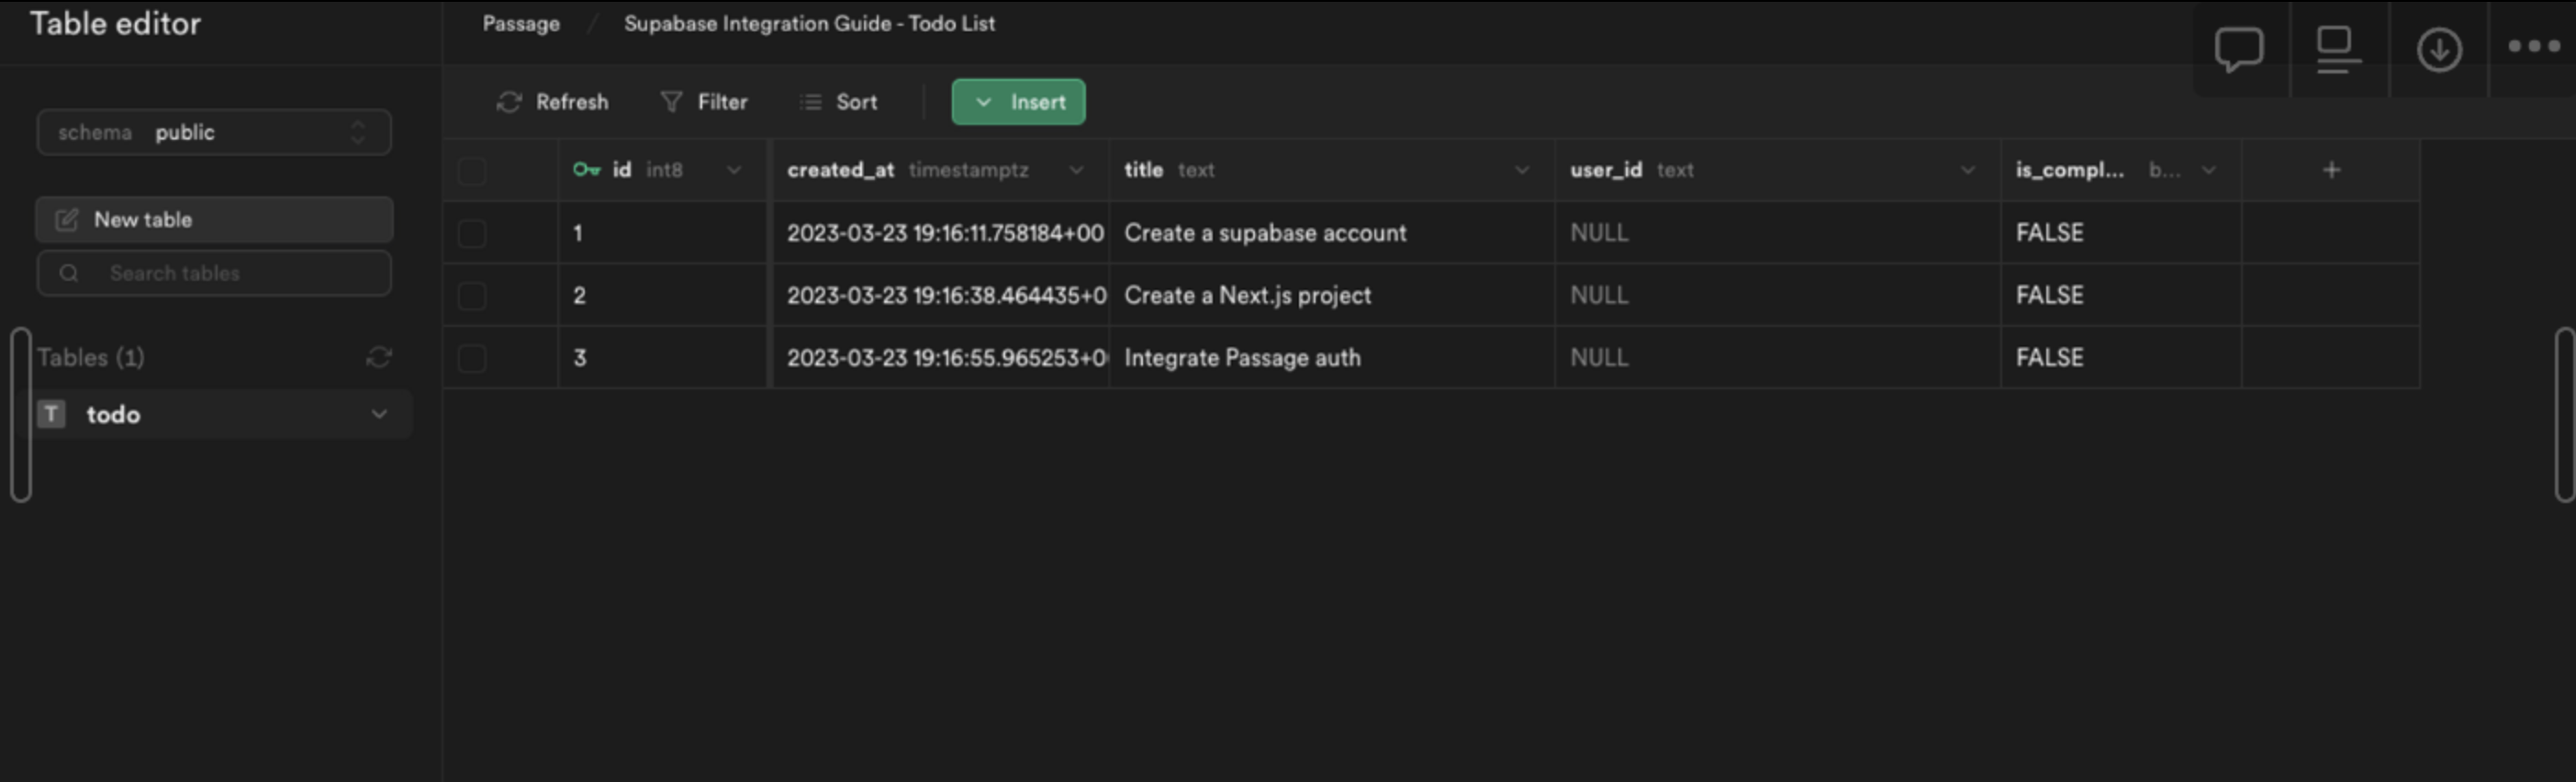
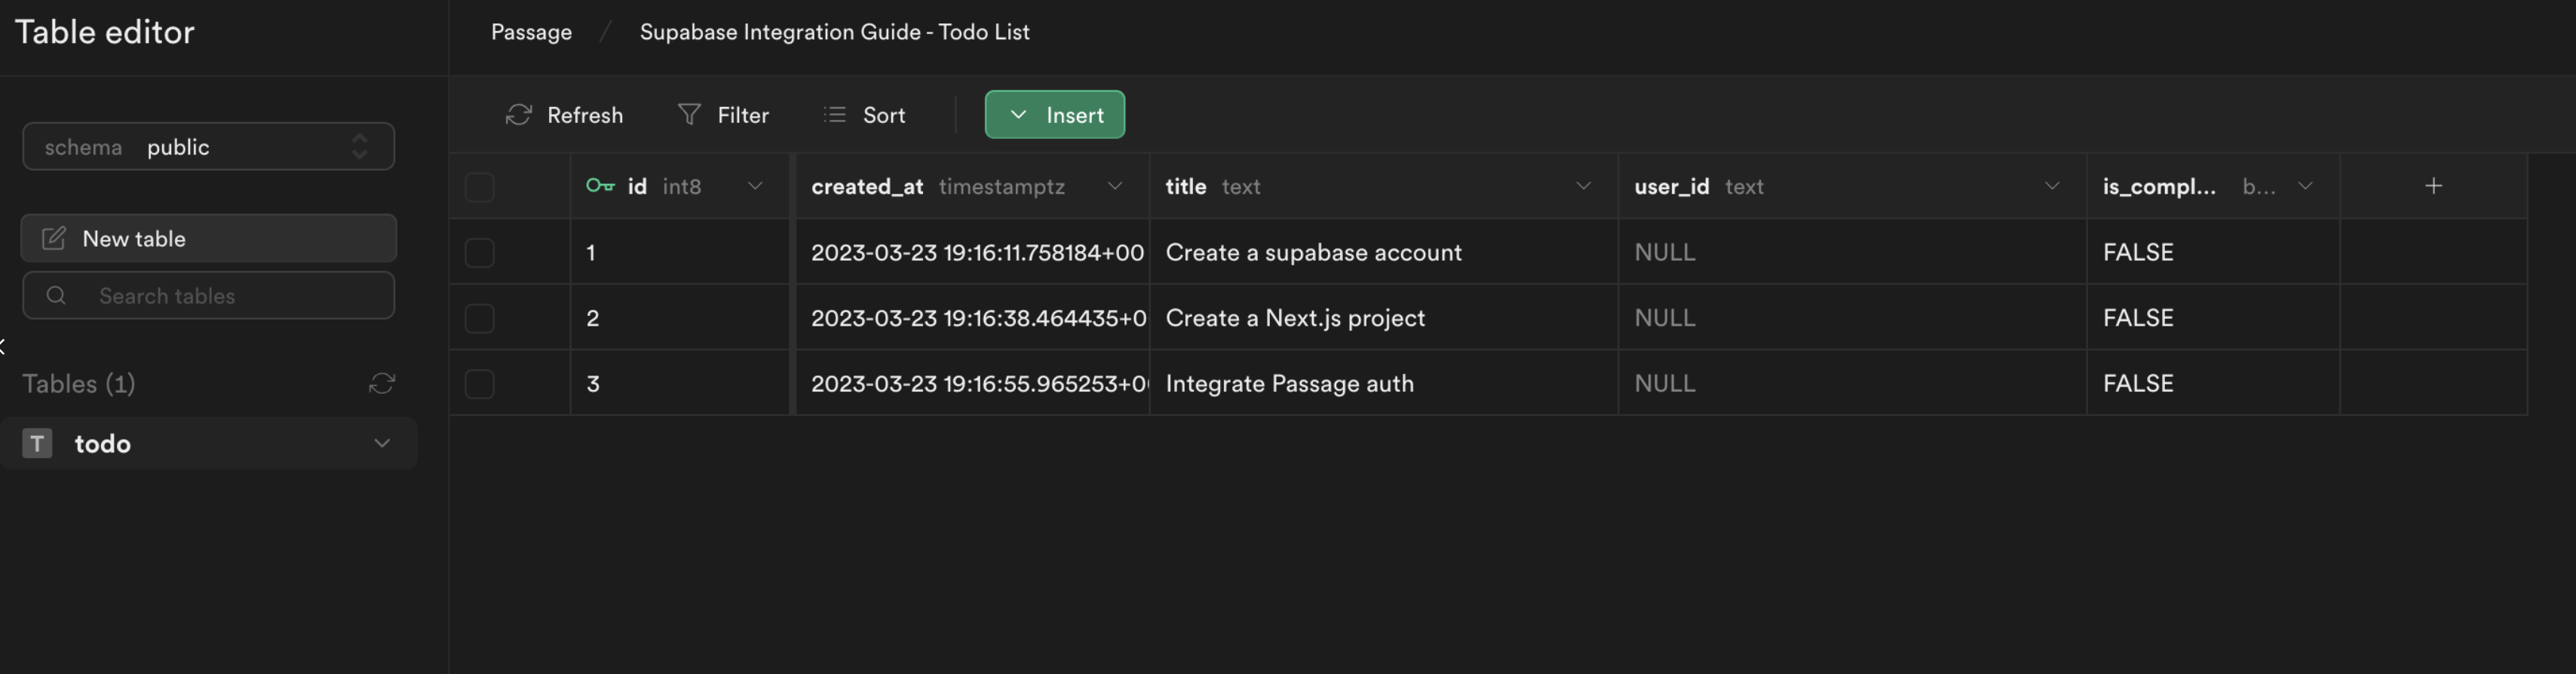
Add initial data to the table
From the Table editor, select the todo table and click Insert row. Fill out the required fields with an example todo item, leaving the user_id as NULL and click Save.
After adding a few todo items, the table editor view will look like this:
3. Build a Next.js app
Create Next.js app
Create a new Next.js project on the command line. You can choose your settings through the setup wizard - for this guide we will use JavaScript instead of TypeScript. This example uses the create script in Next v13.2.
_10npx create-next-app <name-of-project>_10cd <name-of-project>/
You should be able to use the default settings for the project, but here are the settings used for the example app.

Configure your ENV
Create a .env file and enter the following values.
_10NEXT_PUBLIC_PASSAGE_APP_ID=get-from-passage-settings_10PASSAGE_API_KEY=get-from-passage-settings_10NEXT_PUBLIC_SUPABASE_URL=get-from-supabase-dashboard_10NEXT_PUBLIC_SUPABASE_ANON_KEY=get-from-supabase-dashboard_10SUPABASE_JWT_SECRET=get-from-supabase-dashboard
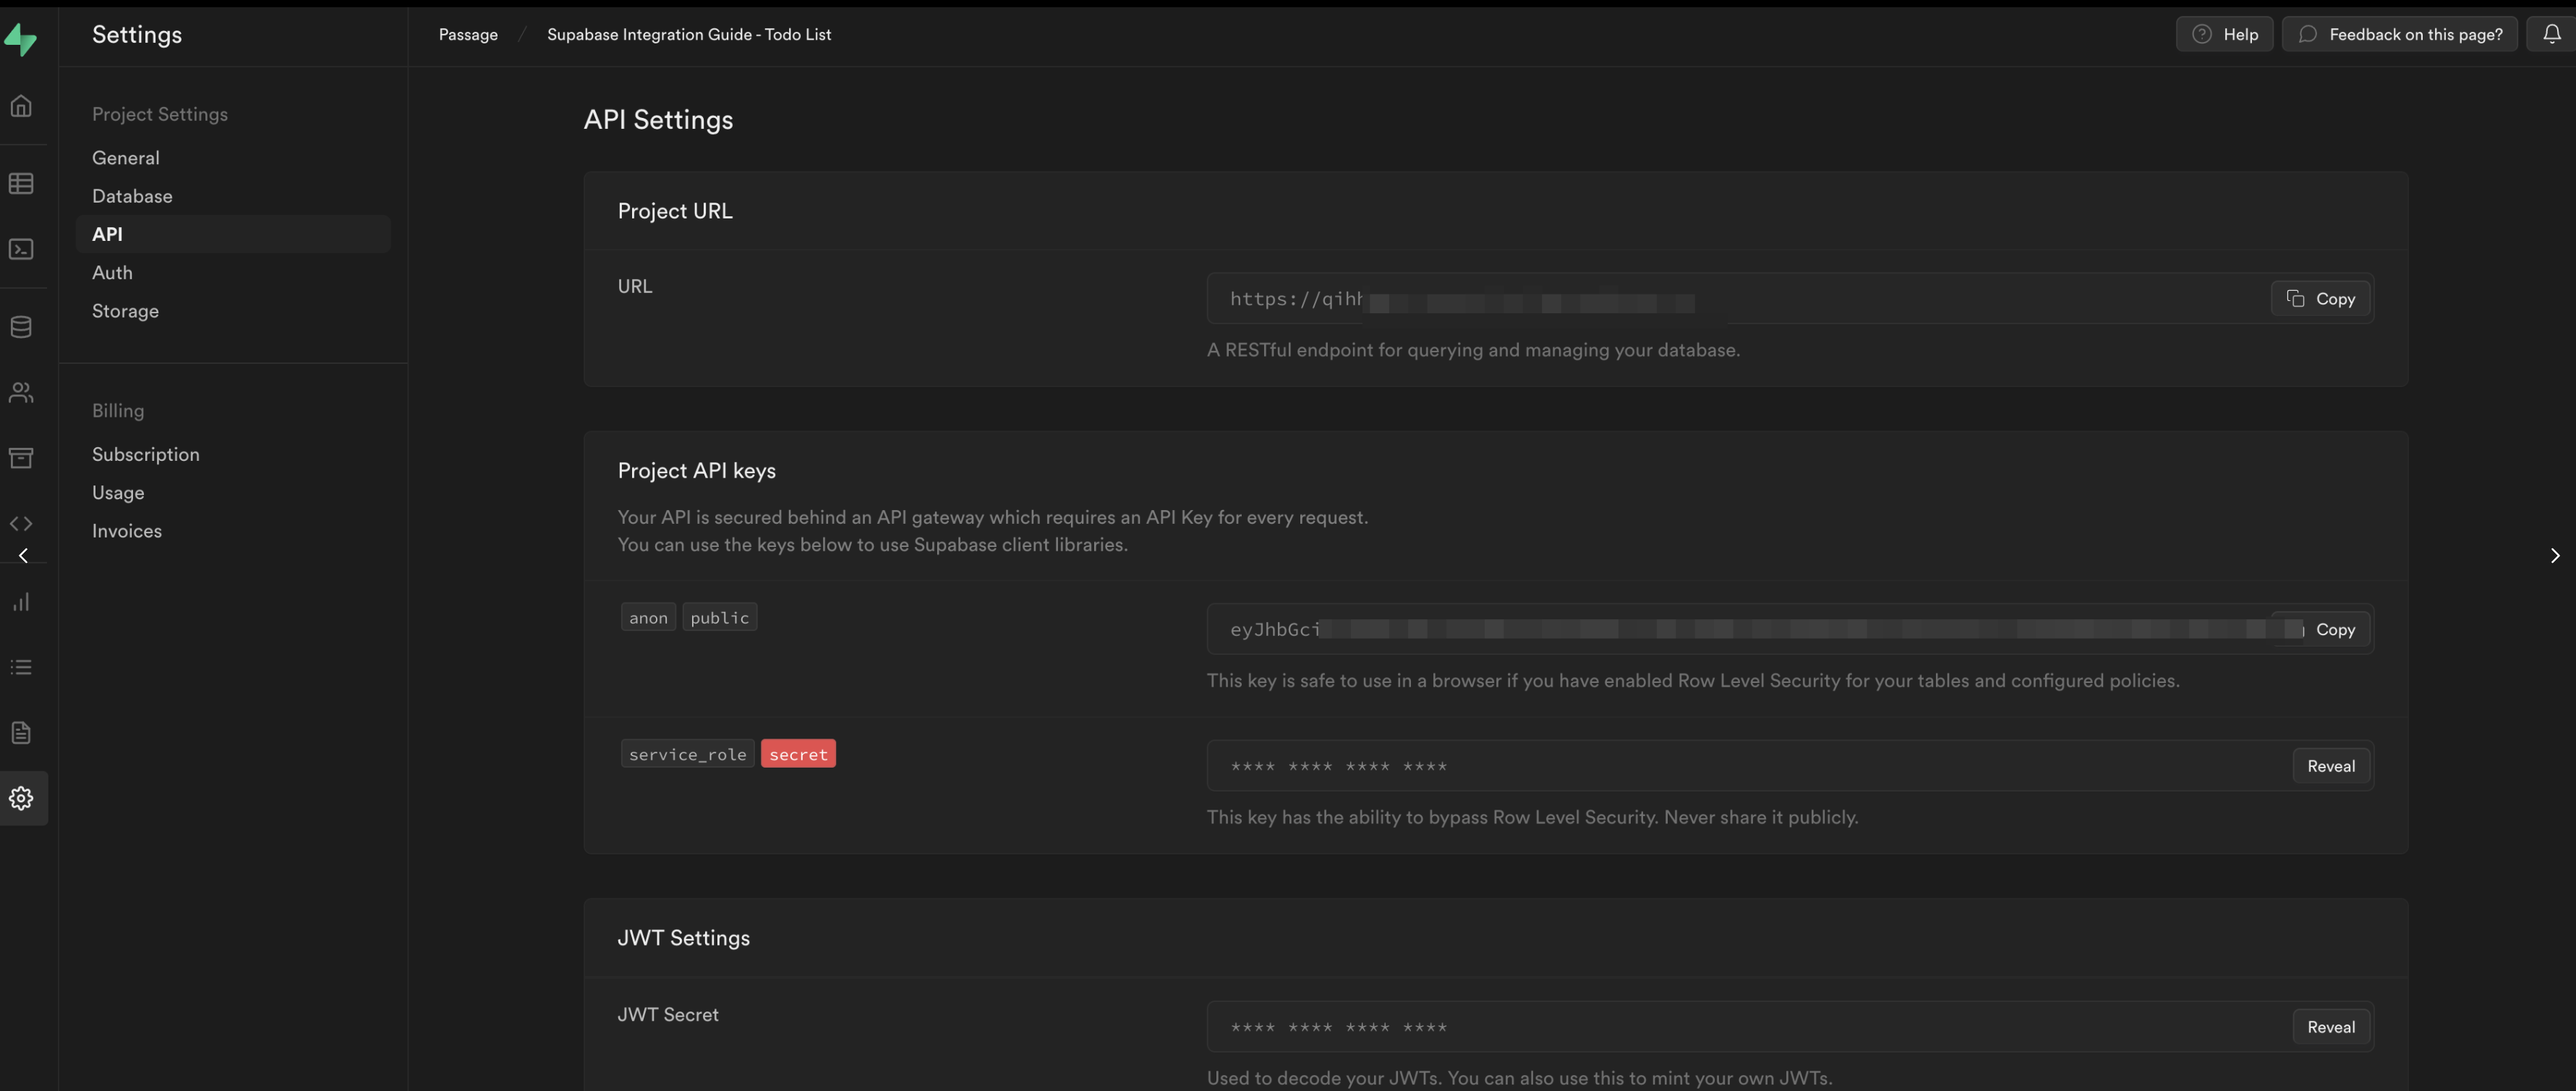
The Supabase values can be found under Project->Settings->API Settings.
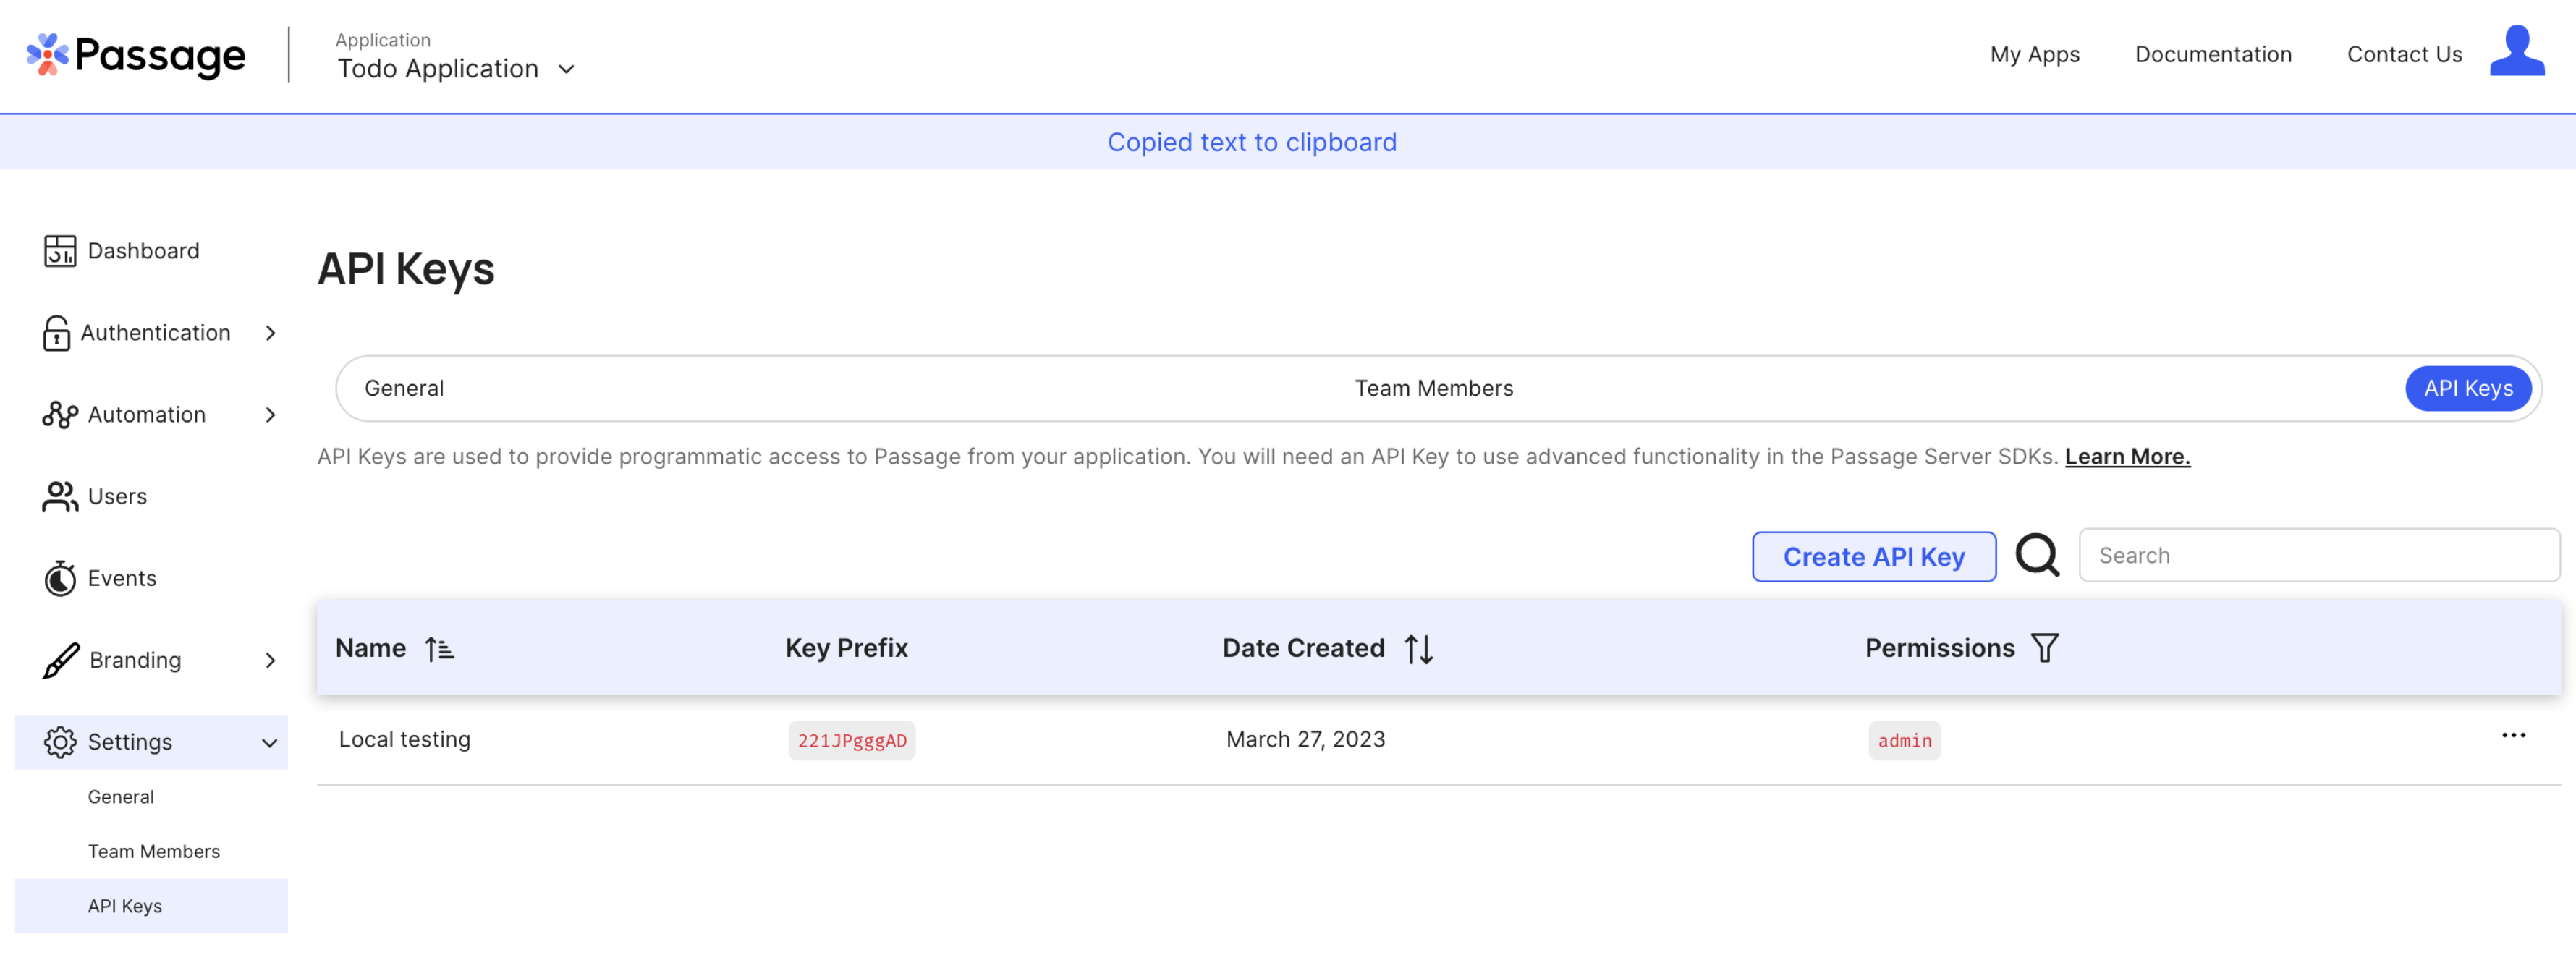
The Passage values can be found under General->Settings and General->API Keys.
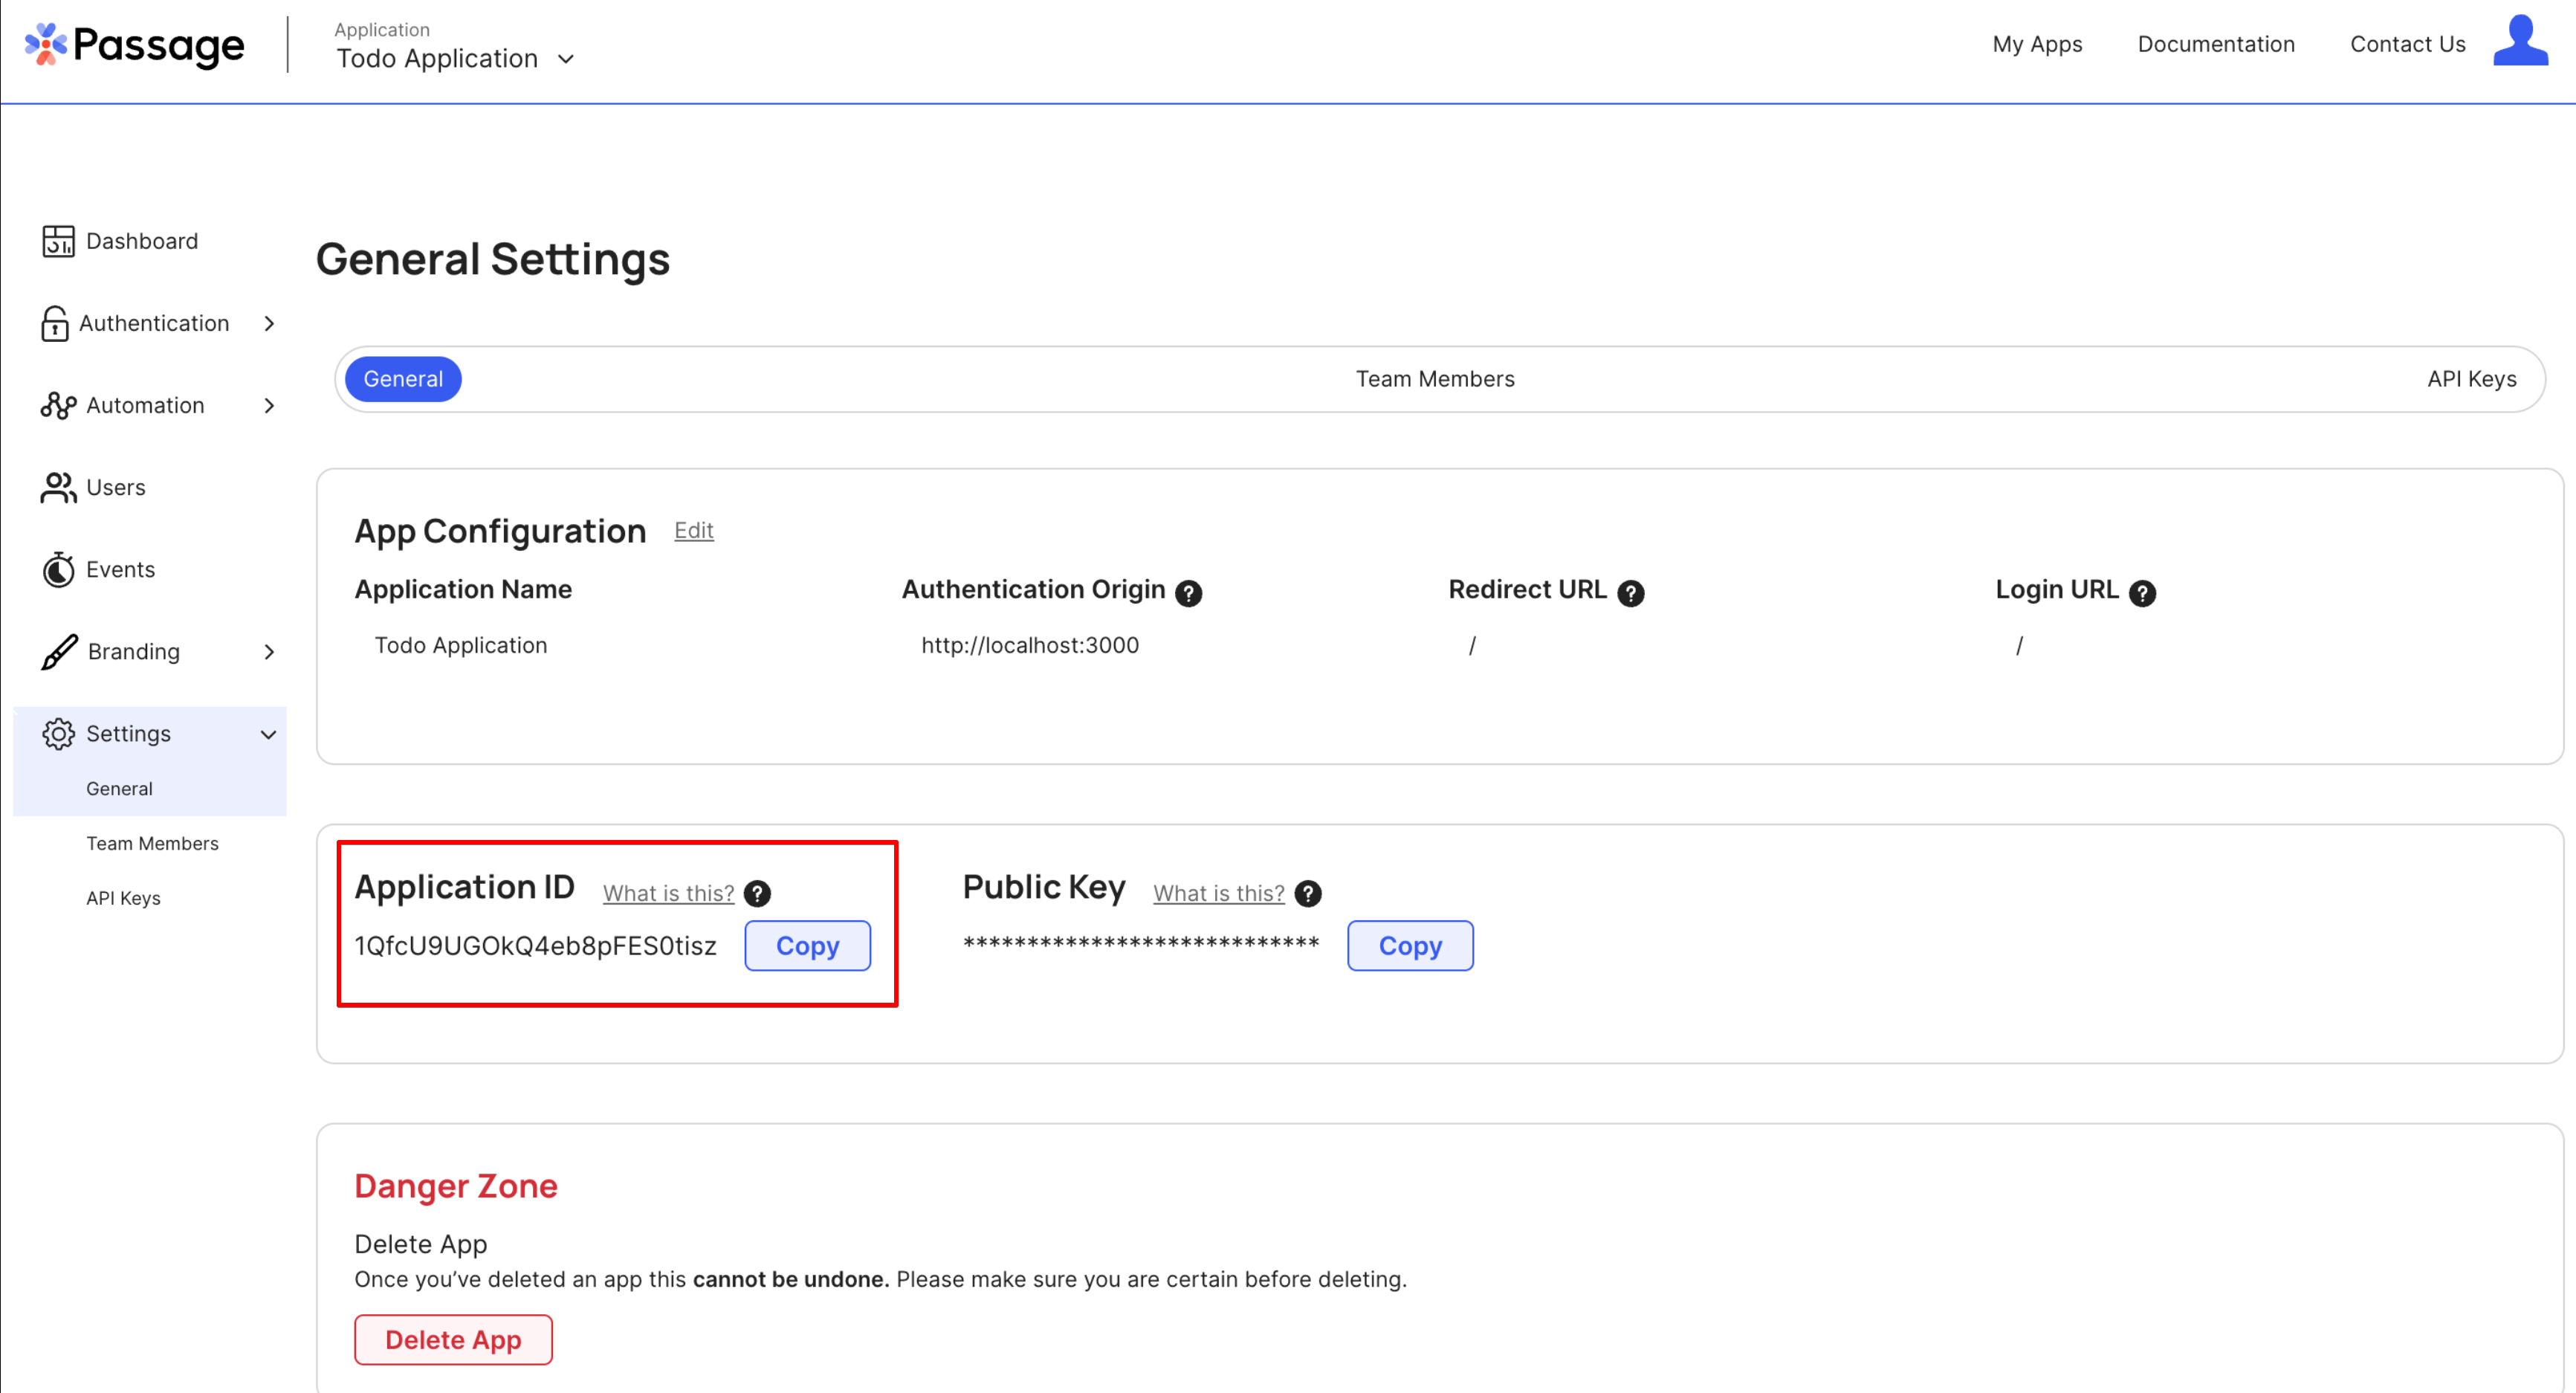
The
PASSAGE_API_KEYandSUPABASE_JWT_SECRETare secret values and should never be shared publicly. They will only be used in the server-side code of the Next.js application.
Restart your Next.js development server to read in the environment variables.
_10npm run dev
4. Add Passage login to your app
Add Passage Element
Install the @passageidentity/passage-elements package.
_10npm install @passageidentity/passage-elements
Create a new folder called components with a new login file components/login.js and add the following content.
_16// components/login.js_16import { useEffect } from 'react'_16_16const PassageLogin = () => {_16 useEffect(() => {_16 require('@passageidentity/passage-elements/passage-auth')_16 }, [])_16_16 return (_16 <>_16 <passage-auth app-id={process.env.NEXT_PUBLIC_PASSAGE_APP_ID}></passage-auth>_16 </>_16 )_16}_16_16export default PassageLogin
Then update pages/index.js to include the login component.
_11// pages/index.js_11import styles from '@/styles/Home.module.css'_11import PassageLogin from '@/components/login'_11_11export default function Home(props) {_11 return (_11 <div className={styles.main}>_11 <PassageLogin />_11 </div>_11 )_11}
When we have a successful registration the Passage element will request a redirect to /dashboard per the redirect URL we set during app creation.
Create a new file pages/dashboard.js for this new route with the following content:
_12// pages/dashboard.js_12import styles from '@/styles/Home.module.css'_12_12export default function Dashboard({ isAuthorized, userID, todos }) {_12 return (_12 <div className={styles.main}>_12 <div className={styles.container}>_12 <p>You've logged in!</p>_12 </div>_12 </div>_12 )_12}
Now when you visit http://localhost:3000 in a browser you will have a fully functioning and passwordless login page!
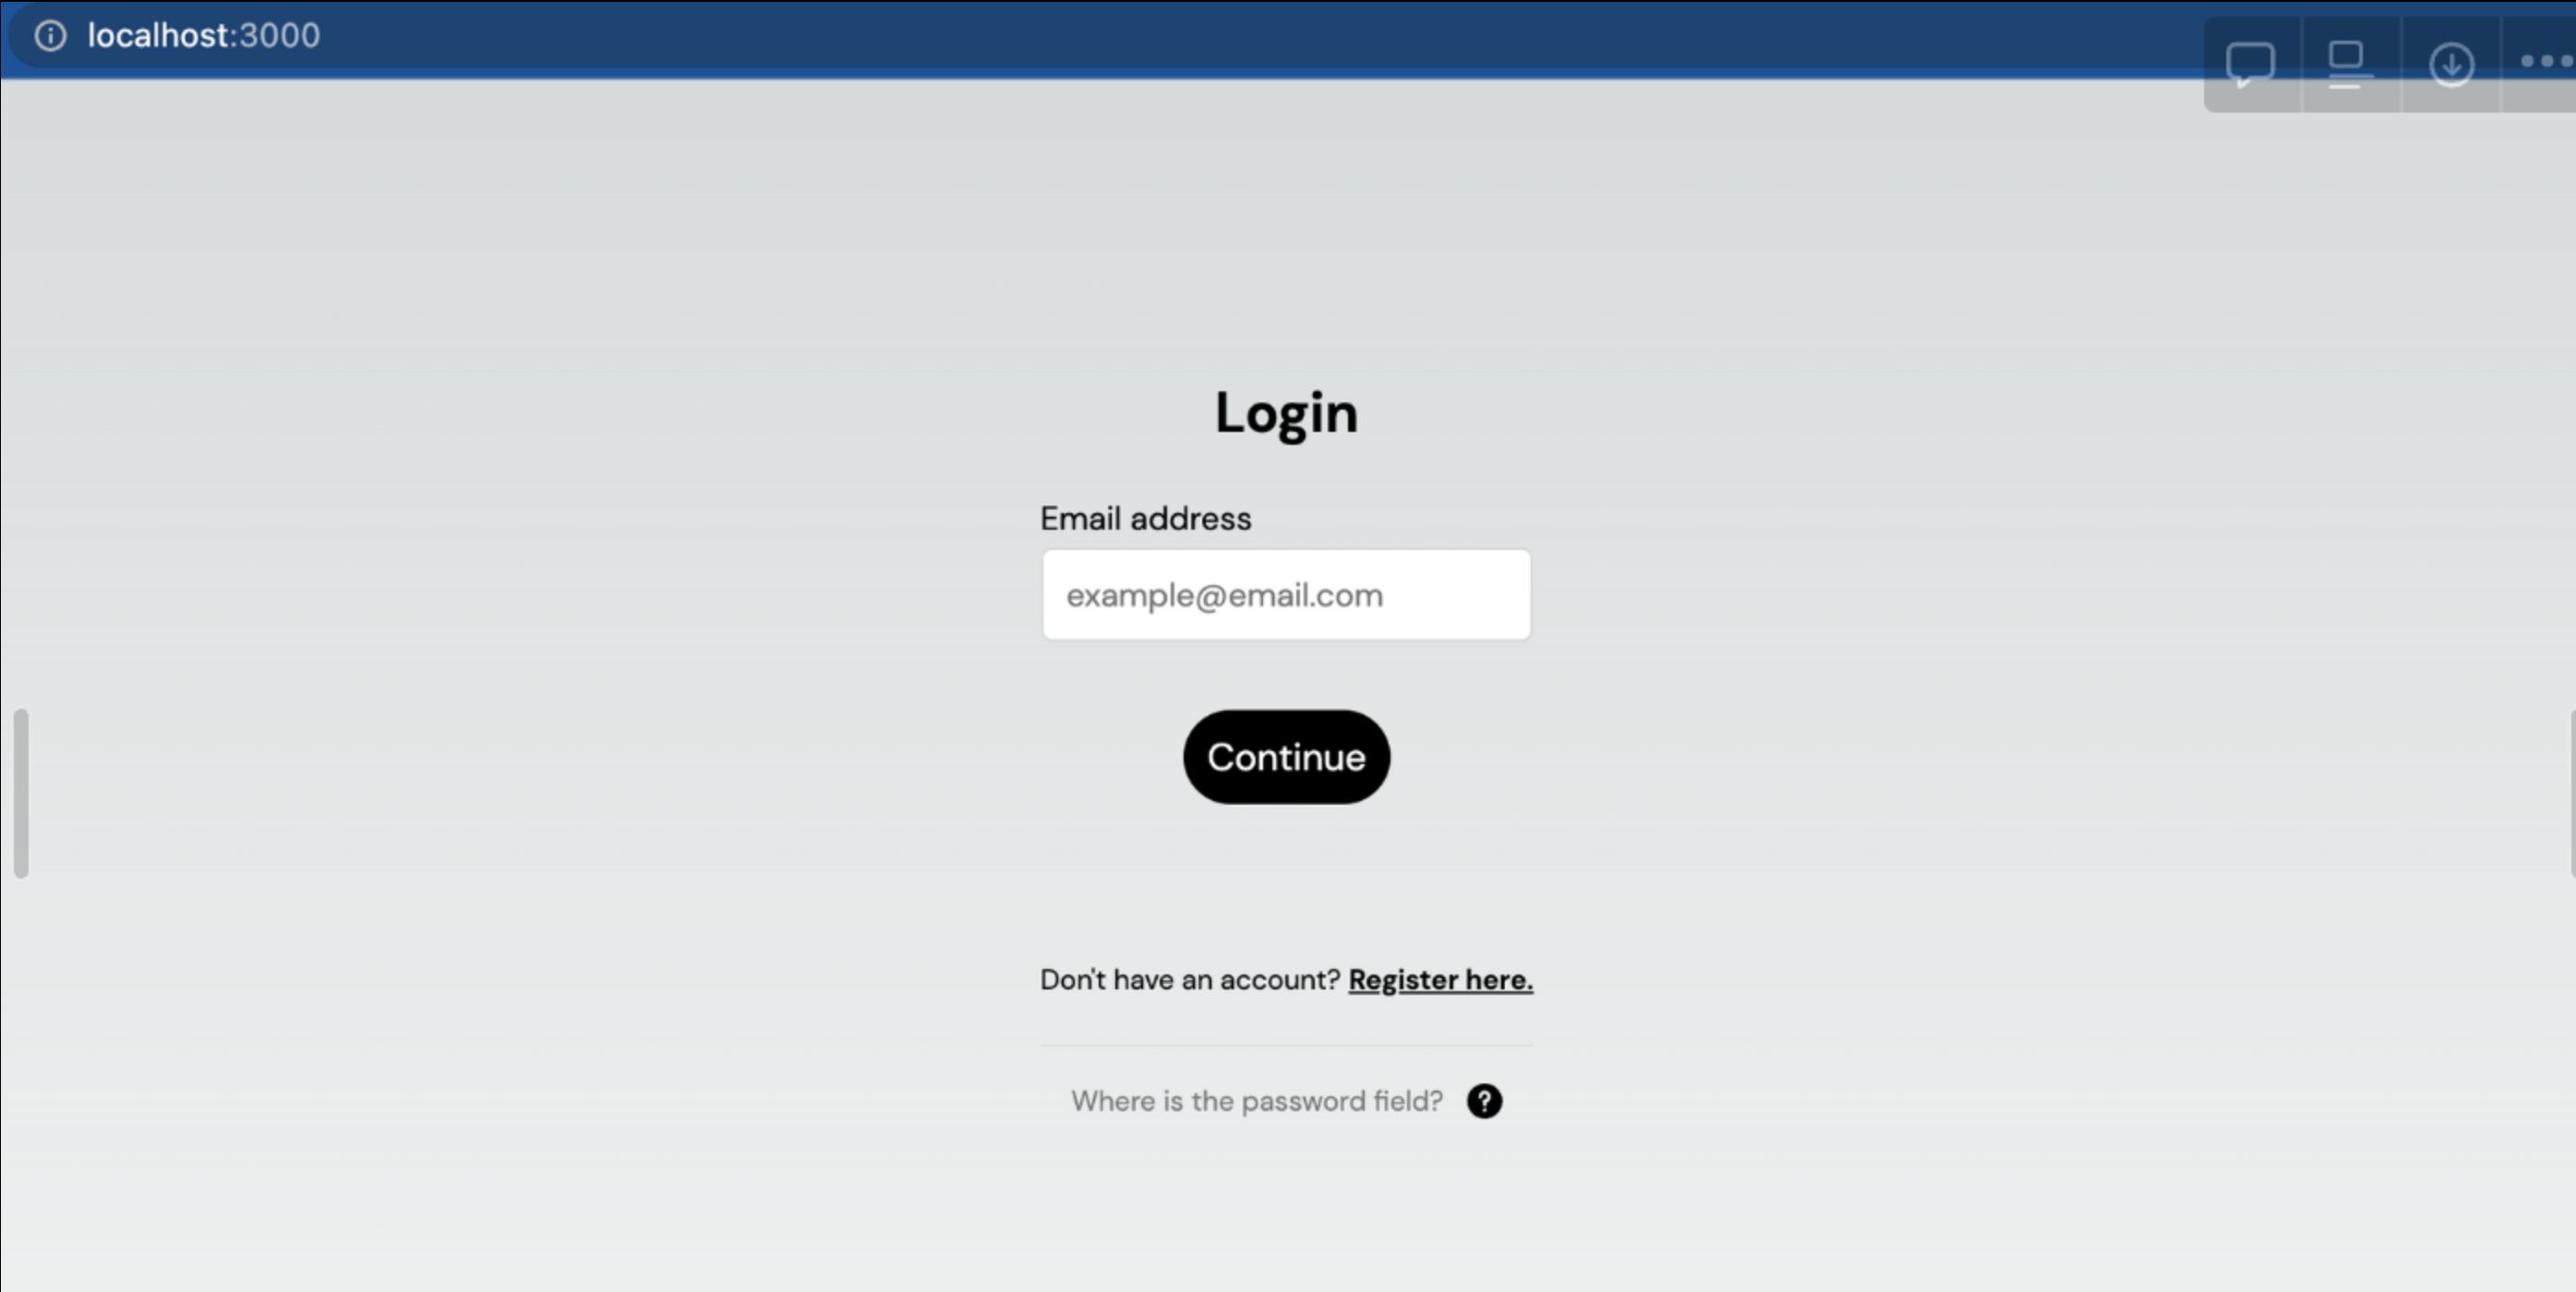
Go ahead and go through the registration process. You will be able to register an account with either a passkey or a magic link. Once you've logged in, you will notice that you just get redirected to /dashboard page.
The login was successful, but we need to build in the functionality to know when a user is authenticated and show them the appropriate view.
Use Passage to verify the JWT
Now we will need to use a Passage SDK to verify the JWT from Passage.
Install the Passage Node.js library.
_10npm install @passageidentity/passage-node
Create a utils folder and a file called utils/passage.js with the following content.
_19// utils/passage.js_19import Passage from '@passageidentity/passage-node'_19_19const passage = new Passage({_19 appID: process.env.NEXT_PUBLIC_PASSAGE_APP_ID,_19 apiKey: process.env.PASSAGE_API_KEY,_19})_19_19export const getAuthenticatedUserFromSession = async (req, res) => {_19 try {_19 const userID = await passage.authenticateRequest(req)_19 if (userID) {_19 return { isAuthorized: true, userID: userID }_19 }_19 } catch (error) {_19 // authentication failed_19 return { isAuthorized: false, userID: '' }_19 }_19}
This will be used in the getServerSideProps() function to check authentication status for a user. Add this function to index.js then update the Home function to use the props.
_30// pages/index.js_30import styles from '@/styles/Home.module.css'_30import PassageLogin from '@/components/login'_30import { getAuthenticatedUserFromSession } from '@/utils/passage'_30import { useEffect } from 'react'_30import Router from 'next/router'_30_30export default function Home({ isAuthorized }) {_30 useEffect(() => {_30 if (isAuthorized) {_30 Router.push('/dashboard')_30 }_30 })_30_30 return (_30 <div className={styles.main}>_30 <PassageLogin />_30 </div>_30 )_30}_30_30export const getServerSideProps = async (context) => {_30 const loginProps = await getAuthenticatedUserFromSession(context.req, context.res)_30 return {_30 props: {_30 isAuthorized: loginProps.isAuthorized ?? false,_30 userID: loginProps.userID ?? '',_30 },_30 }_30}
We will also use this logic on the dashboard page to check if a user is authenticated. If not we should redirect them to the login page. We will also add a quick sign out button using Passage while we are at it.
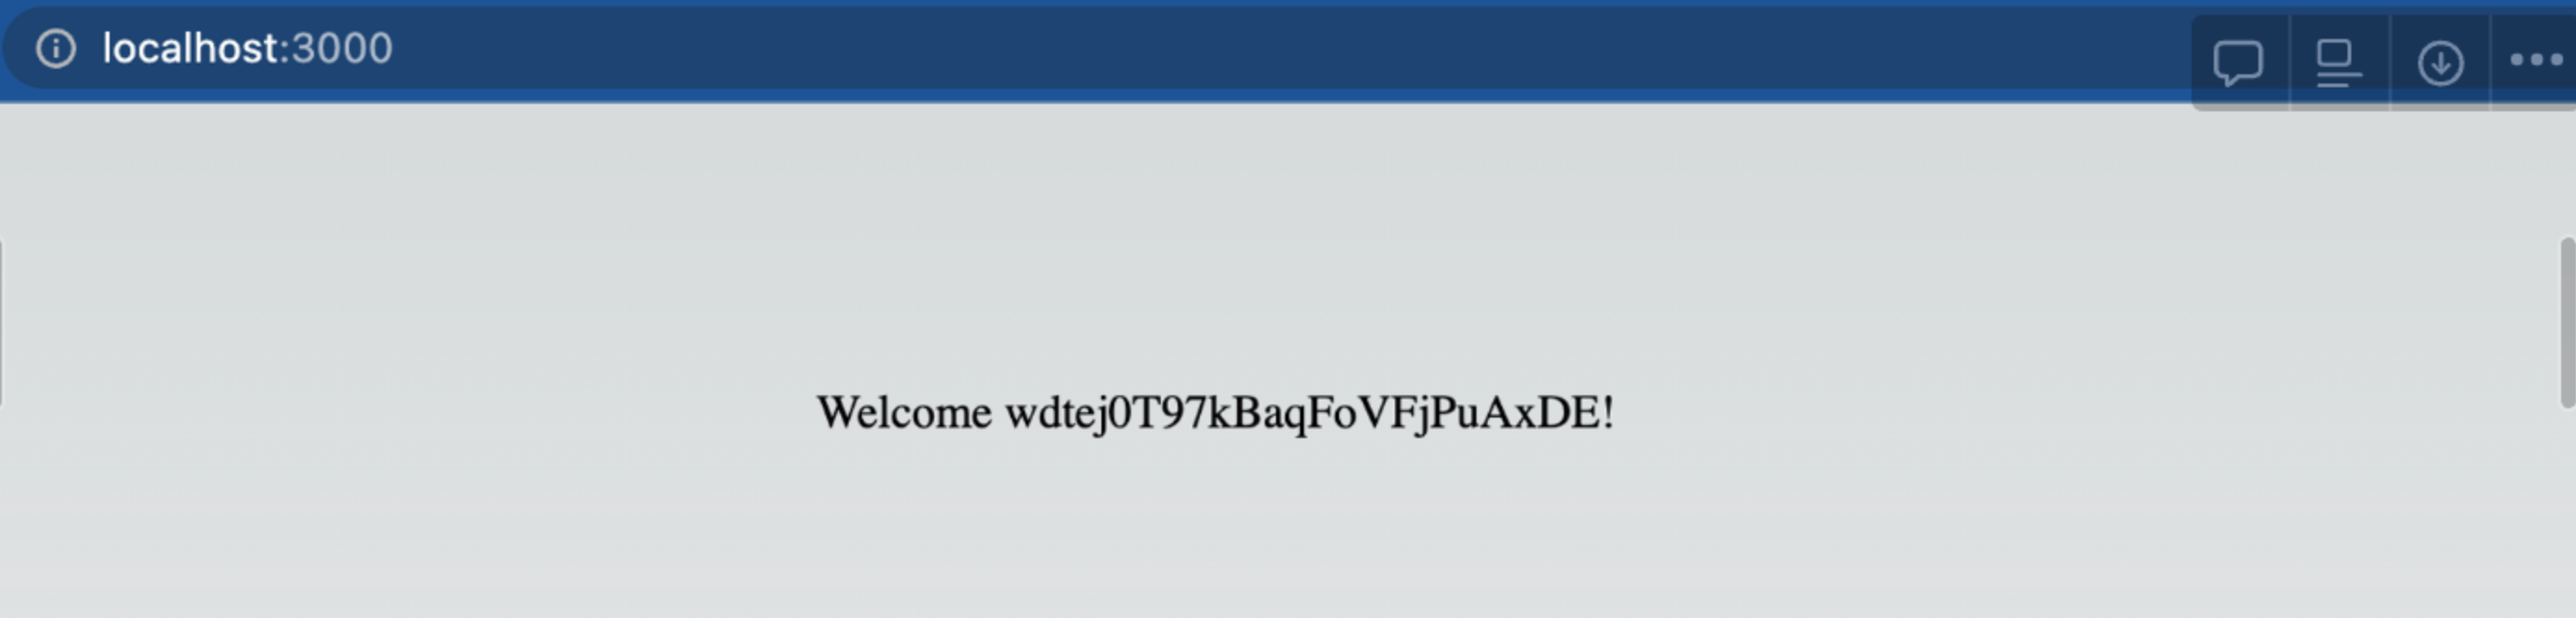
_38// pages/dashboard.js_38import styles from '@/styles/Home.module.css'_38import { useEffect } from 'react'_38import Router from 'next/router'_38import { getAuthenticatedUserFromSession } from '@/utils/passage'_38import { PassageUser } from '@passageidentity/passage-elements/passage-user'_38_38export default function Dashboard({ isAuthorized, userID }) {_38 useEffect(() => {_38 if (!isAuthorized) {_38 Router.push('/')_38 }_38 })_38_38 const signOut = async () => {_38 new PassageUser().signOut()_38 Router.push('/')_38 }_38_38 return (_38 <div className={styles.main}>_38 <h1>Welcome {userID}! </h1>_38 <br></br>_38 <button onClick={signOut}>Sign Out</button>_38 </div>_38 )_38}_38_38export const getServerSideProps = async (context) => {_38 const loginProps = await getAuthenticatedUserFromSession(context.req, context.res)_38_38 return {_38 props: {_38 isAuthorized: loginProps.isAuthorized ?? false,_38 userID: loginProps.userID ?? '',_38 },_38 }_38}
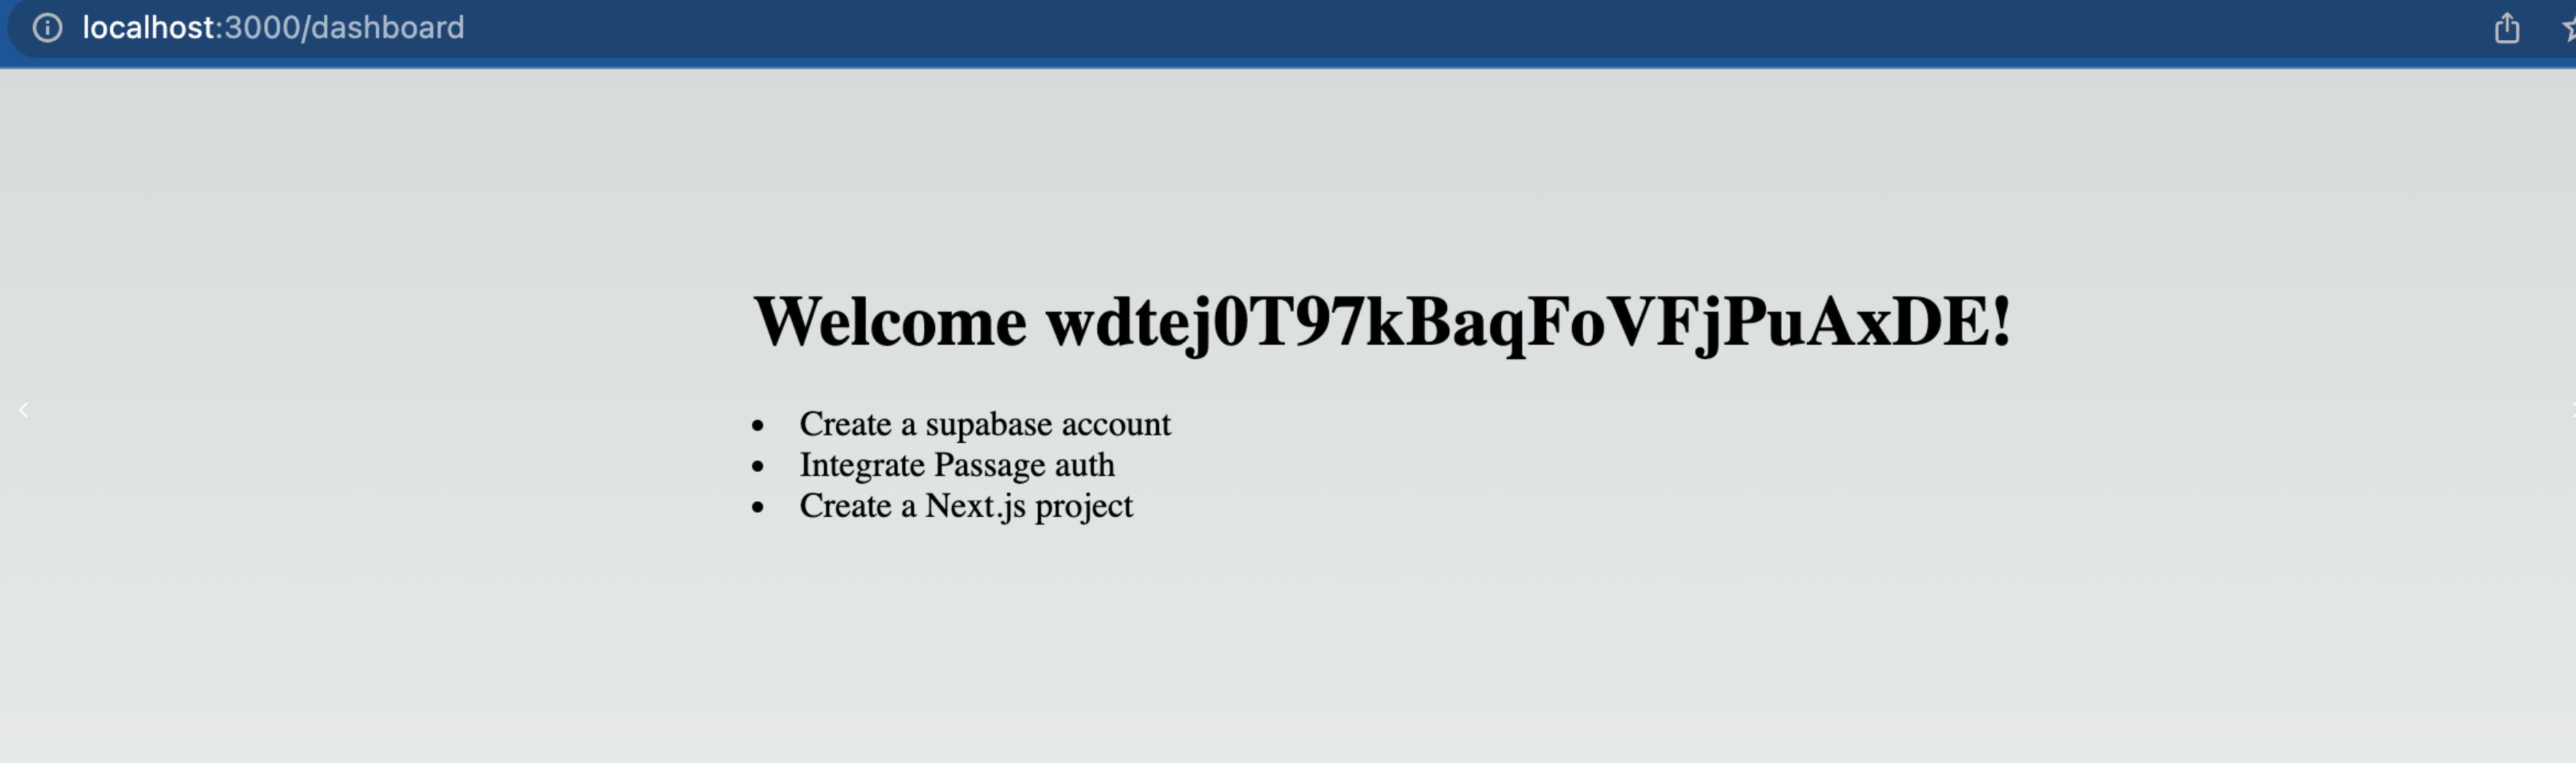
The app can now tell the difference between an authenticated and unauthenticated user. When you log into the application, you will be redirected to the dashboard and see this message.
5. Integrate Supabase into Next.js app
Passage and Supabase do not currently allow for custom signing secrets. Therefore, we will need to extract the necessary claims from the Passage JWT and sign a new JWT to send to Supabase.
Because of the sensitive nature of this functionality, we will handle the authentication and JWT exchange in Next.js’s server-side rendering function getServerSideProps(). Imports used in this function will not be bundled client-side. Additionally, the JWT provided by Passage is stored in a cookie which is automatically passed to getServerSideProps().
Sign Passage token for Supabase
Install the Supabase client SDK and the popular Node package jsonwebtoken, which allows us to easily work with JWTs.
_10npm install @supabase/supabase-js jsonwebtoken
Create a new file called utils/supabase.js and add the following content. This function accepts a Passage user ID and then creates and signs a Supabase JWT for that user. This allows Supabase to verify the token and authenticate the user when making Supabase calls.
_30// utils/supabase.js_30import { createClient } from '@supabase/supabase-js'_30import jwt from 'jsonwebtoken'_30_30const getSupabase = (userId) => {_30 const options = {}_30_30 if (userId) {_30 const payload = {_30 userId,_30 exp: Math.floor(Date.now() / 1000) + 60 * 60,_30 }_30 const token = jwt.sign(payload, process.env.SUPABASE_JWT_SECRET)_30_30 options.global = {_30 headers: {_30 Authorization: `Bearer ${token}`,_30 },_30 }_30 }_30_30 const supabase = createClient(_30 process.env.NEXT_PUBLIC_SUPABASE_URL,_30 process.env.NEXT_PUBLIC_SUPABASE_ANON_KEY,_30 options_30 )_30 return supabase_30}_30_30export { getSupabase }
Enable Row Level Security (RLS) in Supabase
To enable users to view and create their own todo items we need to write a RLS policy. Our policy will check the currently logged in user is to determine whether or not they should have access. Let's create a PostgreSQL function to extract the current user from our new JWT.
Navigate back to the Supabase dashboard, select SQL Editor from the sidebar menu, and click New query. This will create a new query called new sql snippet, which will allow us to run any SQL against our Postgres database.
Write the following and click Run.
_10create or replace function auth.user_id() returns text as $$_10 select nullif(current_setting('request.jwt.claims', true)::json->>'userId', '')::text;_10$$ language sql stable;
You should see the output Success, no rows returned. This created a function called auth.user_id() which will return the userId field of our JWT payload.
To learn more about PostgresSQL functions, check out this deep dive video.
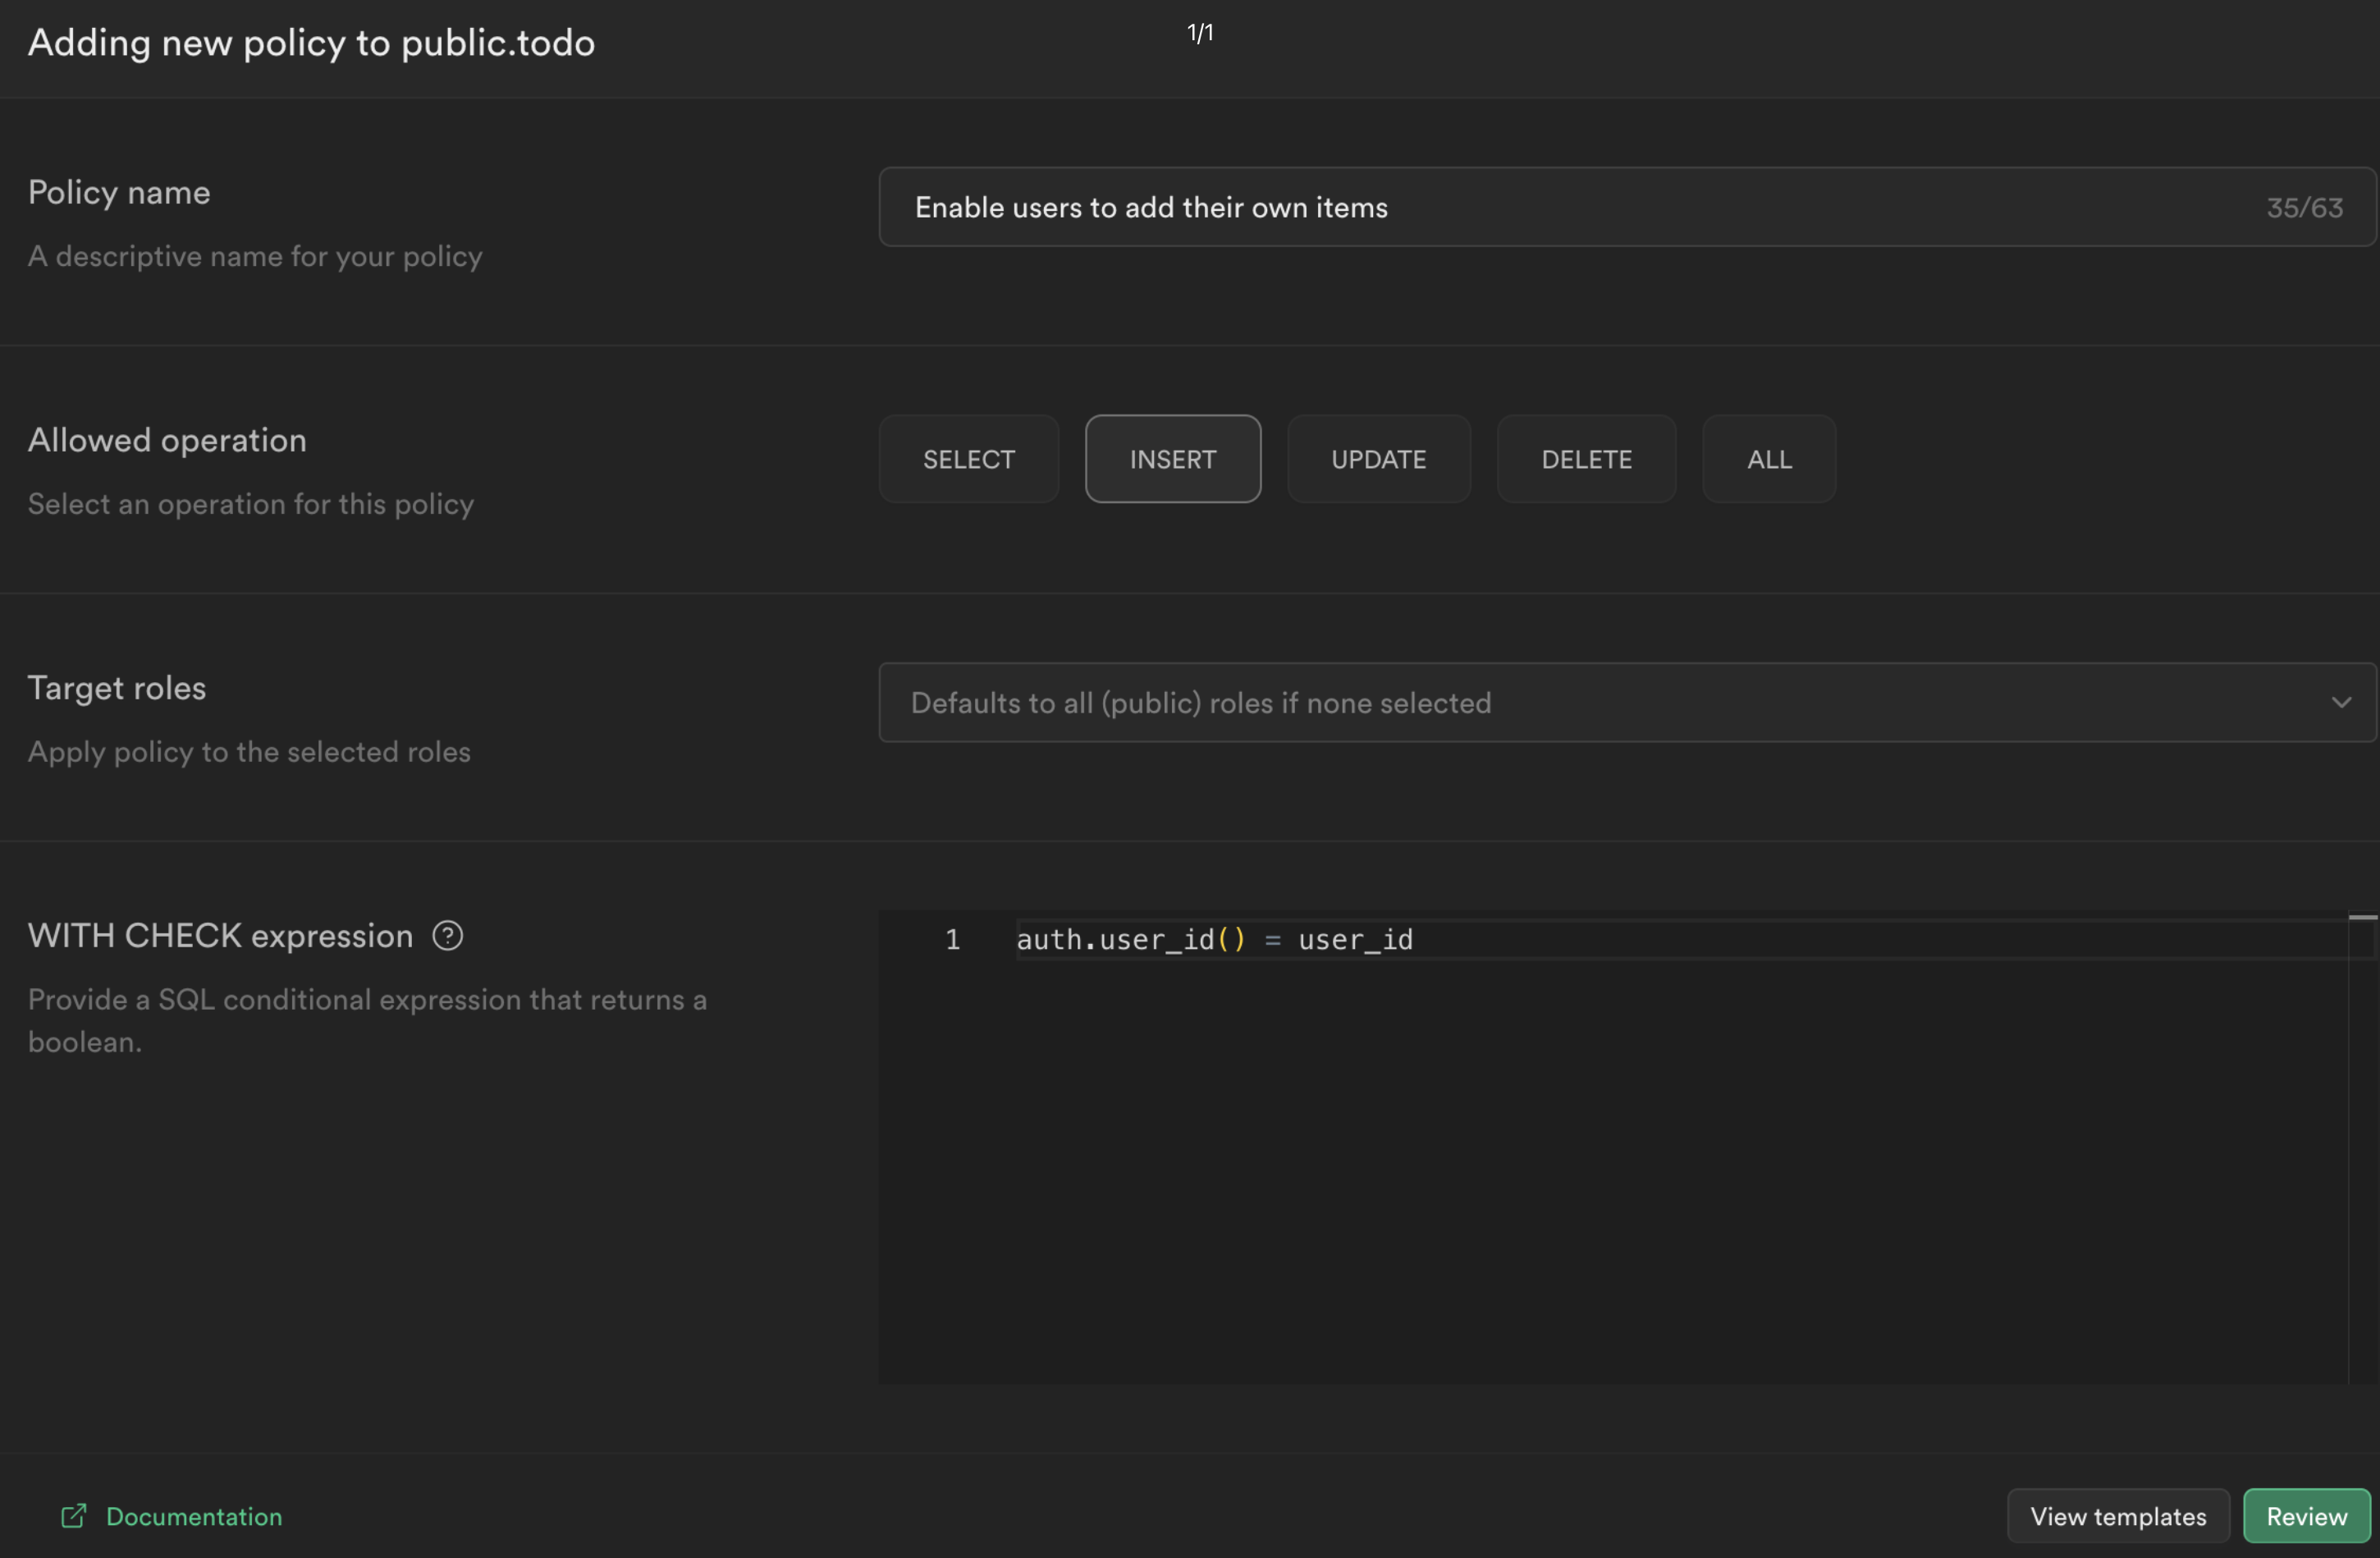
Now we can create a policy that checks whether the current user is the owner of a todo item. From the Authentication sidebar menu in Supabase, click Policies then create a new policy.
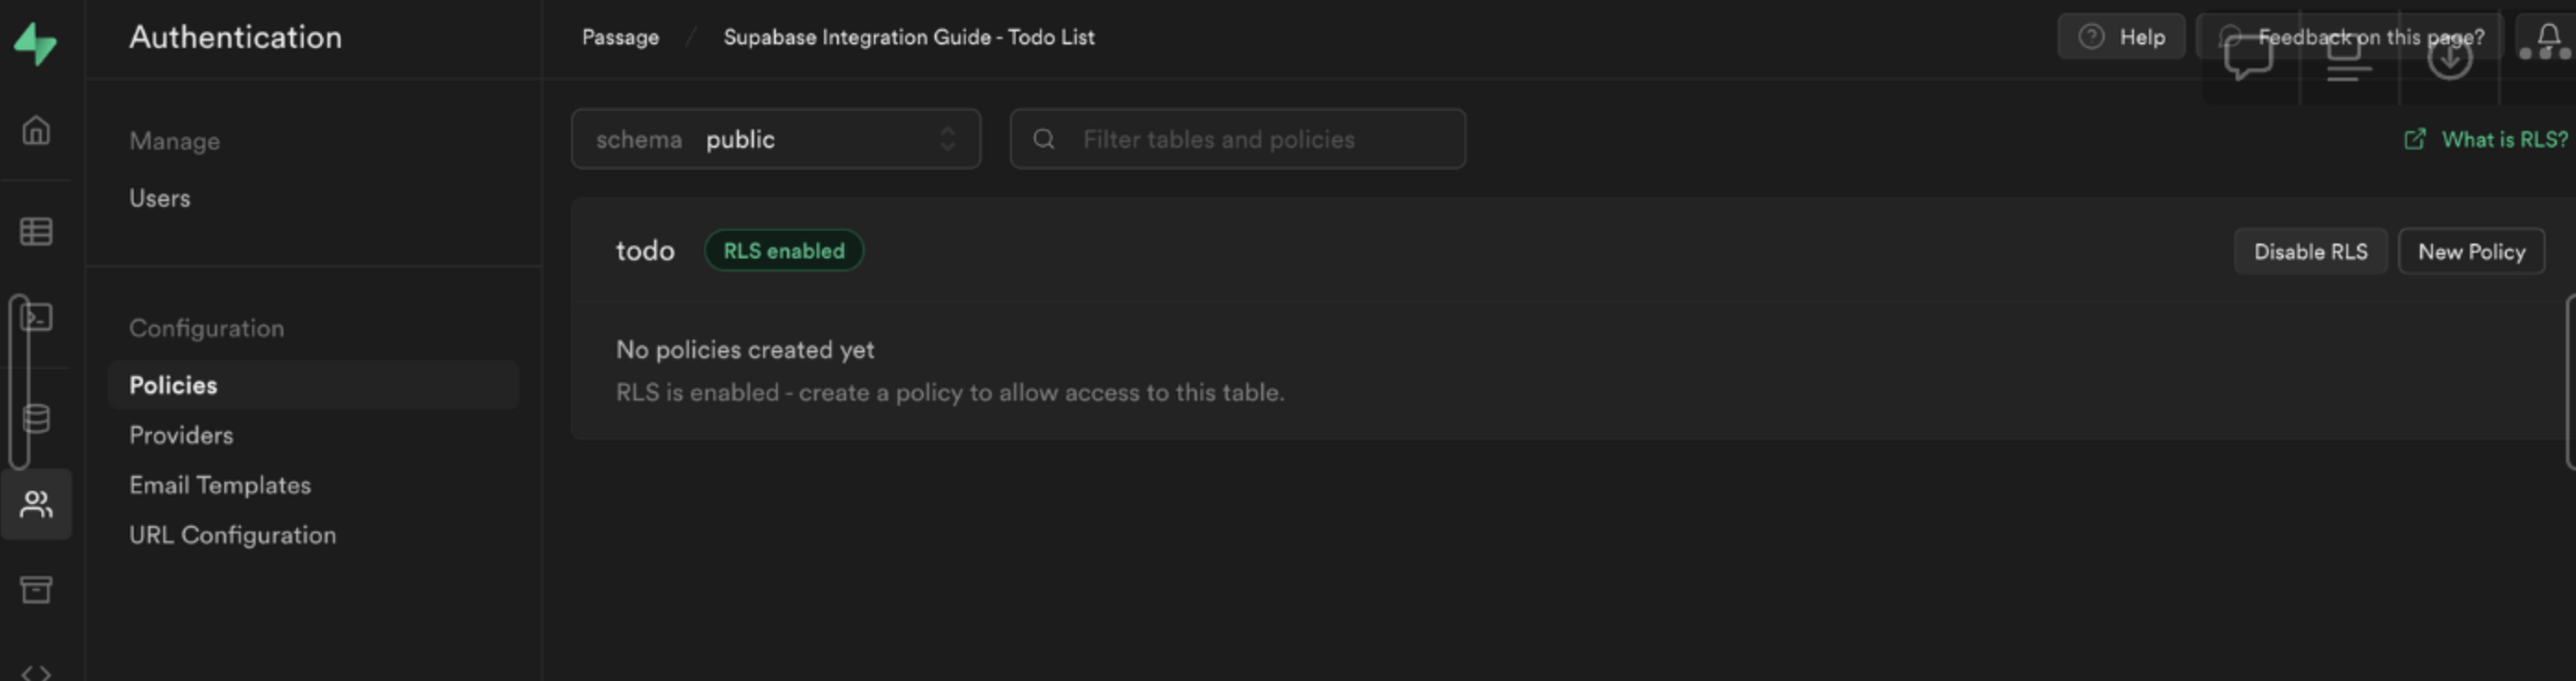
Choose For full customization create a policy from scratch and add the following.
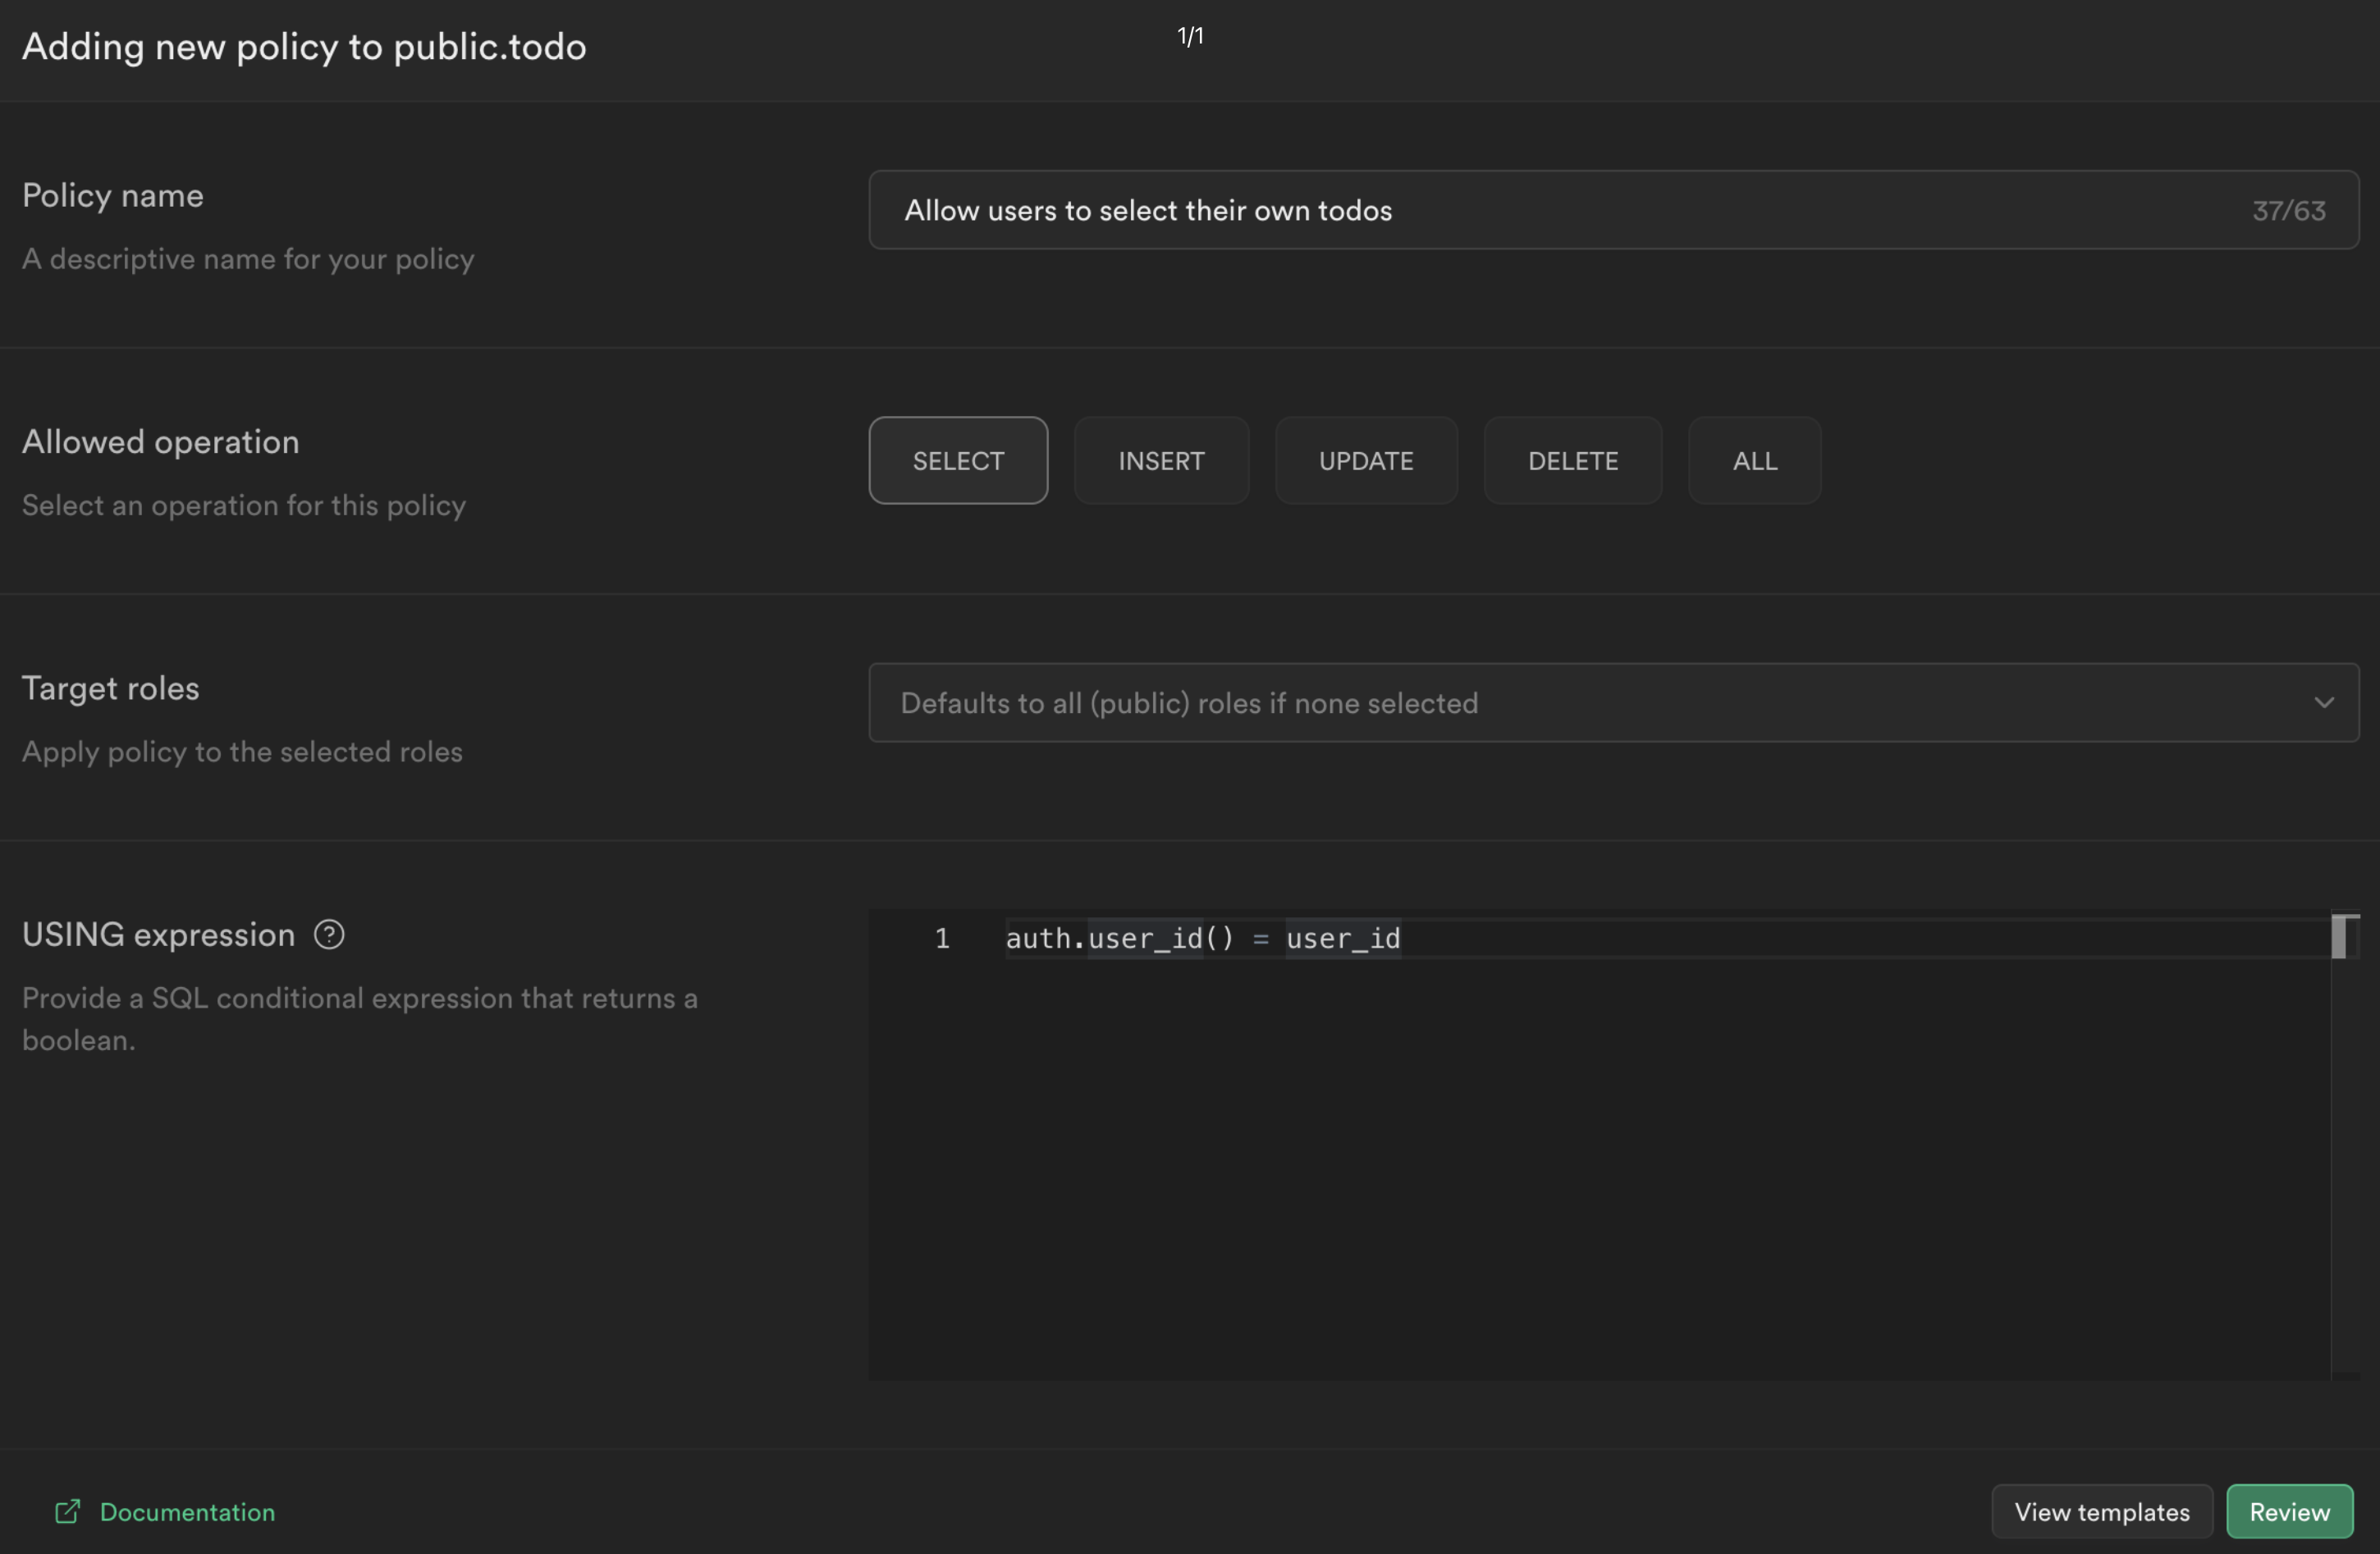
This policy is calling the function we just created to get the currently logged in user's ID auth.user_id() and checking whether this matches the user_id column for the current todo. If it does, then it will allow the user to select it, otherwise it will deny access.
Click Review and then Save policy.
Note: To learn more about RLS and policies, check out this deep dive video.
Fetch data from Supabase
Now we can fetch data from Supabase specific to that user. We will update pages/dashboard.js to do the following:
- authenticate the user using Passage
- create and sign a JWT for the user with the Supabase secret
- query Supabase to fetch a user’s todo list items
_56// pages/dashboard.js_56import styles from '@/styles/Home.module.css'_56import { useEffect } from 'react'_56import Router from 'next/router'_56import { getAuthenticatedUserFromSession } from '@/utils/passage'_56import { getSupabase } from '../utils/supabase'_56_56export default function Dashboard({ isAuthorized, userID, todos }) {_56 useEffect(() => {_56 if (!isAuthorized) {_56 Router.push('/')_56 }_56 })_56_56 return (_56 <div className={styles.main}>_56 <div className={styles.container}>_56 <h1>Welcome {userID}! </h1>_56 <br></br>_56 <button onClick={signOut}>Sign Out</button>_56 <br></br>_56 <div className={styles.list}>_56 {todos?.length > 0 ? (_56 todos.map((todo) => <li key={todo.id}>{todo.title}</li>)_56 ) : (_56 <p>You have completed all todos!</p>_56 )}_56 </div>_56 </div>_56 </div>_56 )_56}_56_56export const getServerSideProps = async (context) => {_56 const loginProps = await getAuthenticatedUserFromSession(context.req, context.res)_56_56 if (loginProps.isAuthorized) {_56 const supabase = getSupabase(loginProps.userID)_56 const { data } = await supabase.from('todo').select()_56_56 return {_56 props: {_56 isAuthorized: loginProps.isAuthorized ?? false,_56 userID: loginProps.userID ?? '',_56 todos: data ?? [],_56 },_56 }_56 } else {_56 return {_56 props: {_56 isAuthorized: loginProps.isAuthorized ?? false,_56 userID: loginProps.userID ?? '',_56 },_56 }_56 }_56}
When we reload our application, we are still getting the empty state for todos.
This is because we enabled Row Level Security, which blocks all requests by default and lets you granularly control access to the data in your database.
Update the UserID data
The last thing we need to do is update the user_id columns for our existing todos. Head back to the Supabase dashboard, and select Table editor from the sidebar. You will see that the user_id field is NULL for all of our todo items.
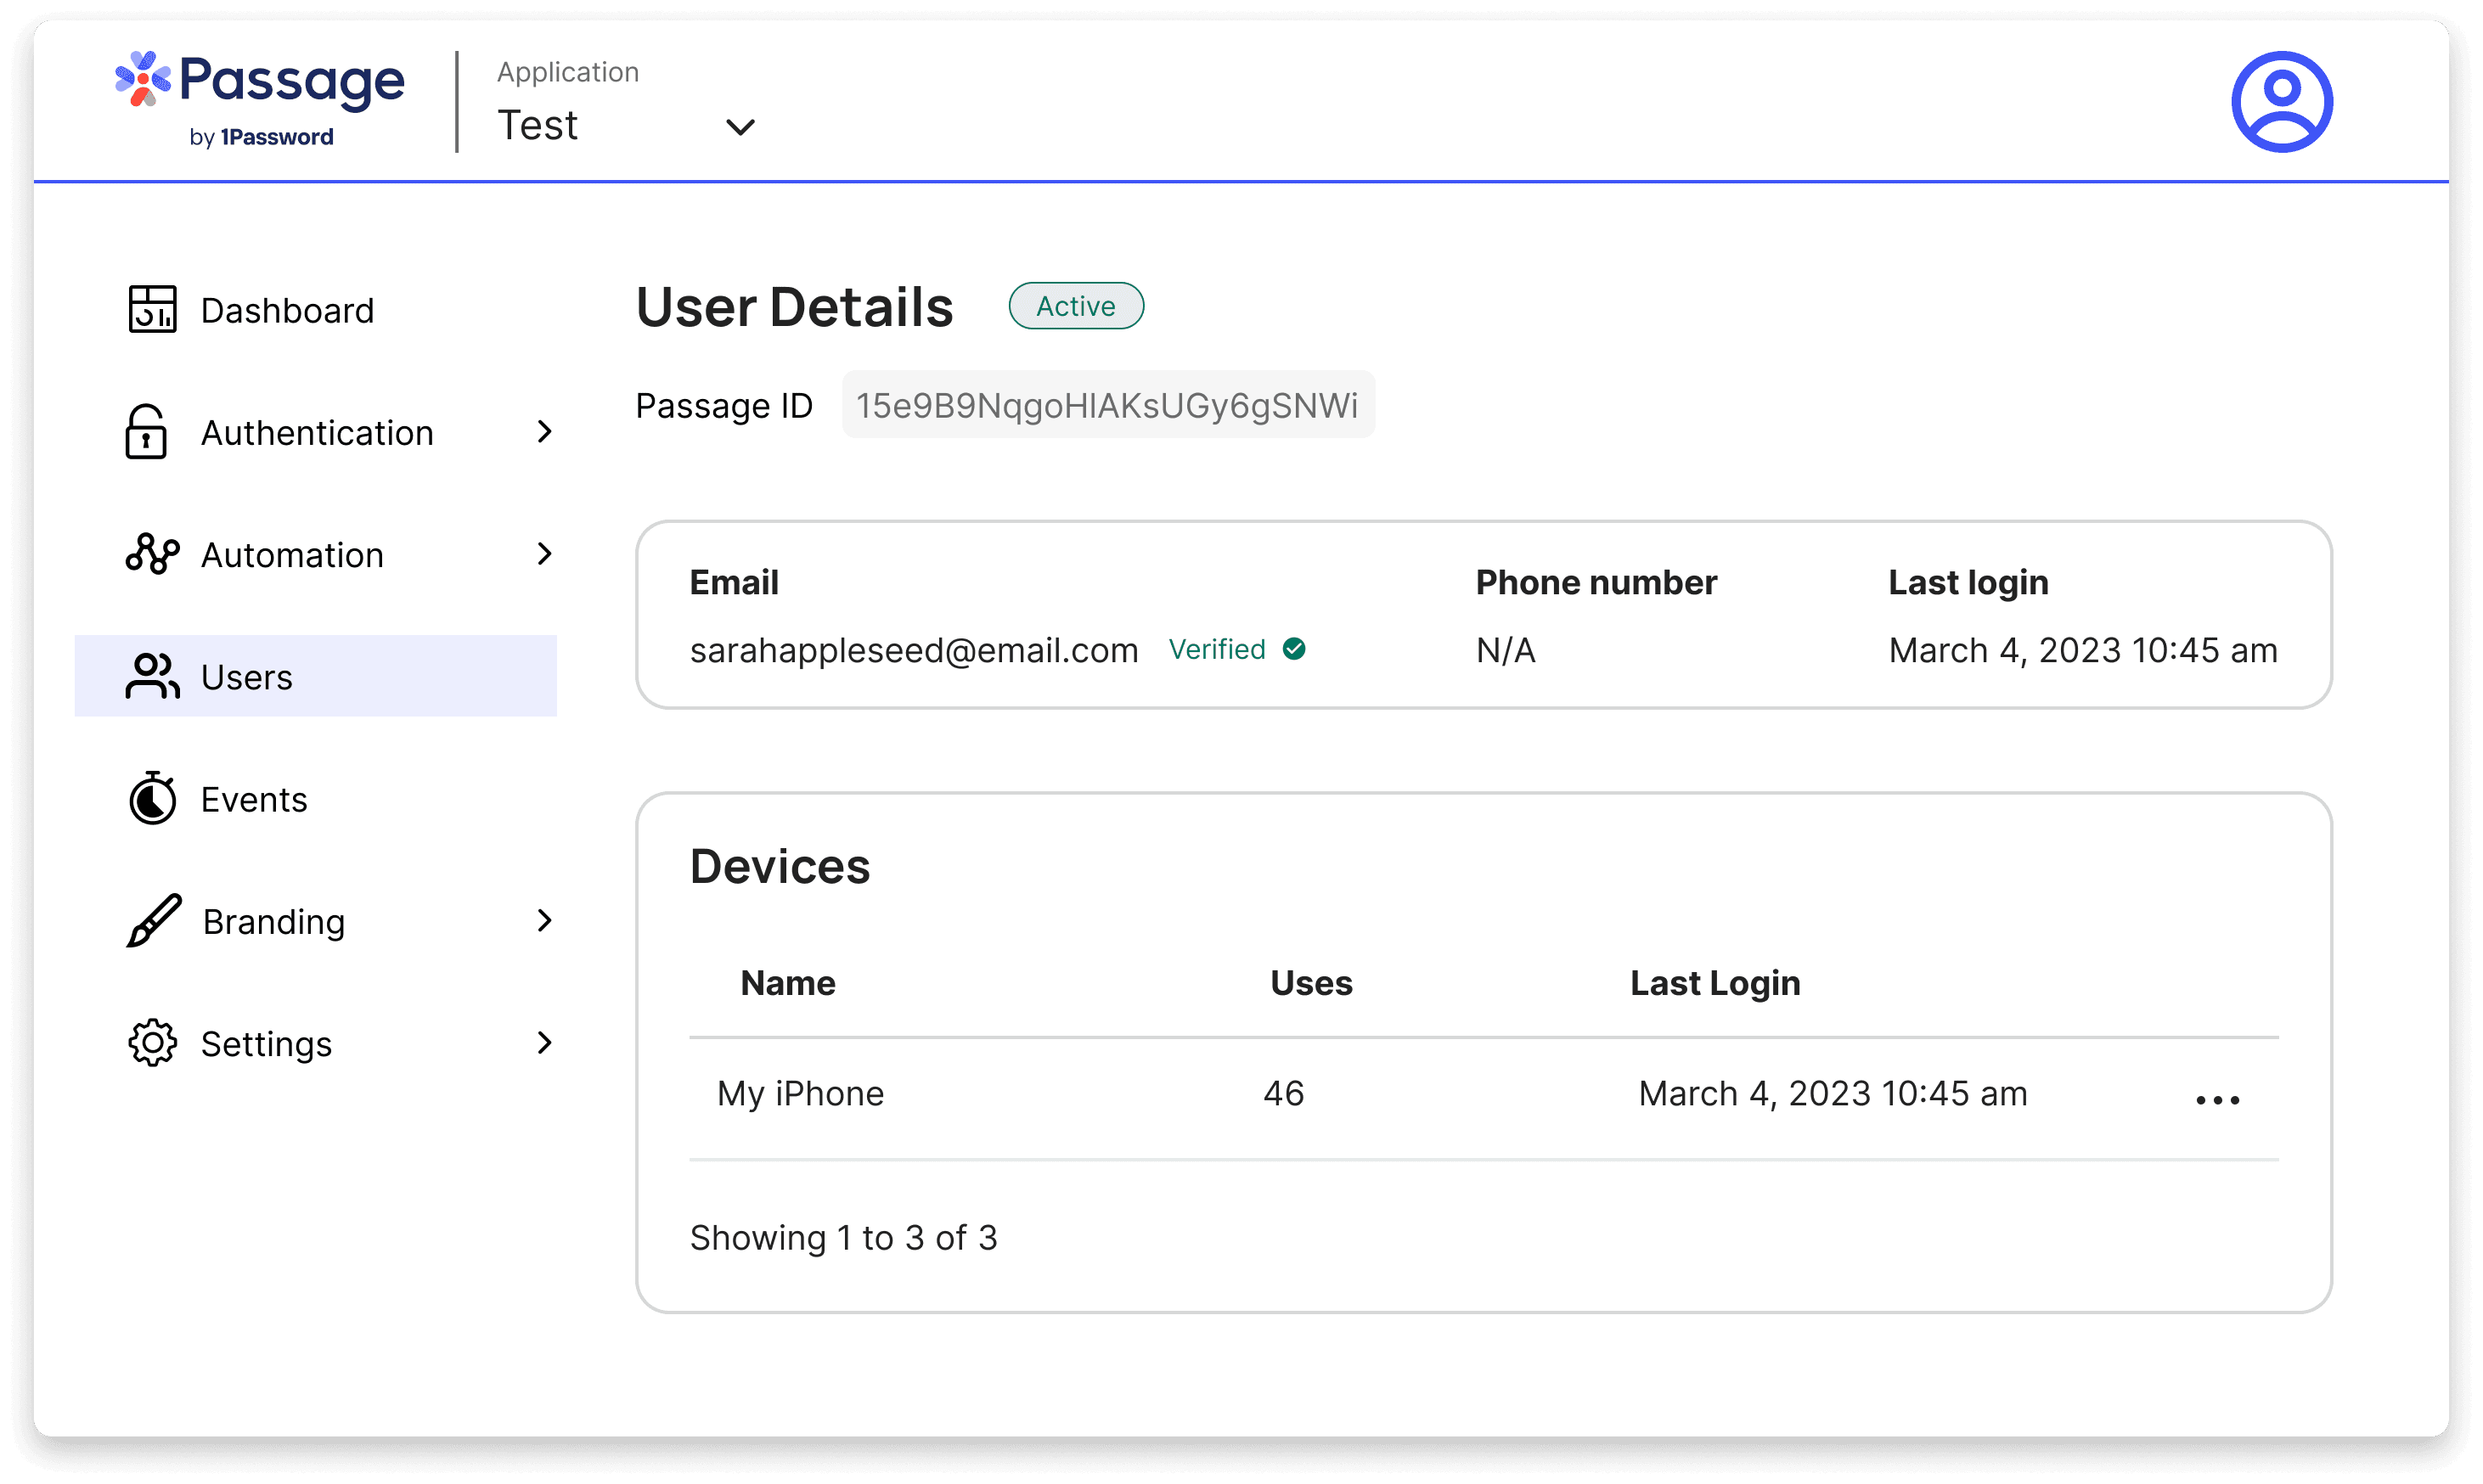
To get the user ID for our Passage user, go back to the Passage Console and check the Users tab.
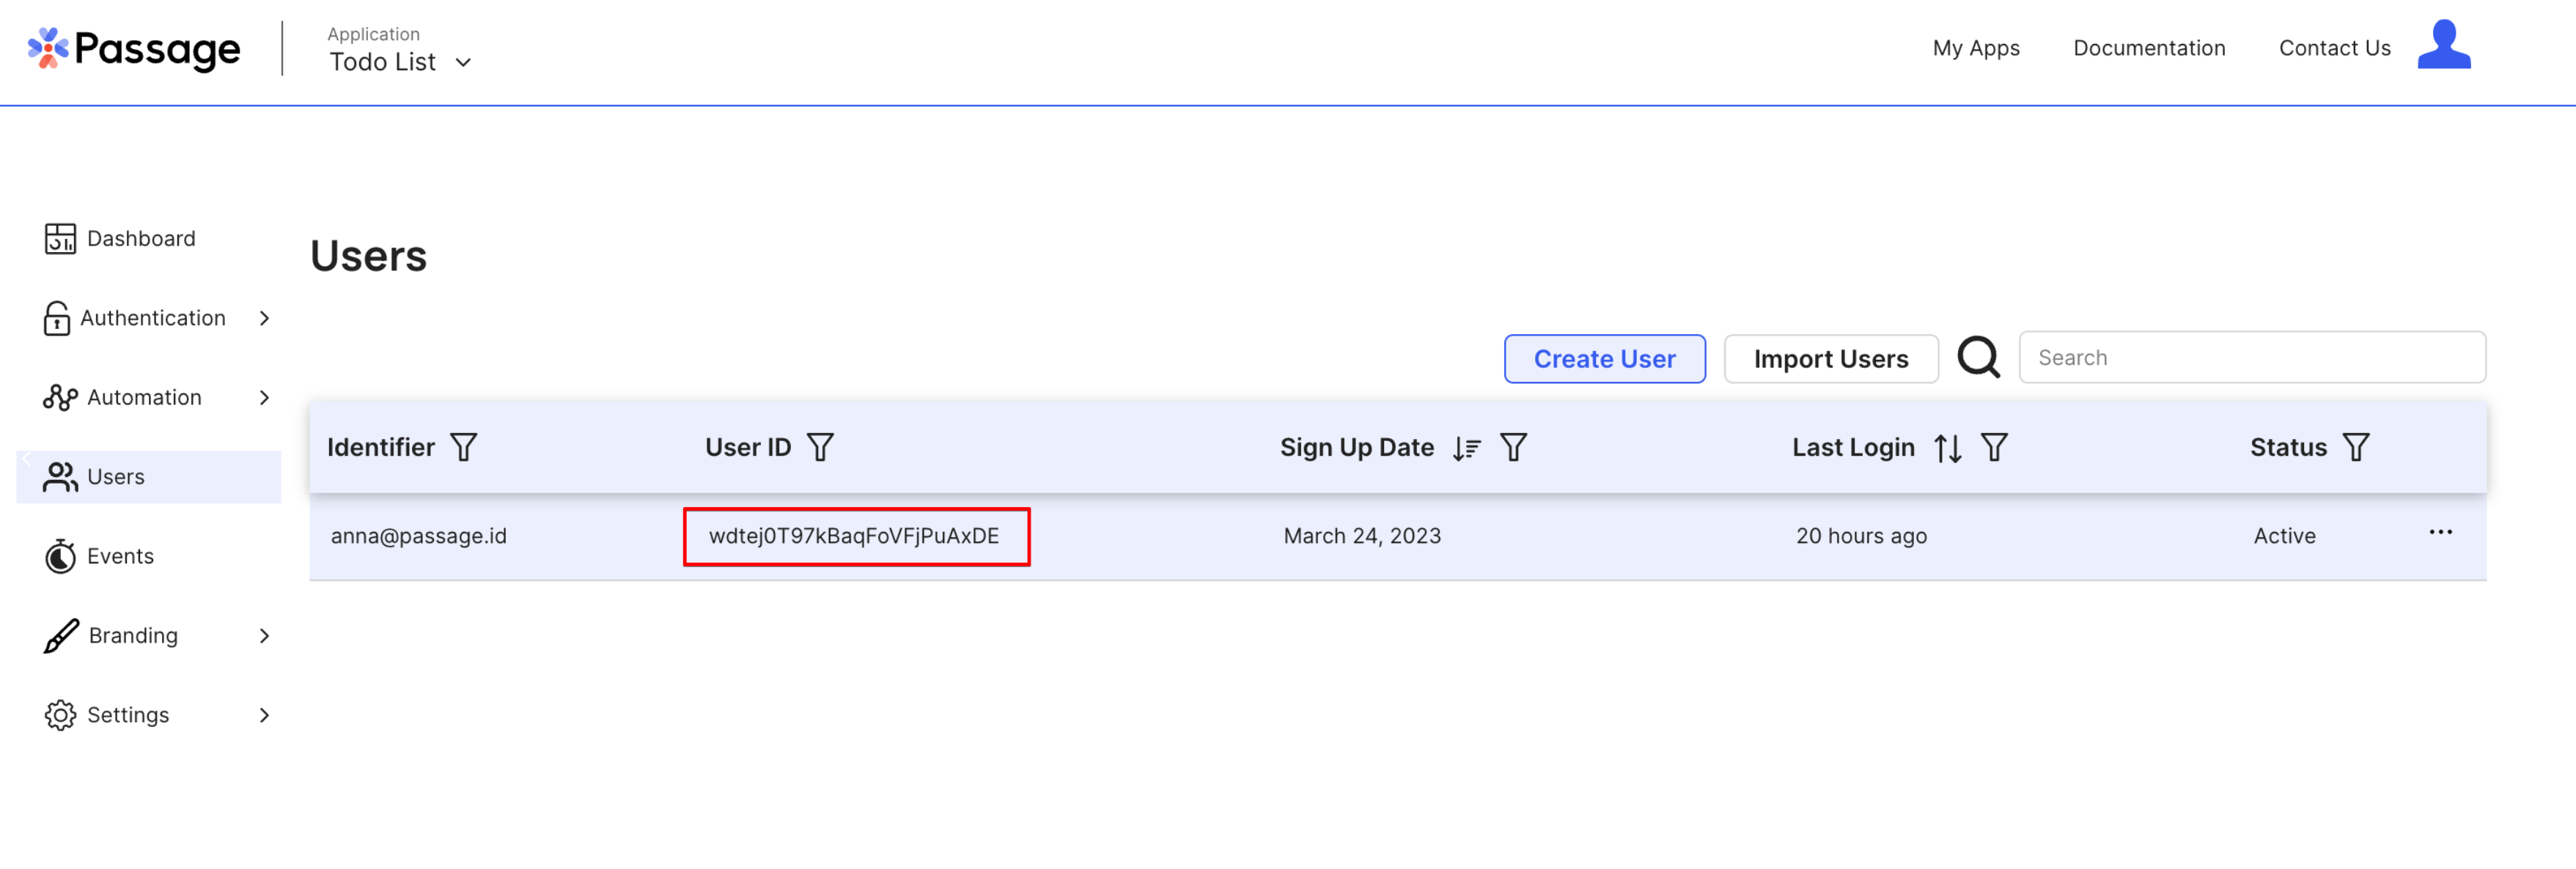
Copy this user ID and update two of the three rows in the Supabase database to match this user ID. When you are done, the database table will look like this.

Now when we refresh the application, we will see the todo items for our user!
Bonus: Add todo items
To build out a bit more functionality in our application, we can now let users add items to their to do list. Create a file pages/api/addTodo.js with the following content.
_10// pages/api/addTodo.js_10import { getSupabase } from '../../utils/supabase'_10_10export default async function handler(req, res) {_10 const { userID, todo } = req.body_10 const supabase = getSupabase(userID)_10 const { data, error } = await supabase.from('todo').insert({ title: todo }).select().single()_10 if (error) return res.status(400).json(error)_10 res.status(200).json(data)_10}
Then update pages/dashboard.js to include a form for submitting new to do items. The complete file will look like this.
_83//pages/dashboard.js_83import styles from '@/styles/Home.module.css'_83import { useEffect, useState } from 'react'_83import Router from 'next/router'_83import { getAuthenticatedUserFromSession } from '@/utils/passage'_83import { getSupabase } from '../utils/supabase'_83import { PassageUser } from '@passageidentity/passage-elements/passage-user'_83_83export default function Dashboard({ isAuthorized, userID, initialTodos }) {_83 const [todos, setTodos] = useState(initialTodos)_83 useEffect(() => {_83 if (!isAuthorized) {_83 Router.push('/')_83 }_83 })_83_83 const handleSubmit = async (e) => {_83 e.preventDefault()_83 const data = new FormData(e.target)_83 const todo = data.get('todo')_83 const res = await fetch('/api/addTodo', {_83 method: 'POST',_83 headers: {_83 'Content-Type': 'application/json',_83 },_83 body: JSON.stringify({ todo, userID }),_83 }).then((res) => res.json())_83 setTodos([...todos, res])_83 }_83_83 const signOut = async () => {_83 new PassageUser().signOut()_83 Router.push('/')_83 }_83_83 return (_83 <div className={styles.main}>_83 <div className={styles.container}>_83 <h1>Welcome {userID}! </h1>_83 <br></br>_83 <button onClick={signOut}>Sign Out</button>_83 <br></br>_83 <div className={styles.list}>_83 {todos?.length > 0 ? (_83 todos.map((todo) => <li key={todo.id}>{todo.title}</li>)_83 ) : (_83 <p>You have completed all todos!</p>_83 )}_83 </div>_83 <form onSubmit={handleSubmit}>_83 <label>_83 Todo: <input type="text" name="todo" />_83 </label>_83 <button>Submit</button>_83 </form>_83 </div>_83 </div>_83 )_83}_83_83export const getServerSideProps = async (context) => {_83 const loginProps = await getAuthenticatedUserFromSession(context.req, context.res)_83_83 if (loginProps.isAuthorized) {_83 const supabase = getSupabase(loginProps.userID)_83 const { data } = await supabase.from('todo').select().is('is_complete', false)_83_83 return {_83 props: {_83 isAuthorized: loginProps.isAuthorized ?? false,_83 userID: loginProps.userID ?? '',_83 initialTodos: data ?? [],_83 },_83 }_83 } else {_83 return {_83 props: {_83 isAuthorized: loginProps.isAuthorized ?? false,_83 userID: loginProps.userID ?? '',_83 },_83 }_83 }_83}
Finally, we need to add a new RLS policy in Supabase to allow users to insert their own todo items.
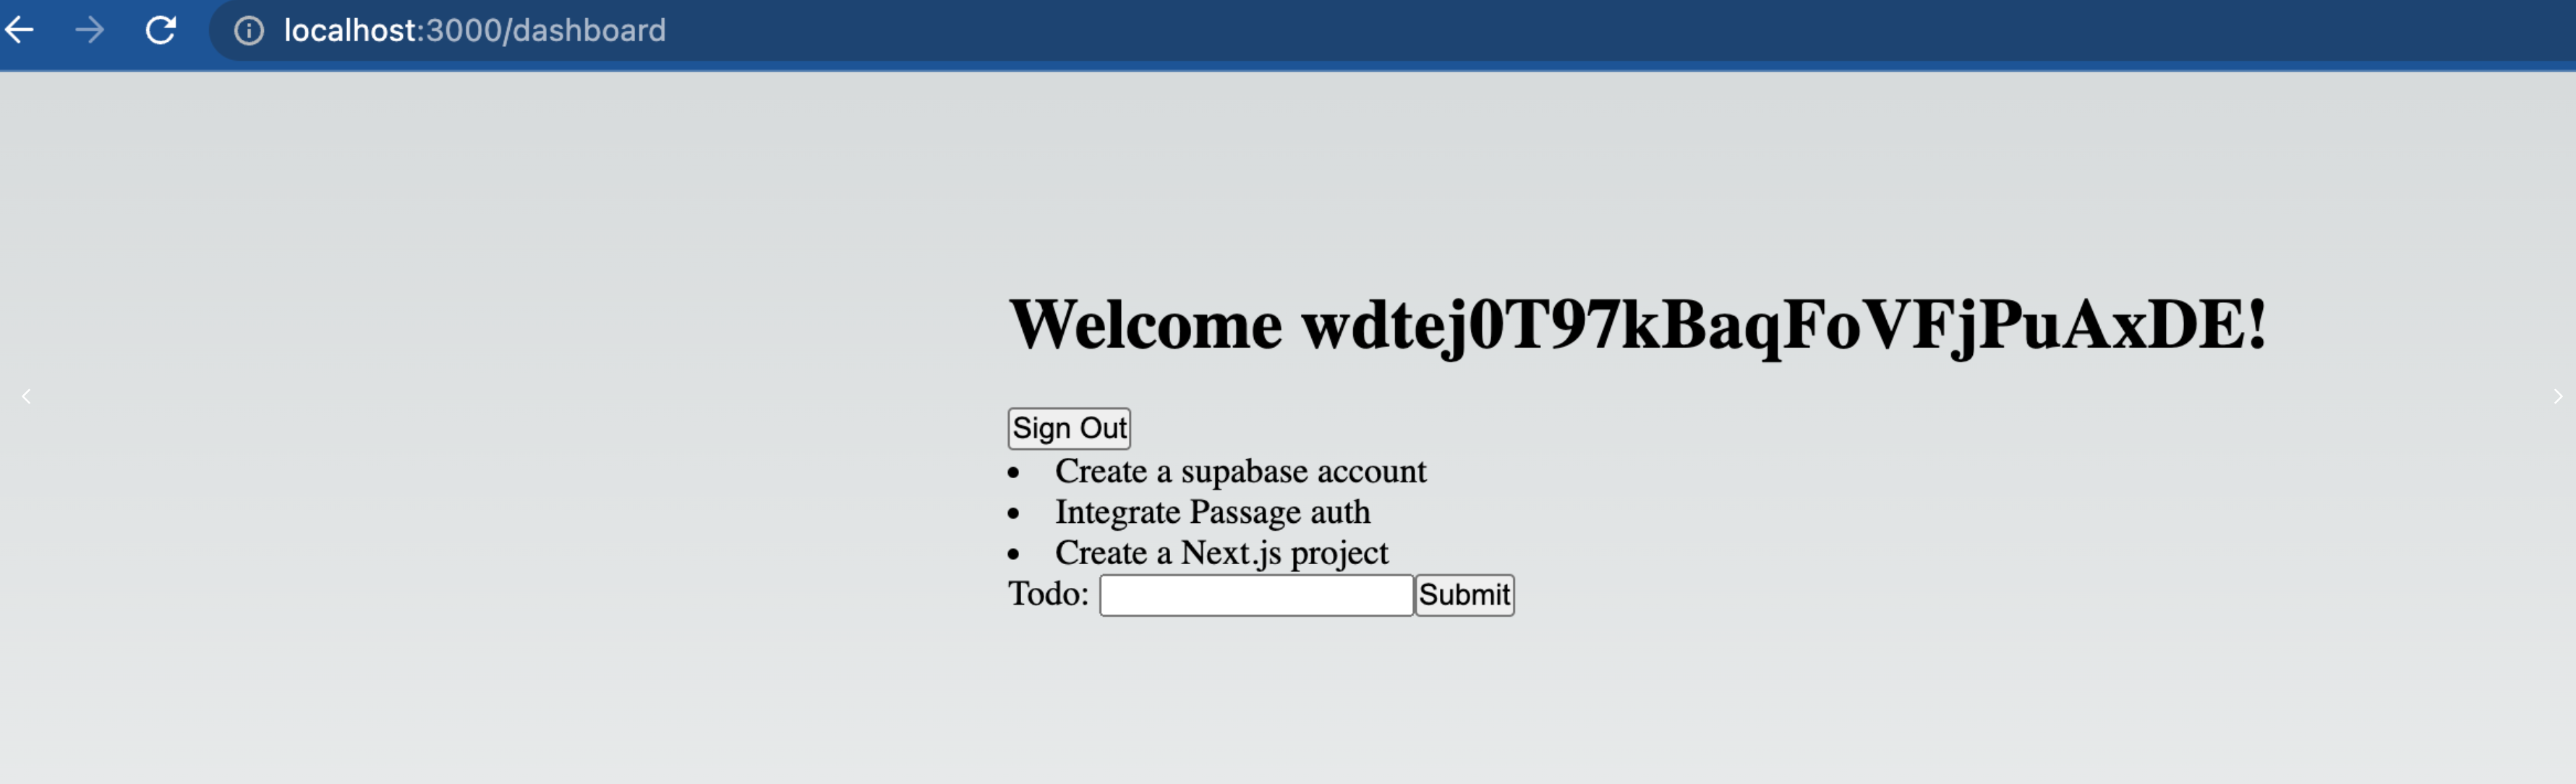
That's it! Now the website has form for submitting new items for the to do list.
Resources
- Passage website
- Complete developer documentation
- Passage Github, including SDKs and example apps for Next.js
- Developer community on Discord
Details
Third-party integrations and docs are managed by Supabase partners.