
Stytch
Overview
Stytch provides an all-in-one platform for passwordless auth. Stytch makes it easy for you to embed passwordless solutions into your websites and apps for better security, better conversion rates, and a better end user experience. Their easy-to-use SDKs and direct API access allows for maximum control and customization. In this example we will use Email magic links to create and log in our users, and Session management. There is an additional, optional step to enable Google One Tap which is an especially high-converting Google OAuth sign-up and login flow.
Documentation
In this guide we will build a simple expense tracker web application using Stytch, Supabase, and Next.js.
Stytch provides an all-in-one platform for passwordless auth. Stytch makes it easy for you to embed passwordless solutions into your websites and apps for better security, better conversion rates, and a better end user experience. Their easy-to-use SDKs and direct API access allows for maximum control and customization. In this example we will use Email magic links to create and log in our users, and Session management. There is an additional, optional step to enable Google One Tap which is an especially high-converting Google OAuth sign-up and login flow.
We will leverage Supabase to store and authorize access to user data. Supabase makes it simple to set up Row Level Security (RLS) policies which ensure users can only read and write data that they are authorized to do so. If you do not already have a Supabase account, you will need to create one.
This guide will use Next.js which is a web application framework built on top of React. Stytch provides a Node.js library and a React library which makes building Next.js apps super easy.
Note: You can find a completed version of this project on Github.
Step 0: Create a Stytch Account
If you already have a Stytch account you may skip this step.
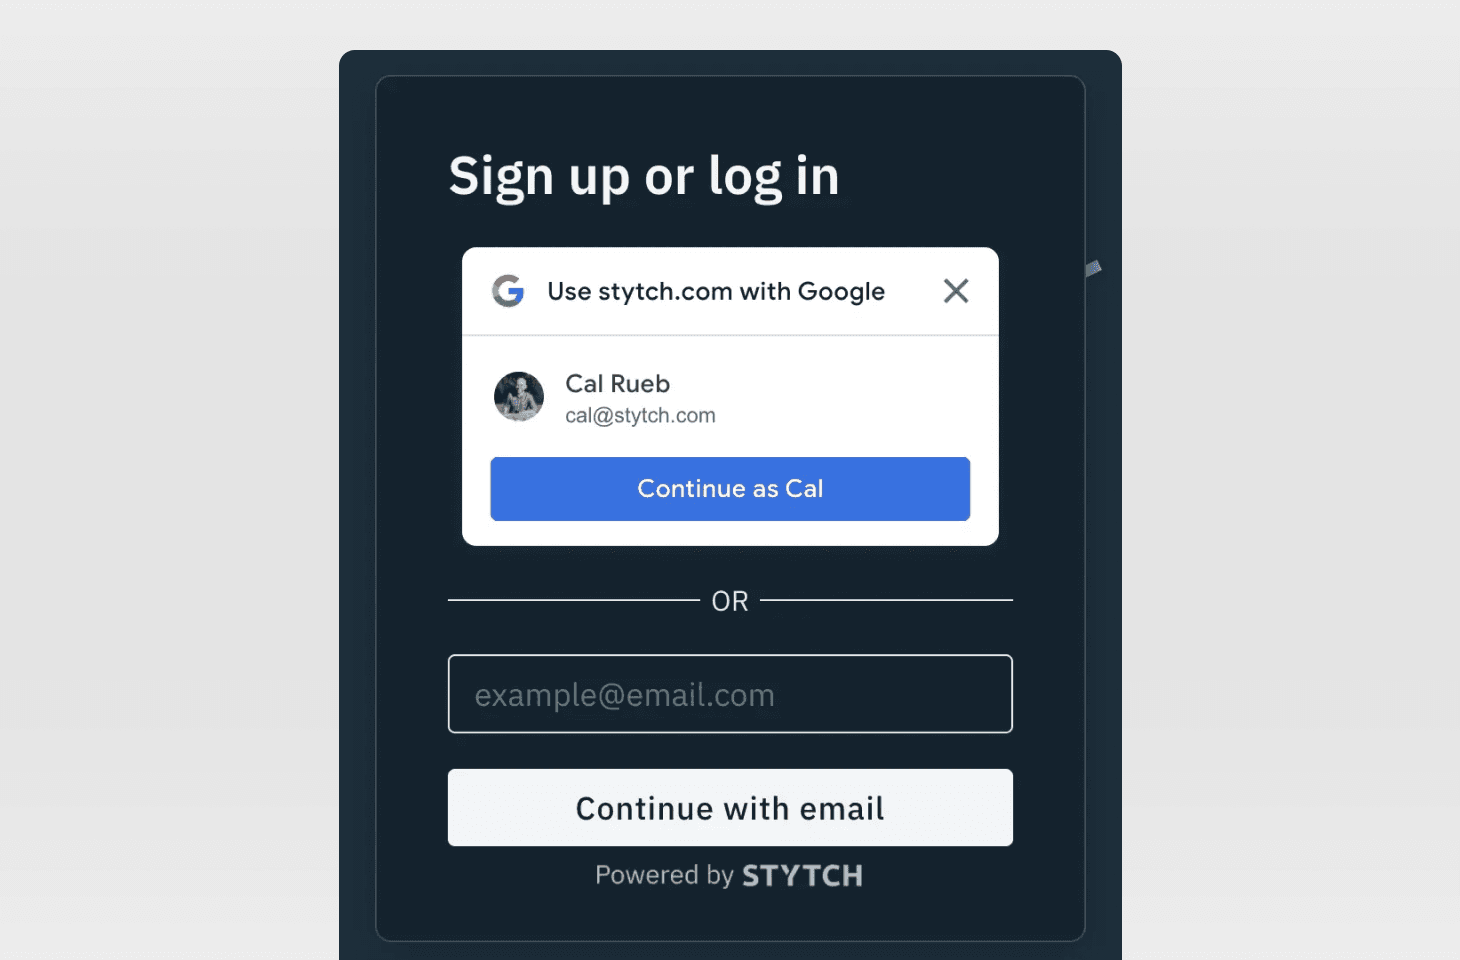
Go to Stytch, and create an account. Note that Stytch provides two ways to create an account, either via Google OAuth, or through Email magic links. This is the same user experience we will be building in this guide!
Step 1: Set up Stytch redirect URLs
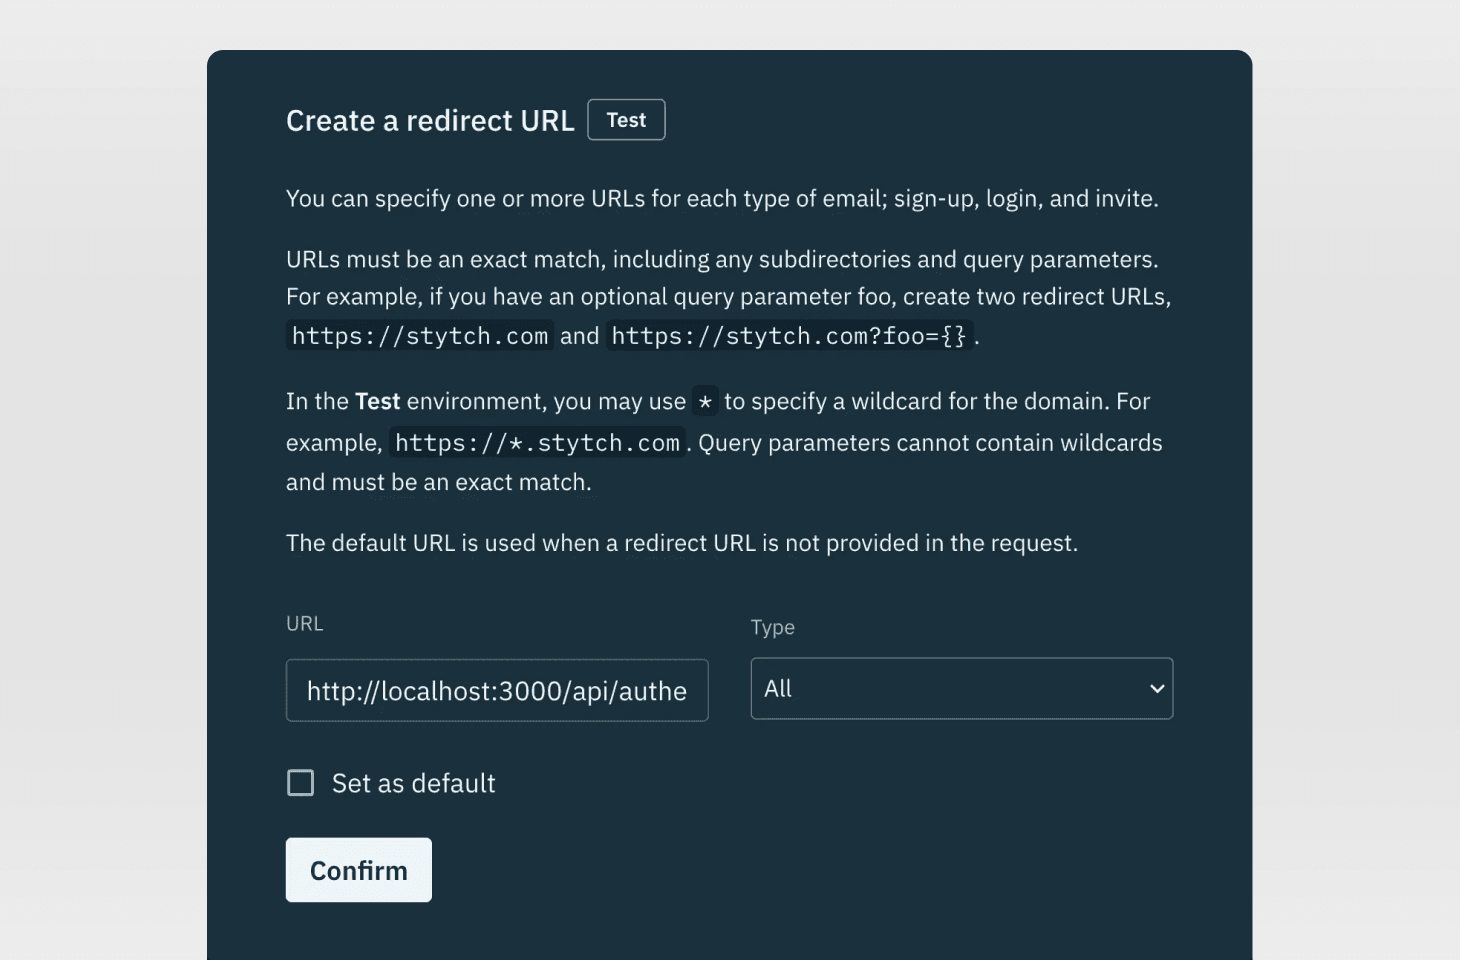
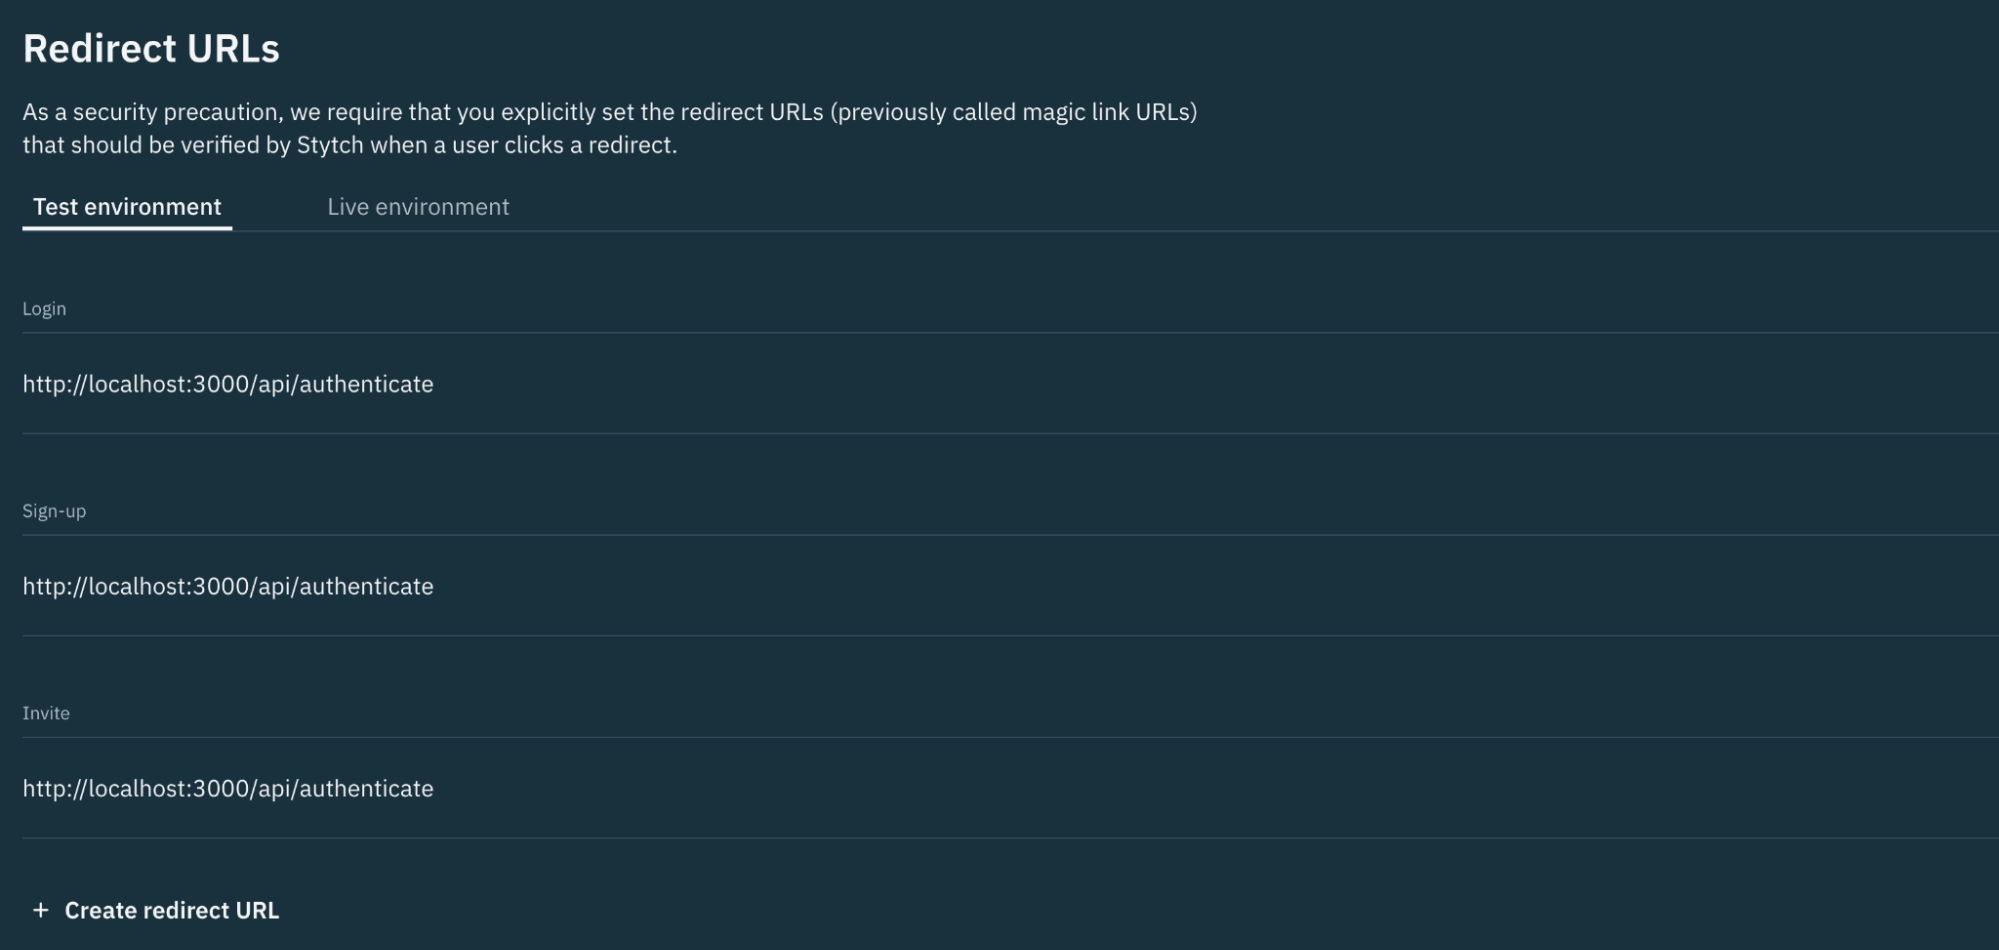
First we need to add the redirect URLs that will be used during the Email magic link flow. This step helps ensure bad actors cannot spoof your magic links and hijack redirects.
Navigate to your redirect URL settings in the Stytch dashboard, and under Test environment create an entry where the URL is http://localhost:3000/api/authenticate and the Type is All.

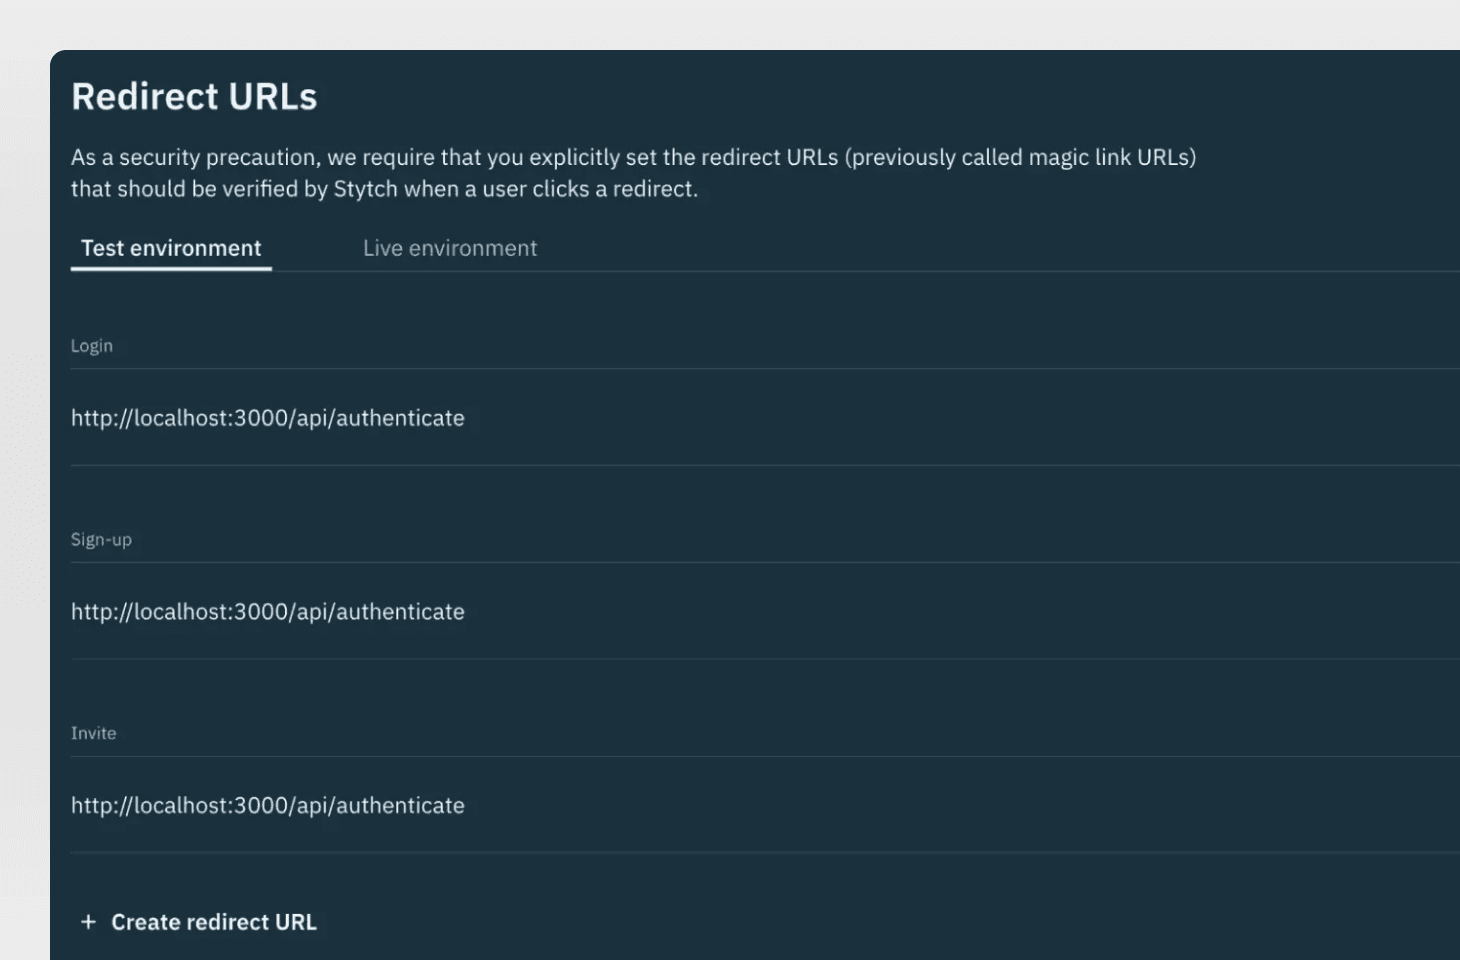
After pressing Confirm, the redirect URLs dashboard will update to show your new entry. We will use this URL later on.
Step 2: Create a Supabase project
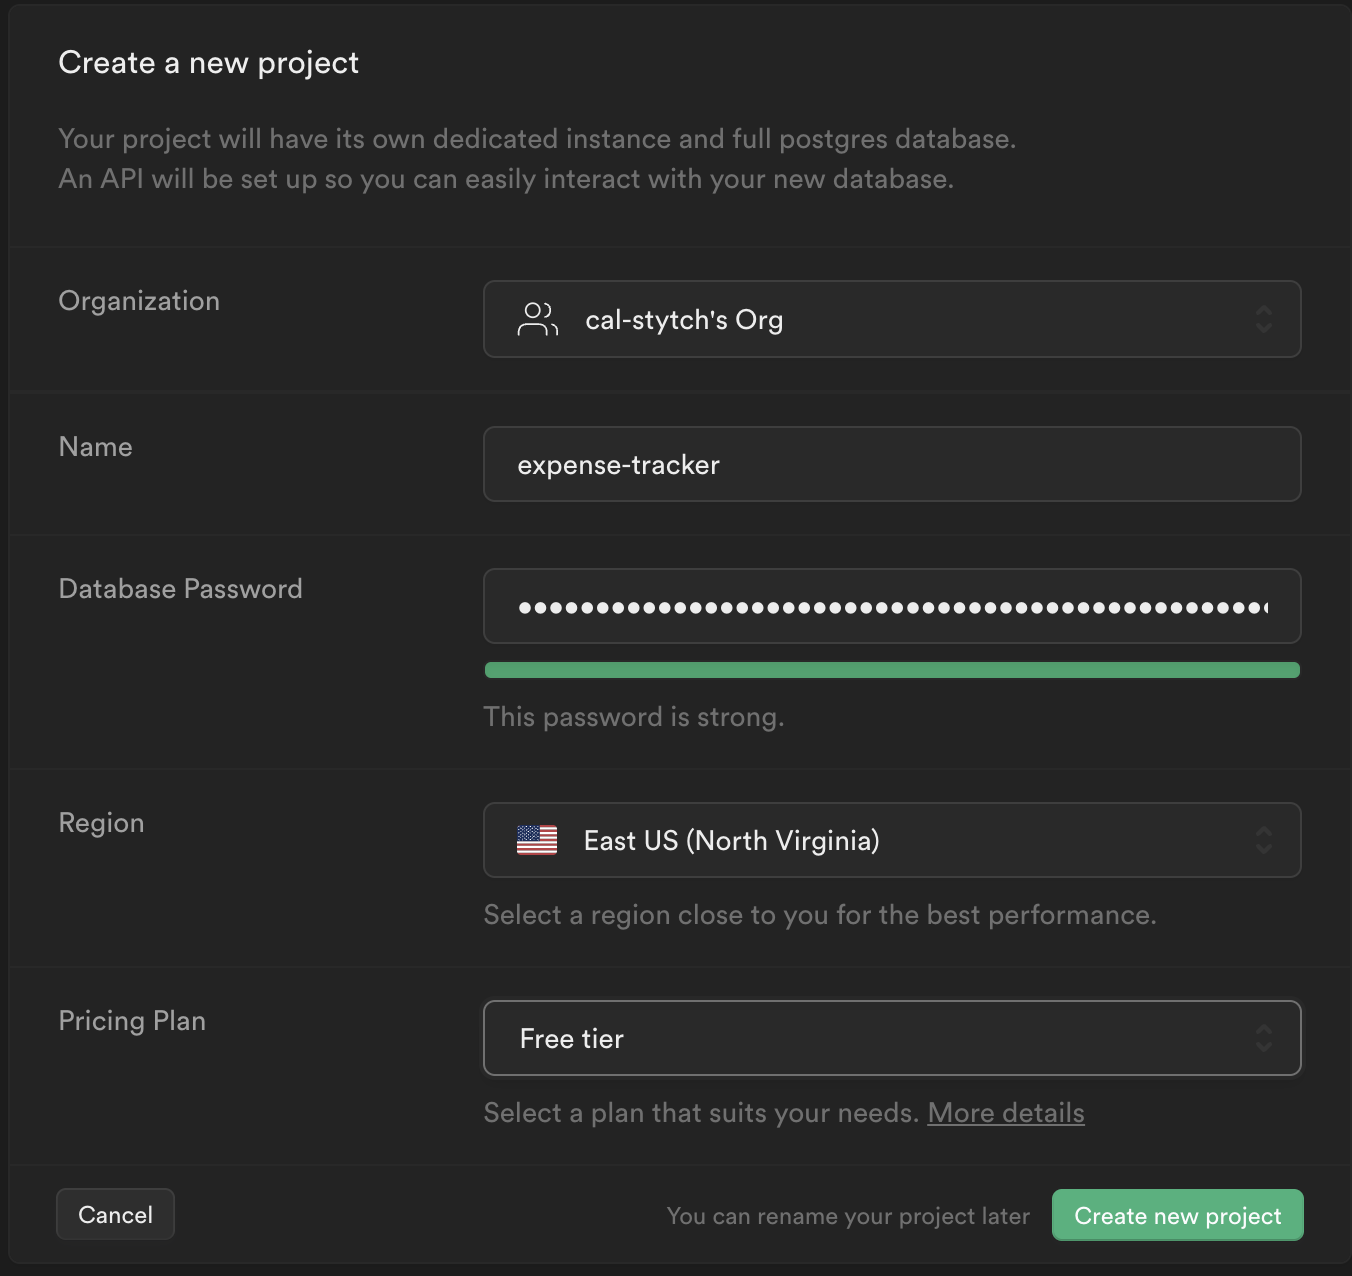
From your Supabase dashboard, click New project.
Enter a Name for your Supabase project.
Enter a secure Database Password.
Click Create new project. It may take a couple minutes for your project to be provisioned.
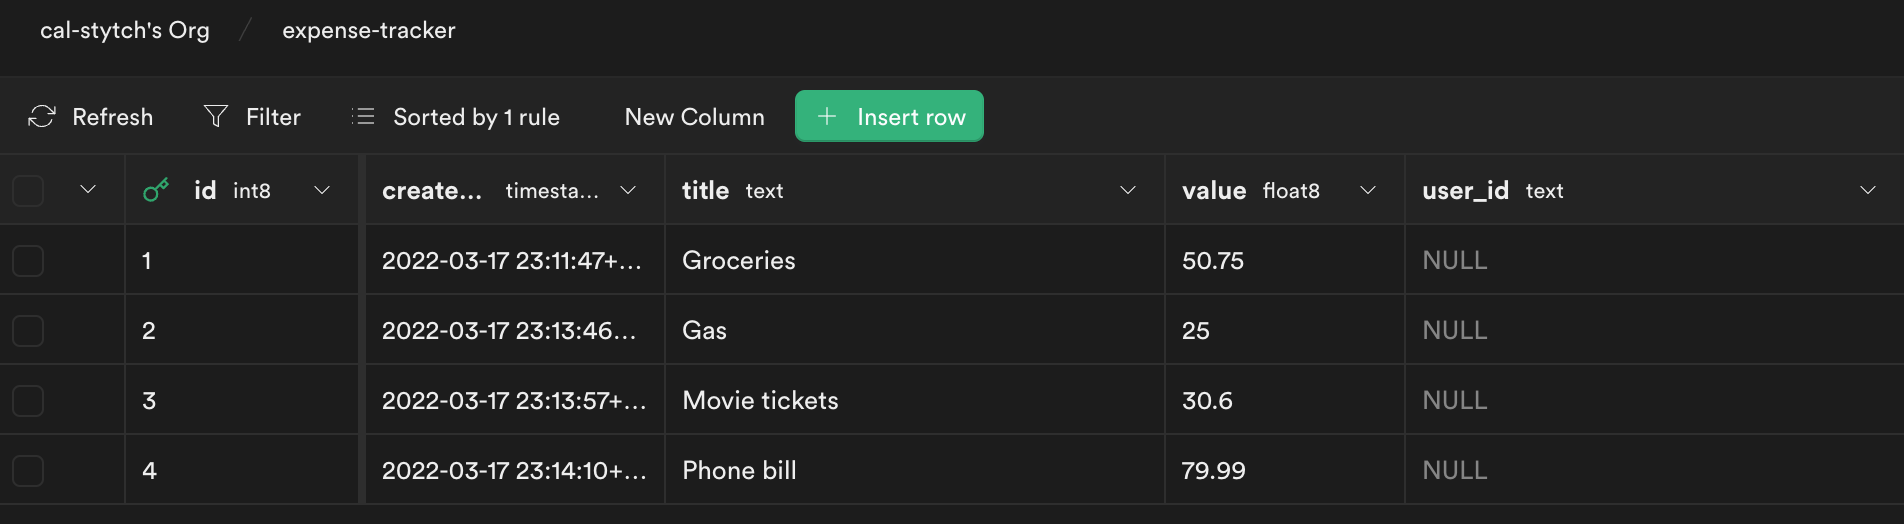
Step 3: Creating data in Supabase
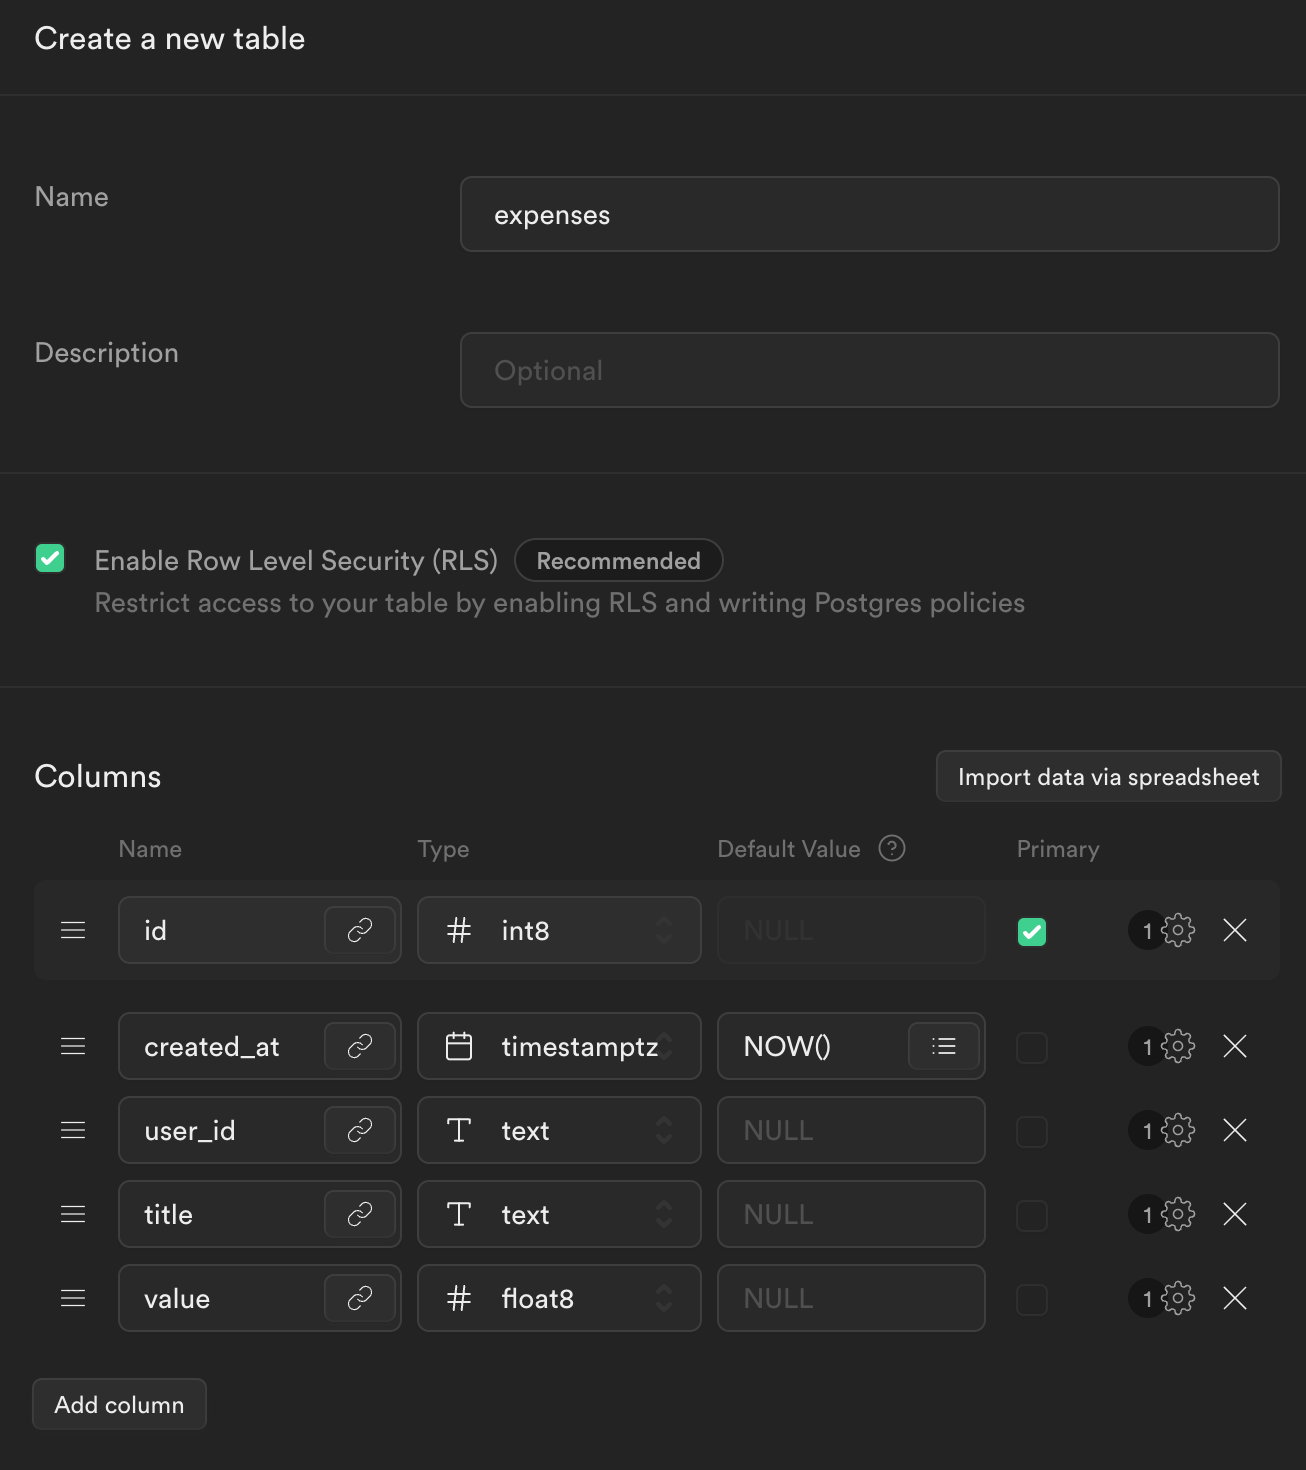
Once your Supabase project is provisioned, click Table editor, then New table. This tool is available from the sidebar menu in the Supabase dashboard.
Enter expenses as the Name field.
Select Enable Row Level Security (RLS).
Add three new columns:
-
user_idastext -
titleastext -
valueasfloat8
Click Save to create the new table.
From the Table editor view, select the expenses table and click Insert row.
Fill out the title and value fields (leave user_id blank for now) and click Save.
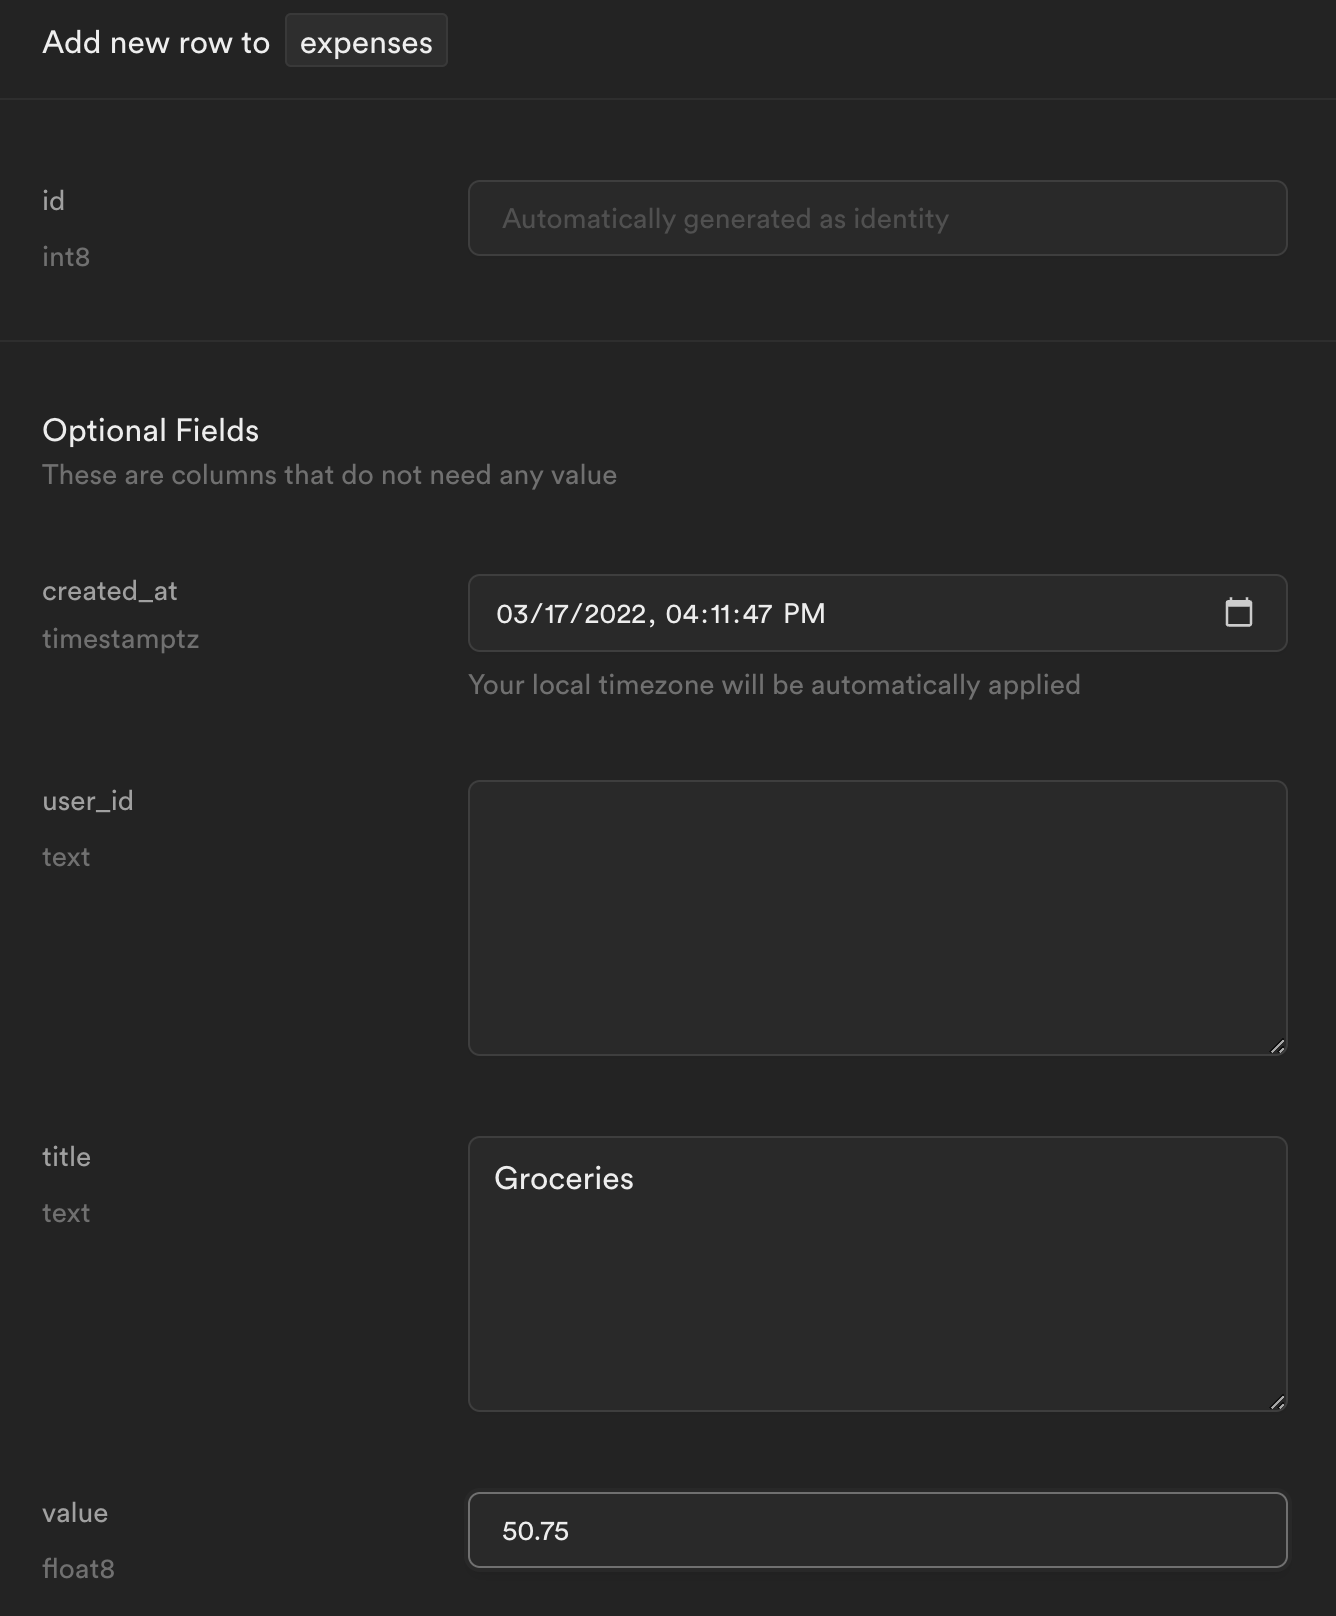
Use Insert Row to further populate the table with expenses.
Step 4: Building a Next.js app
Using a terminal, create a new Next.js project:
_10npx create-next-app stytch-supabase-example
Next, within stytch-supabase-example create a .env.local file and enter the following values:
_10STYTCH_PROJECT_ENV=test_10STYTCH_PROJECT_ID=GET_FROM_STYTCH_DASHBOARD_10STYTCH_PUBLIC_TOKEN=GET_FROM_STYTCH_DASHBOARD_10STYTCH_SECRET=GET_FROM_STYTCH_DASHBOARD_10NEXT_PUBLIC_SUPABASE_URL=GET_FROM_SUPABASE_DASHBOARD_10NEXT_PUBLIC_SUPABASE_KEY=GET_FROM_SUPABASE_DASHBOARD_10SUPABASE_SIGNING_SECRET=GET_FROM_SUPABASE_DASHBOARD
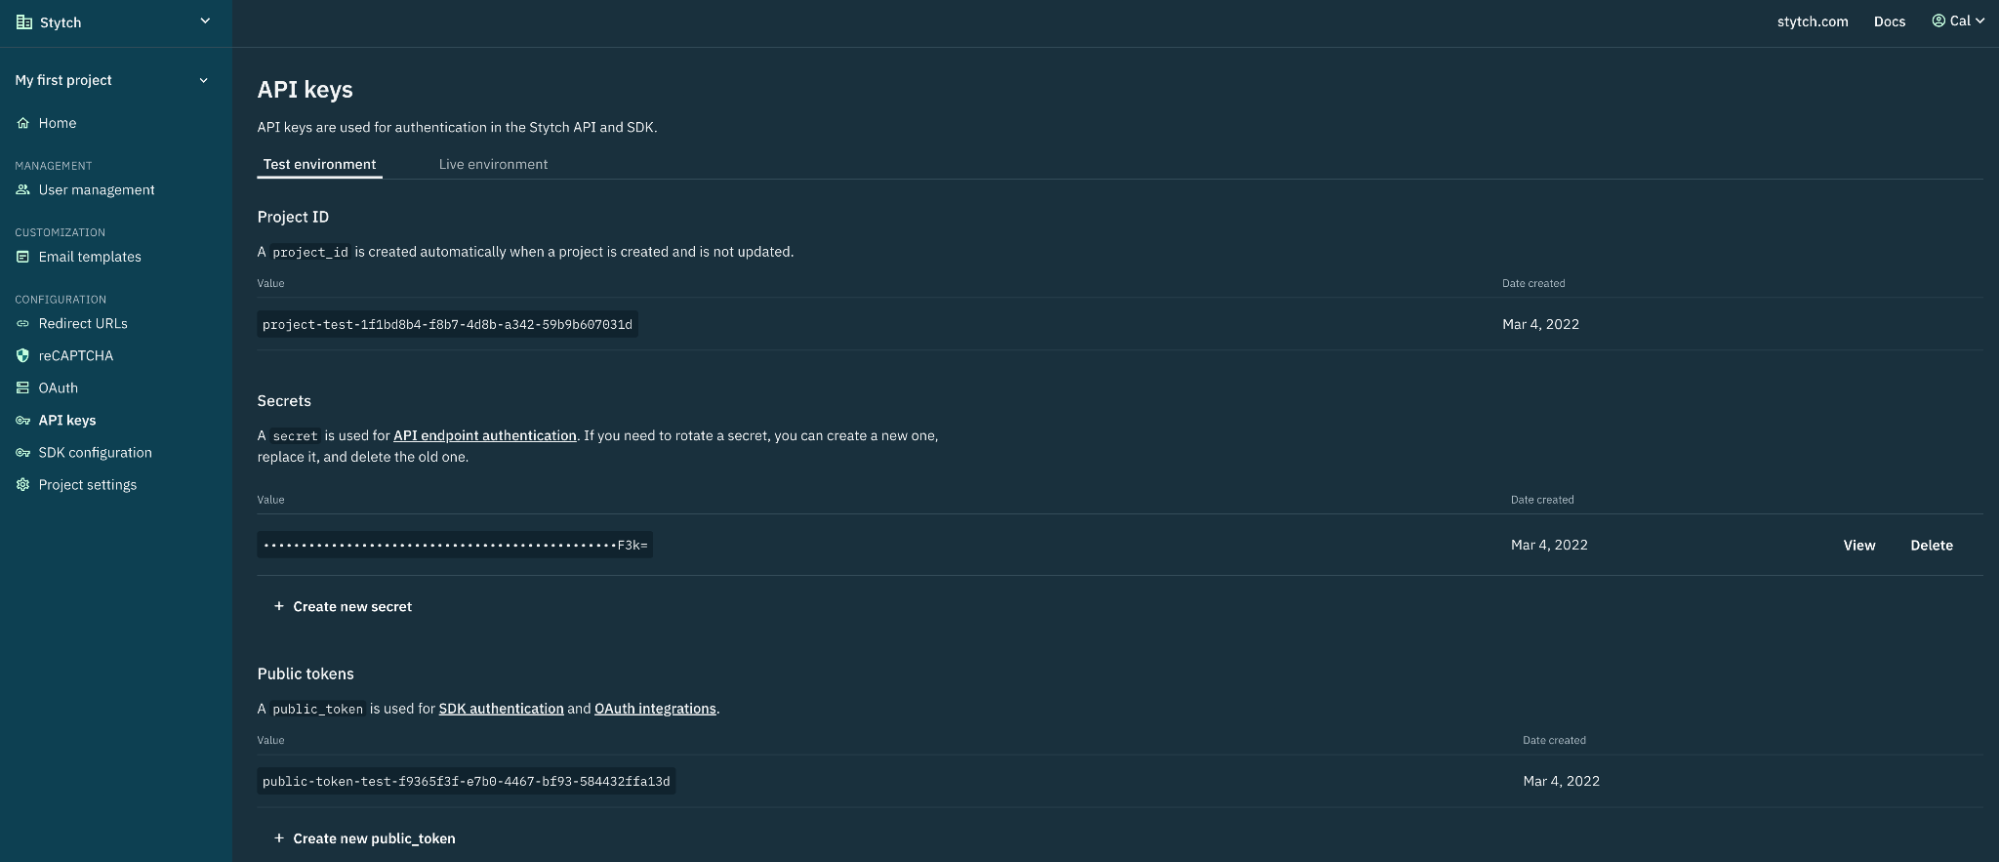
Note: Stytch values can be found in the project dashboard under API Keys.
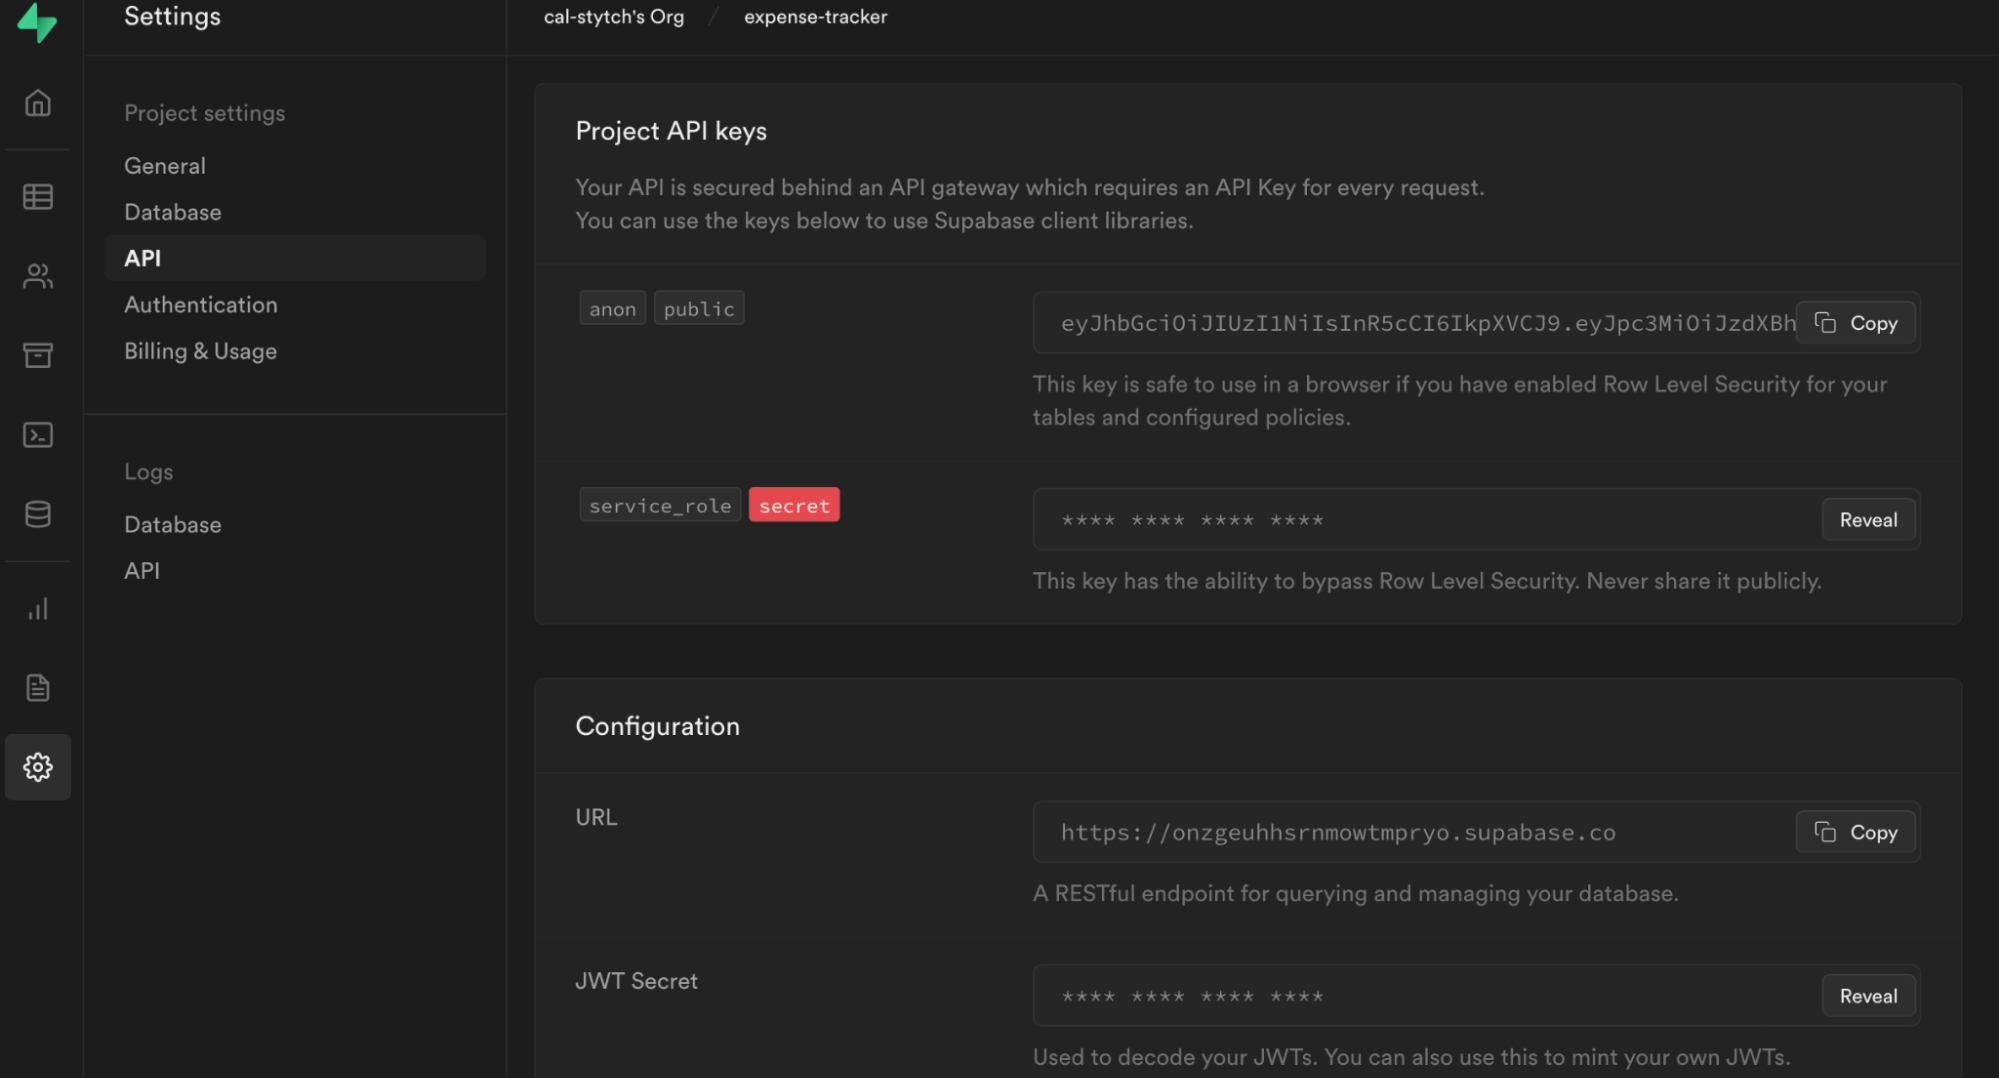
Note: Supabase values can be found under Settings > API for your project.
Start your Next.js development server to read in the new values from .env.local.
_10npm run dev
You should have a running Next.js application on localhost:3000.
Step 5: Build the Login Form
Now we will replace the default Next.js home page with a login UI. We will use the Stytch React library.
Note: Stytch provides direct API access for those that want to build login UI themselves
Install the @stytch/stytch-react library.
_10npm install @stytch/stytch-react
In the root directory, create a new folder named components and file in that folder named /StytchLogin.js. Within this file, paste the snippet below. This will configure, and style the Stytch React component to use Email magic links.
_33// components/StytchLogin.js_33import React from 'react'_33import { Stytch } from '@stytch/stytch-react'_33_33const stytchConfig = {_33 loginOrSignupView: {_33 products: ['emailMagicLinks'],_33 emailMagicLinksOptions: {_33 loginRedirectURL: 'http://localhost:3000/api/authenticate',_33 loginExpirationMinutes: 30,_33 signupRedirectURL: 'http://localhost:3000/api/authenticate',_33 signupExpirationMinutes: 30,_33 createUserAsPending: true,_33 },_33 },_33 style: {_33 fontFamily: '"Helvetica New", Helvetica, sans-serif',_33 width: '321px',_33 primaryColor: '#0577CA',_33 },_33}_33_33const StytchLogin = ({ publicToken }) => {_33 return (_33 <Stytch_33 publicToken={publicToken}_33 loginOrSignupView={stytchConfig.loginOrSignupView}_33 style={stytchConfig.style}_33 />_33 )_33}_33_33export default StytchLogin
Additionally, create a profile component by creating a file called Profile.js in /components. We will use this component to render our expenses stored in Supabase later on.
_27// components/Profile.js_27import React from 'react'_27import Link from 'next/link'_27_27export default function Profile({ user }) {_27 return (_27 <div>_27 <h1>Welcome {user.userId}</h1>_27 <h2>Your expenses</h2>_27 {user.expenses?.length > 0 ? (_27 user.expenses.map((expense) => (_27 <p key={expense.id}>_27 {expense.title}: ${expense.value}_27 </p>_27 ))_27 ) : (_27 <p>You have no expenses!</p>_27 )}_27_27 <Link href="/api/logout" passHref>_27 <button>_27 <a>Logout</a>_27 </button>_27 </Link>_27 </div>_27 )_27}
Finally, replace the contents of the file /pages/index.js to render our new StytchLogin and Profile components.
_24// pages/index.js_24import styles from '../styles/Home.module.css'_24import Profile from '../components/Profile'_24import StytchLogin from '../components/StytchLogin'_24_24const Index = ({ user, publicToken }) => {_24 let content_24 if (user) {_24 content = <Profile user={user} />_24 } else {_24 content = <StytchLogin publicToken={publicToken} />_24 }_24_24 return <div className={styles.main}>{content}</div>_24}_24_24export async function getServerSideProps({ req, res }) {_24 const user = null // Will update later_24 return {_24 props: { user, publicToken: process.env.STYTCH_PUBLIC_TOKEN },_24 }_24}_24_24export default Index
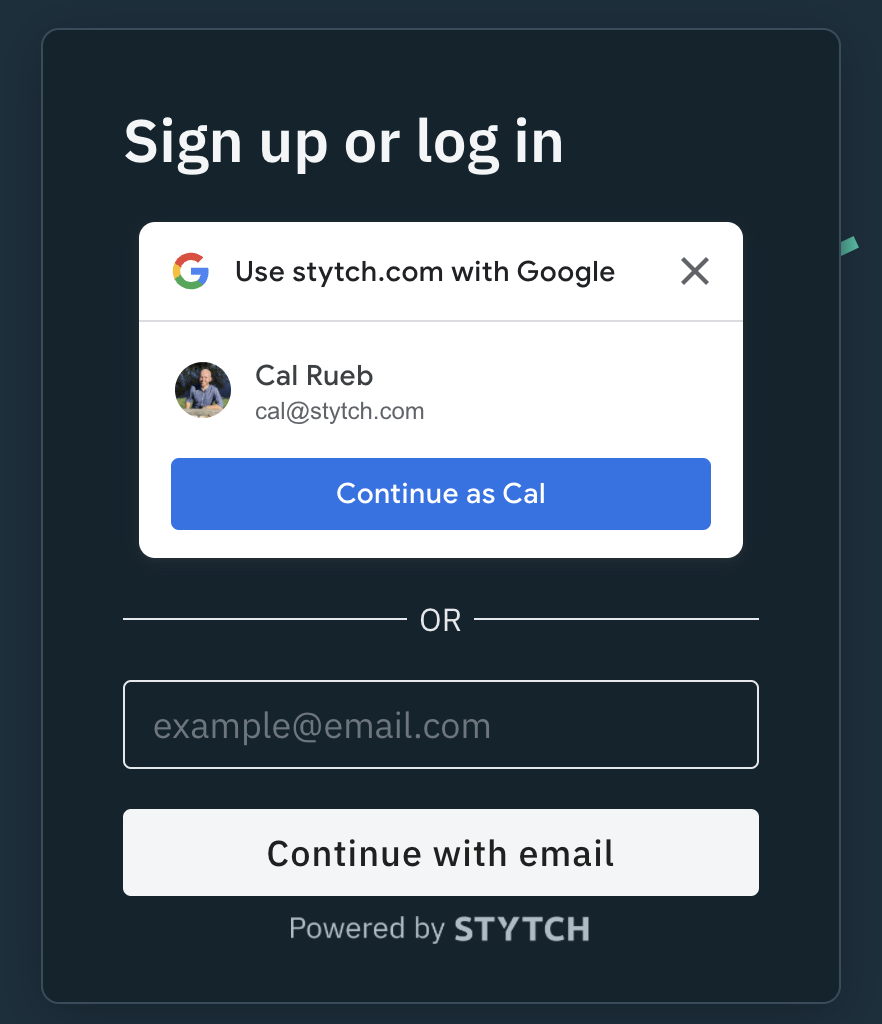
On localhost:3000 there is now a login form prompting for your email address.
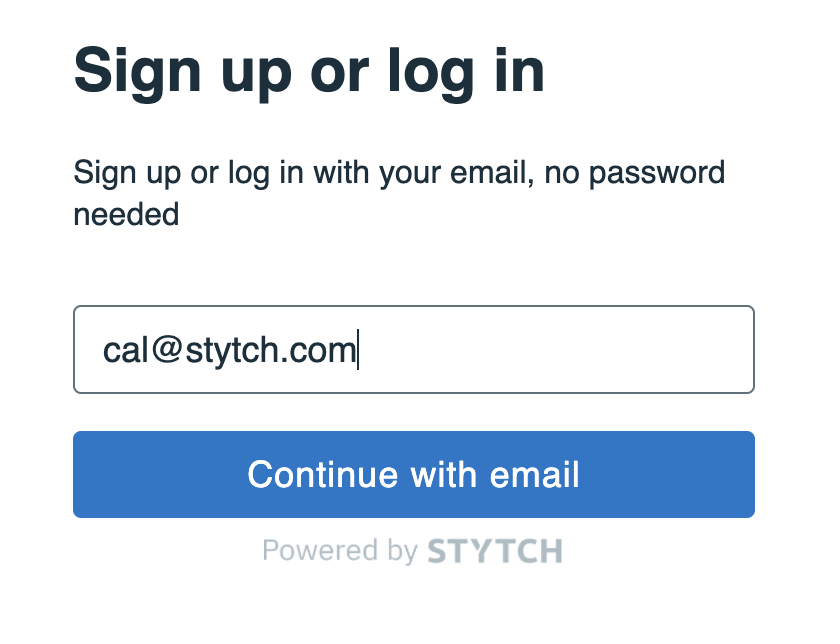
Enter your email address and press Continue with email.
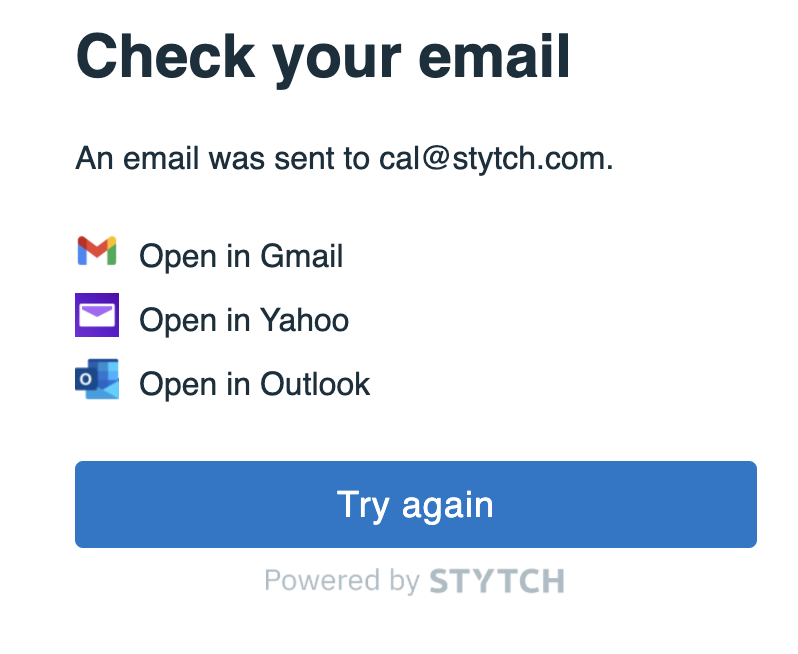
In your inbox you will find a login request from your app.
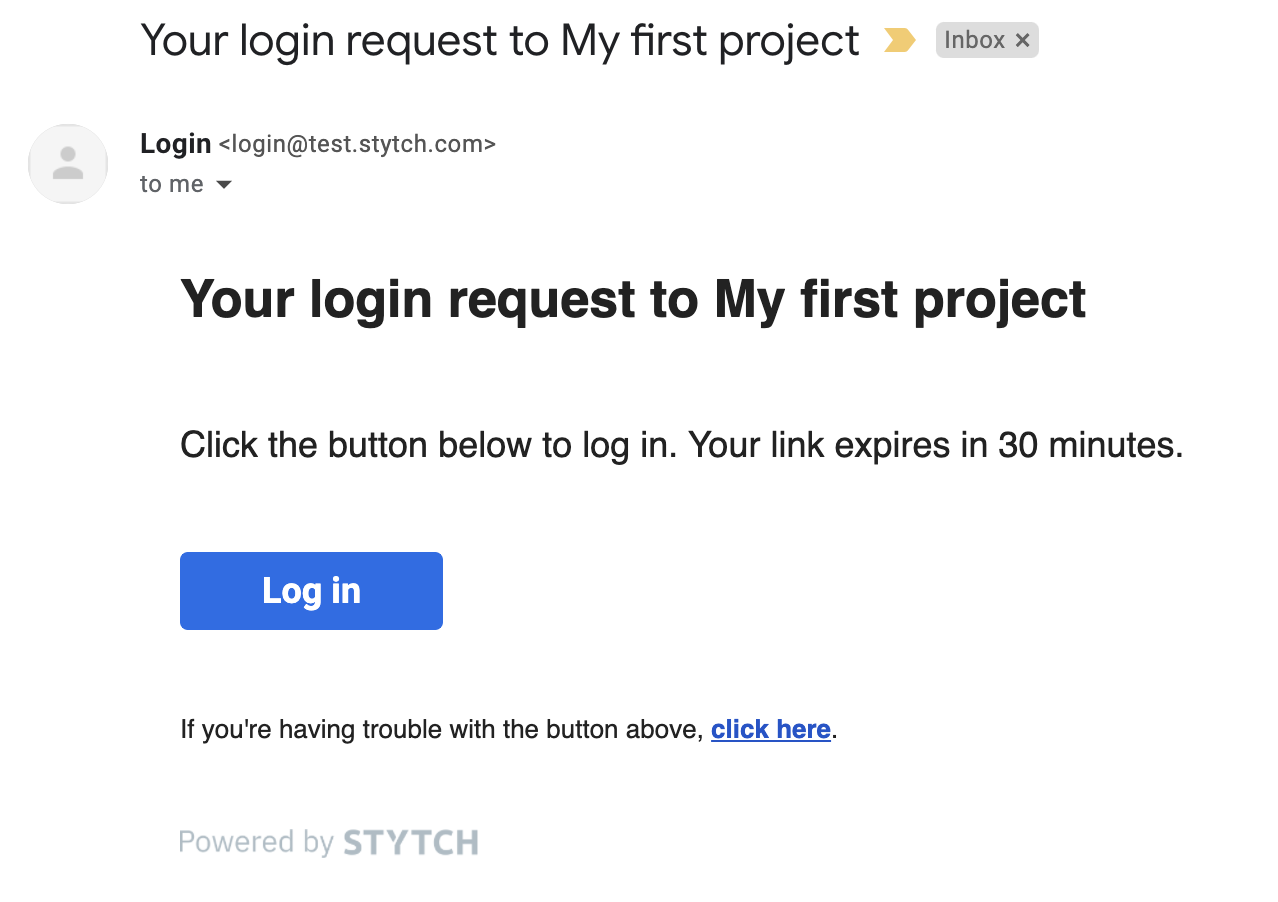
However, if you click the link in the email you will get a 404. We need to build an API route to handle the email magic link authentication.
Step 6: Authenticate and start a session
To make authentication easier we will use the Stytch Node.js library. Run
_10npm install stytch
Additionally, we will need to store the authenticated session in a cookie. Run
_10npm install cookies-next
Create a new folder named utils and inside a file namedstytchLogic.js with the following contents
_79// utils/stytchLogic.js_79import * as stytch from 'stytch'_79import { getCookie, setCookies, removeCookies } from 'cookies-next'_79_79export const SESSION_COOKIE = 'stytch_cookie'_79_79let client_79const loadStytch = () => {_79 if (!client) {_79 client = new stytch.Client({_79 project_id: process.env.STYTCH_PROJECT_ID,_79 secret: process.env.STYTCH_SECRET,_79 env: process.env.STYTCH_PROJECT_ENV === 'live' ? stytch.envs.live : stytch.envs.test,_79 })_79 }_79_79 return client_79}_79_79export const getAuthenticatedUserFromSession = async (req, res) => {_79 const sessionToken = getCookie(SESSION_COOKIE, { req, res })_79 if (!sessionToken) {_79 return null_79 }_79_79 try {_79 const stytchClient = loadStytch()_79 const resp = await stytchClient.sessions.authenticate({_79 session_token: sessionToken,_79 })_79 return resp.session.user_id_79 } catch (error) {_79 console.log(error)_79 return null_79 }_79}_79_79export const revokeAndClearSession = async (req, res) => {_79 const sessionToken = getCookie(SESSION_COOKIE, { req, res })_79_79 if (sessionToken) {_79 try {_79 const stytchClient = loadStytch()_79 await stytchClient.sessions.revoke({_79 session_token: sessionToken,_79 })_79 } catch (error) {_79 console.log(error)_79 }_79 removeCookies(SESSION_COOKIE, { req, res })_79 }_79_79 return res.redirect('/')_79}_79_79export const authenticateTokenStartSession = async (req, res) => {_79 const { token, type } = req.query_79 let sessionToken_79 try {_79 const stytchClient = loadStytch()_79 const resp = await stytchClient.magicLinks.authenticate(token, {_79 session_duration_minutes: 30,_79 })_79 sessionToken = resp.session_token_79 } catch (error) {_79 console.log(error)_79 const errorString = JSON.stringify(error)_79 return res.status(400).json({ errorString })_79 }_79_79 setCookies(SESSION_COOKIE, sessionToken, {_79 req,_79 res,_79 maxAge: 60 * 60 * 24,_79 secure: true,_79 })_79_79 return res.redirect('/')_79}
This logic is responsible for setting up the Stytch client we will use to call the API. It provides functions we will use to login, logout, and validate user sessions.
In order to complete the email login flow, create a new file pages/api/authenticate.js with the contents:
_10// pages/api/authenticate.js_10import { authenticateTokenStartSession } from '../../utils/stytchLogic'_10_10export default async function handler(req, res) {_10 return authenticateTokenStartSession(req, res)_10}
We will also create a logout API endpoint with similar contents. In pages/api/logout.js include the following:
_10// pages/api/logout.js_10import { revokeAndClearSession } from '../../utils/stytchLogic'_10_10export default async function handler(req, res) {_10 return revokeAndClearSession(req, res)_10}
Finally, update pages/index.js by importing getAuthenticatedUserFromSession, and calling it to set the user variable in getServerSideProps.
_31// pages/index.js_31import styles from '../styles/Home.module.css'_31_31import StytchLogin from '../components/StytchLogin'_31import Profile from '../components/Profile'_31import { getAuthenticatedUserFromSession } from '../utils/stytchLogic'_31_31const Index = ({ user, publicToken }) => {_31 let content_31 if (user) {_31 content = <Profile user={user} />_31 } else {_31 content = <StytchLogin publicToken={publicToken} />_31 }_31_31 return <div className={styles.main}>{content}</div>_31}_31_31export async function getServerSideProps({ req, res }) {_31 const userId = await getAuthenticatedUserFromSession(req, res)_31 if (userId) {_31 return {_31 props: { user: { userId }, publicToken: process.env.STYTCH_PUBLIC_TOKEN },_31 }_31 }_31 return {_31 props: { publicToken: process.env.STYTCH_PUBLIC_TOKEN },_31 }_31}_31_31export default Index
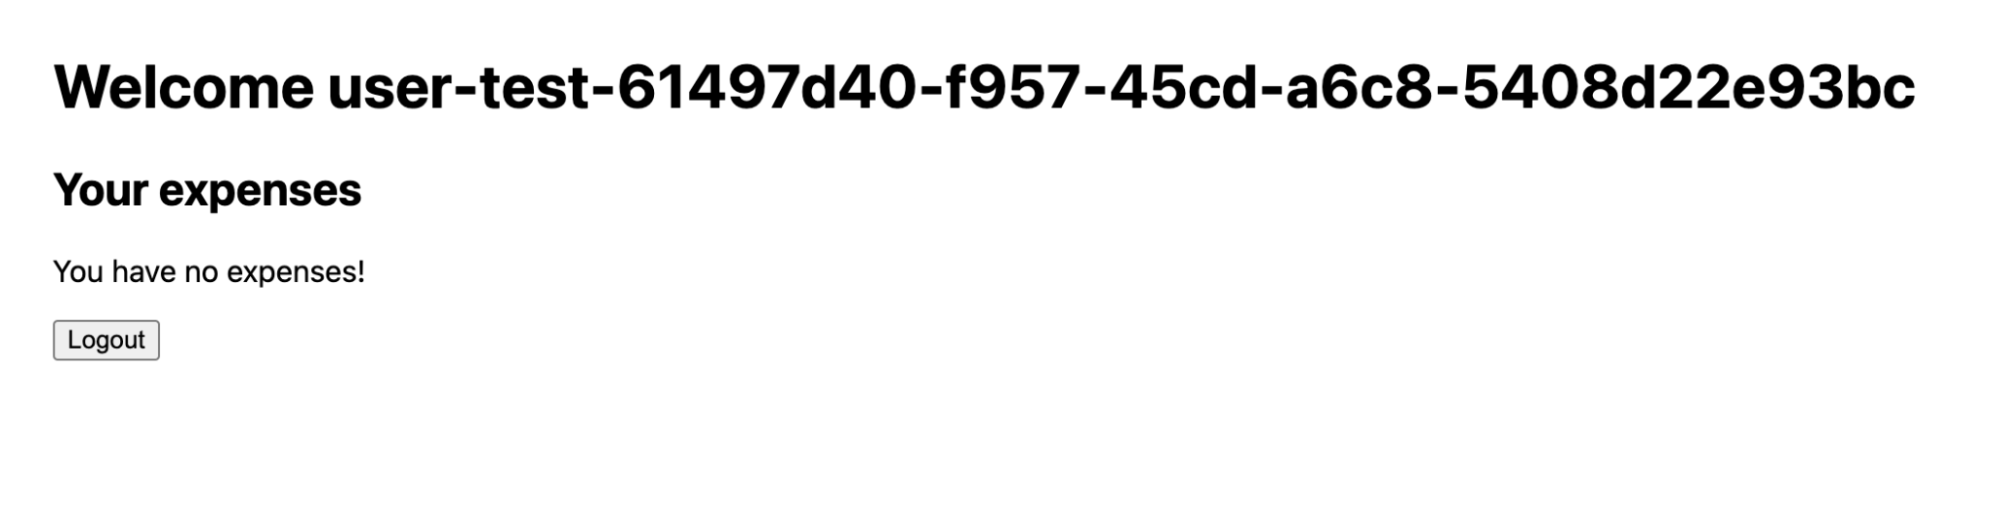
Return to localhost:3000, and login again by sending yourself a new email. Upon clicking through in the email you should be presented with “Welcome $USER_ID”. If you refresh the page, you should remain in an authenticated state. If you press Logout then you should return to the login screen.
Now that we have a working login flow with persistent authentication it is time to pull in our expense data from Supabase.
Step 7: Requesting user data from Supabase
First, install the Supabase client:
_10npm install @supabase/supabase-js
In order to pass an authenticated user_id to Supabase we will package it within a JWT. Install jsonwebtoken:
_10npm install jsonwebtoken
Create a new file utils/supabase.js and add the following:
_25// utils/supabase.js_25import { createClient } from '@supabase/supabase-js'_25import jwt from 'jsonwebtoken'_25_25const getSupabase = (userId) => {_25 const supabase = createClient(_25 process.env.NEXT_PUBLIC_SUPABASE_URL,_25 process.env.NEXT_PUBLIC_SUPABASE_KEY_25 )_25_25 if (userId) {_25 const payload = {_25 userId,_25 exp: Math.floor(Date.now() / 1000) + 60 * 60,_25 }_25_25 supabase.auth.session = () => ({_25 access_token: jwt.sign(payload, process.env.SUPABASE_SIGNING_SECRET),_25 })_25 }_25_25 return supabase_25}_25_25export { getSupabase }
Our payload for the JWT will contain our user's unique identifier from Stytch, their user_id. We are signing this JWT using Supabase's signing secret, so Supabase will be able to validate it is authentic and hasn't been tampered with in transit.
Let's load our expenses from Supabase on the home page! Update pages/index.js a final time to make a request for expense data from Supabase.
_39import styles from '../styles/Home.module.css'_39_39import StytchLogin from '../components/StytchLogin'_39import Profile from '../components/Profile'_39import { getAuthenticatedUserFromSession } from '../utils/stytchLogic'_39import { getSupabase } from '../utils/supabase'_39_39const Index = ({ user, publicToken }) => {_39 let content_39 if (user) {_39 content = <Profile user={user} />_39 } else {_39 content = <StytchLogin publicToken={publicToken} />_39 }_39_39 return <div className={styles.main}>{content}</div>_39}_39_39export async function getServerSideProps({ req, res }) {_39 const userId = await getAuthenticatedUserFromSession(req, res)_39_39 if (userId) {_39 const supabase = getSupabase(userId)_39 const { data: expenses } = await supabase.from('expenses').select('*')_39_39 return {_39 props: {_39 user: { userId, expenses },_39 publicToken: process.env.STYTCH_PUBLIC_TOKEN,_39 },_39 }_39 } else {_39 return {_39 props: { publicToken: process.env.STYTCH_PUBLIC_TOKEN },_39 }_39 }_39}_39_39export default Index
When we reload our application, we are still getting the empty state for expenses.
This is because we enabled Row Level Security, which blocks all requests by default and lets you granularly control access to the data in your database. To enable our user to select their expenses we need to write a RLS policy.
Step 8: Write a policy to allow select
Our policy will need to know who our currently logged in user is to determine whether or not they should have access. Let's create a PostgreSQL function to extract the current user from our new JWT.
Navigate back to the Supabase dashboard, select SQL from the sidebar menu, and click New query. This will create a new query,, which will allow us to run any SQL against our Postgres database.
Write the following and click Run.
_10create or replace function auth.user_id() returns text as $$_10 select nullif(current_setting('request.jwt.claims', true)::json->>'userId', '')::text;_10$$ language sql stable;
You should see the output Success, no rows returned. This created a function called auth.user_id(), which will inspect the userId field of our JWT payload.
Note: To learn more about PostgreSQL functions, check out this deep dive video.
Let's create a policy that checks whether this user is the owner of an expense.
Select Authentication from the Supabase sidebar menu, click Policies, then New Policy.
From the modal, select For full customization create a policy from scratch and add the following.
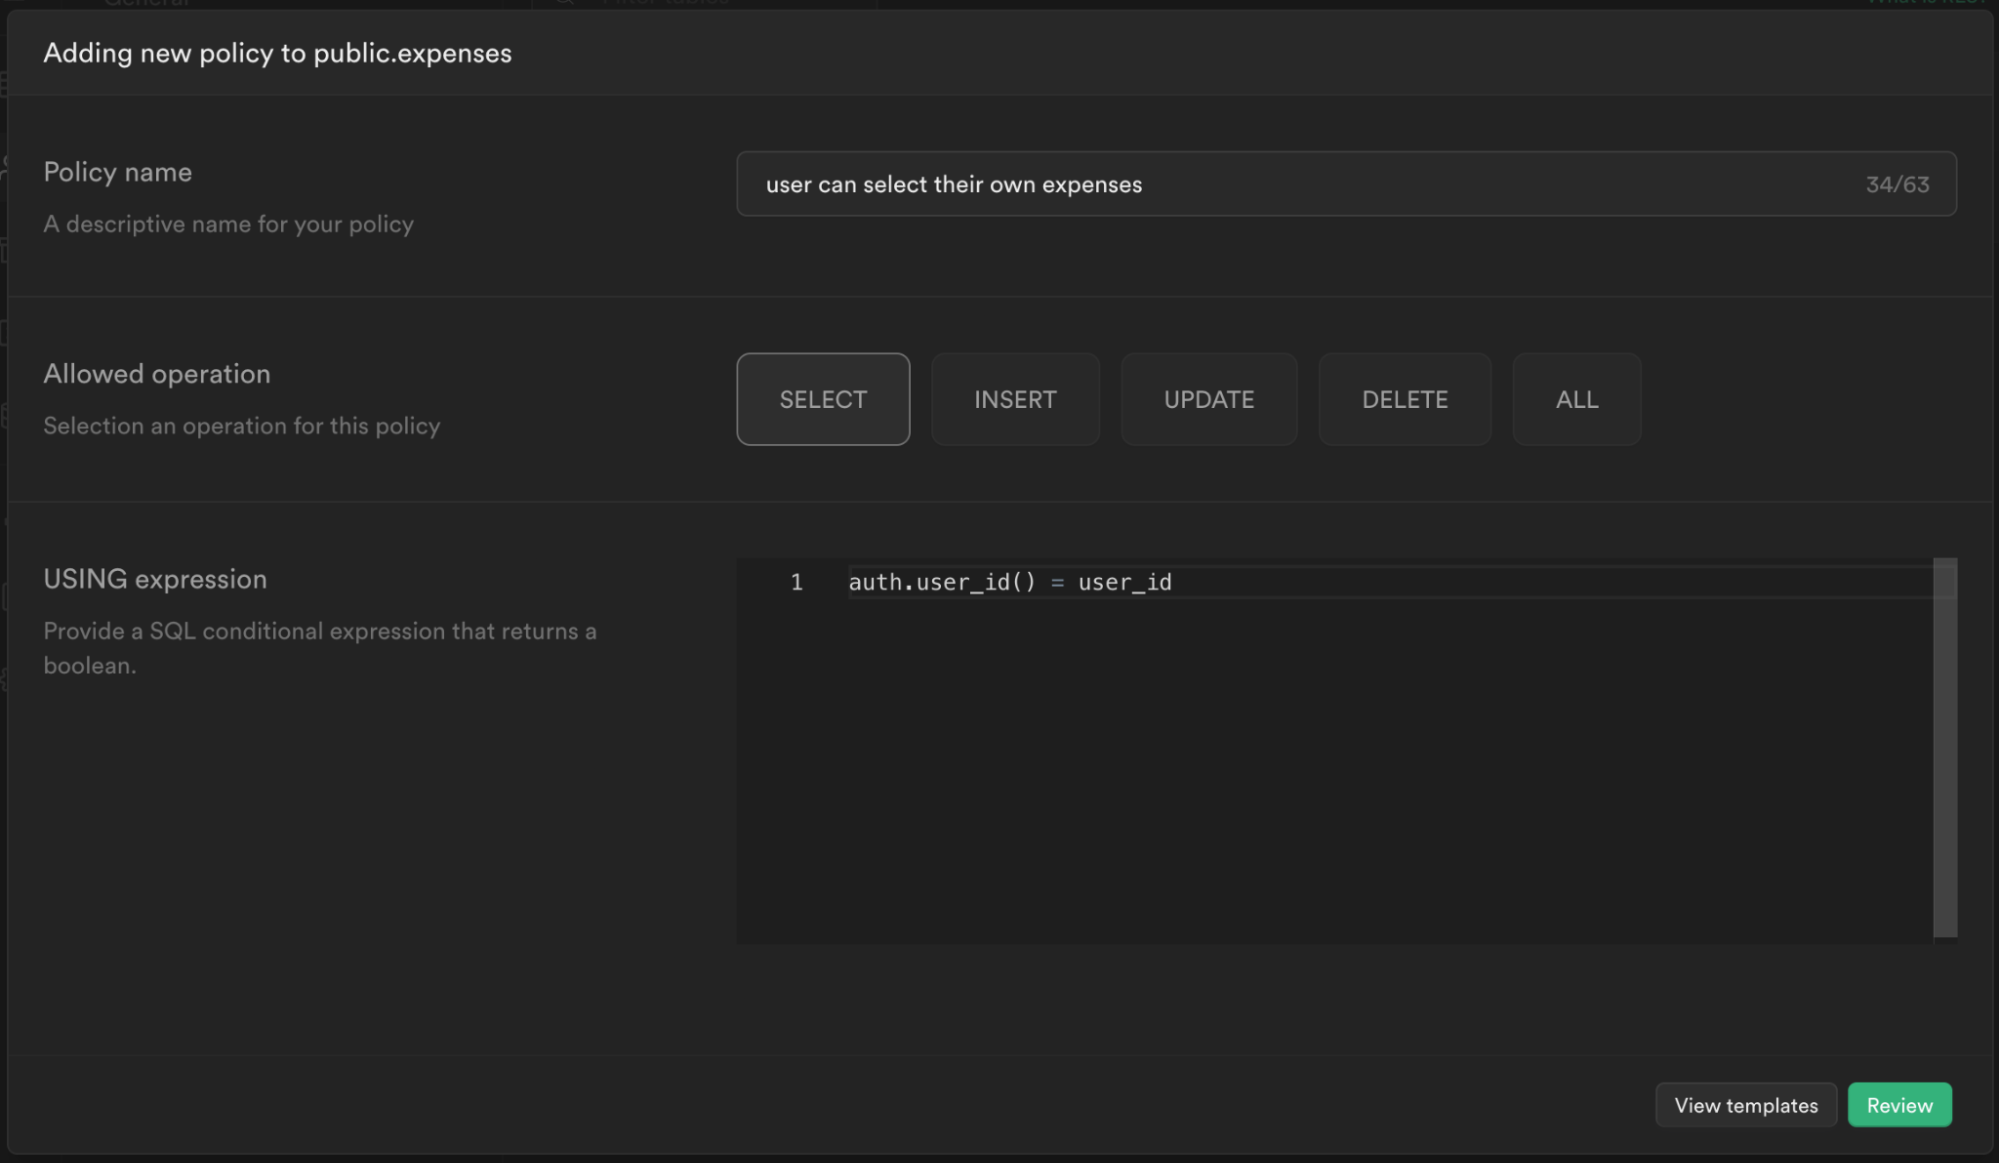
This policy is calling the function we just created to get the currently logged in user's user_id auth.user_id() and checking whether this matches the user_id column for the current expense. If it does, then it will allow the user to select it, otherwise it will continue to deny.
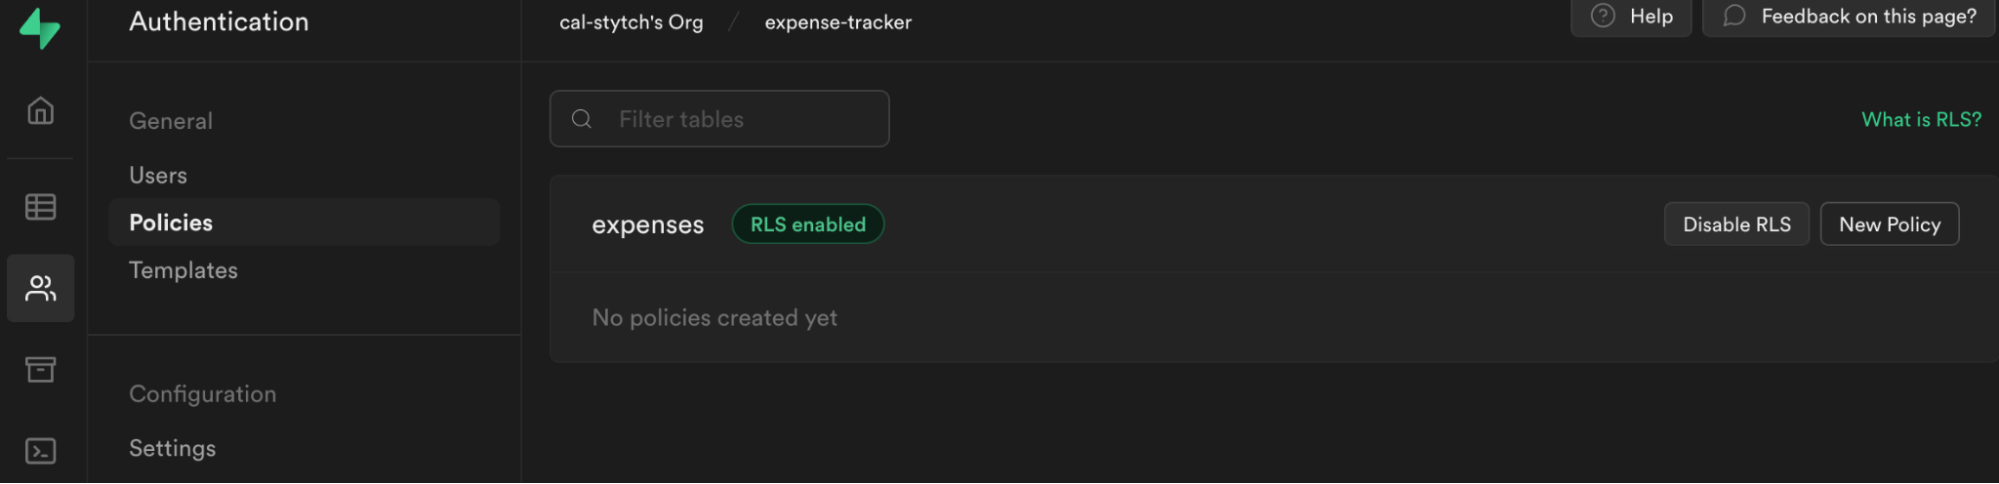
Click Review and then Save policy. After you've saved, click Enable RLS on the table to enable the policy we just created.
Note: To learn more about RLS and policies, check out this video.
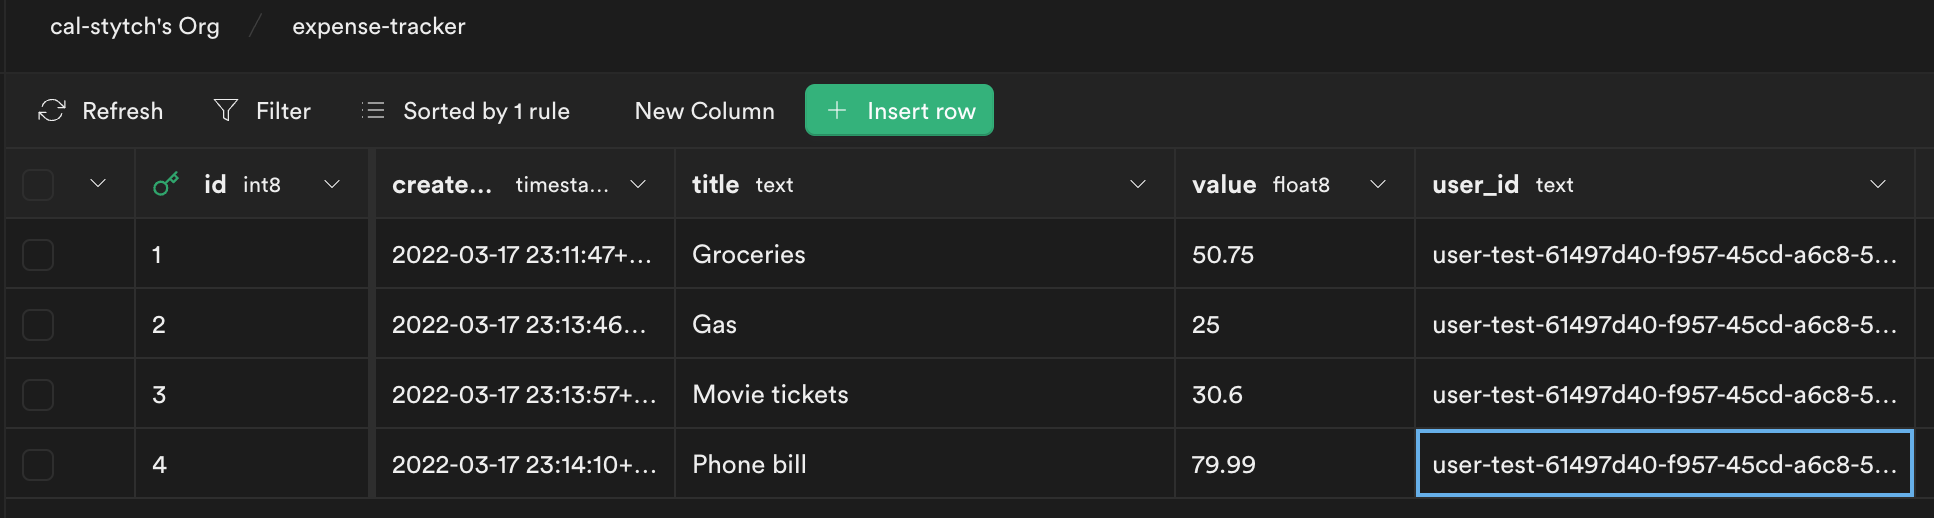
The last thing we need to do is update the user_id columns for our existing expenses.
Head back to the Supabase dashboard, and select Table editor from the sidebar. You will notice each entry has user_id set to NULL. We need to update this value to the proper user_id.

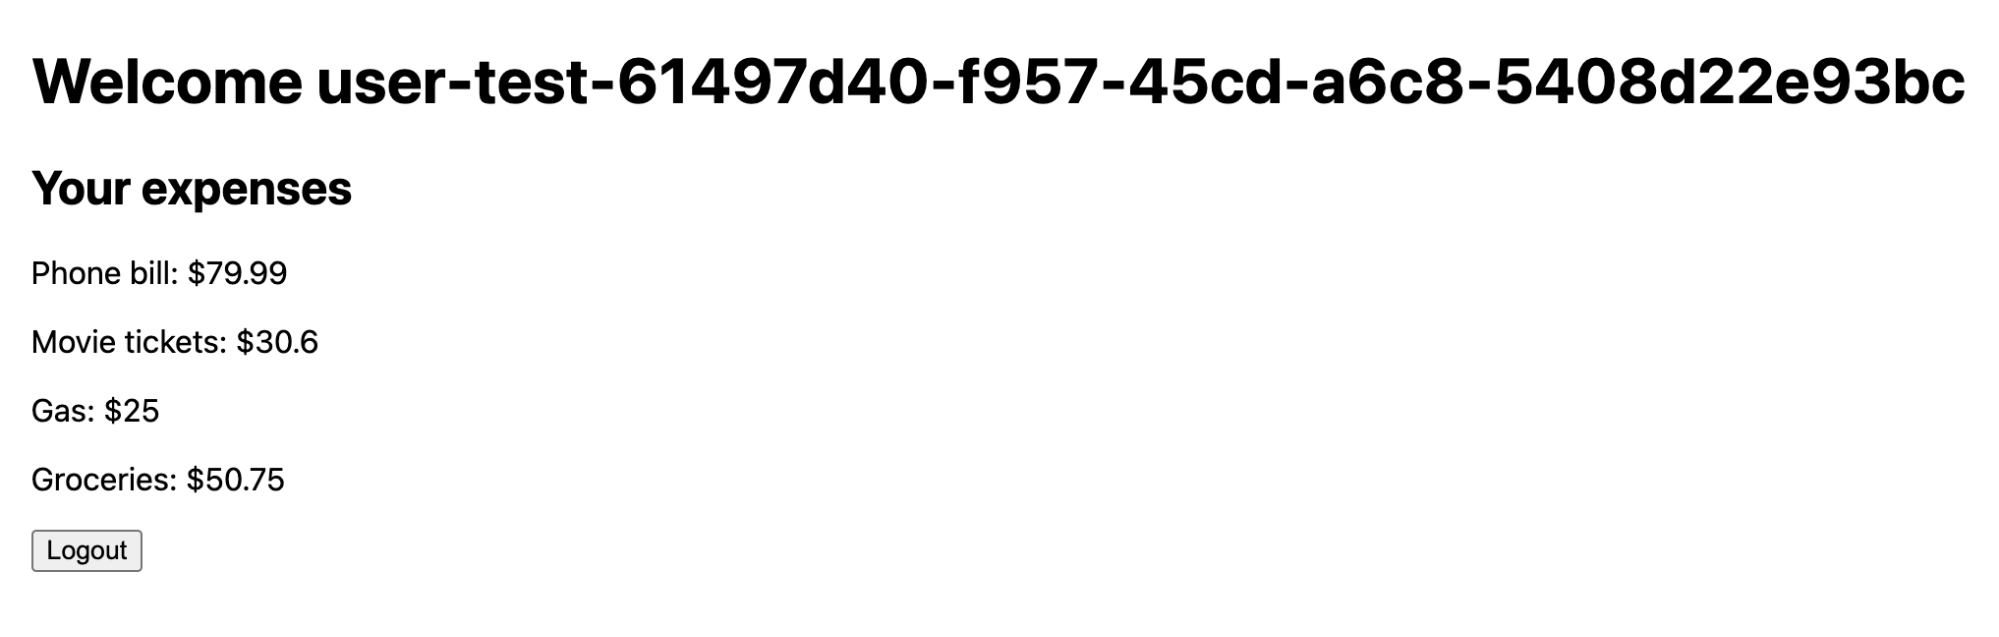
To get the user_id for our Stytch user, you can pull it from the welcome page in our example app (eg user-test-61497d40-f957-45cd-a6c8-5408d22e93bc).

Update each row in Supabase to this user_id.
Return to localhost:3000, and you will see your expenses listed.
We now have a basic expense tracker application powered by Stytch, Supabase, and Next.js. From here you could add additional features like adding, editing, and organizing your expenses further.
Note: You can find a completed version of this project on Github.
Optional: Add Google One Tap
In this optional step, we will extend our application to allow users to login with Google One Tap in addition to Email magic links.
You will need to follow the first four steps of this guide to create a Google project, set up Google OAuth consent, and configure credentials and redirect URLs.
First, we will make some adjustments to the StytchLogin component. We will update the configuration, so that it uses both Google OAuth, and Email magic links.
_44// components/StytchLogin.js_44import React from 'react'_44import { Stytch } from '@stytch/stytch-react'_44_44const stytchConfig = {_44 loginOrSignupView: {_44 products: ['oauth', 'emailMagicLinks'],_44 oauthOptions: {_44 providers: [_44 {_44 type: 'google',_44 one_tap: true,_44 position: 'embedded',_44 },_44 ],_44 loginRedirectURL: 'http://localhost:3000/api/authenticate?type=oauth',_44 signupRedirectURL: 'http://localhost:3000/api/authenticate?type=oauth',_44 },_44 emailMagicLinksOptions: {_44 loginRedirectURL: 'http://localhost:3000/api/authenticate',_44 loginExpirationMinutes: 30,_44 signupRedirectURL: 'http://localhost:3000/api/authenticate',_44 signupExpirationMinutes: 30,_44 createUserAsPending: true,_44 },_44 },_44 style: {_44 fontFamily: '"Helvetica New", Helvetica, sans-serif',_44 width: '321px',_44 primaryColor: '#0577CA',_44 },_44}_44_44const StytchLogin = ({ publicToken }) => {_44 return (_44 <Stytch_44 publicToken={publicToken}_44 loginOrSignupView={stytchConfig.loginOrSignupView}_44 style={stytchConfig.style}_44 />_44 )_44}_44_44export default StytchLogin
We also need to make an adjustment to the function authenticateTokenStartSession in stytchLogic.js. Stytch has separate authentication endpoints for Email magic links and OAuth, so we need to route our token correctly.
_35// utils/stytchLogic.js_35_35// leave the rest of the file contents as is_35export const authenticateTokenStartSession = async (req, res) => {_35 const { token, type } = req.query_35 let sessionToken_35 try {_35 const stytchClient = loadStytch()_35 if (type == 'oauth') {_35 const resp = await stytchClient.oauth.authenticate(token, {_35 session_duration_minutes: 30,_35 session_management_type: 'stytch',_35 })_35 sessionToken = resp.session.stytch_session.session_token_35 } else {_35 const resp = await stytchClient.magicLinks.authenticate(token, {_35 session_duration_minutes: 30,_35 })_35 sessionToken = resp.session_token_35 }_35 } catch (error) {_35 console.log(error)_35 const errorString = JSON.stringify(error)_35 return res.status(400).json({ errorString })_35 }_35_35 setCookies(SESSION_COOKIE, sessionToken, {_35 req,_35 res,_35 maxAge: 60 * 60 * 24,_35 secure: true,_35 })_35_35 return res.redirect('/')_35}
With these two changes you will now have a working Google One Tap authentication method along with email magic links.
Resources
Details
Third-party integrations and docs are managed by Supabase partners.