DhiWise

Overview
With the help of DhiWise, now you can easily integrate data from Supabase to DhiWise in 5 simple steps. Thereafter, you can create your application easily and effectively on DhiWise by mapping out all the essential data to their respective view components.
Documentation
This guide explains how to connect Supabase backend to DhiWise Flutter application quickly.
DhiWise is a Developer tool to convert Figma designs into React and Flutter applications. It lets you quickly integrate Databases and APIs into your React and Flutter Apps.
If you don't have a DhiWise account, create one here.
DhiWise supports easy Supabase Integration in just five steps.
Let's get started!
Step 1: SignIn to Supabase
Go to Supabase, Click Sign In, and create a new account by authenticating with GitHub. If you already have an account, you will be logged in.
Step 2: Create a new project in Supabase
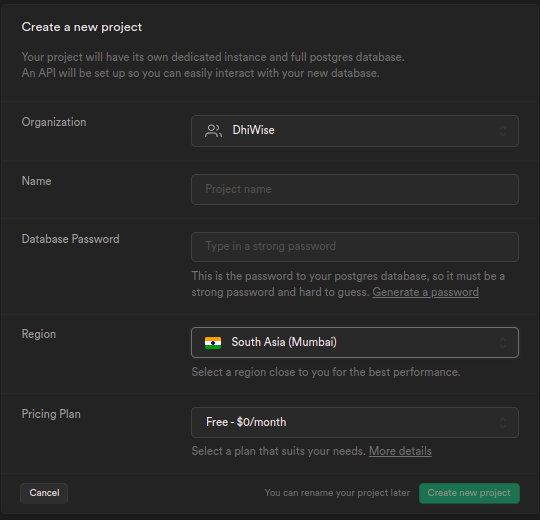
Click on New project from the Dashboard and select an organization. If you don't have an organization, create one using + New organization.
- Give your Supabase project a
name. - Enter a secure
Database Password. - Choose the
regionwhere your app's backend is hosted. - Click
Create new project.
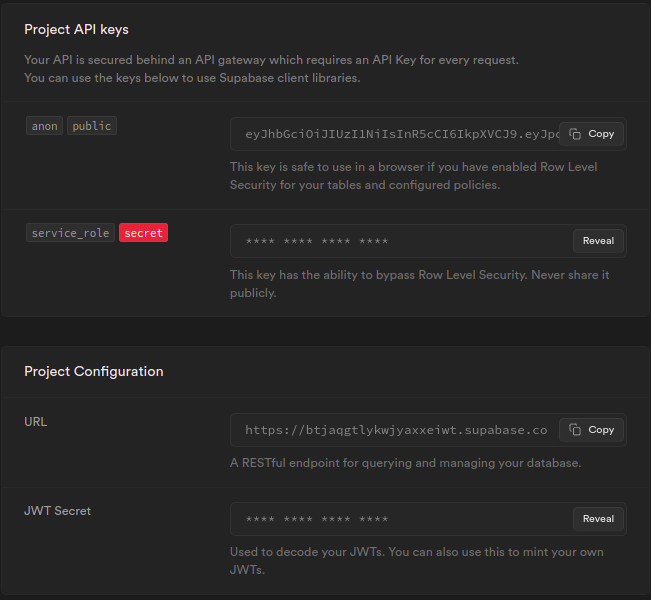
Step 3: Find the API key and URL
Once your project is created, you can access the API Key and URL string, Or if you already have an account go to your organization-> app-> settings-> API.
Step 4: Integrations
There are two ways you can integrate Supabase into your DhiWise Flutter applications.
Authentication
You can integrate Supabase Email/Password SignUp or Supabase Email/Password SignIn on your components.
- Open the screen of your flutter application
- Go to the component on which you want to add authentication
- on the
onClickmethod - selectauthentication - From the list, If you want SignUp - select
SignUp with Email/Password; otherwise, selectSignIn with Email/Passwordfrom Supabase Auth section

And that's it. Supabase authentication will be added to the selected component.
After downloading the application source code,
- Add Supabase URL and Supabase public key inside lib/core/utils/initial_bindings file.
- For additional details, refer https://supabase.com/docs/guides/with-flutter
Working with Data
When you first integrate Supabase in your DhiWise Flutter application, You will be asked to add Supabase auth key and URL. When you add them, all the tables available in your Supabase project will be synced in DhiWise. You can integrate Select and Create queries on your Flutter screen for a particular table in DhiWise.
Select records

Step 1:
Select the screen from the screen list where you want to integrate Supabase.
Step 2:
Next, go to the view where you want to add Integration, and from the suggestion box for the onClick property, choose Supabase integration, which will take you to the Integration screen. Where you will be asked to Enter function name. Enter the name of your function and click Submit.
Step 3:
After submitting the function name, you will be asked to select a type of Supabase integration. To retrieve data from Supabase, choose select.
Step 4:
Next, select the table from which you want to fetch records from the listed Tables.
Step 5:
Select the type of integration
| Type | Description |
|---|---|
| Single | Used to fetch a single record from the database. |
| Multiple | Used to fetch multiple records from the database. |
For Multiple types, you need to set data limit, order by, and order.`
Step 6:
You will be redirected to the API Integration screen, where you can set request and response.
For request binding, the below types are supported. Also, Select the operator for comparison before moving forward.
| Type | Description |
|---|---|
| View | Select any component from your screen. |
| Constant | Select a constant you've created in your app. |
| Get from preference | Select the key you want to fetch from preference. |
| Navigation argument | Select data that's been passed from one screen to another. |
For response binding, the below types are supported.
| Type | Description |
|---|---|
| View | Select any component from the screen. |
| Save to preference | Storing the data to preference. |
Select 7:
Handle action - Select the action you wish to take once the Supabase call has either been accepted successfully or refused due to an error.
Available action for On success and On error are,
Step 8:
Finally, you have added Supabase to your application to fetch records on your screen!
Example
Suppose you want to fetch records from Supabase and populate the item list on your screen. You can integrate Supabase as discussed above and bind the response with your list view.
Create records
Step 1:
Choose the screen you wish to integrate Supabase for from the list of screens.
Step 2:
Next, switch to the component you want to add Integration, and on the onClick property, choose Supabase integration, which will take you to its integration screen, where you will be asked to Enter function name, which will be used in generated code. Enter the name for it and click Submit
Step 3:
After submitting the function name, you will be asked to select a type of Supabase integration. For example, to create a record in Supabase, choose Create.
Step 4:
Next, select the table where you want to create a record from the listed Tables.
Step 5:
If you want to create a Single record, Select Select. Otherwise, Multiple.
Step 6:
Now, you will be redirected to the API Integration screen, where you can set request and response.
For request binding, the below types are supported.
| Type | Description |
|---|---|
| View | Select any component from the screen |
| Constant | Select a constant you've created in your app. |
| Get from preference | Select the key you want to fetch from preference. |
| Navigation argument | Select data that's been passed from one screen to another. |
For response binding, the below types are supported.
| Type | Description |
|---|---|
| View | Select any component from the screen |
| Save to preference | Storing the data to preference. |
Select 7:
Handle action - Select the action you wish to take once the Supabase call has either been accepted successfully or refused due to an error.
Available action for On success and On error are,
Step 9:
Finally, you have added Supabase to your application to create records from your screen data!
Resources
Details
Third-party integrations and docs are managed by Supabase partners.