
WeWeb
Overview
WeWeb is a no-code tool that allows you to build user interfaces on top of existing databases.
It allies the short learning curve of no-code with the freedom of code.
You can build complete frontends with drag-and-drop UI elements and no-code CSS properties but have the option to add custom code or import your own Vue.js components.
You can follow development best practices by building global workflows and re-usable functions with no-code triggers and formulas but also have the option to add custom JS where needed.
WeWeb generates a standard PWA-ready Single Page Application and allows you to deploy your projects on your own infrastructure. Build in no-code, host on-premise.
Documentation
This guide explains how to connect a Supabase back-end to a WeWeb front-end and then configure all the CRUD operations necessary to build an Admin Portal with user authentication, roles, and permissions.
WeWeb is a low-code front-end builder that allies the short learning curve of no-code with the freedom of code.
It connects to Supabase via two native integrations:
- one for data manipulation, and
- another for user authentication.
If you don't have an WeWeb account, you can create one here.
Let's get started!
Step 1: Add the Supabase Data Source Plugin in WeWeb
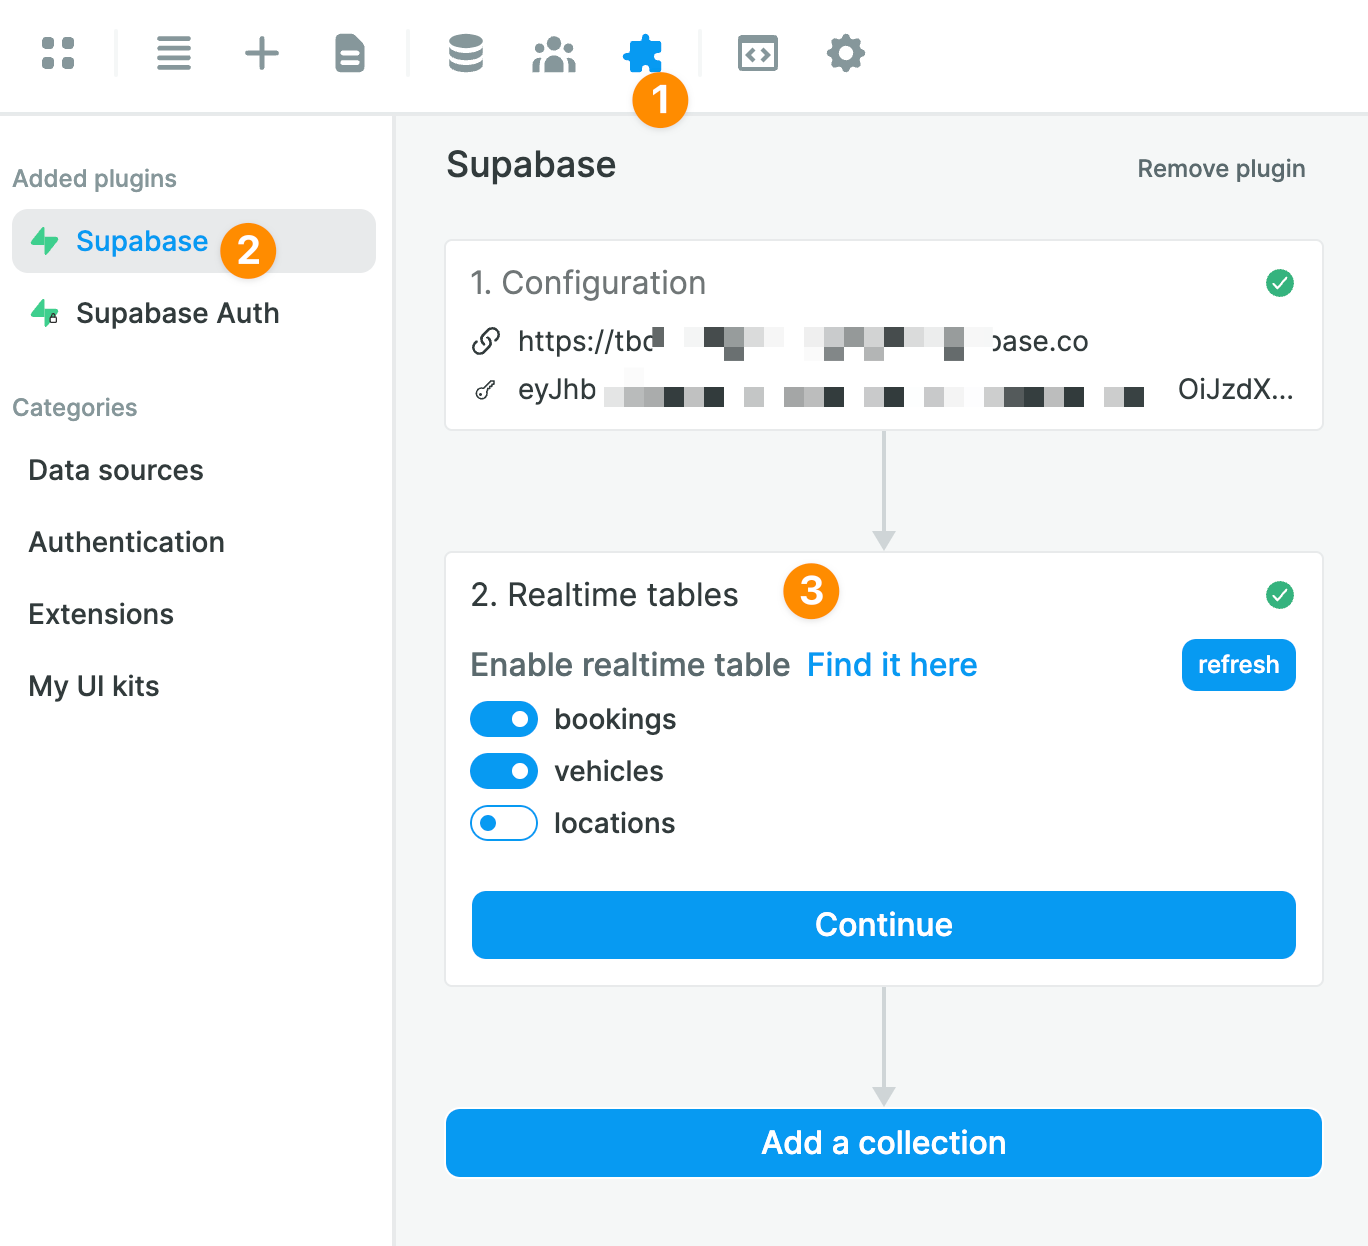
In order to read Supabase data in WeWeb, you'll first need to add the Supabase Data Source Plugin:
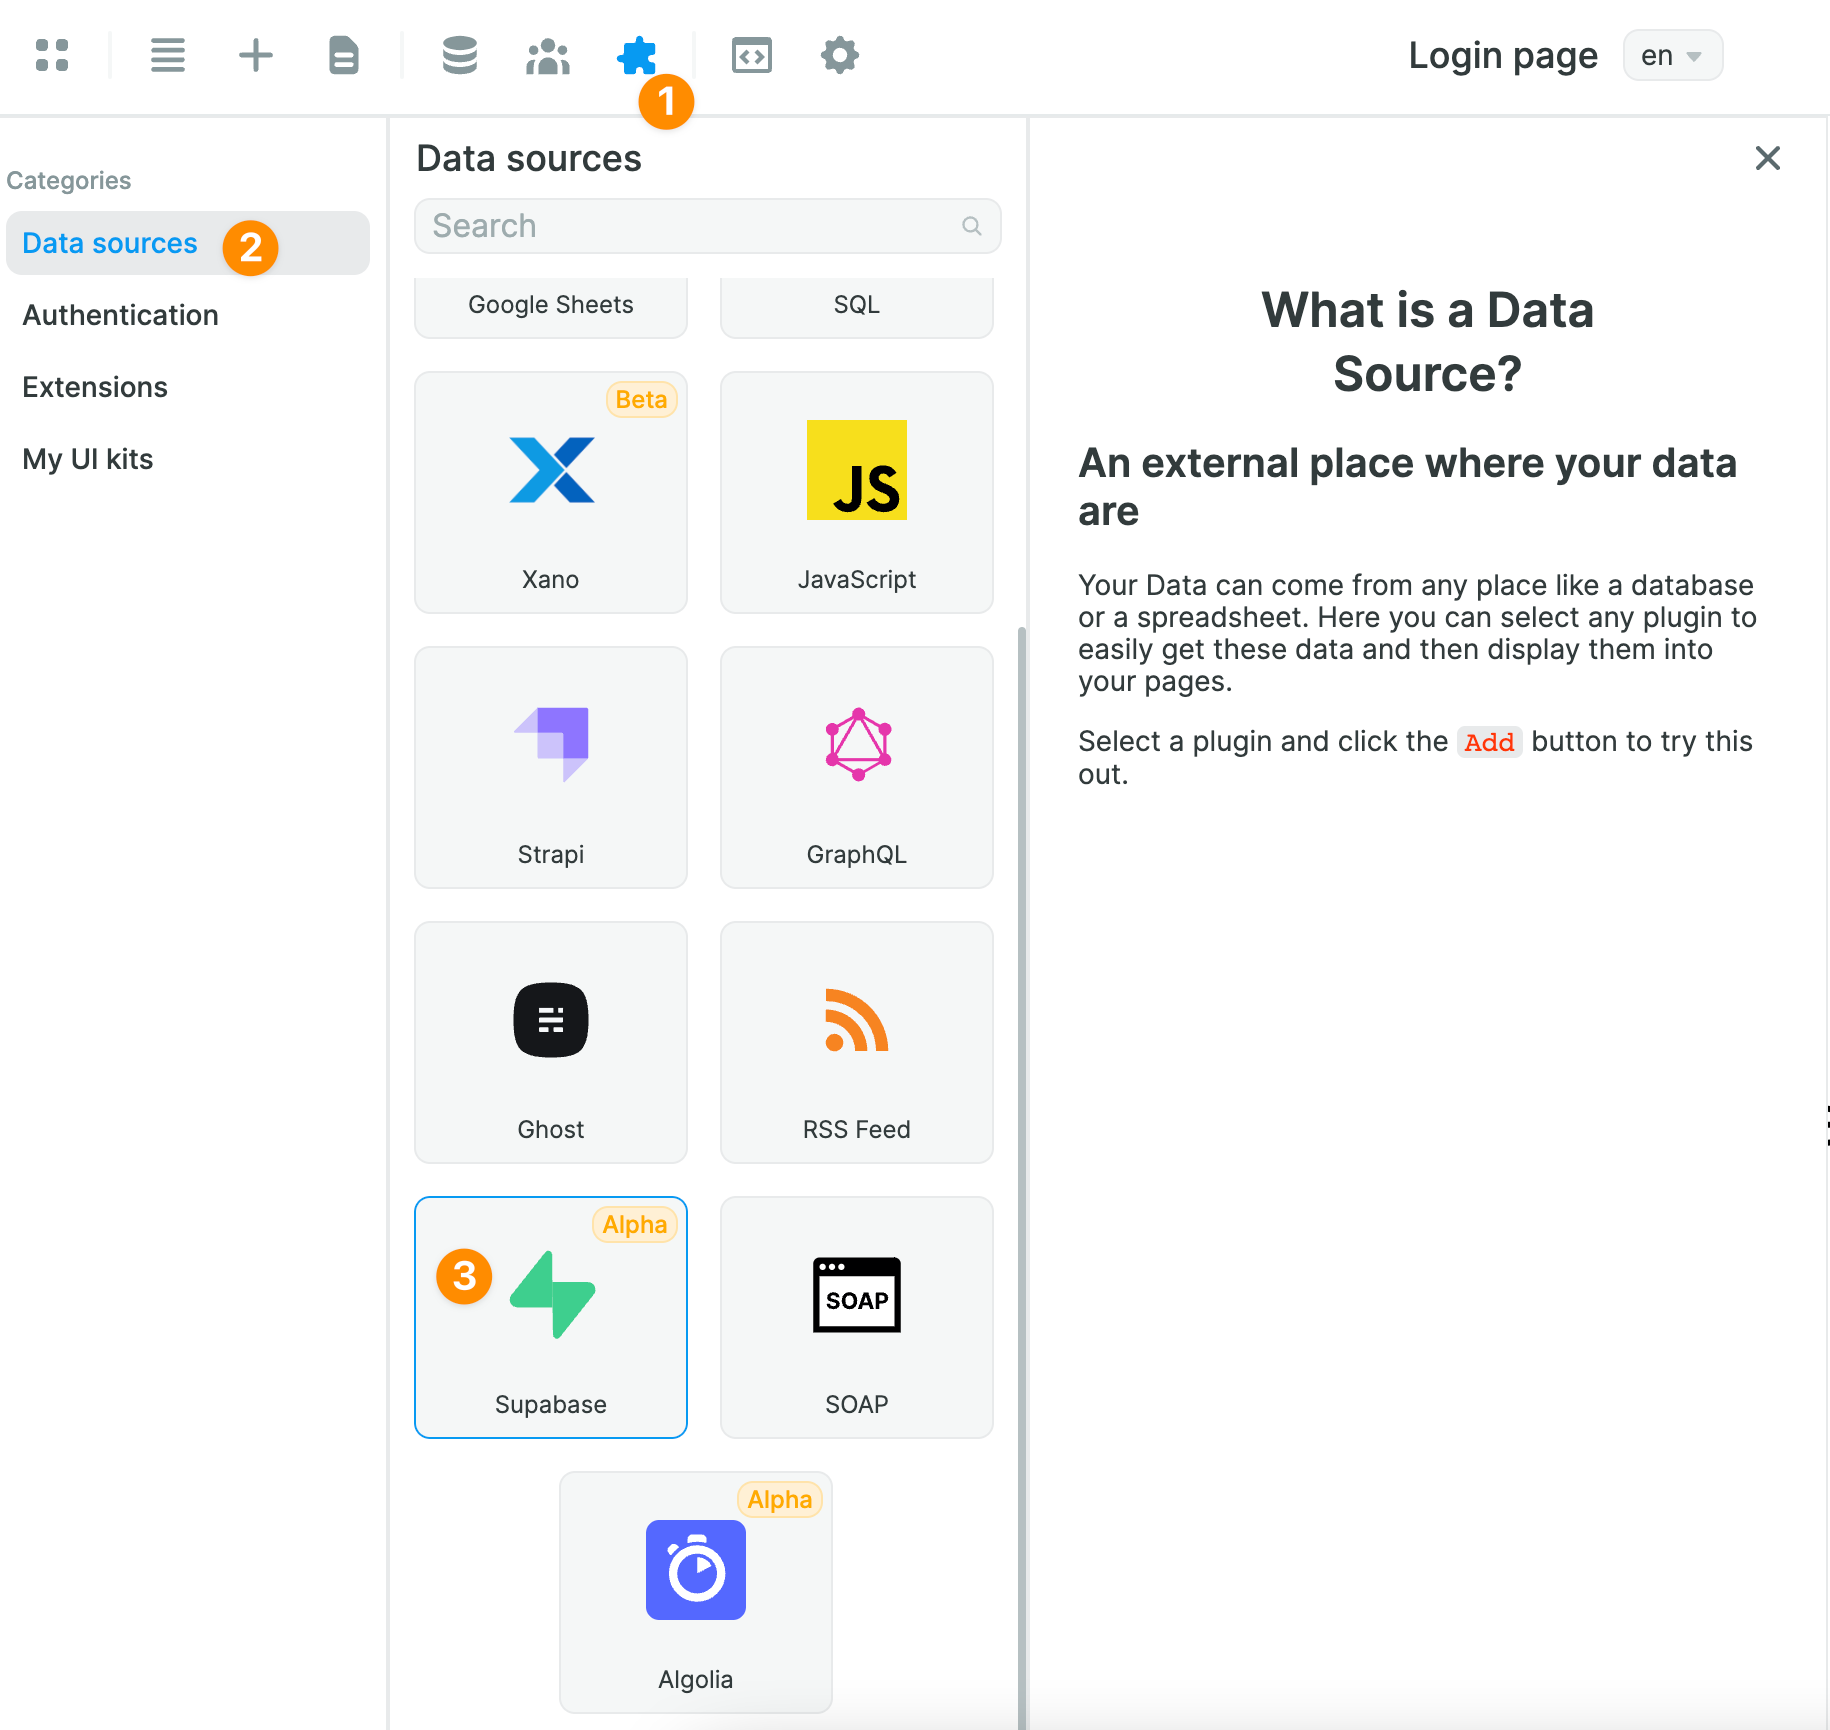
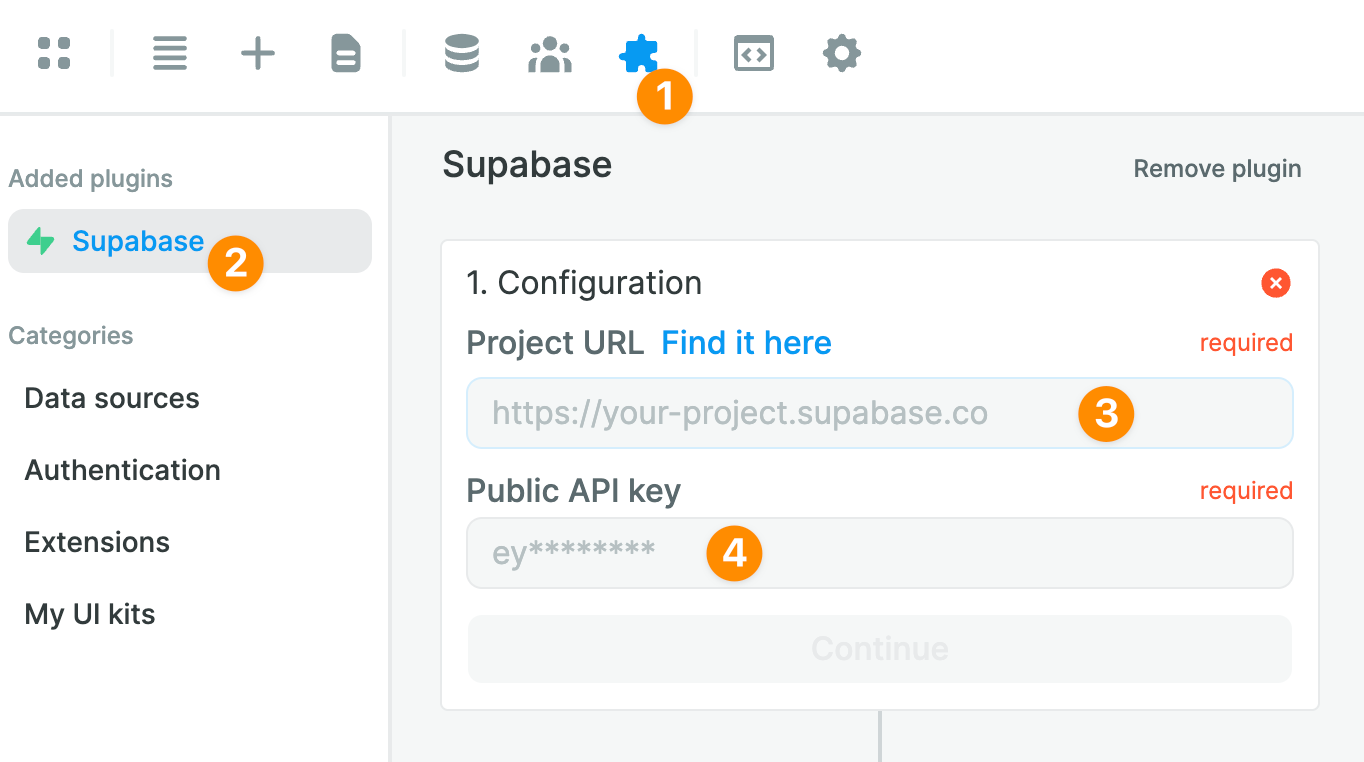
Once you've added it, you will be invited to share your Supabase project URL and public API key:
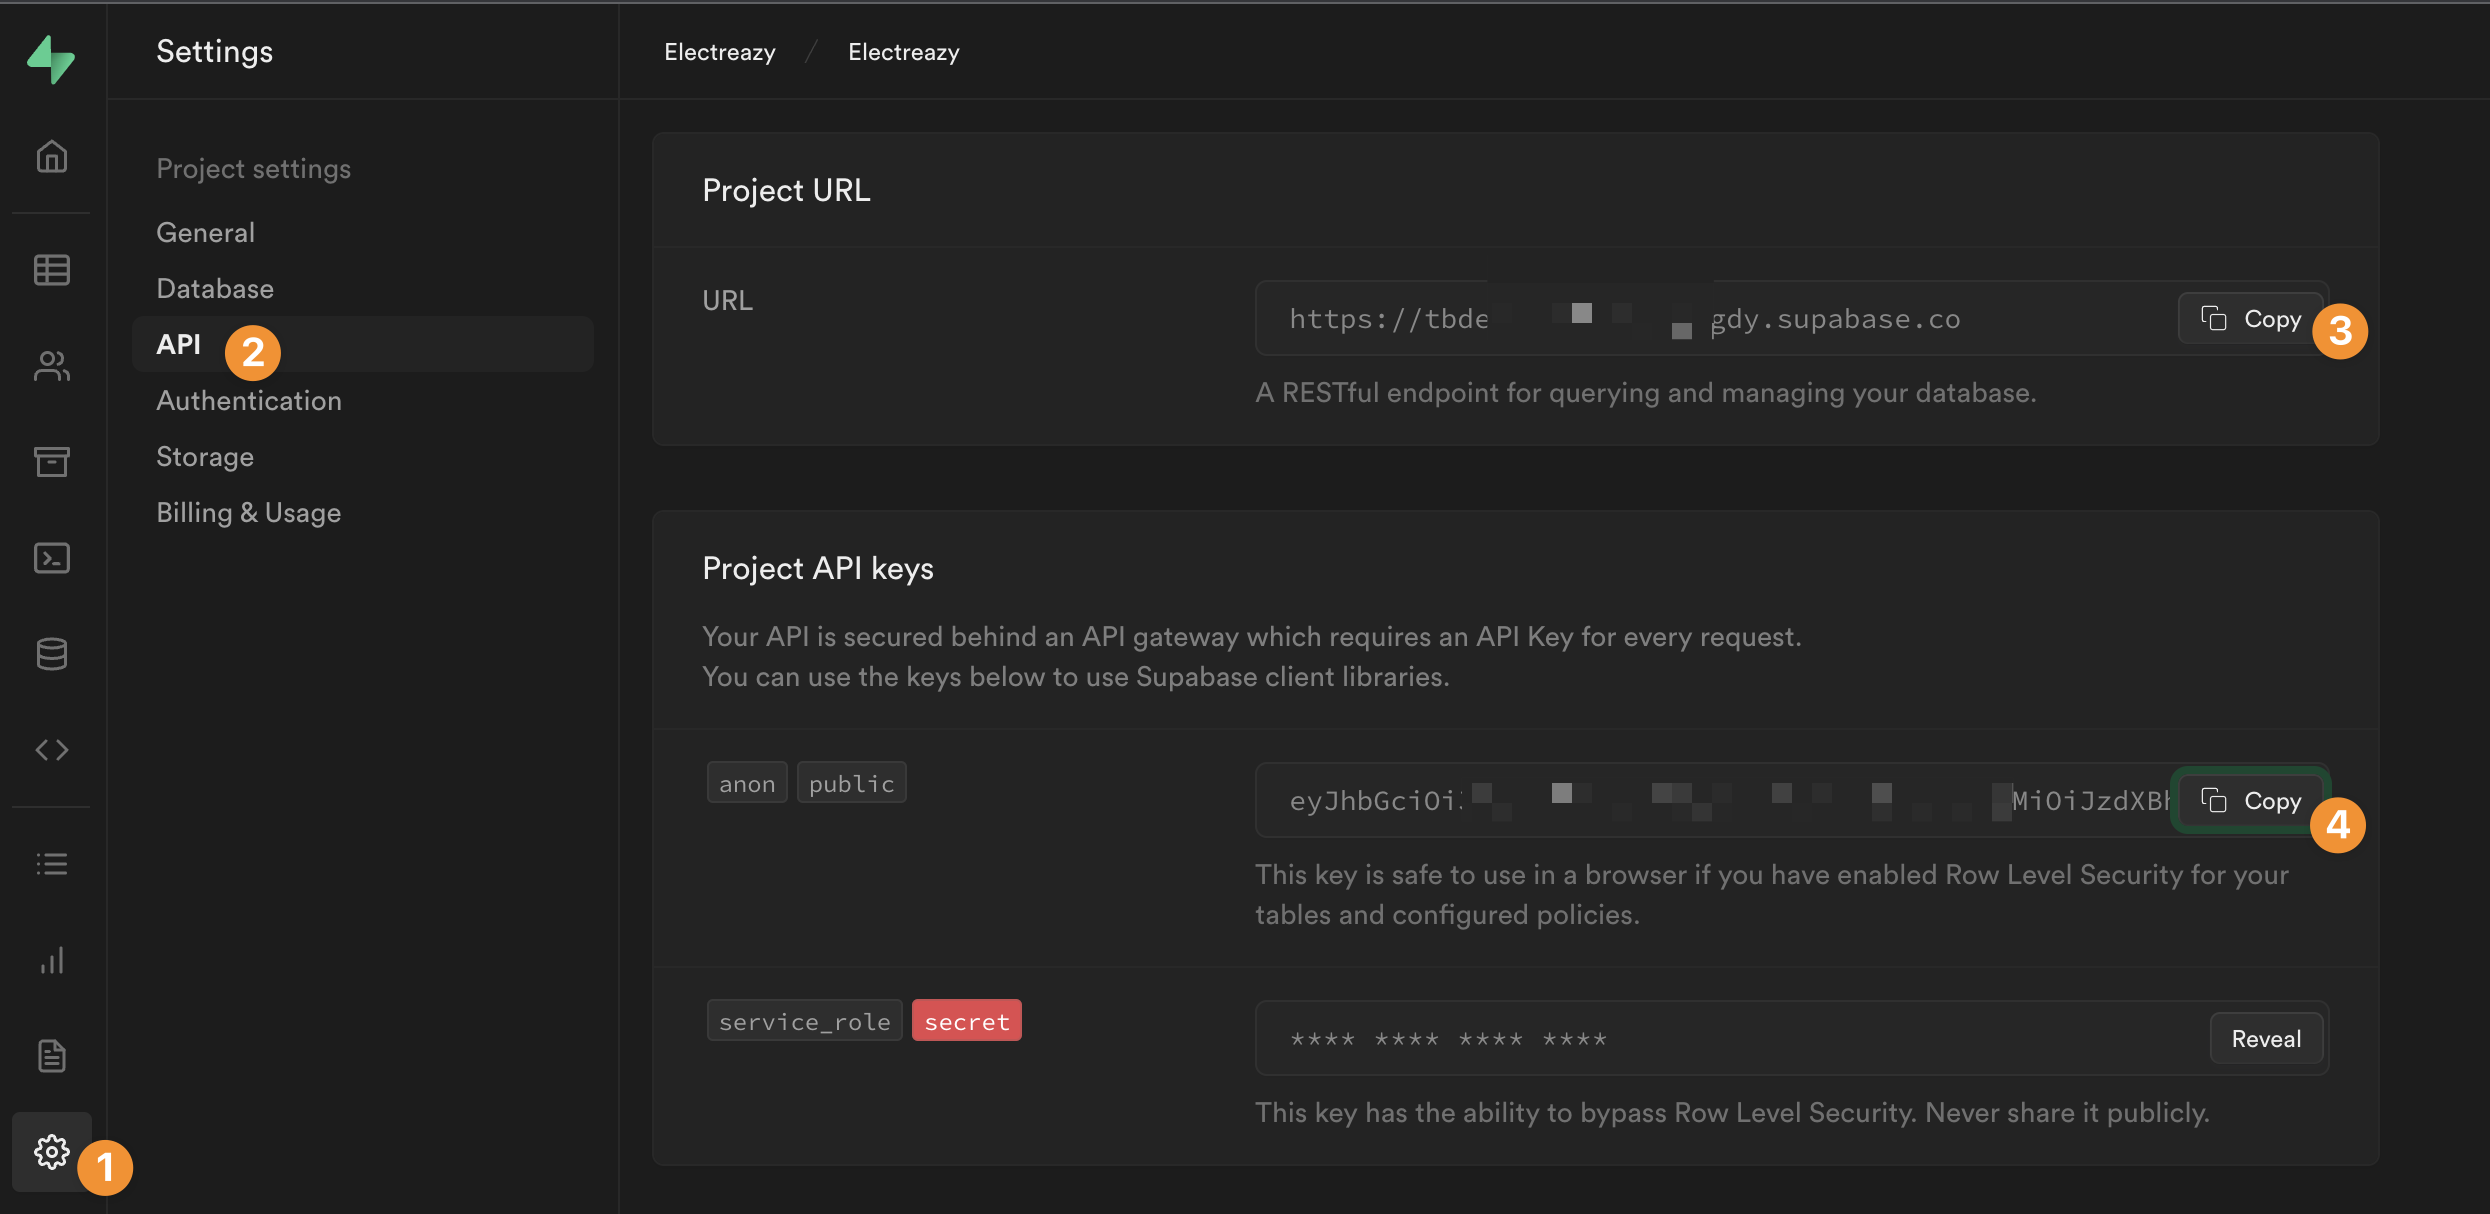
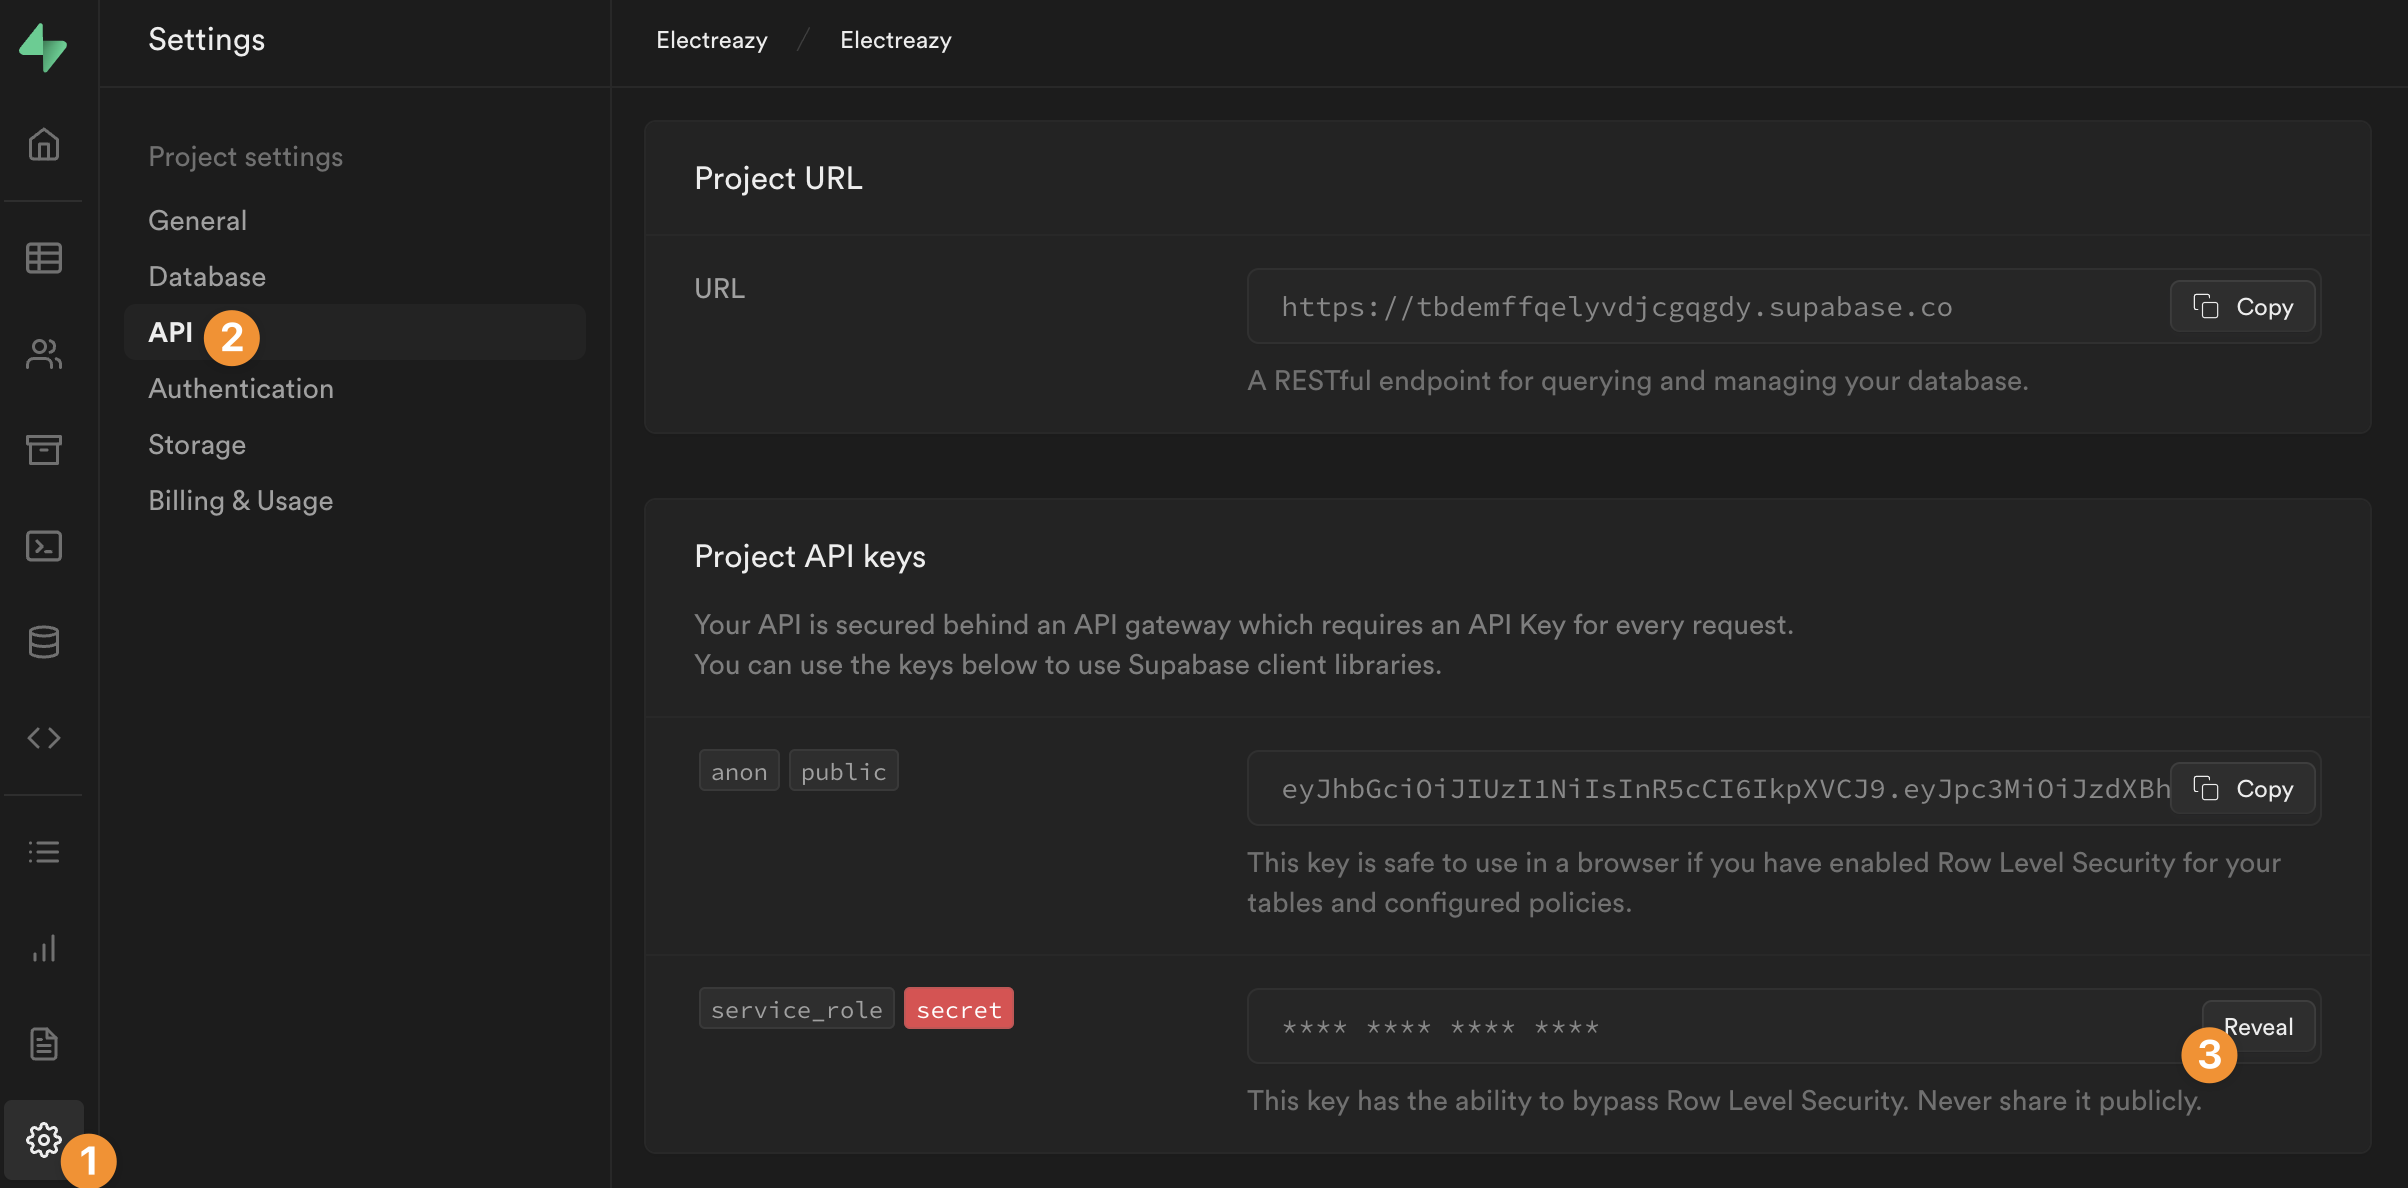
In Supabase, you can find both your project URL and public key in the Settings > API menu:
Once you have added both to WeWeb, you will have the option to enable realtime tables if you wish to do so:
🚨 Warning 🚨
Realtime is disabled by default in Supabase for better database performance and security. Learn more about realtime functionalities.
Step 2: GET Data from Supabase
Once you click on Add a Collection, you will be invited to give your Collection a name and choose Supabase as a Data source:
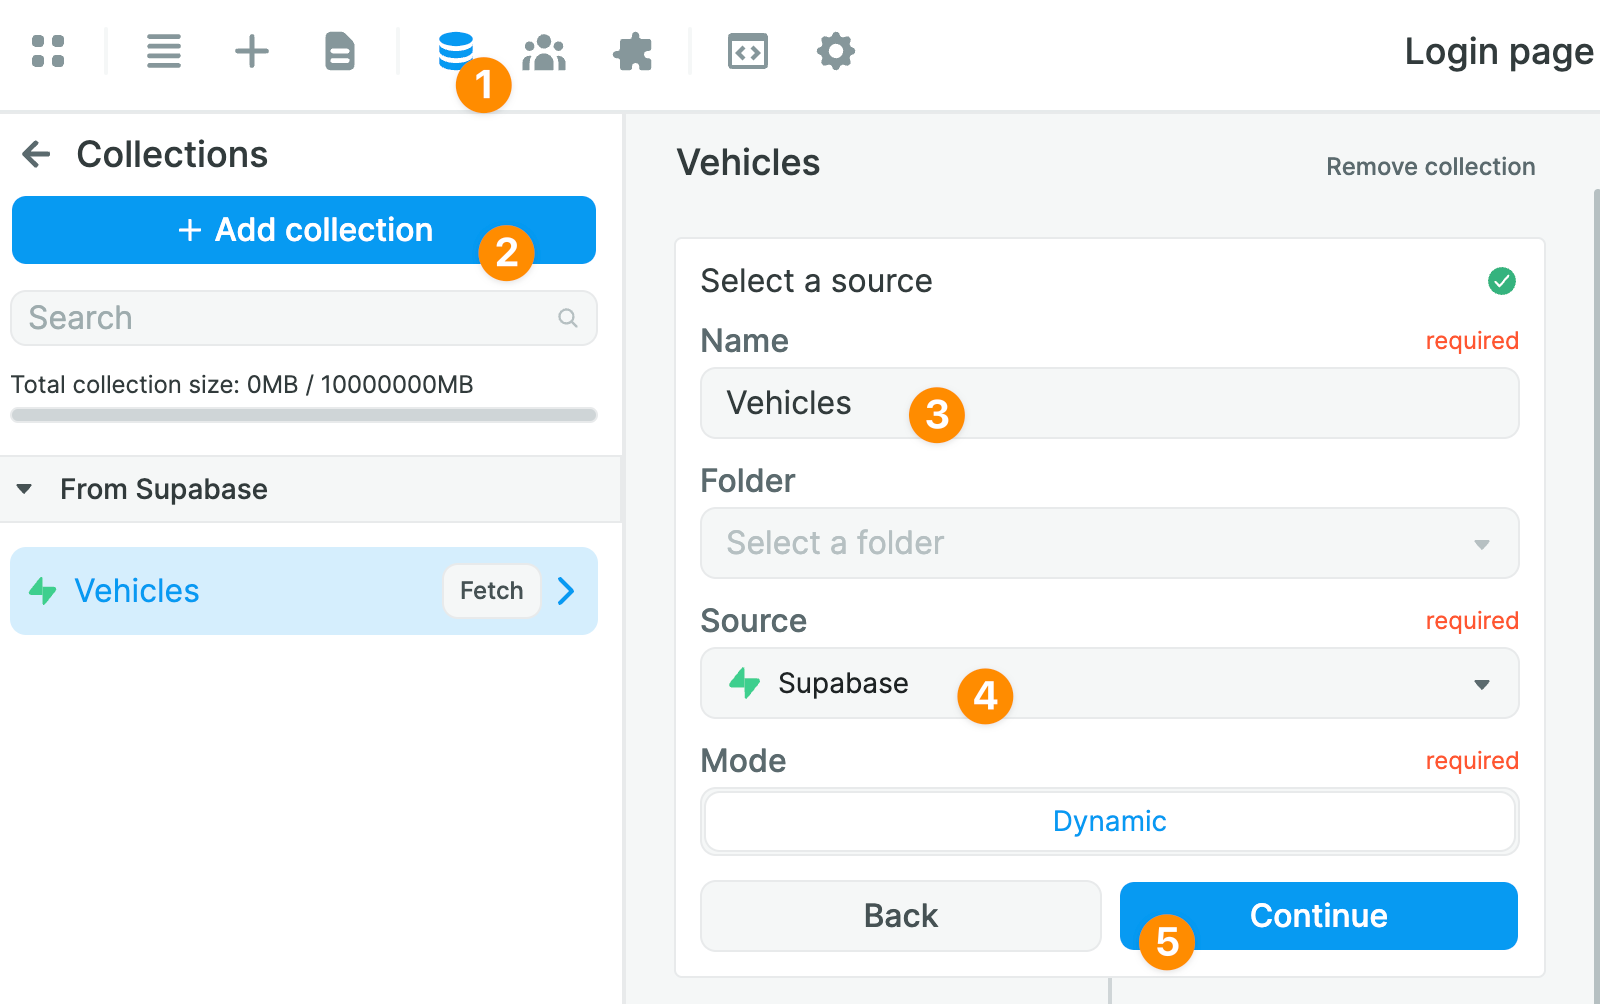
You will then be able to select the Table from which you want to pull data:
Notice that this gives you access to 2 separate modes to access the fields in the table:
- a "Guided" mode, and
- an "Advanced" mode.
Guided mode
By default, the "Guided" mode returns the data from all the fields.
In the example below, we decide to exclude the data from the created_at field in our vehicles table:

As a result, WeWeb does not fetch the created_at field.
This is helpful because we can exclude data that we don't want to load in the frontend, either because we don't need it or because it's confidential.
Advanced mode
In our database, we created 2 separate tables for vehicles and locations.
In the vehicles table, we made a reference to the locations table in our location_id field so we know where each car is:
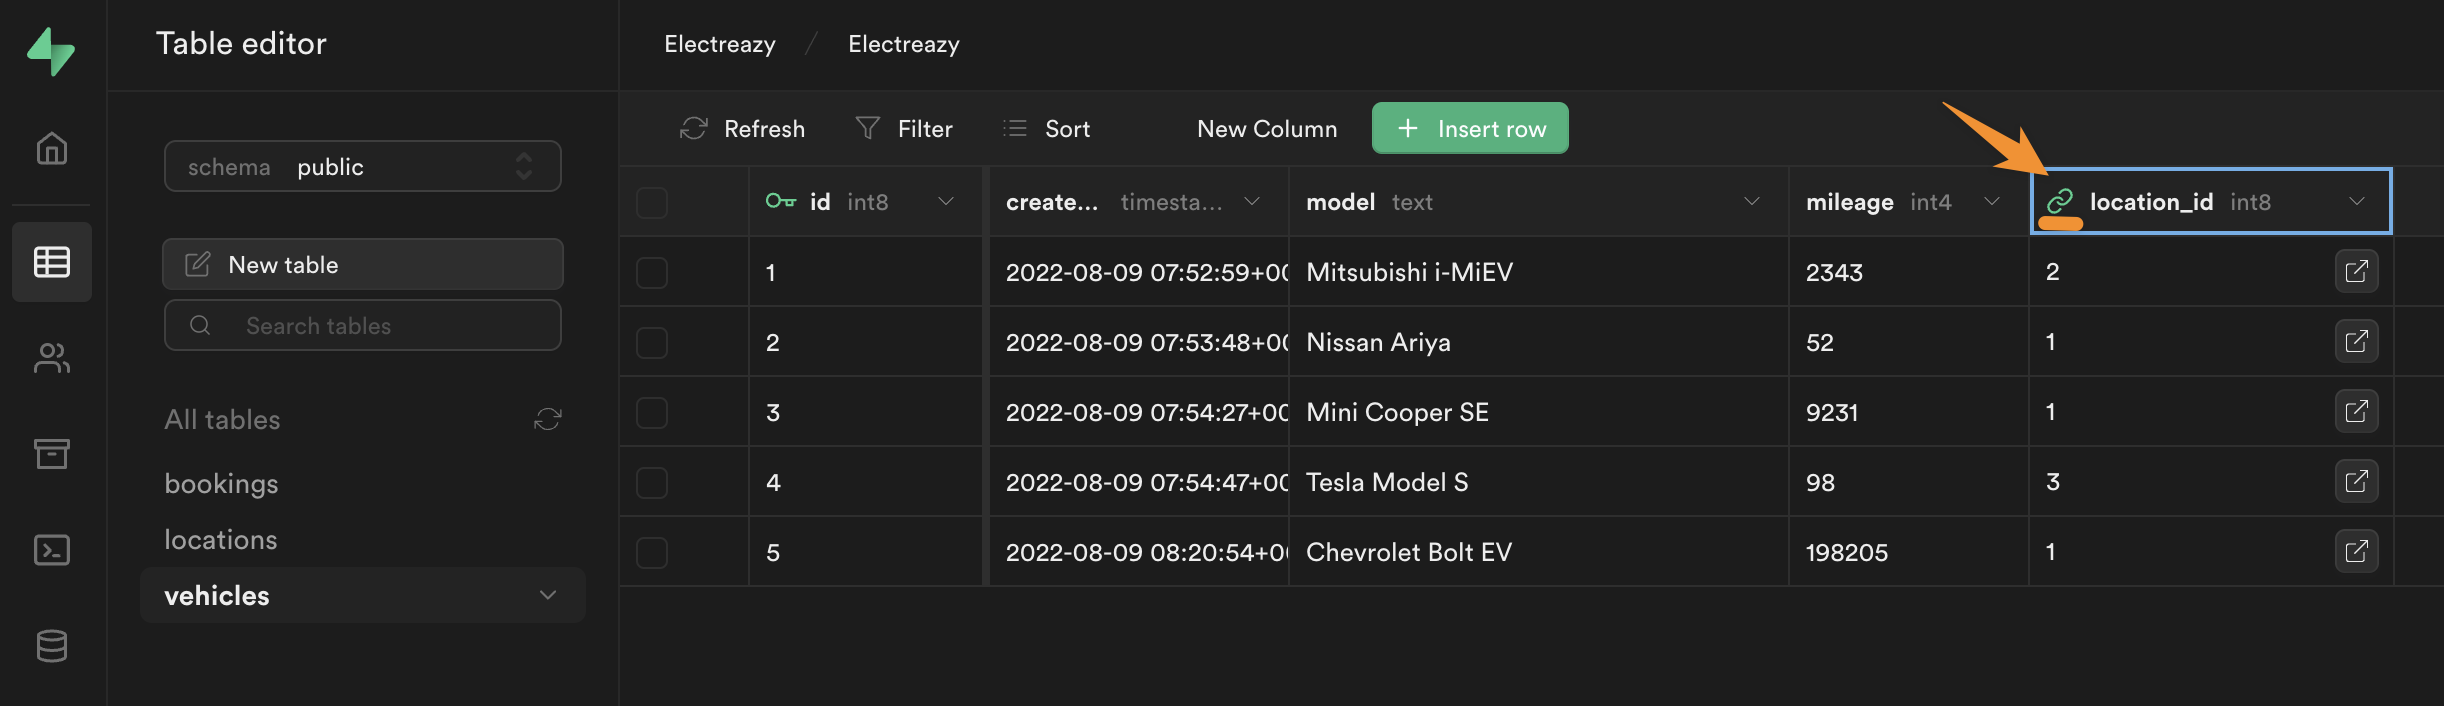
The problem is, the link only gives us the id of the location in the locations table.
If you choose the "Advanced" mode, you will be able to get the name field of the location instead of the id.
How?
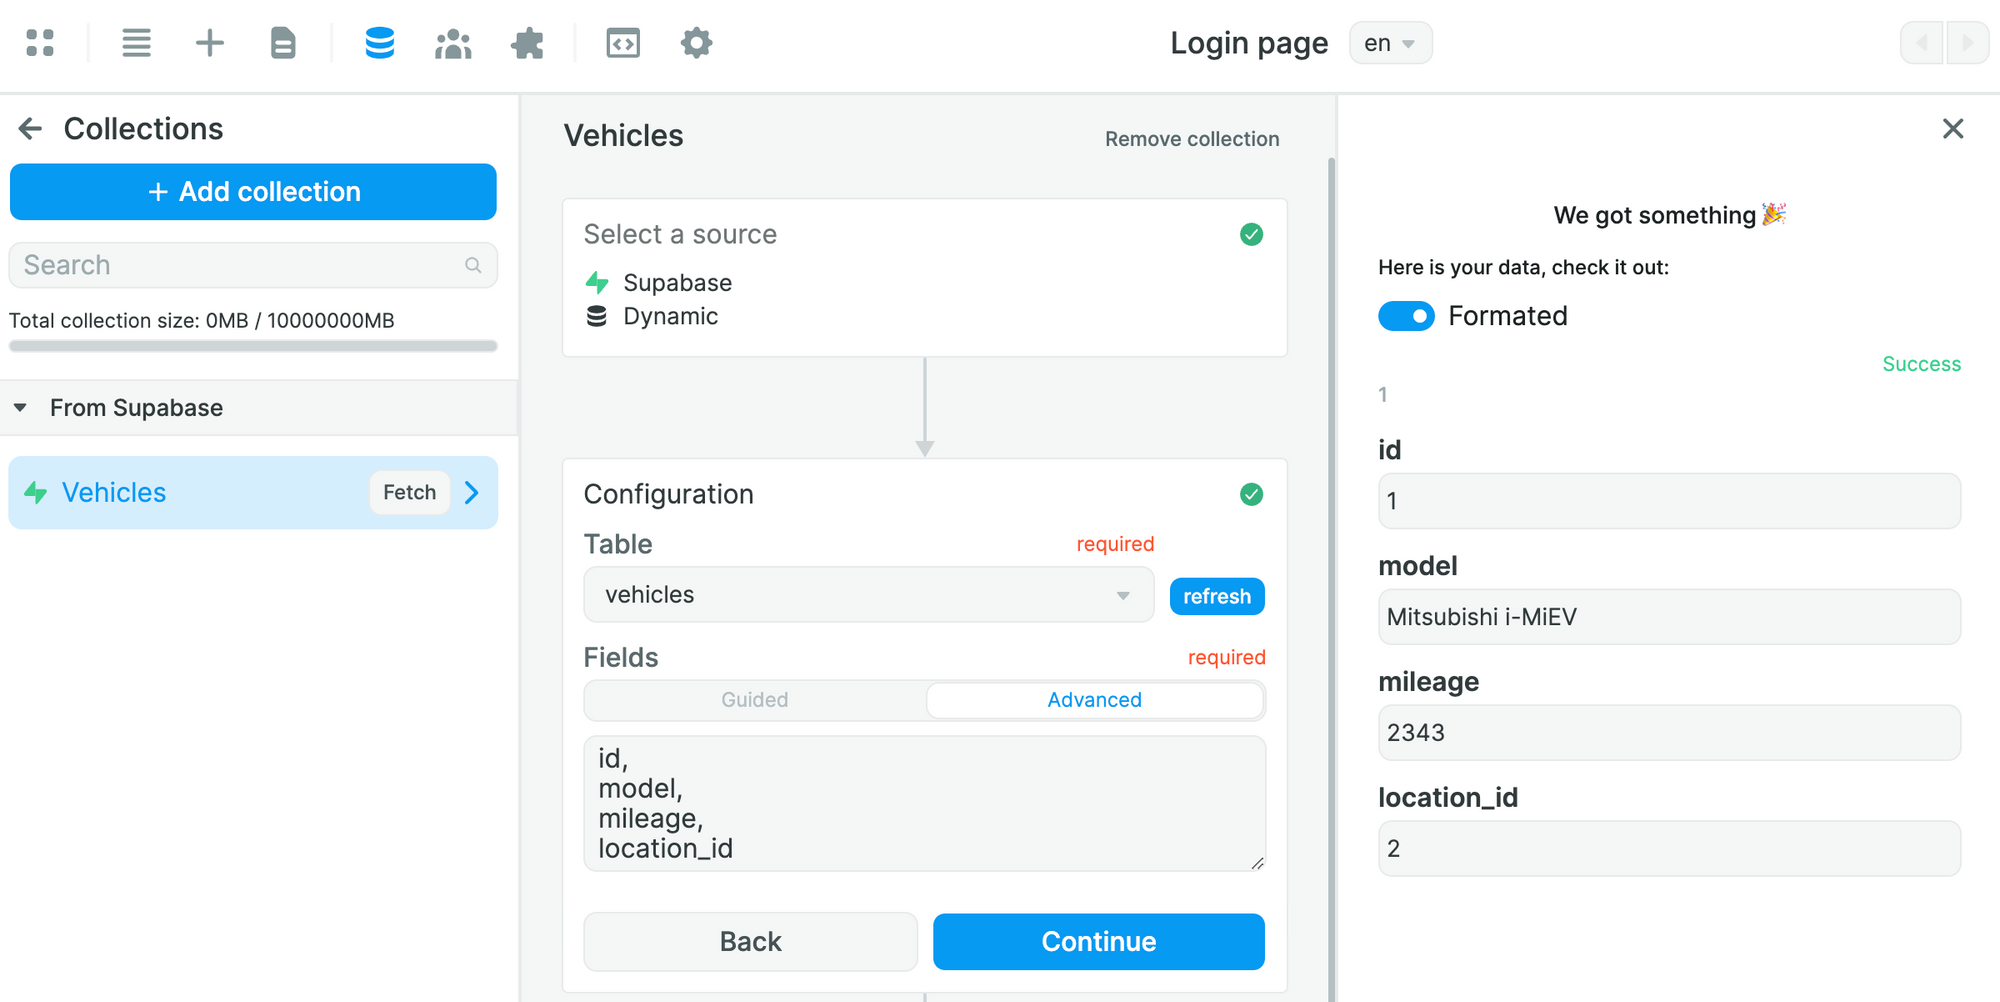
By making custom queries to Supabase:
In the example above, we are telling Supabase:
- from the table selected in the Collection – in this case the
vehiclestable – please send me the data in theid,model, andmileagefields - look for the
location_idin thevehiclestable in thelocationstable and send me the data in the correspondingnamefield
If we only ask for the data from the location field of the vehicles table, Supabase will only return the id:
🚨 Warning 🚨
If you have enabled Row-Level Security in Supabase, make sure you have also added a Policy that allows users to read the data in the table. Otherwise, WeWeb won't be able to get the data.
Step 3: Display Supabase Data in WeWeb
Assuming you were able to fetch data from Supabase in a WeWeb Collection, you'll be able to bind the data from that Collection on your WeWeb pages.
In the example below, we chose to display the car model and mileage in the Data Grid element that comes out-of-the-box in WeWeb:
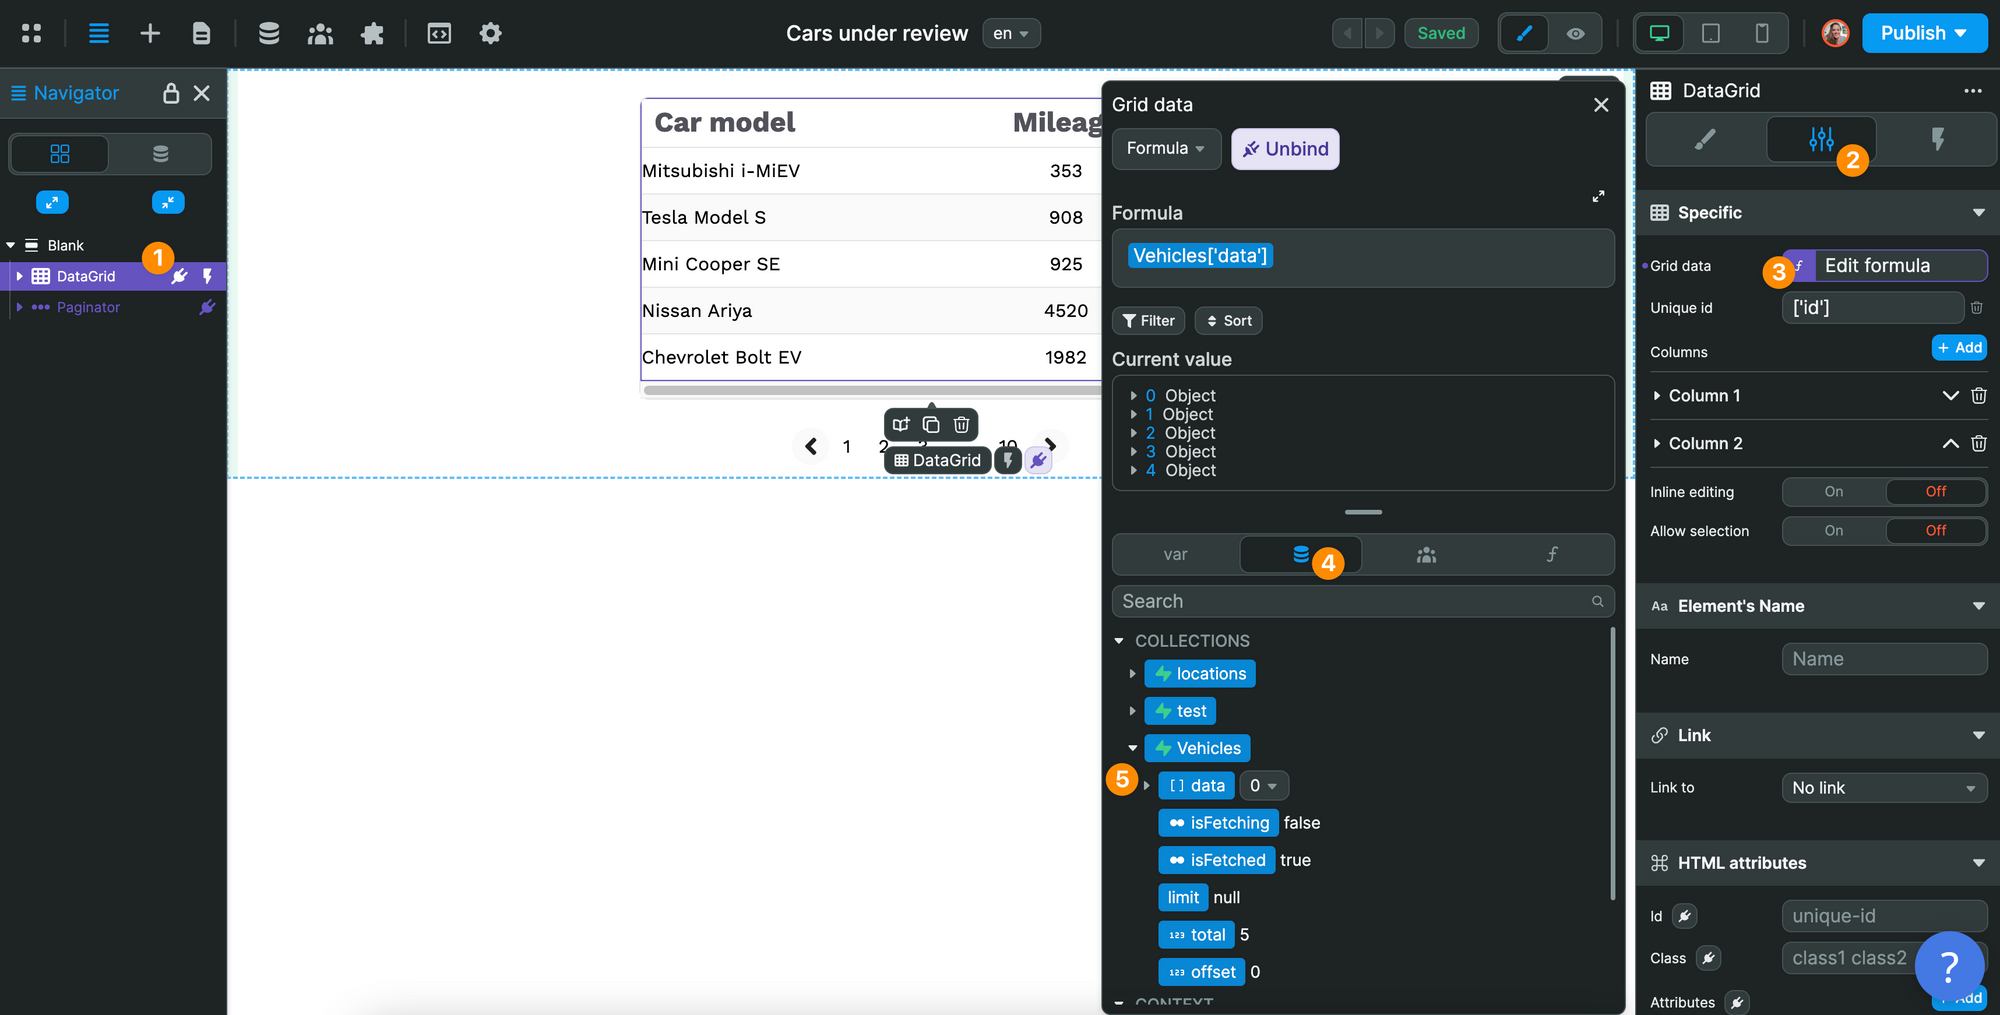
We chose this element because it includes a built-in inline editing mode we'll want to use later for our CRUD operations.
🔥 Pro Tip 🔥
In WeWeb, you can bind arrays of data to any Container. Just bear in mind that the first child of the Container you bind the Collection to will be the repeated item. With that in mind, you might want the first child Element to be another Container with a number of items inside like a title, description, button or image.
Step 4: Update a record in Supabase
Once you've added a Supabase Collection of data to WeWeb, you might want to allow users to manipulate the data in that Collection.
In order to do so, you'll need to create a Workflow in WeWeb.
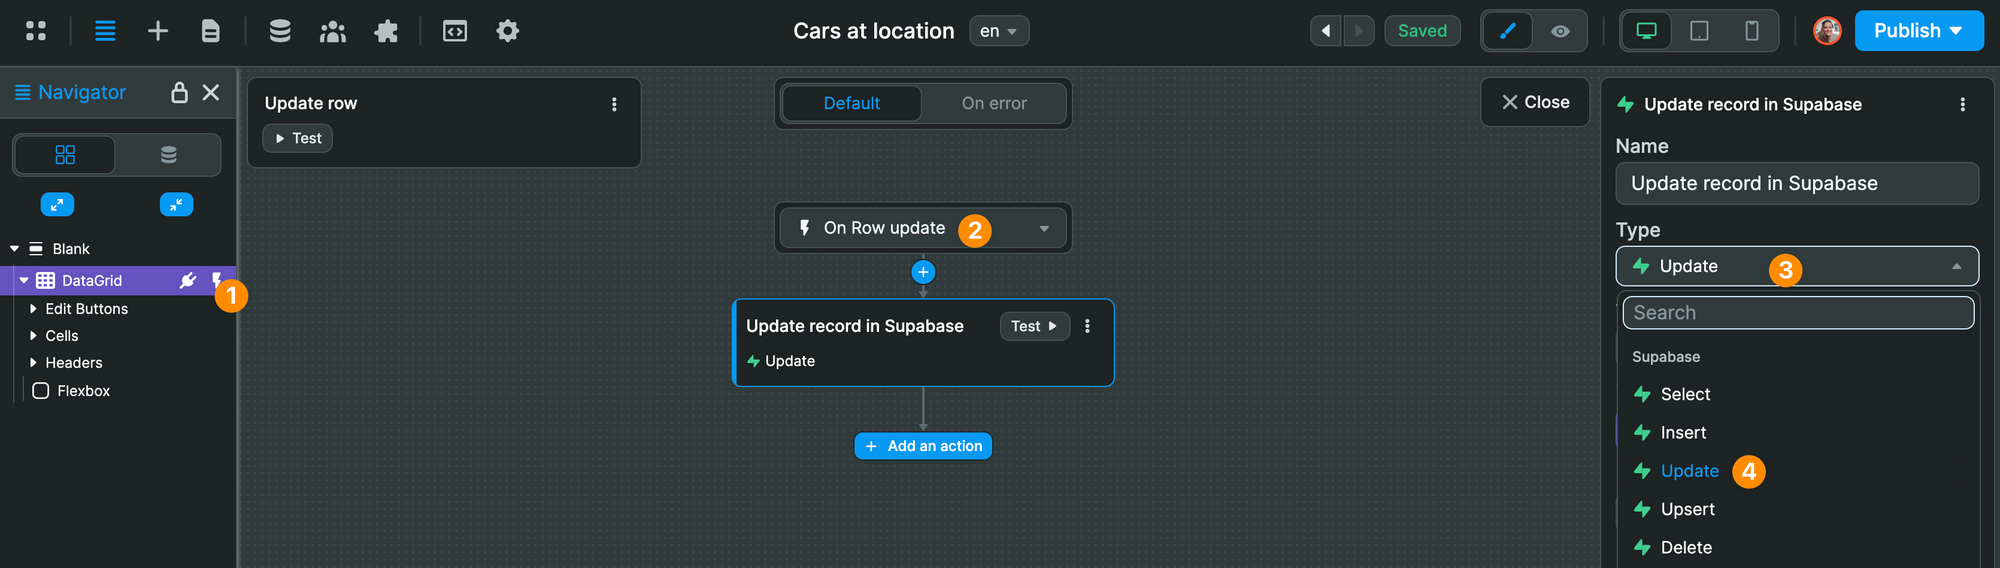
In the example below, we are using the "Update row" Workflow that comes by default with WeWeb's Data Grid Element.
The trigger is On Row update.
Since we added the Supabase Data Source Plugin above, we have access to all the CRUD actions available in Supabase:
- Select
- Insert
- Update
- Upsert
- Delete
In this case, we choose the "Update" action:
Then, in our "Update" action, we select the vehicles table and map the id to the id of the Workflow Event:
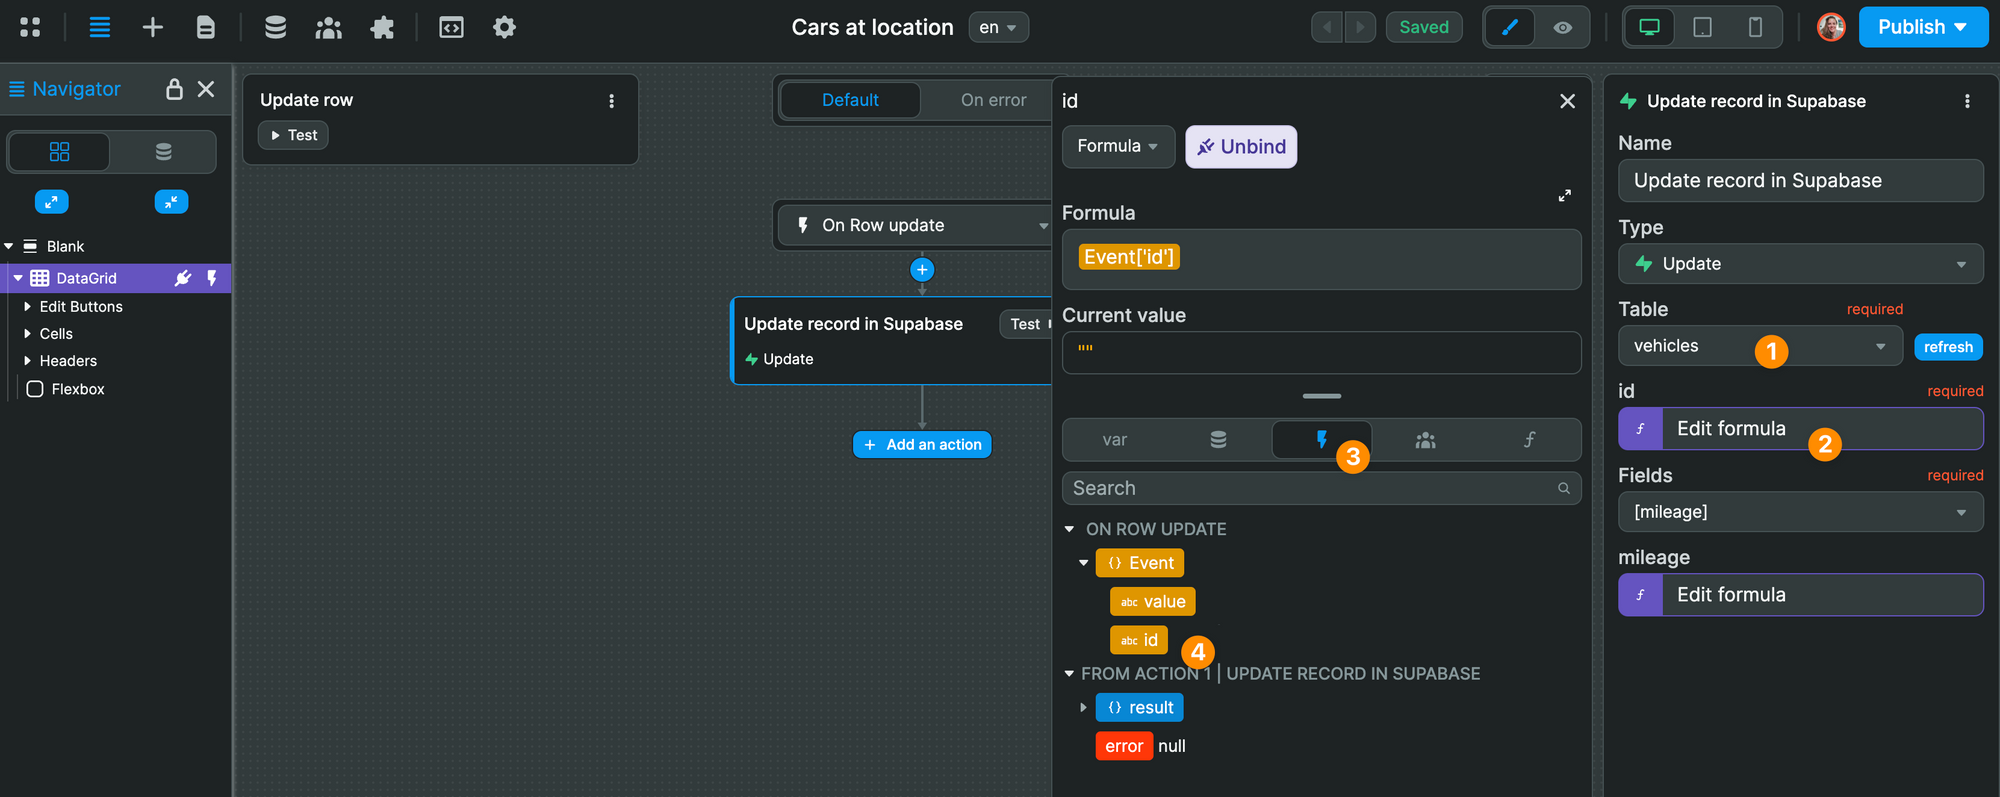
Finally, we tell WeWeb we want to update the mileage field in our Supabase table, and send the value in the mileage column of our Data Grid:

And that's it!
If you switch to Preview mode, you will be update your Supabase table from your WeWeb Data Grid:
🔥 Pro Tip 🔥
By default, the fields in the Data Grid Element are Text fields but you can change the input type to Number if you need to send numerical data to your database:

Restrict who can modify a record in Supabase
By default, all the data in the tables that are in the public schema of your Supabase project can be read, updated, or deleted.
Supabase allows you to enable Row-Level Security for each of your tables:

If you want to restrict certain actions to specific users or roles, you'll need to:
- add Supabase authentication to your WeWeb project, and
- write SQL policies in Supabase.
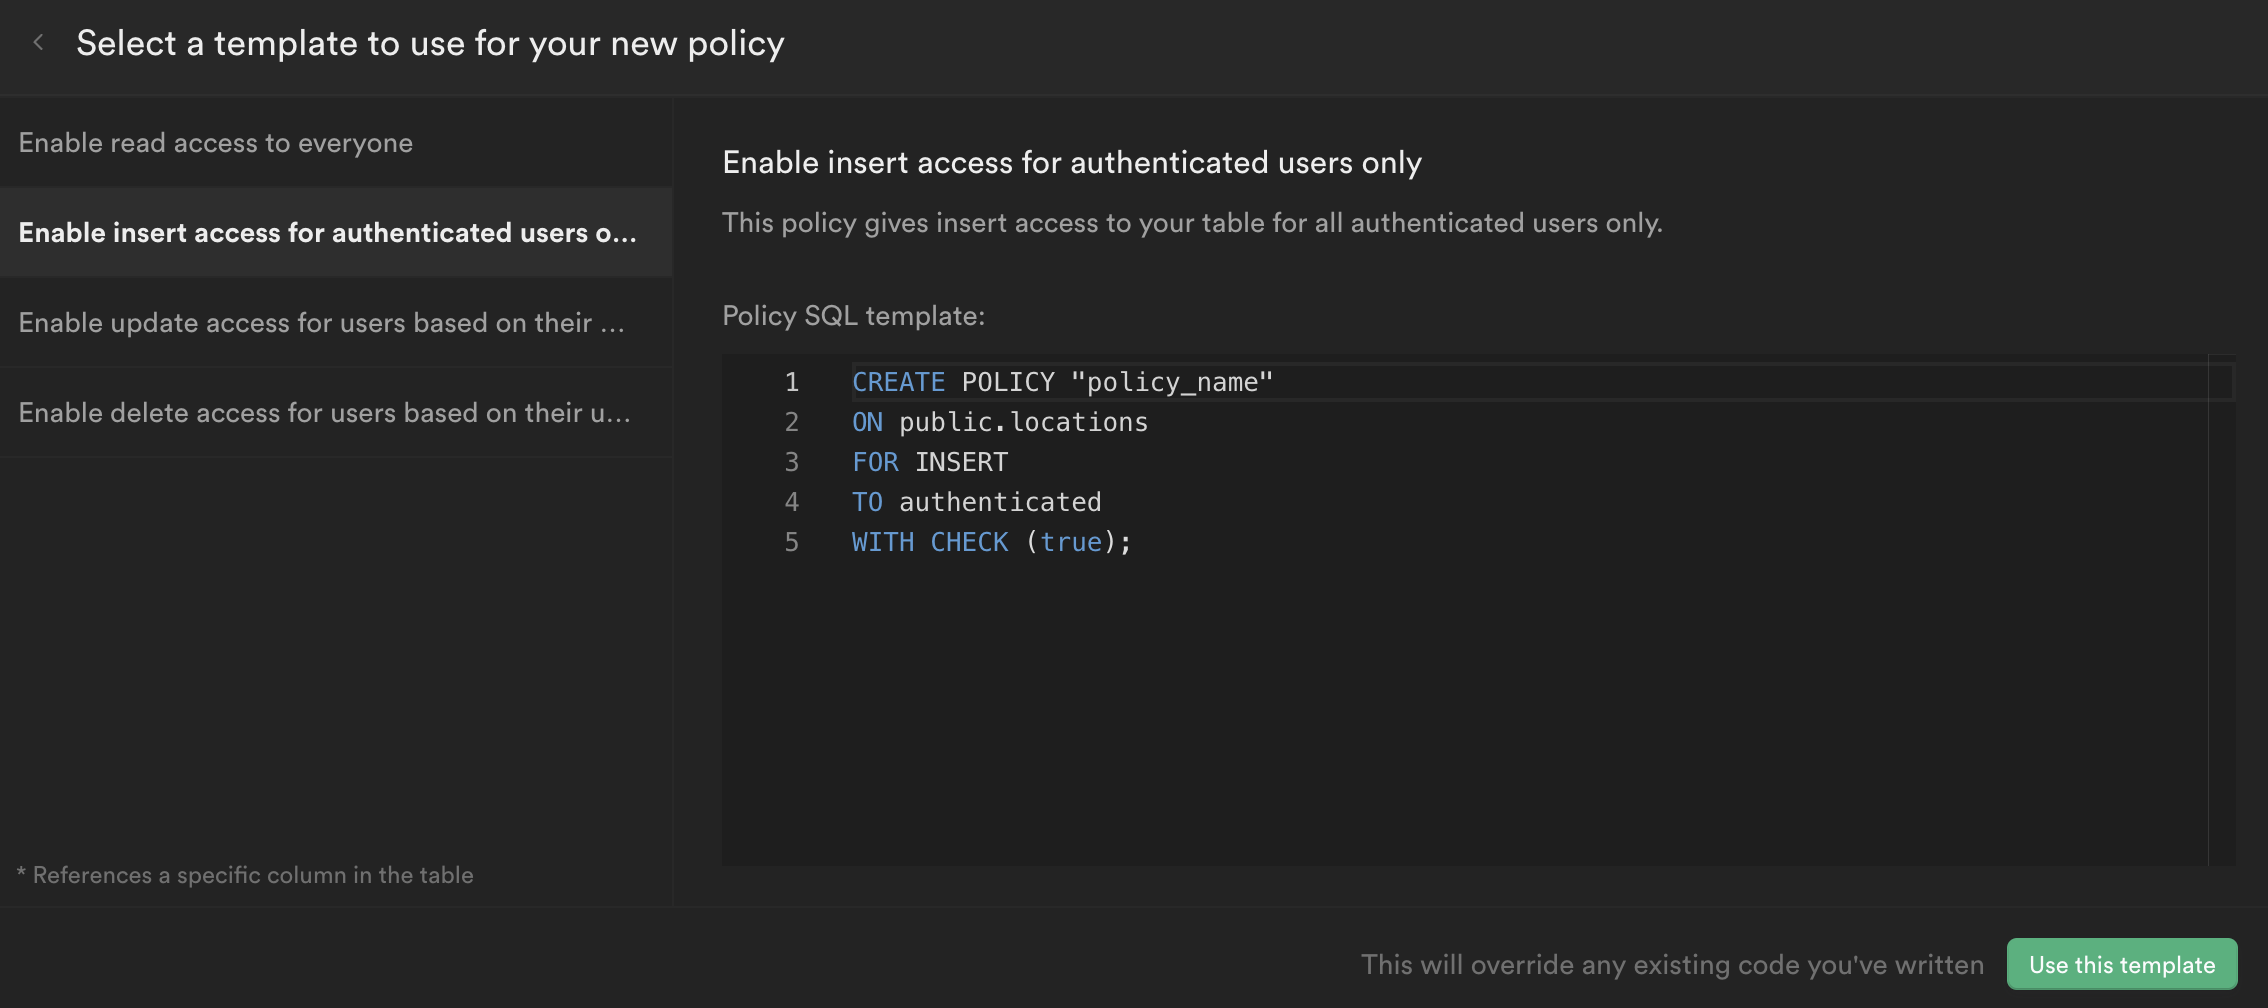
We provide a number of policy templates to get you started:
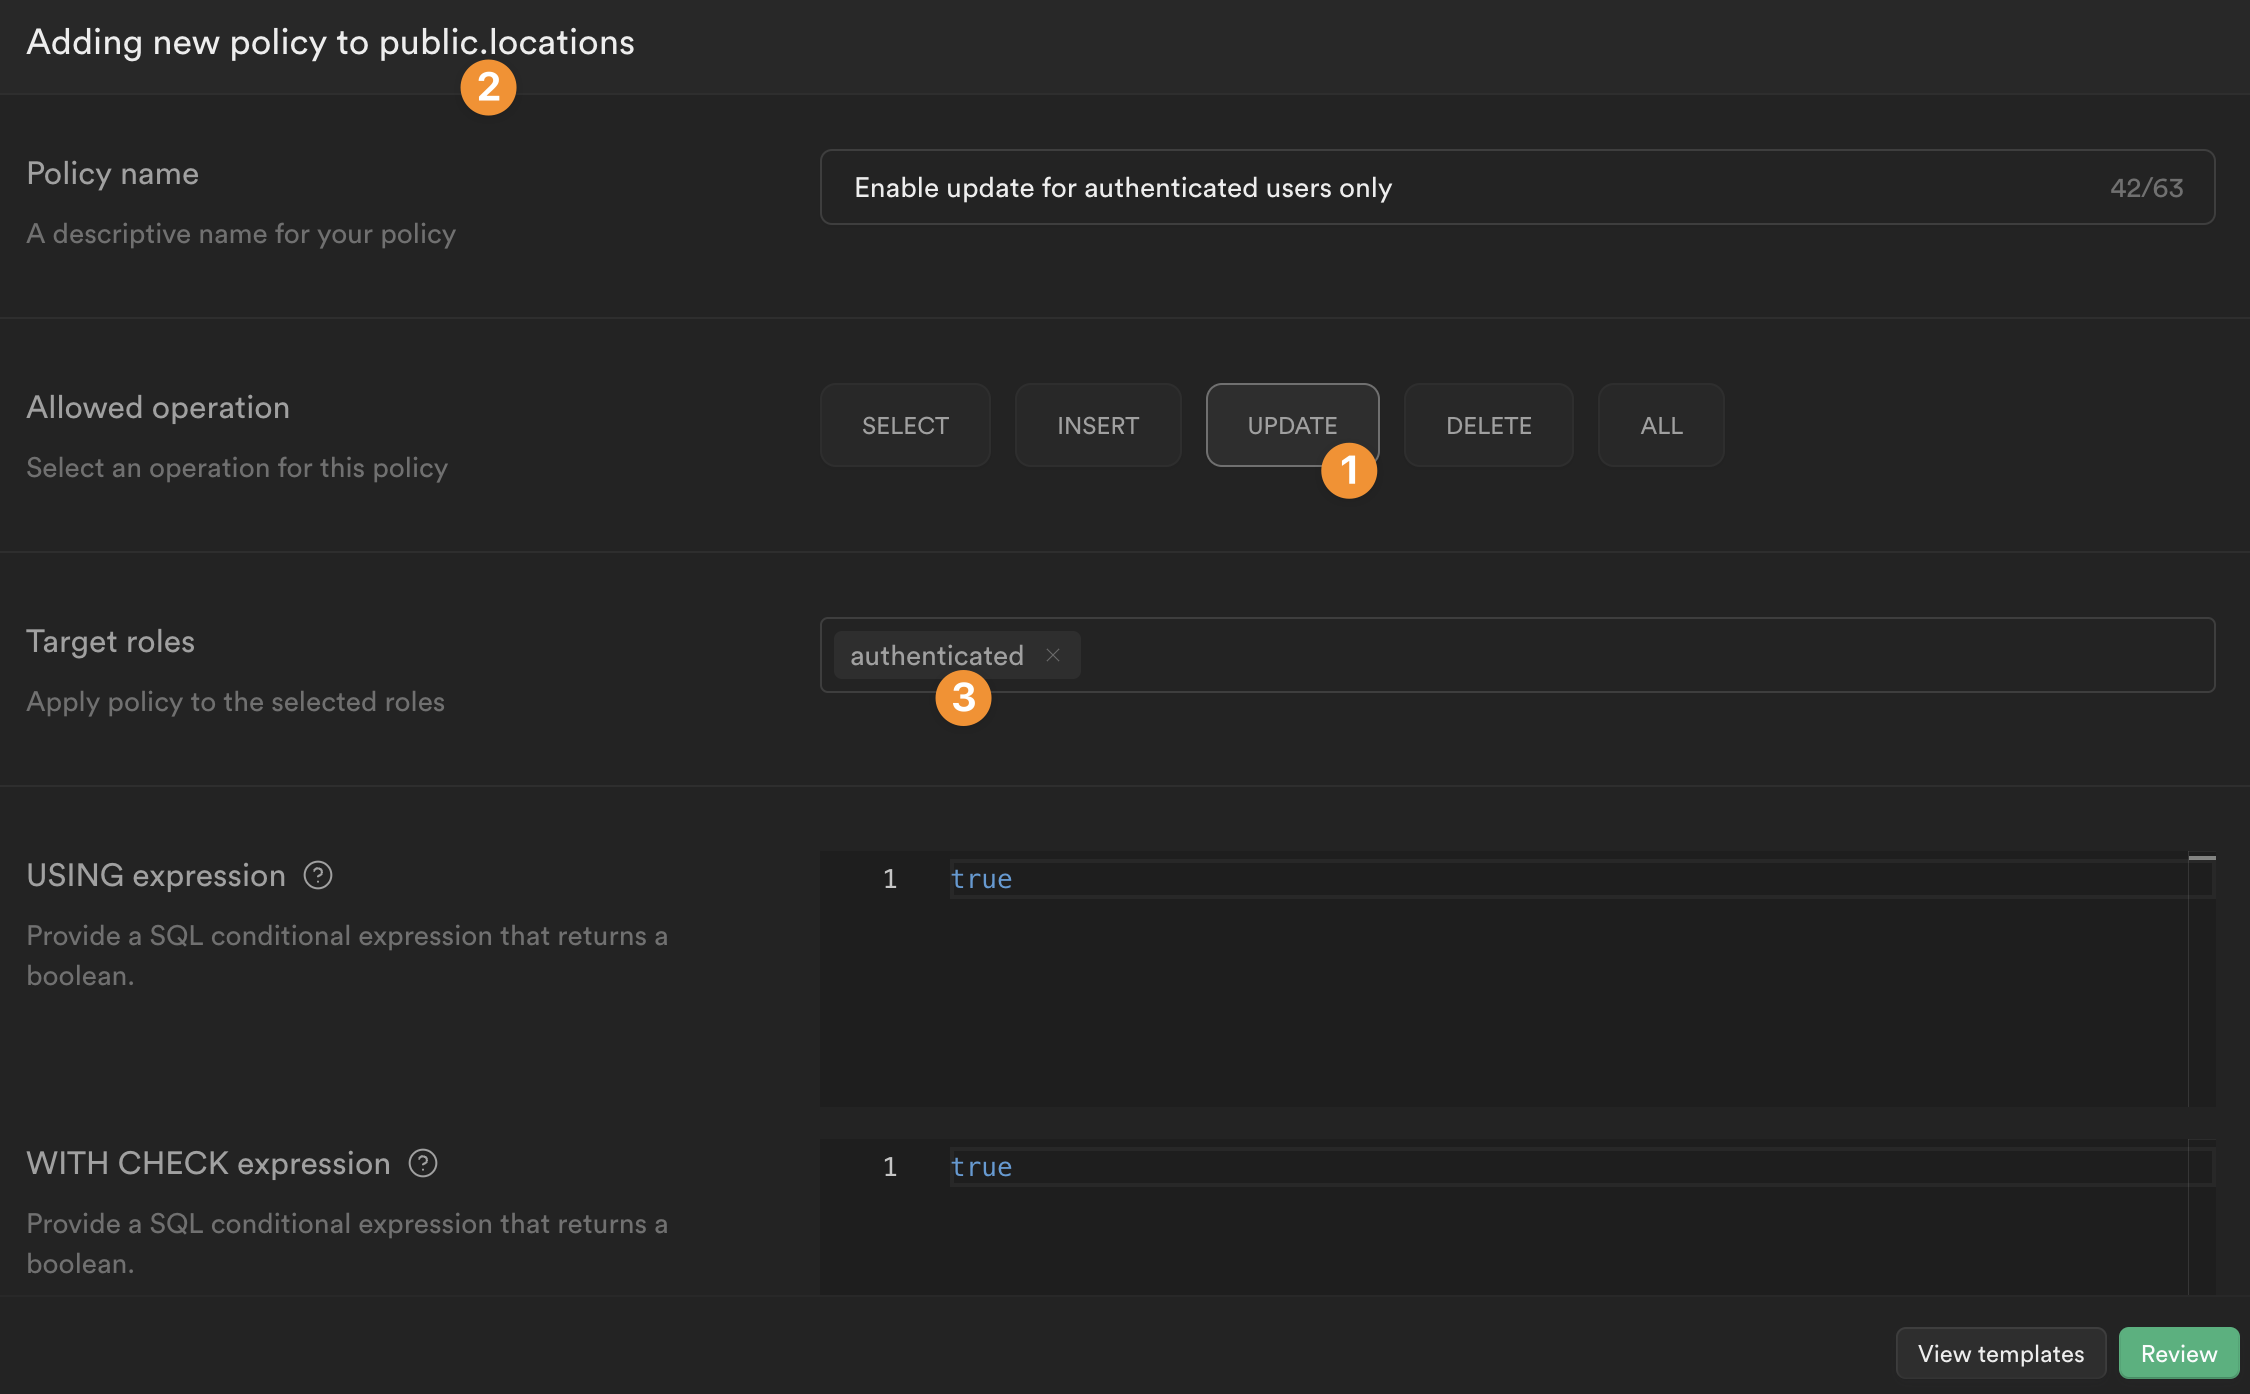
In the example below, we say that users can:
- update a record
- in the "locations" table of the "public" schema
- if they are authenticated
🔥 Pro Tip 🔥
Once you enable RLS on a Supabase table, you won't be able to access the data in a WeWeb Collection unless you've added a policy.
Step 4: Add User Authentication
Once you are able to display Supabase data in WeWeb, you might want to restrict access to certain users or display specific data based on a user's role.
In order to do that, you'll need to add WeWeb's Supabase Auth Plugin.
Add Supabase Auth Plugin in WeWeb
Supabase comes with an in-built authentication system which you can use in WeWeb.
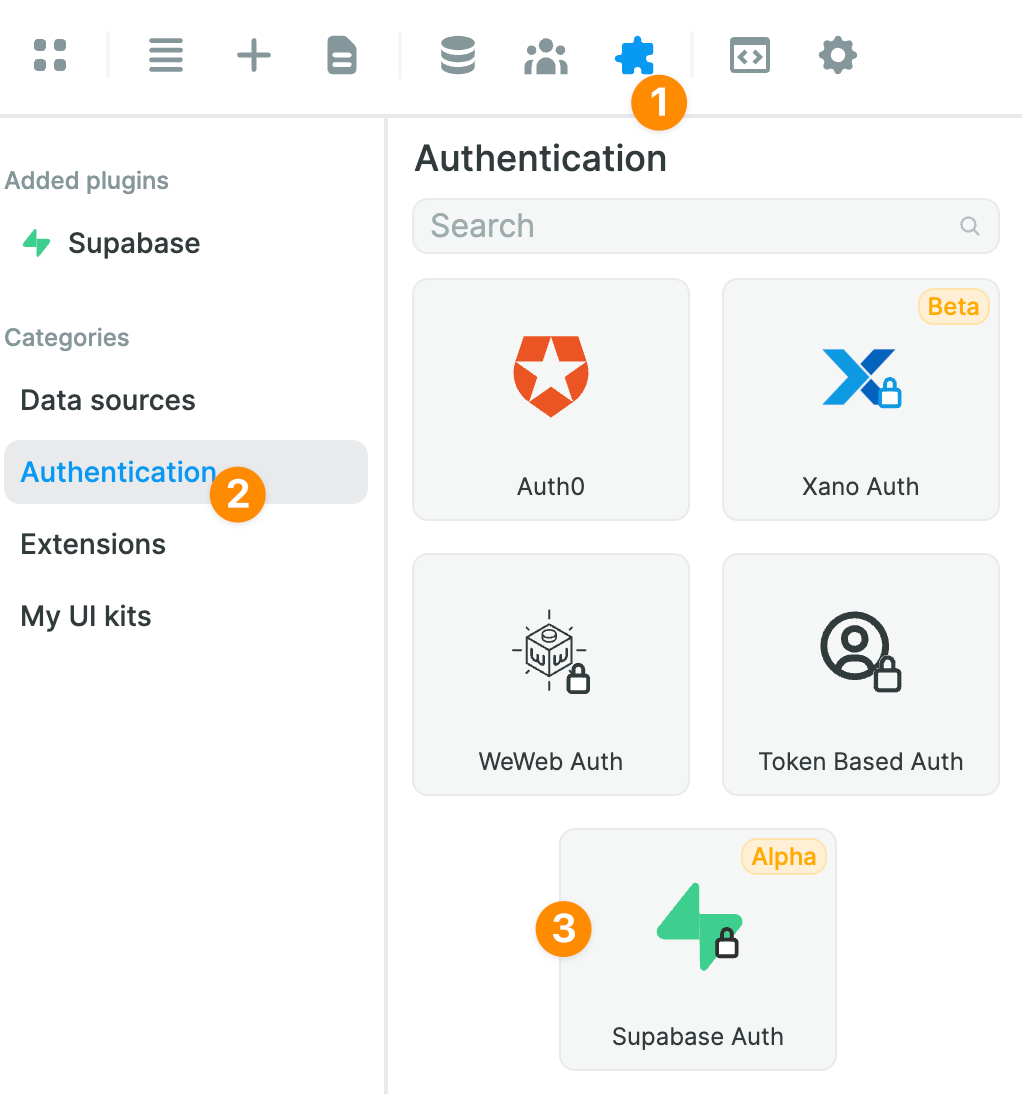
To add the Supabase Auth Plugin in WeWeb, go to Plugins > Authentication:
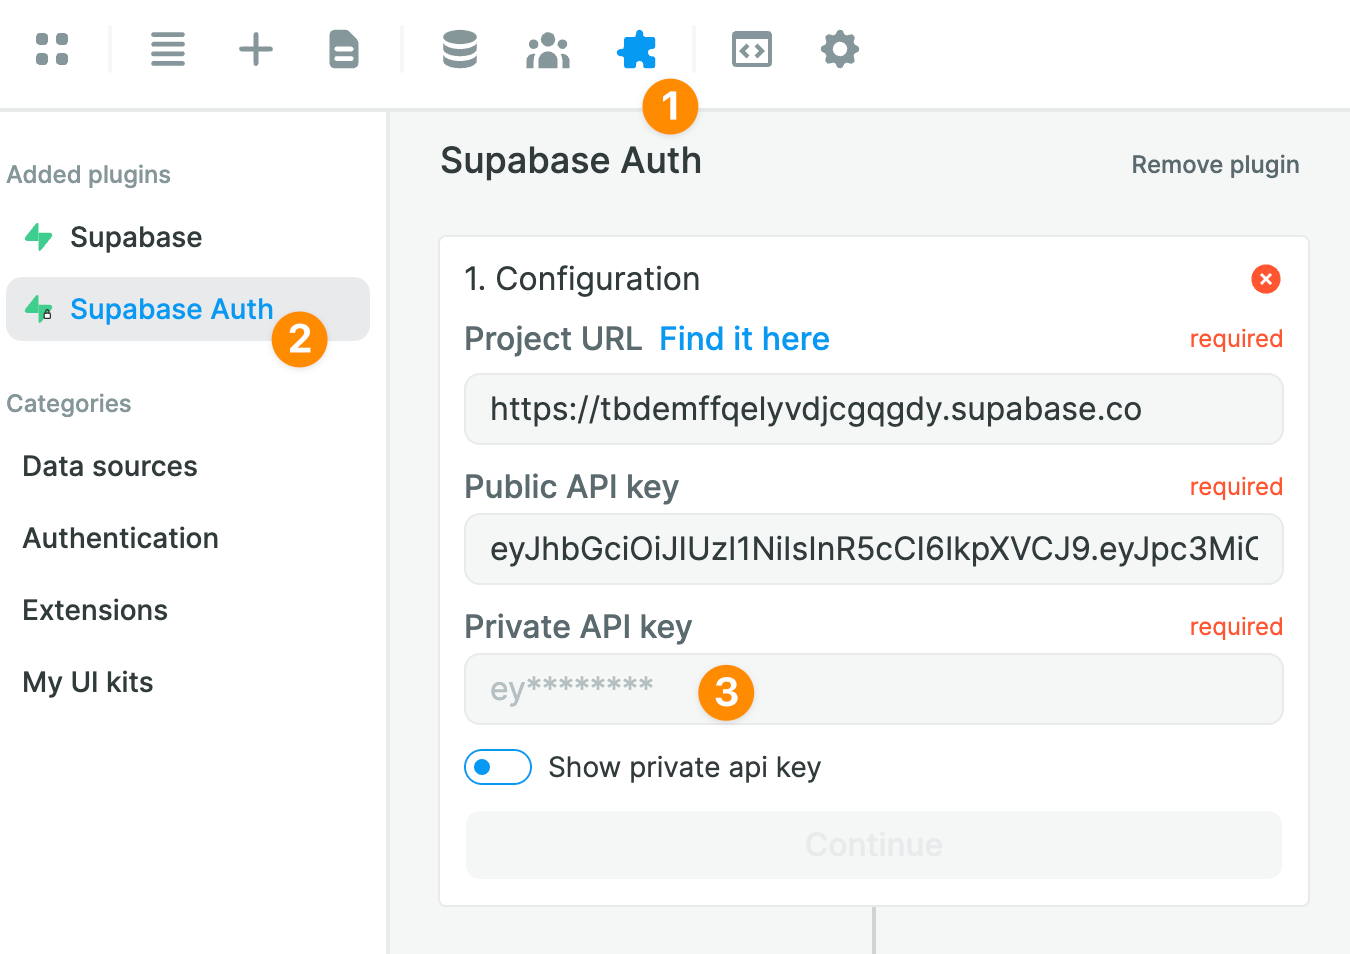
Assuming you have already provided your Supabase project URL and public API key when setting up the Supabase Data source, the only thing left to do will be to add your private API key:
In Supabase, you can find your private API key in Settings > API:
🚨 Warning 🚨
As the name suggests, you'll want to keep this API key secret! Assuming you copy it properly in the "Private API key" field of the Supabase Auth Plugin and don't use it anywhere else in your Weweb project, Weweb will never make it public.
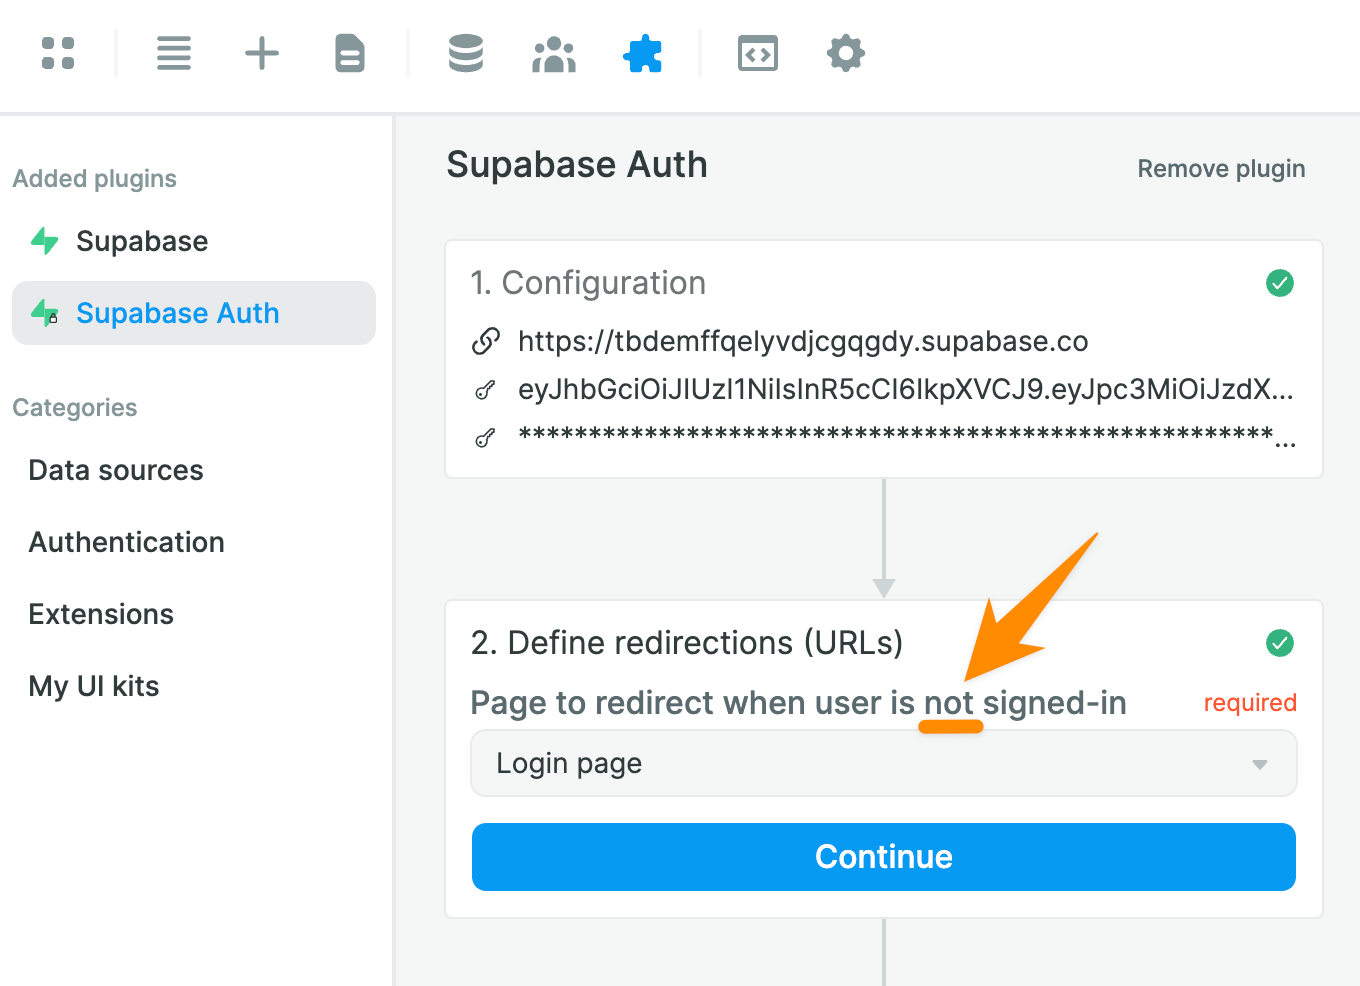
You will then be invited to choose a page to redirect unauthenticated users, i.e. users who are NOT signed-in:
🚨 Warning 🚨
When you setup your Login Workflow, make sure you don't redirect unauthenticated users to a page that is only accessible to authenticated users. Otherwise, you'll be creating an infinite loop and your app will crash.
Create User Sign Up and Sign In Workflows
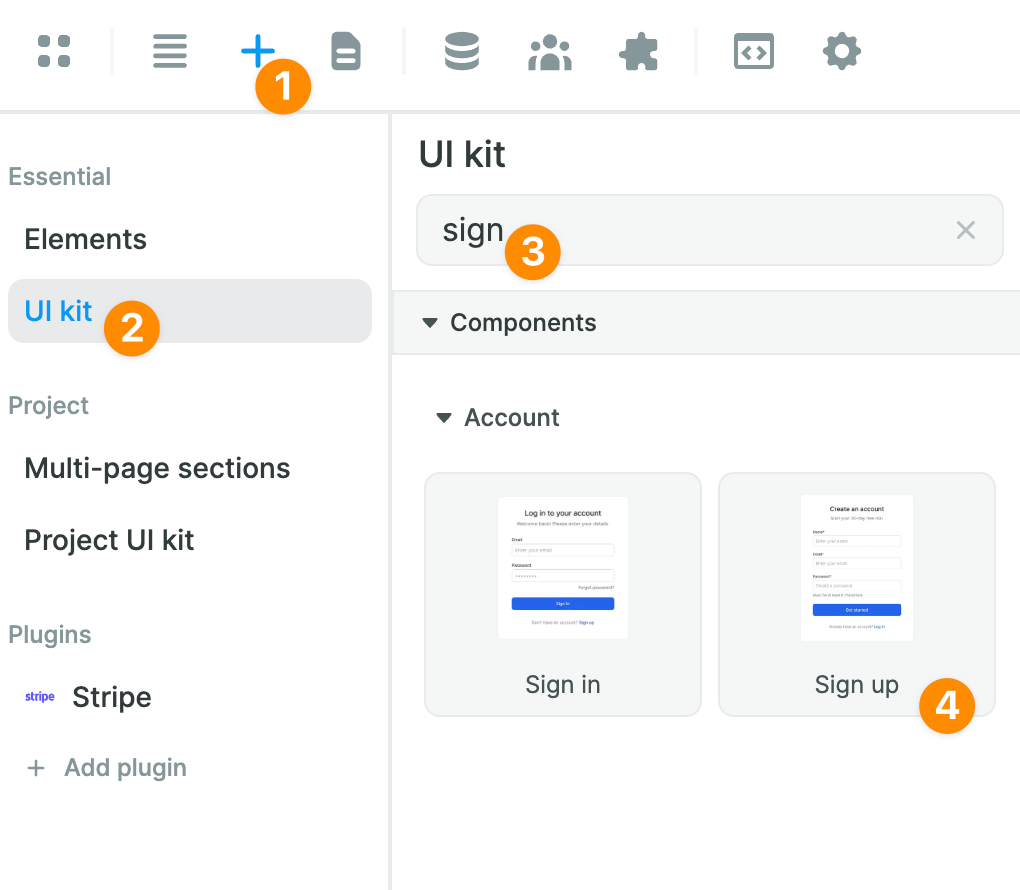
In the Add > UI kit menu of WeWeb, you can find ready-made Sign in and Sign up Forms:
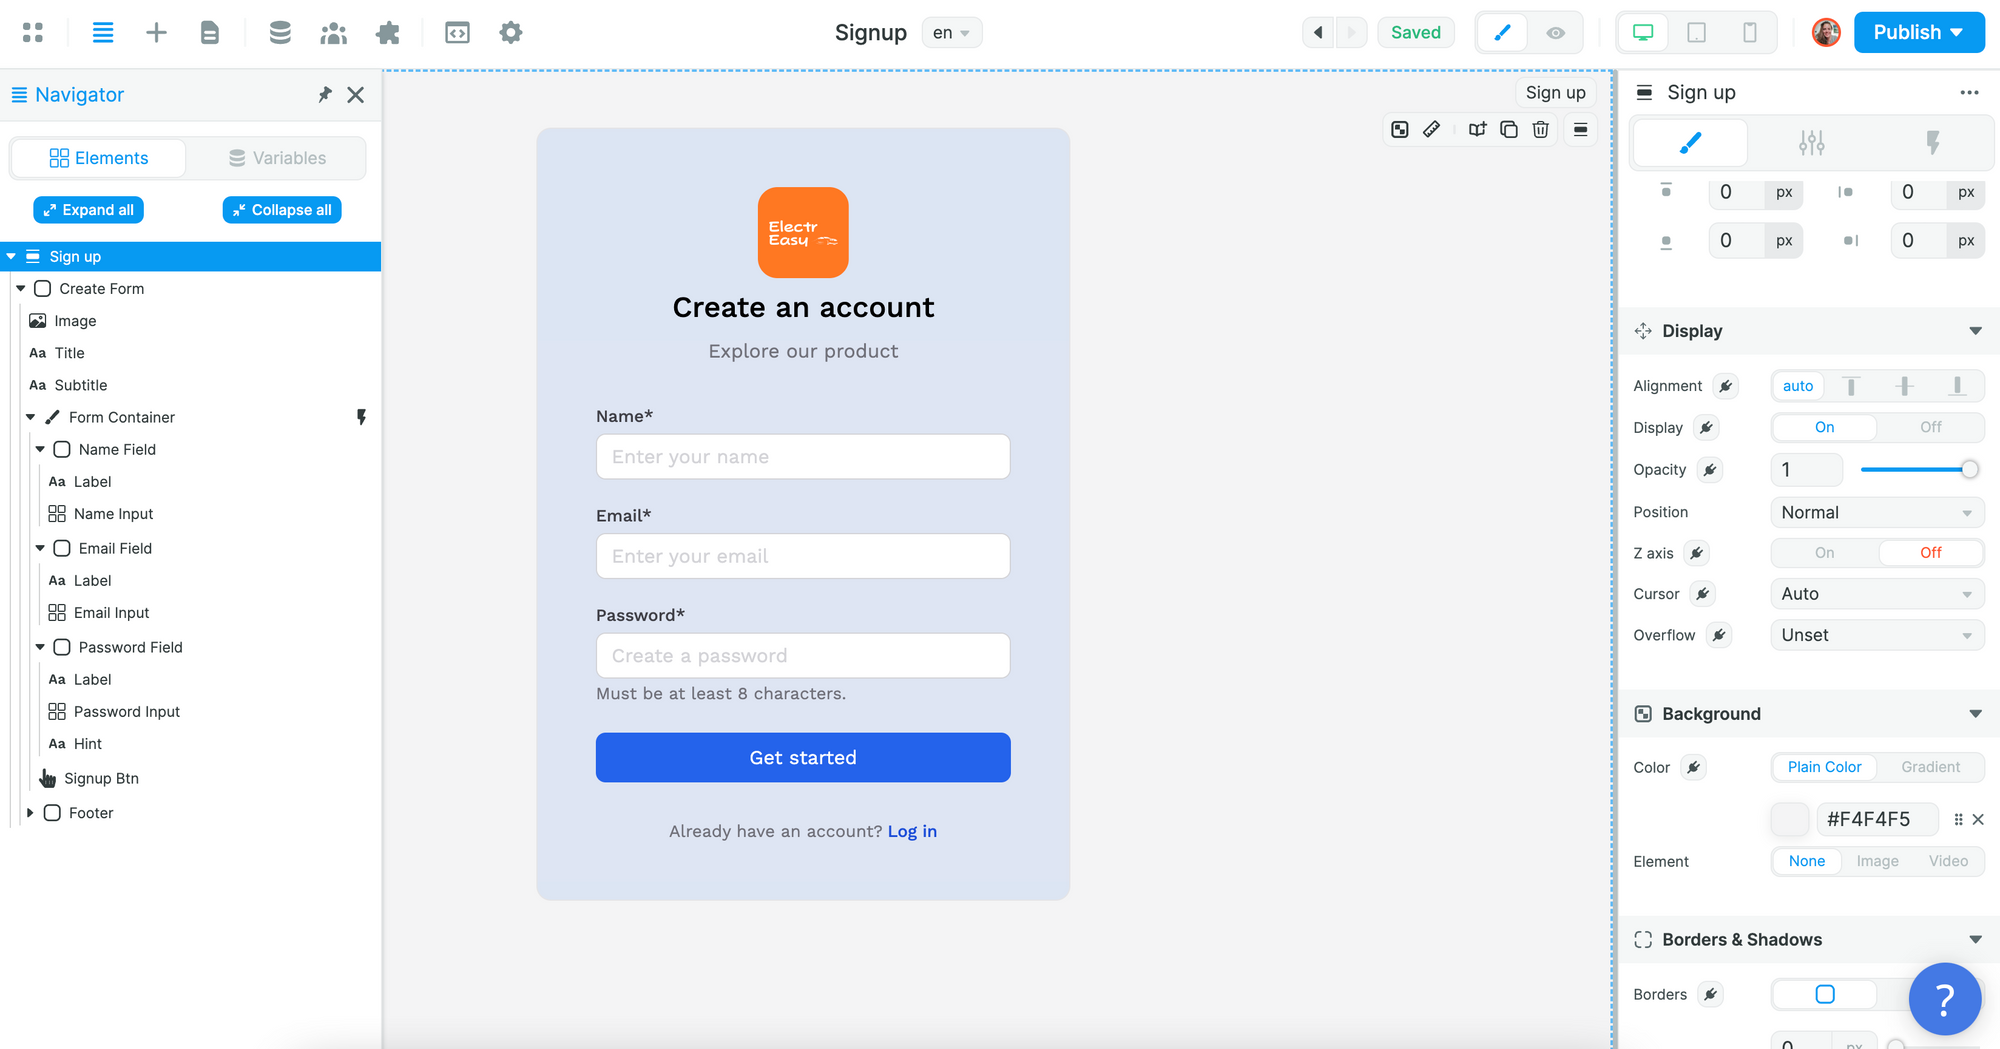
Once you've added a Form to the Canvas, you'll be able to style it whichever way you want.
In the example below, we added an image with the logo of our project to a Sign up Form and changed the background color of the Create Form Container:
To allow users to sign up, you'll need to create a Sign up Workflow on the Form Container:
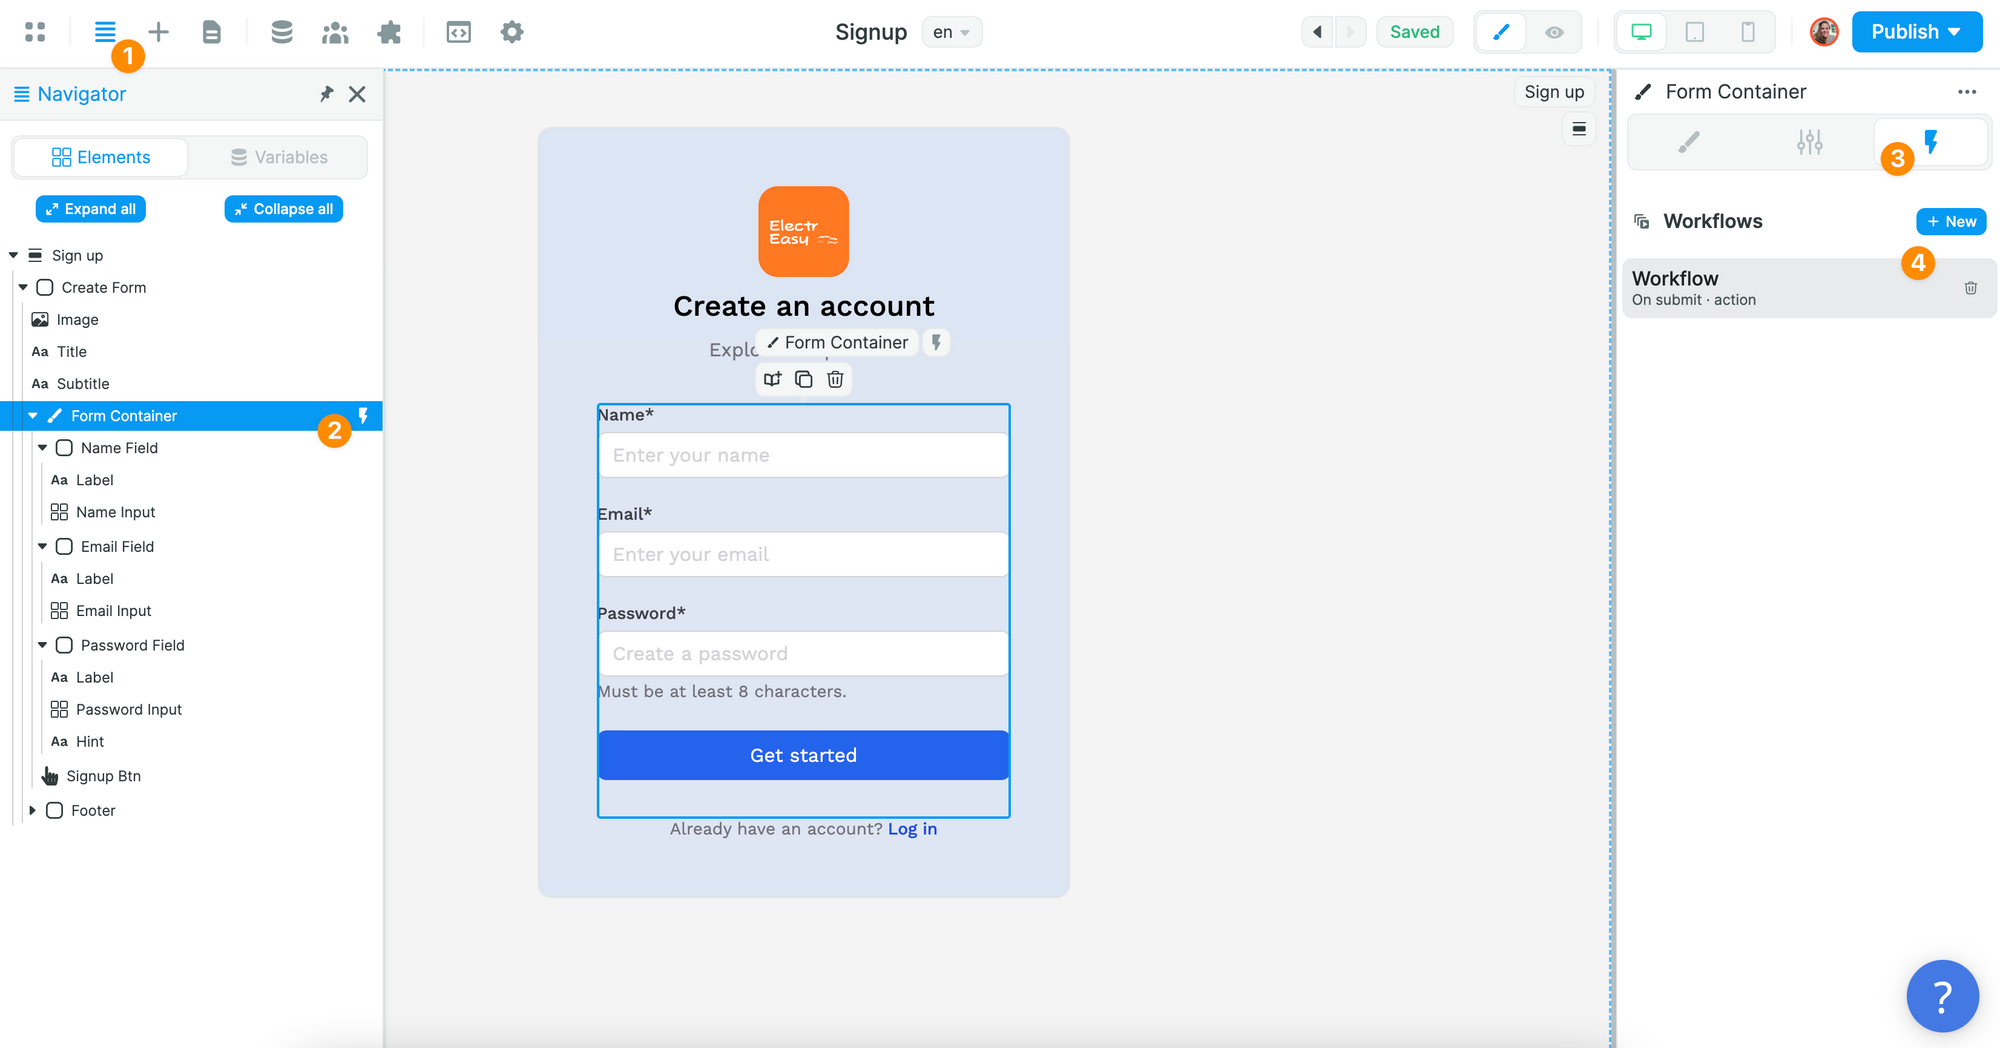
🔥 Pro Tip 🔥
It's important that the Workflow is on the Form Container and not the Sign up Button because we want to validate the fields of the Form when users submit it.
In the Workflow, you will choose the On submit trigger and add the Supabase Sign up Action:
Then, you'll want to map the email, password, and metadata information in the Form to the email, password, and metadata in Supabase before choosing what page the new user should be redirected to:
In the example above, we made sure to add the user's name as an item in that user's metadata.
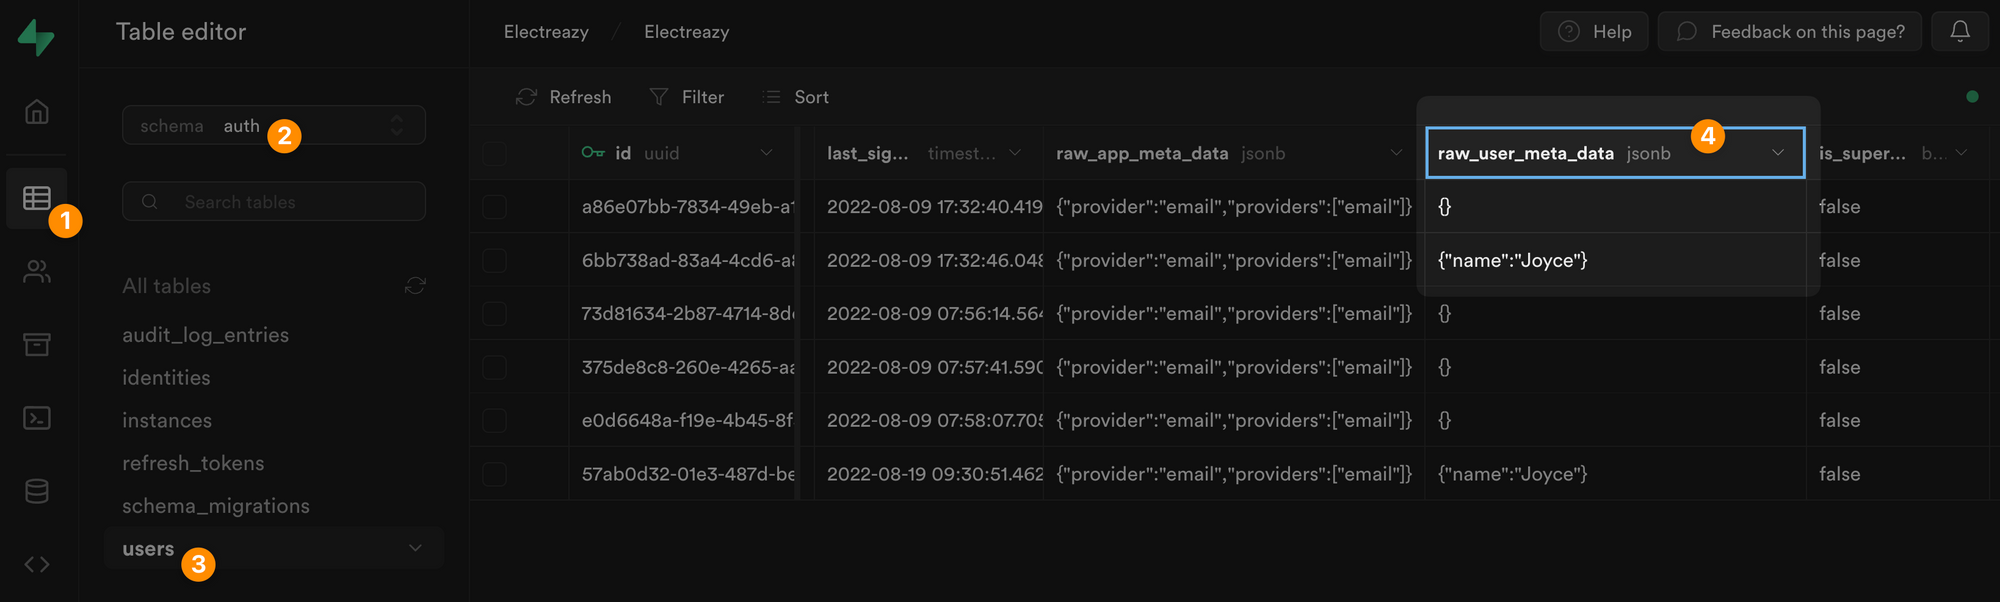
In Supabase, you can find the user's metadata in JSON format in a dedicated field of the users table, named raw_user_meta_data:
The same logic will apply to any Supabase Action you want to trigger.
Adding User Roles & Permissions
Now let's say we want to gate content and set different permissions based on a user's role.
Adding Roles in Supabase
In Supabase, we'll need to create a roles table with a list of roles and a join table that links the roles table with our users table.
First, let's create a roles table with three roles and make sure that each role had a UUID and a name:
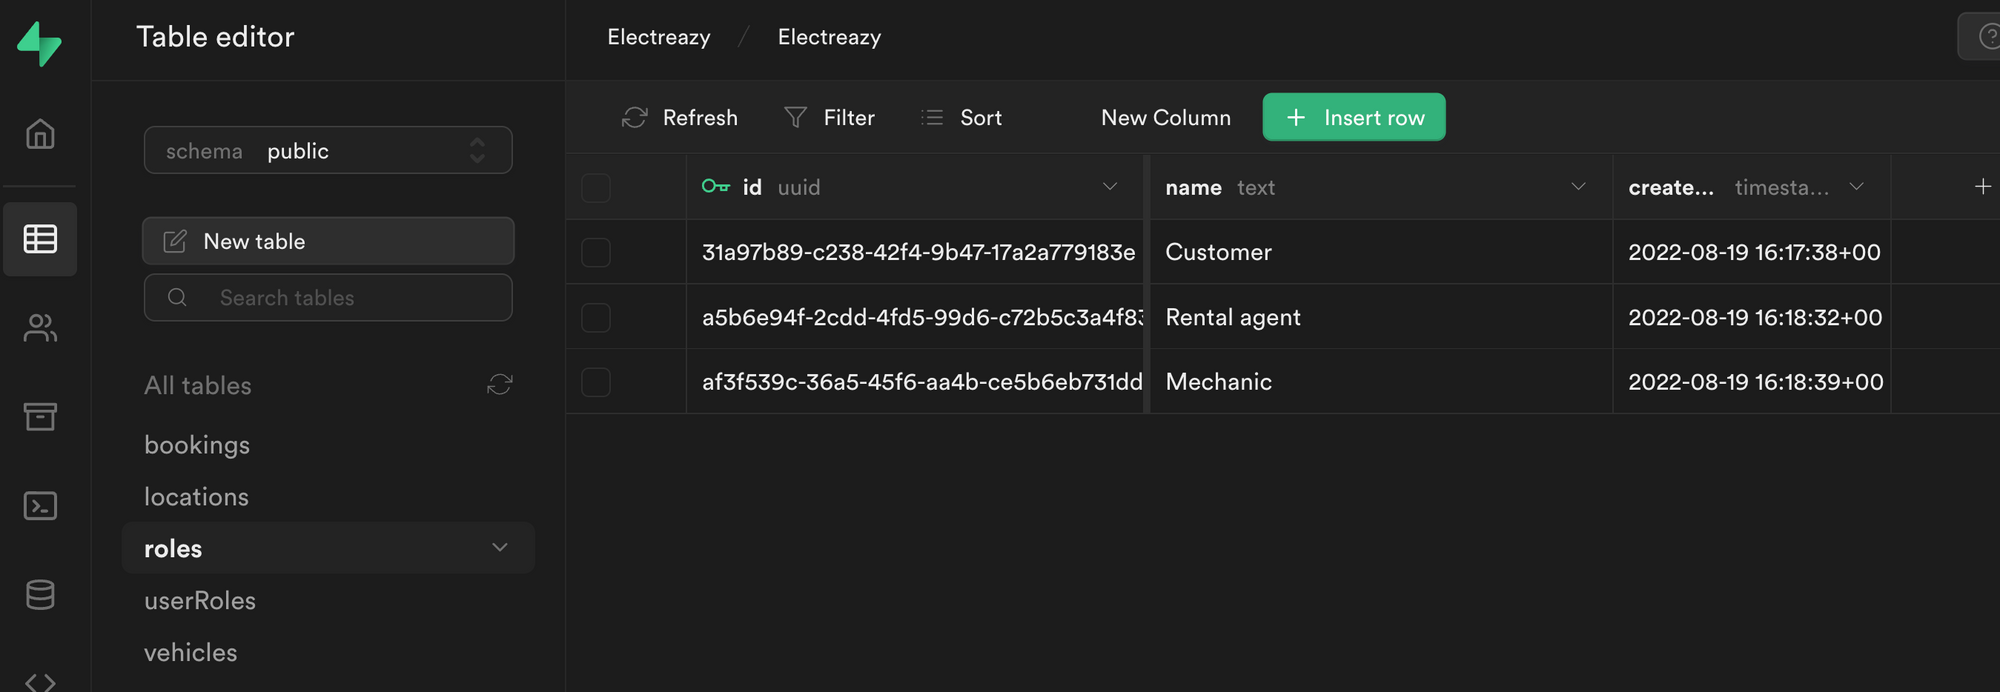
🚨 Warning 🚨
In order for the integration to work with the Users tab in WeWeb, it is crucial that the role title is a text field named
name.
Joining Roles and Users in Supabase
Second, let's create a userRoles join table:
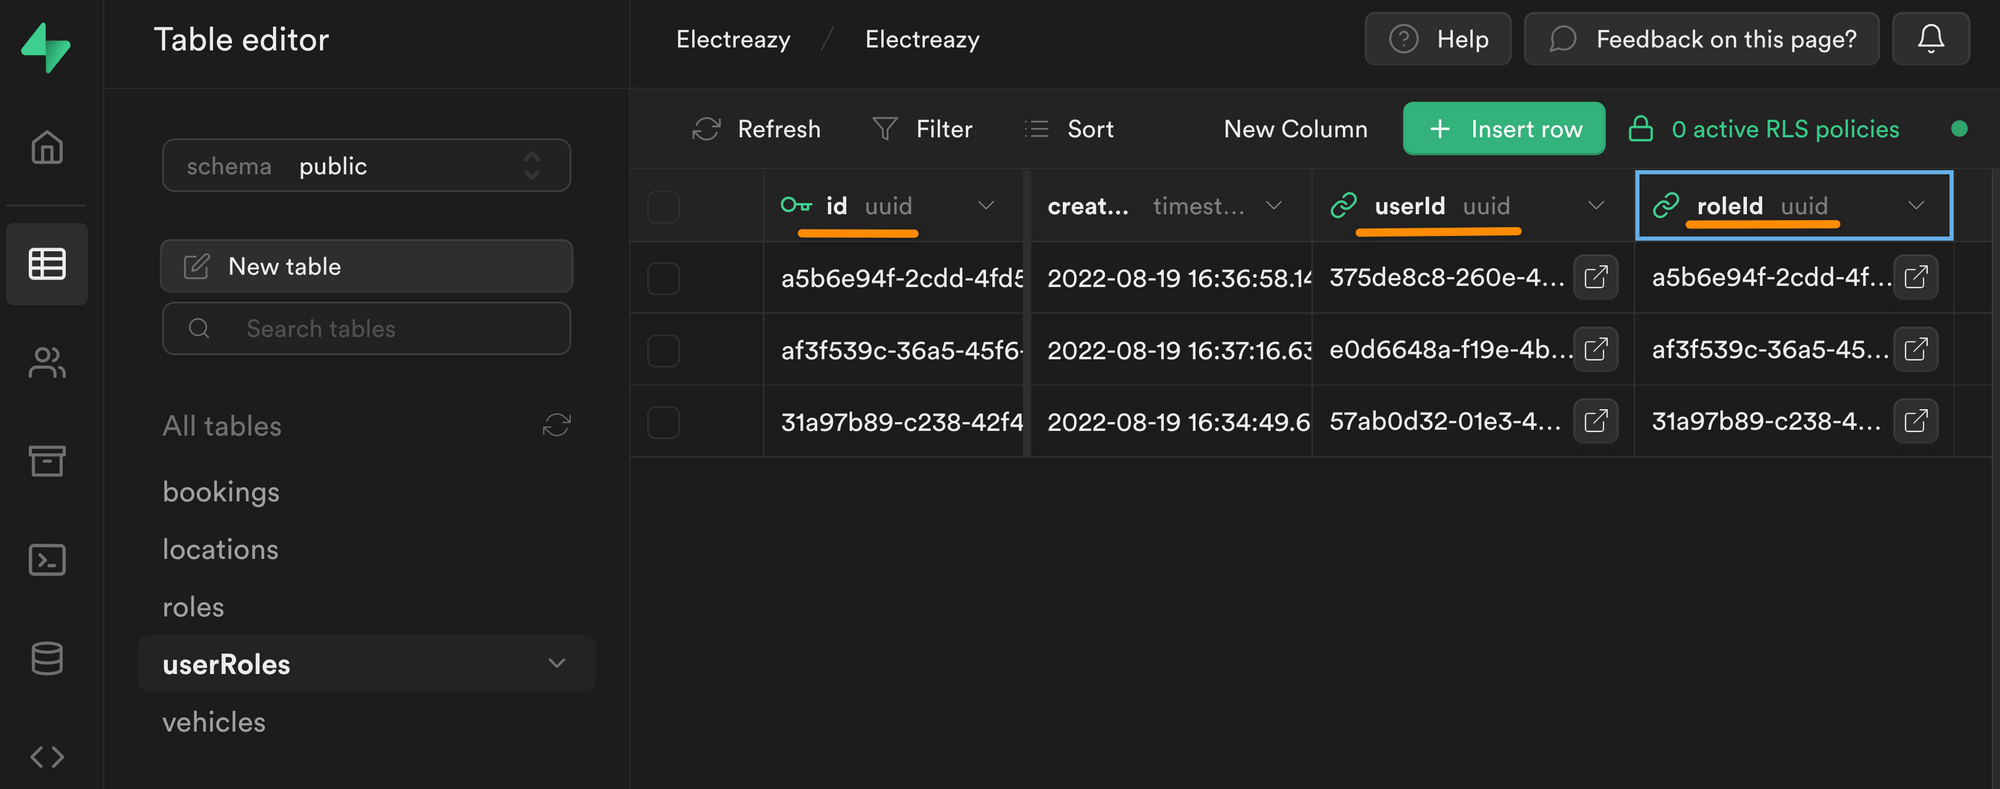
In the join table above, you can see we have an id field that is uniquely identifiable thanks to a UUID.
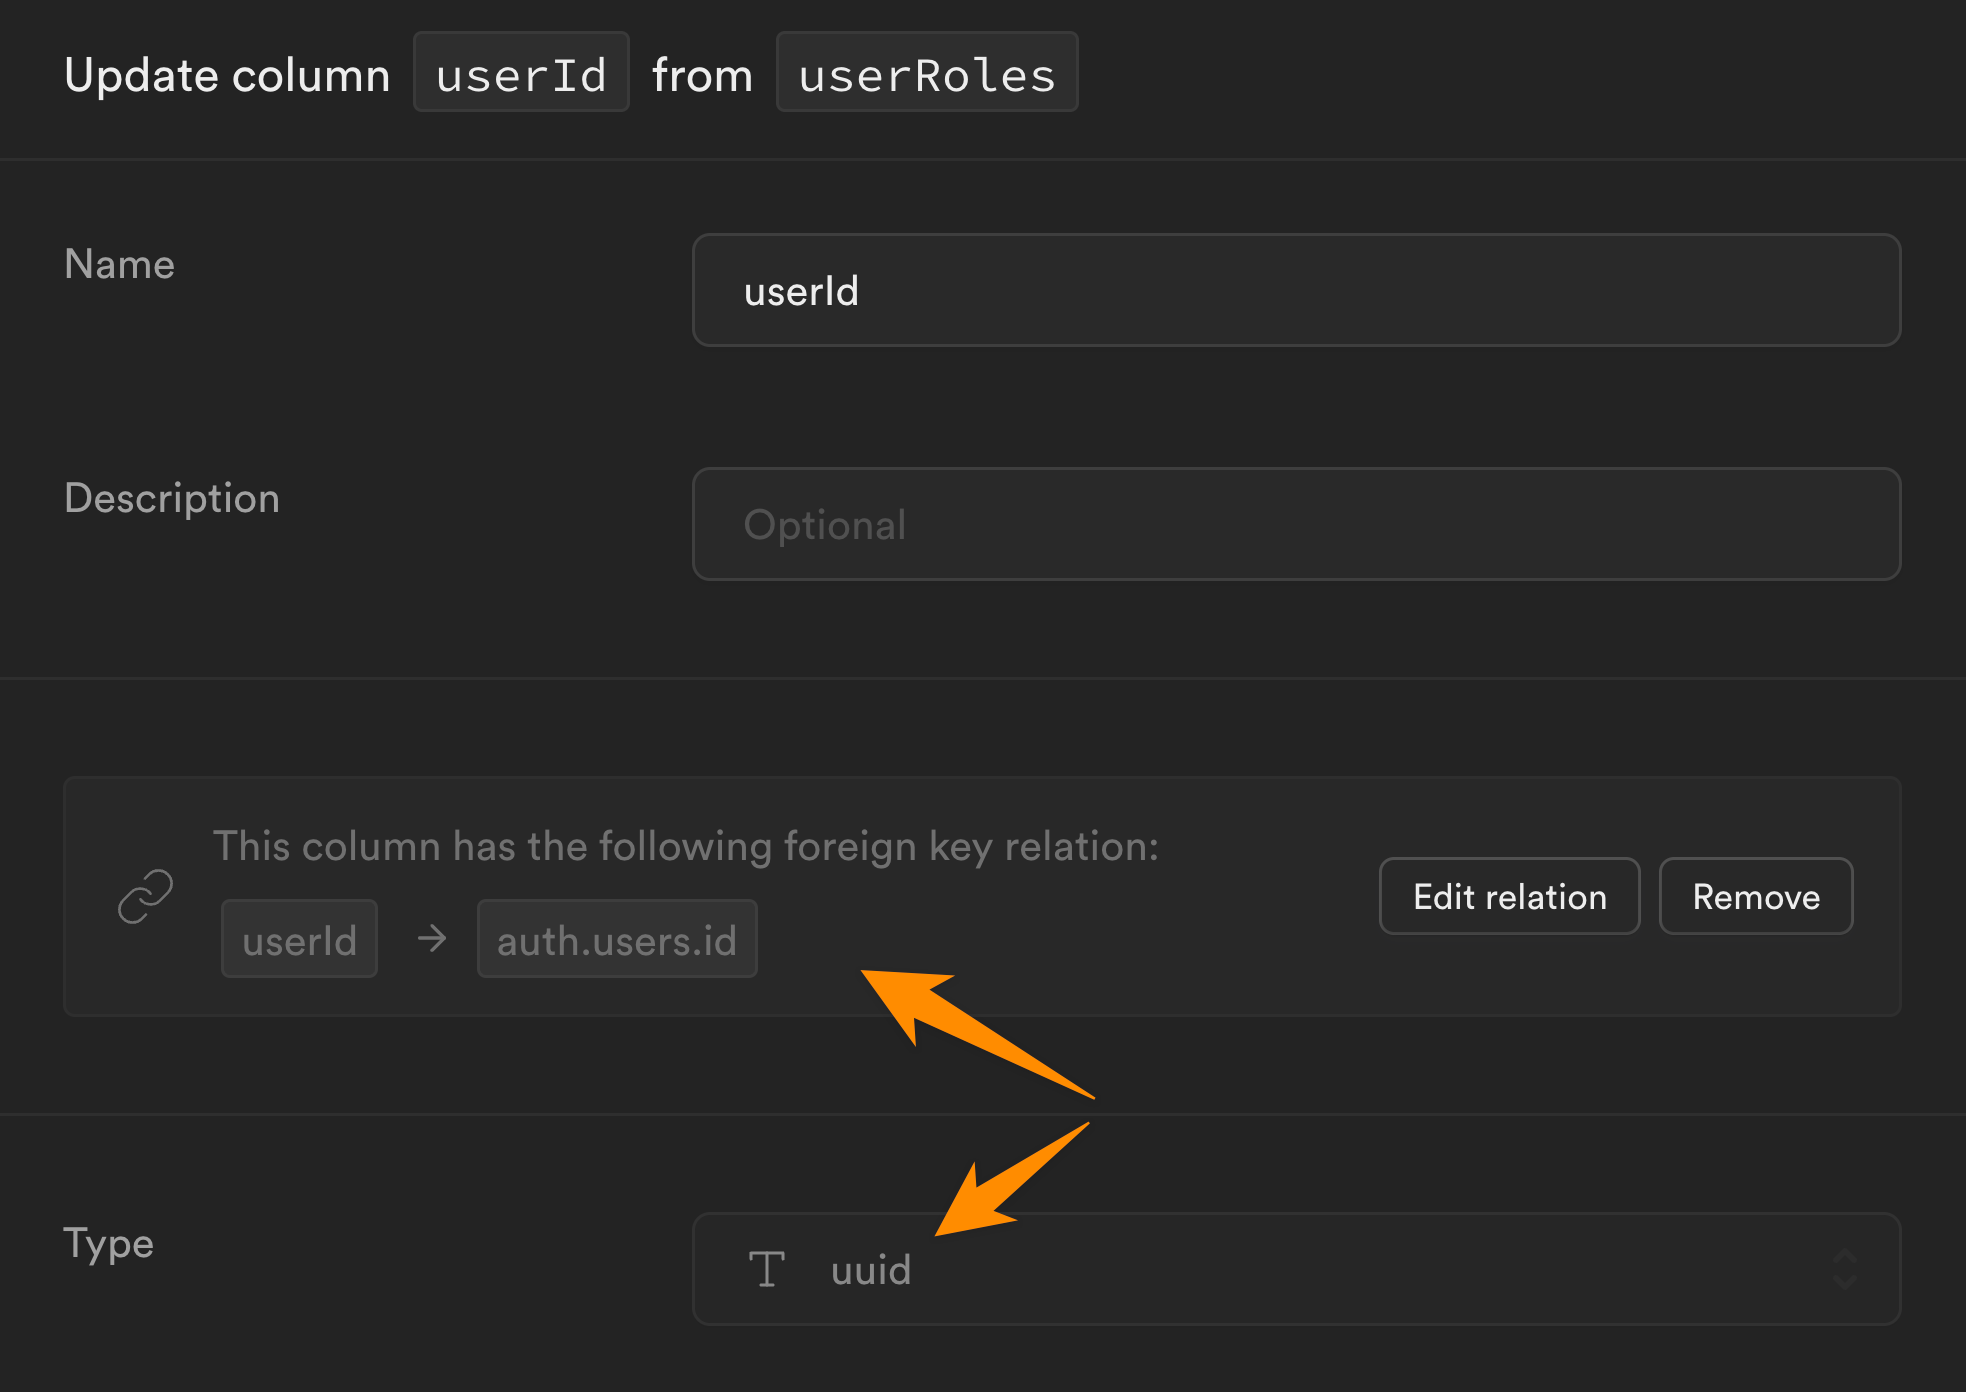
This unique id is linked to a userId, which is also a UUID, more specifically, it is the UUID we find in the id field of the users table in the auth schema:
Each row in our userRoles table is also linked to a roleId which is the UUID we find in the id field of the roles table in the public schema:
Linking Users in WeWeb to Roles and Users in Supabase
Once we've added our list of roles in Supabase and created an empty join table to link our roles with users, it's time to go to WeWeb.
In Plugins > Supabase Auth > 3. Roles table, we'll click refresh and select the relevant Supabase tables we just created:
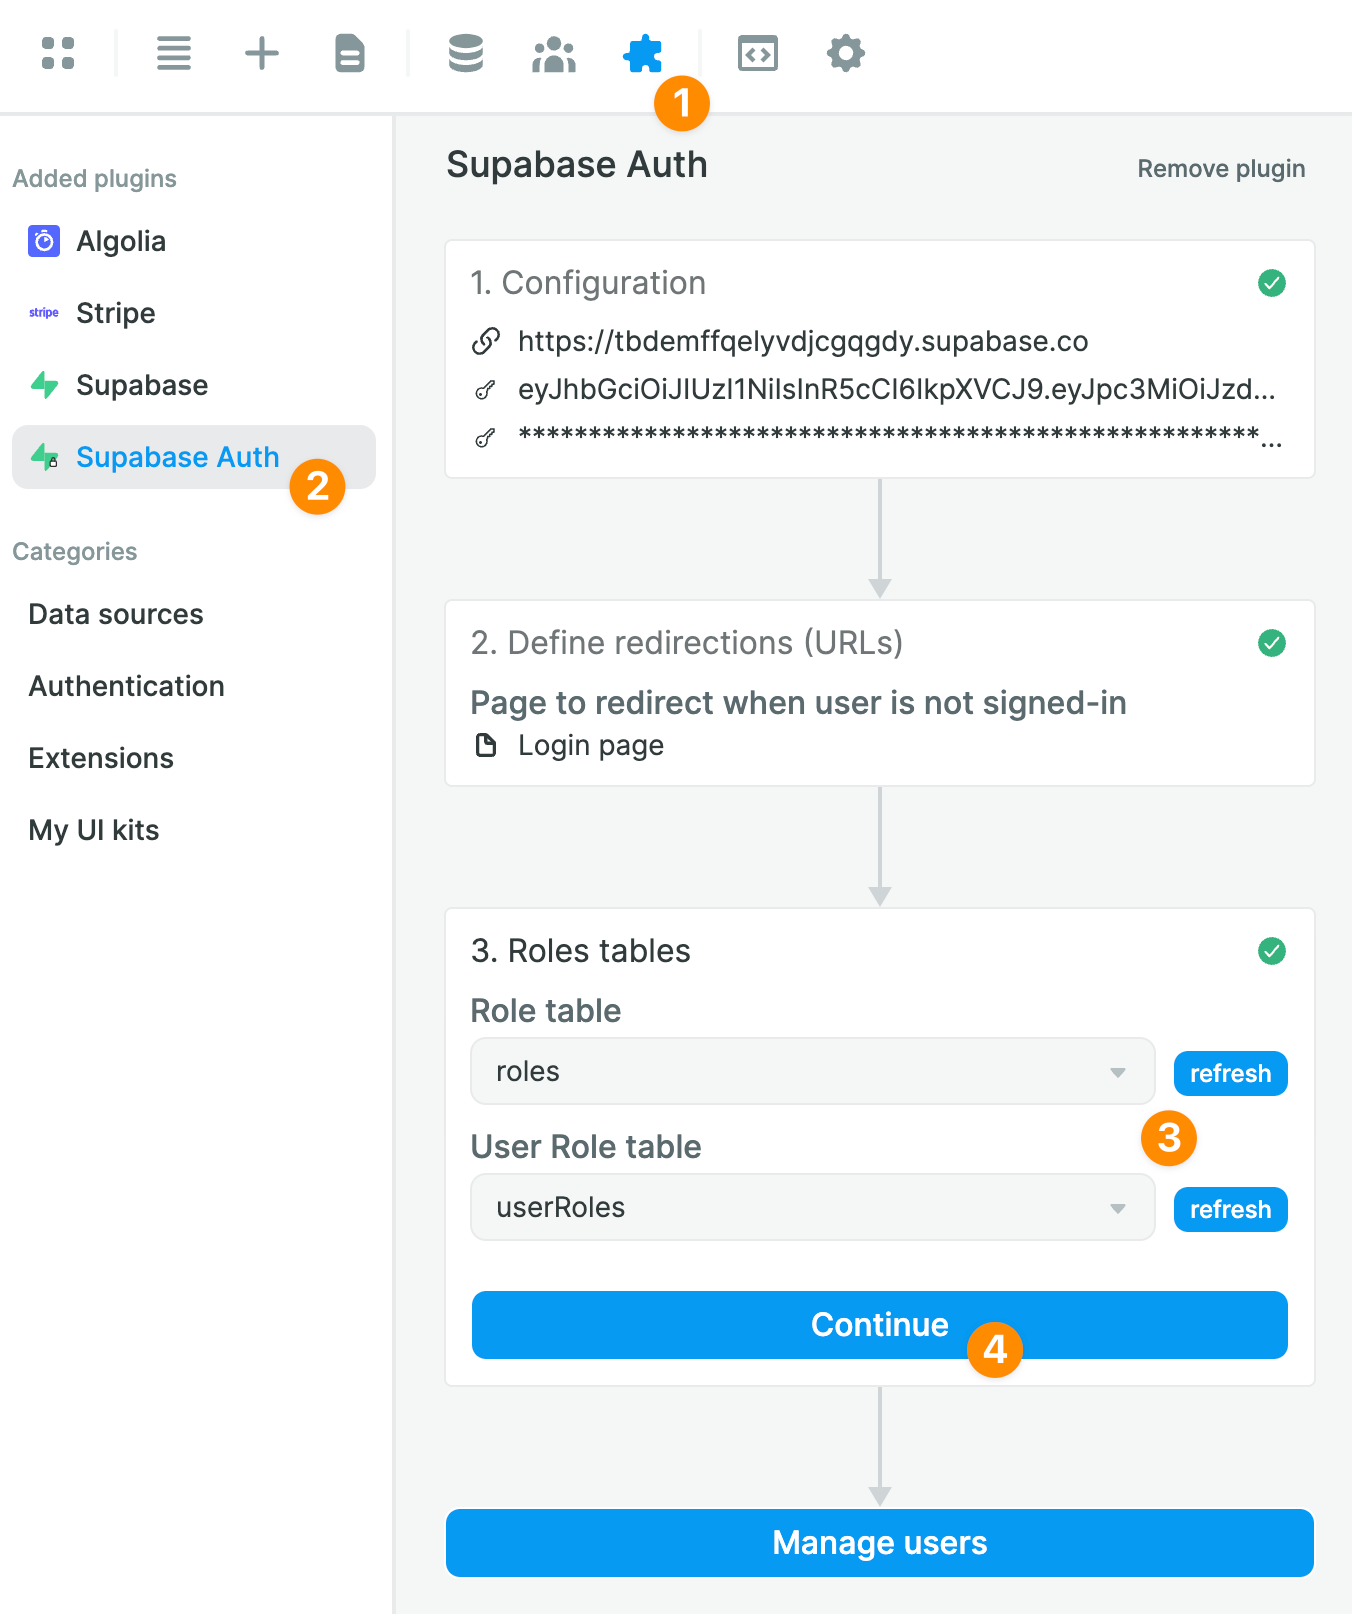
Once you've told WeWeb where to find the roles and the join table in Supabase, you'll be able to easily view and maintain user roles in the Users tab in WeWeb:
When you make a change to a User in WeWeb, it will automatically be updated in Supabase.
Users vs Profiles
So far, we've showed you how to work with the default users table that Supabase generates in the auth schema when you create a new project.
Note that, for security purposes, the information in that users table is not exposed on the auto-generated API.
How does this affect your project in WeWeb?
Let users update their information
Let's say you want to let authenticated users update their information, then you don't need to set up anything else in Supabase.
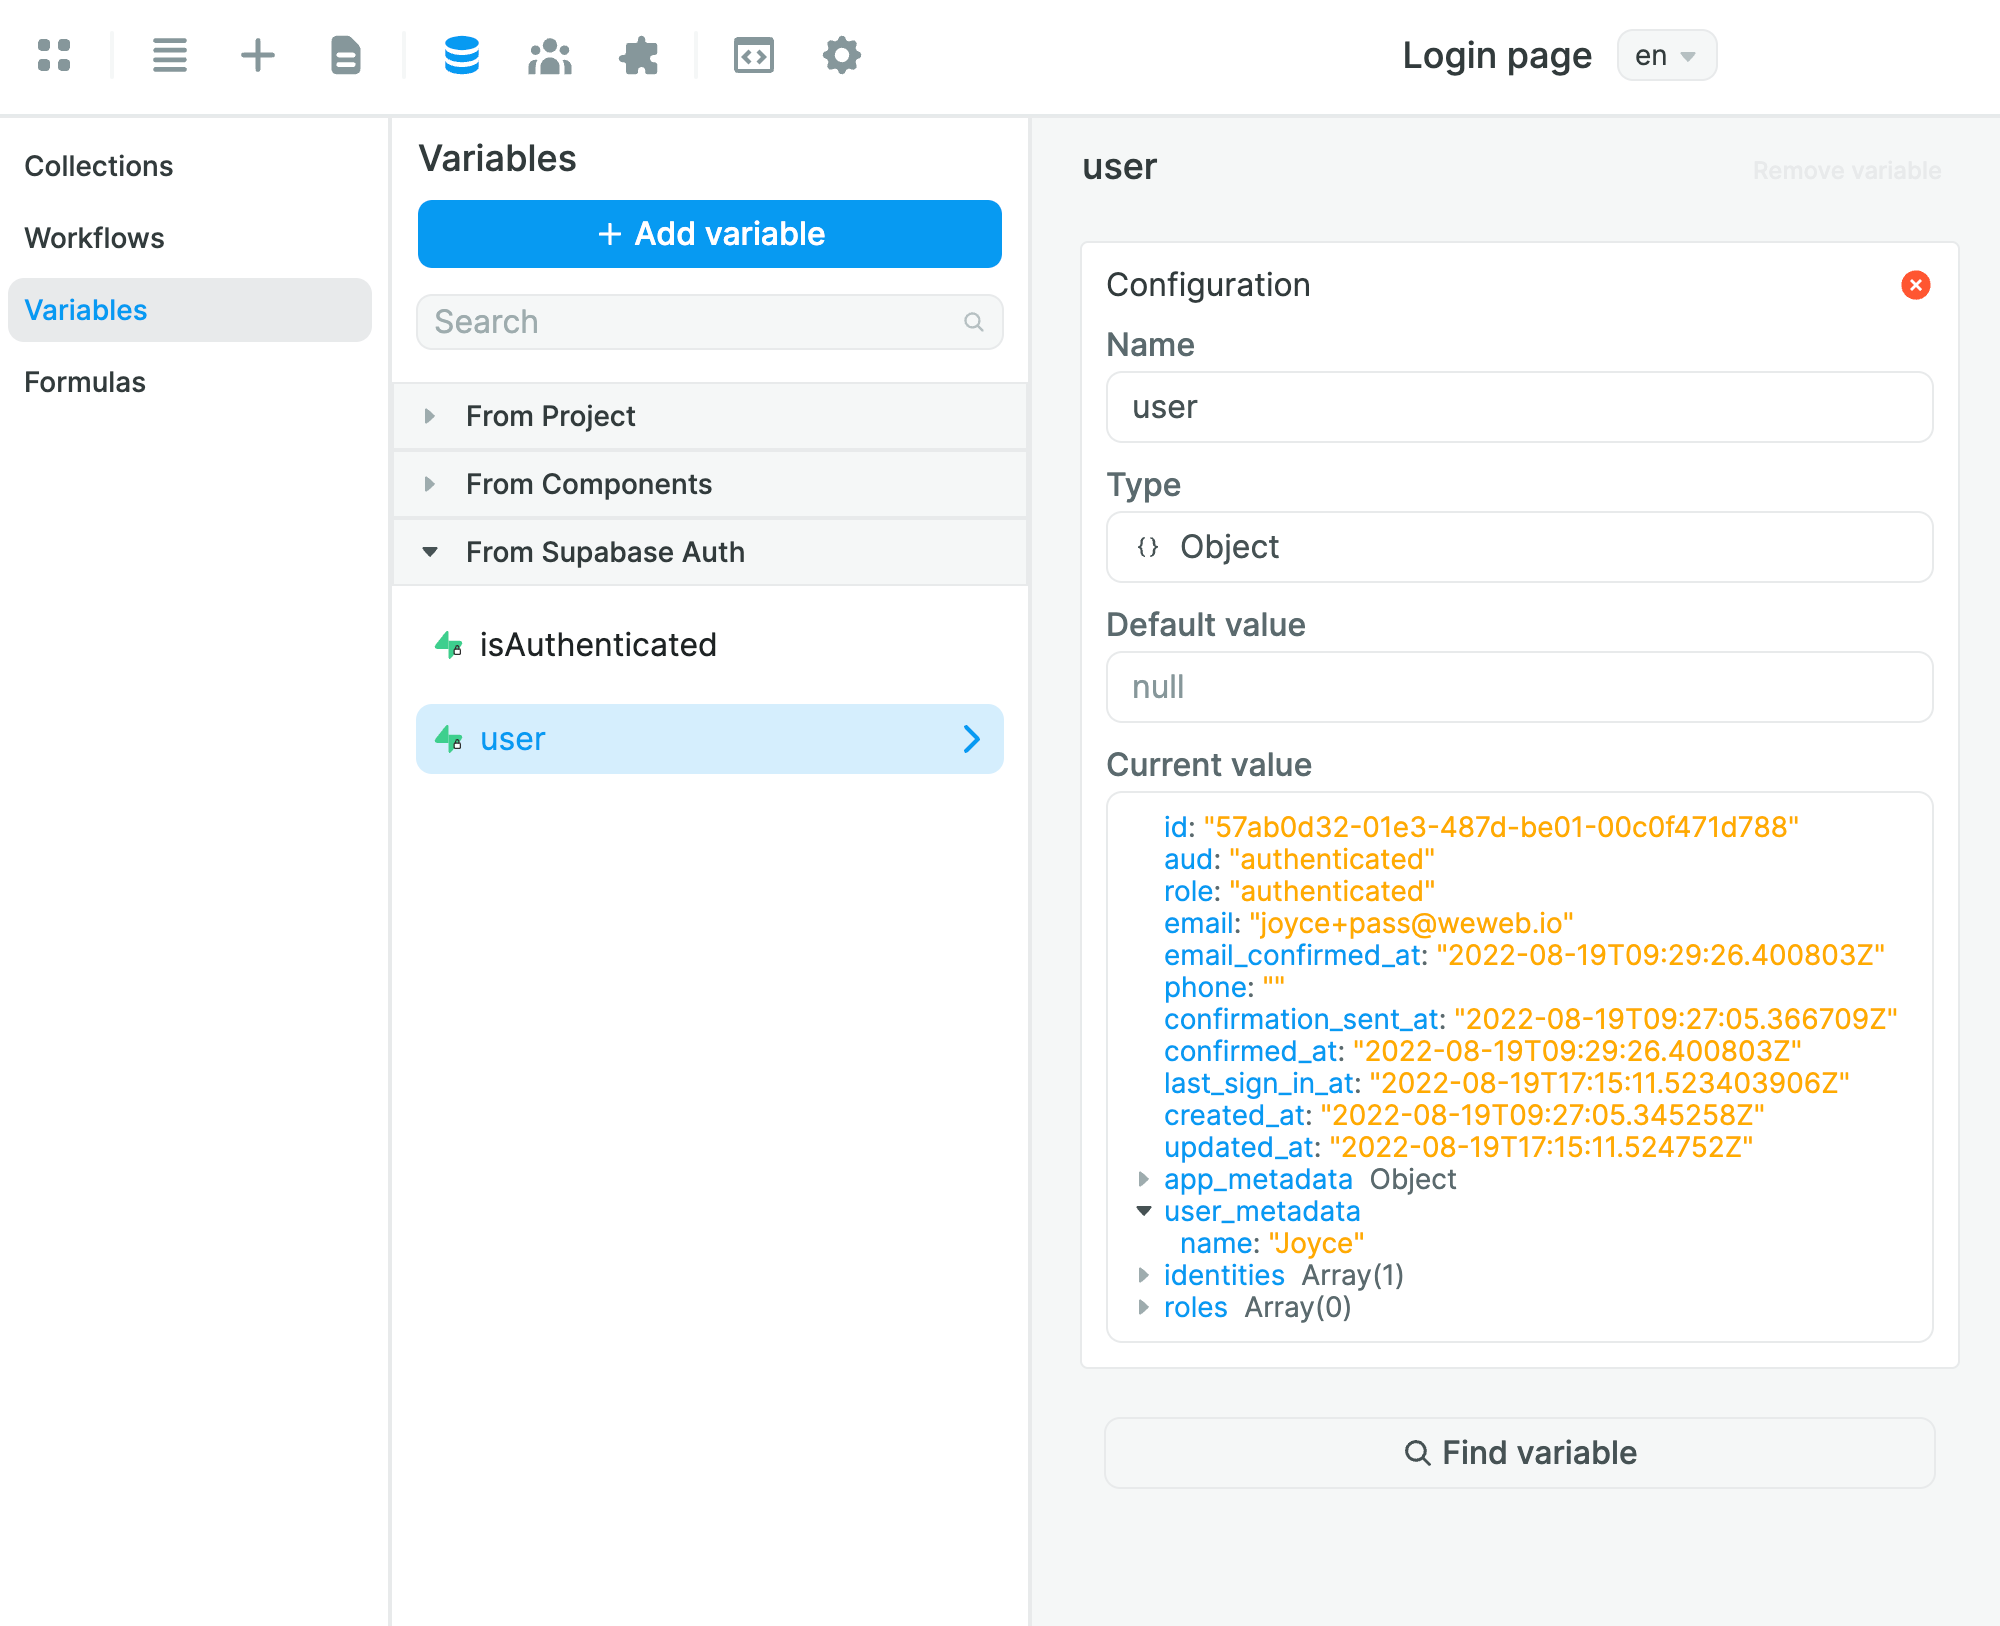
You could simply create a user profile page in WeWeb and display their information when they sign in, based on the data you have in the user Variable:
Display other users' information
In some use cases, you might want to display other users' information.
For example, if you're building an HR portal in WeWeb, you might want HR employees to have access to a list of applicants and their user profiles.
You wouldn't be able to do that with the users table in the auth schema because each user's information is only available to them.
For such a use case, we recommend creating a profiles table in the public schema to store user data that you want to access via the API.
In WeWeb, you would then be able to create a Collection to get data from the profiles table.
Learn more about managing user data in Supabase.
Details
Third-party integrations and docs are managed by Supabase partners.