Draftbit
Overview
Draftbit is a "pro-code" low-code mobile app building platform. Draftbit exports React Native source code that is 100% run on open-source languages and libraries.
Documentation
This guide explains how to connect a Supabase back-end to a Draftbit front-end and then configure all CRUD operations necessary to build a simple mobile app.
Draftbit is a "pro-code" low-code mobile app building platform. Draftbit exports React Native source code that is 100% run on open-source languages and libraries.
Draftbit is back-end agnostic and connects to Supabase via REST API.
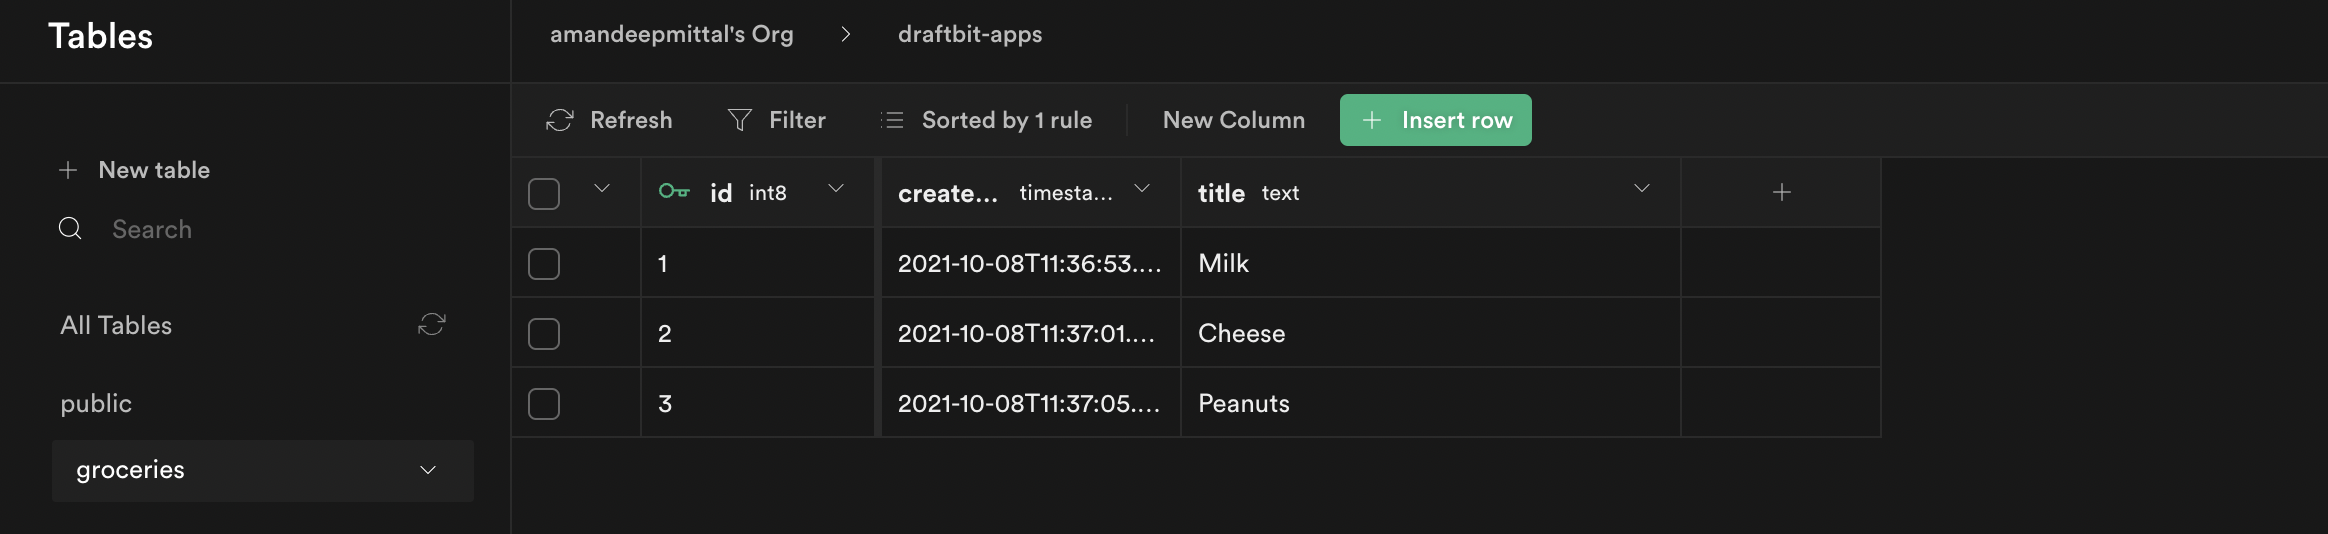
Note: For the demonstration purpose of this guide, we are using a pre-populated database in Supabase. We are calling
Groceries. To follow along, rename it any way you prefer.
If you don’t have a Draftbit account, create one here. Once you’ve got your account set up, Create a New App. You can select Start From a Blank App for this demo and proceed to the Builder interface.
Step 1: Get the RESTful endpoint and Project API key
To connect the REST API in the Draftbit app, the following fields are required:
- Base URL of the REST API, which is in the format:
https://<your-domain>.supabase.co/rest/v1where the<your-domainis a unique domain name generated by Supabase. - The
supabase-keyis the secret key.
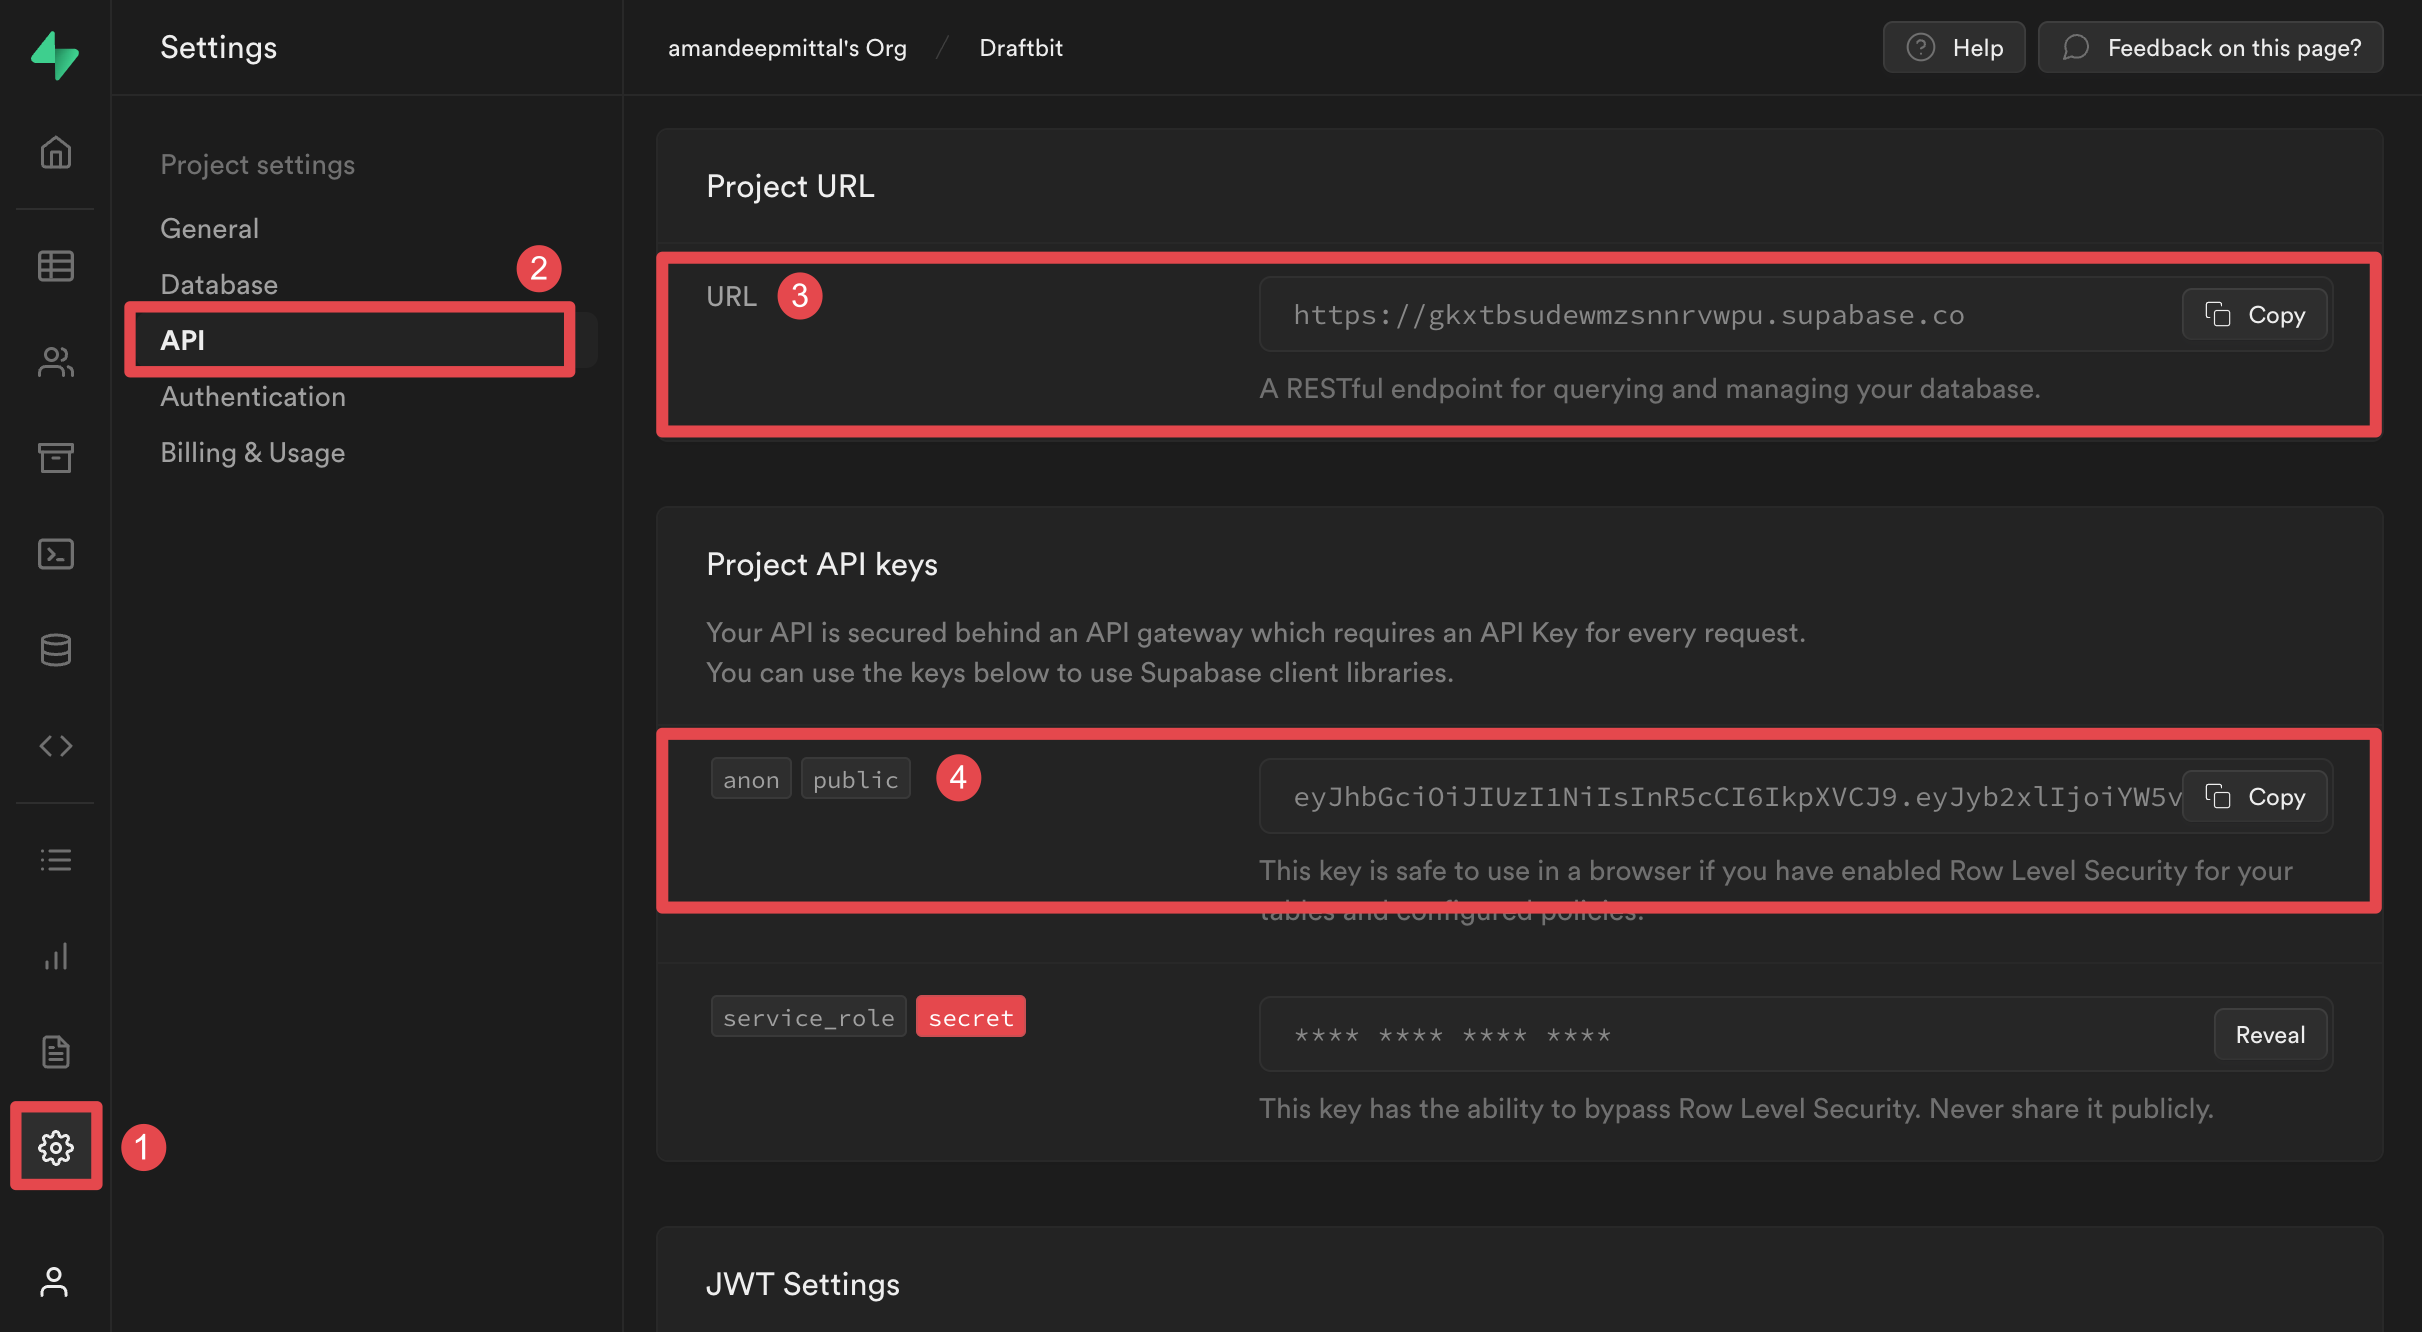
You can find these unique values in the API settings of your Supabase account.
- Click the Settings button from the top menu bar.
- In Settings, select API.
- In the Project URL section, select and copy the URL. It is the Base URL of your Supabase REST API. It will be required to make a connection to the Draftbit app.
- Also, under
Project API keys, select and copy the API key underanon. It is required for every request made to the Supabase database.
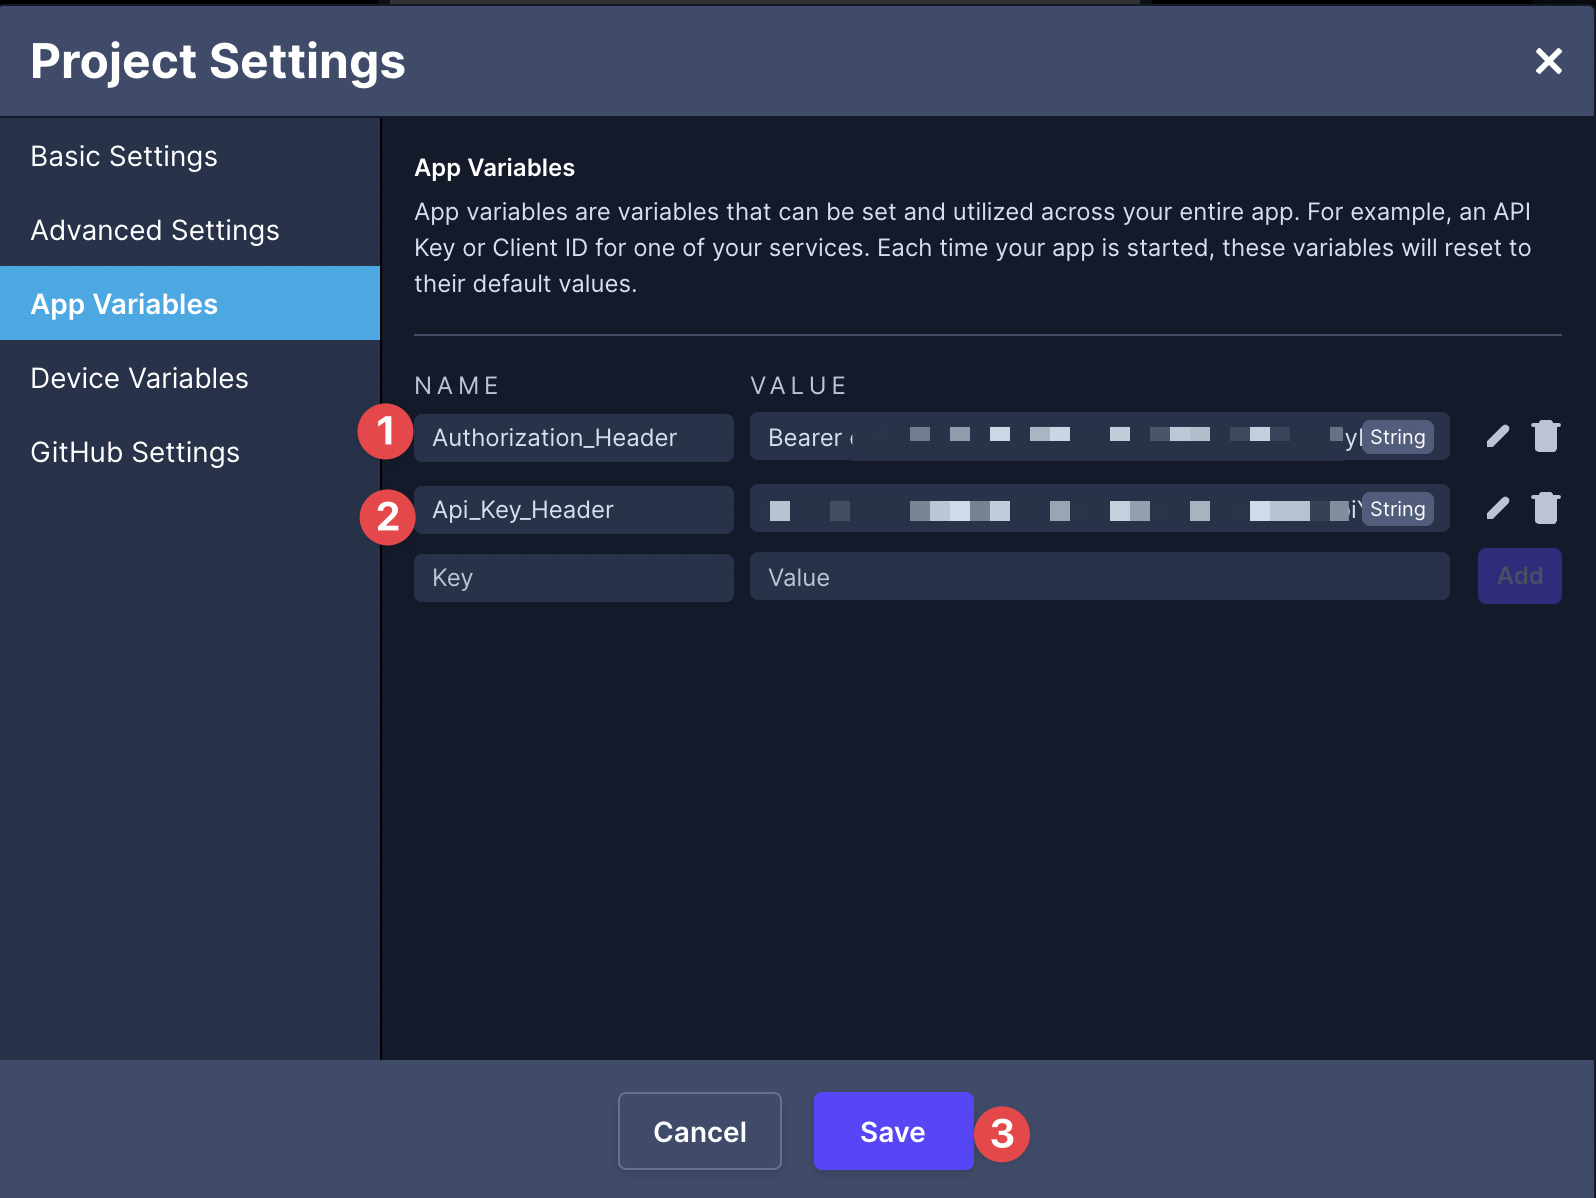
Step 2: Save Supabase API key as Authorization Header in Draftbit
To authorize your Draftbit app with Supabse, in the builder interface:
- Open the Settings tab from the top menu bar.
- In Project Settings, navigate to App Variables.
- Enter a name to access the API Key such as
Authorization_Header. When making the service connection in the next section, it will be passed as the value for the headerAuthorization. - The value of this key requires you to enter an authorization token that starts with syntax
Bearer <your-api-key>(the space betweenBearerand<your-api-key>is required). Click Add after adding the value. - Enter another key name to access the API Key such as
Api_Key_Header. When making the service connection in the next section, it will be passed as the headerapiKeyvalue. - The value of this key requires you to enter an authorization token that starts with syntax is
<your-api-key>. Click Add after adding the value. - Click Save to save these keys and close the modal.
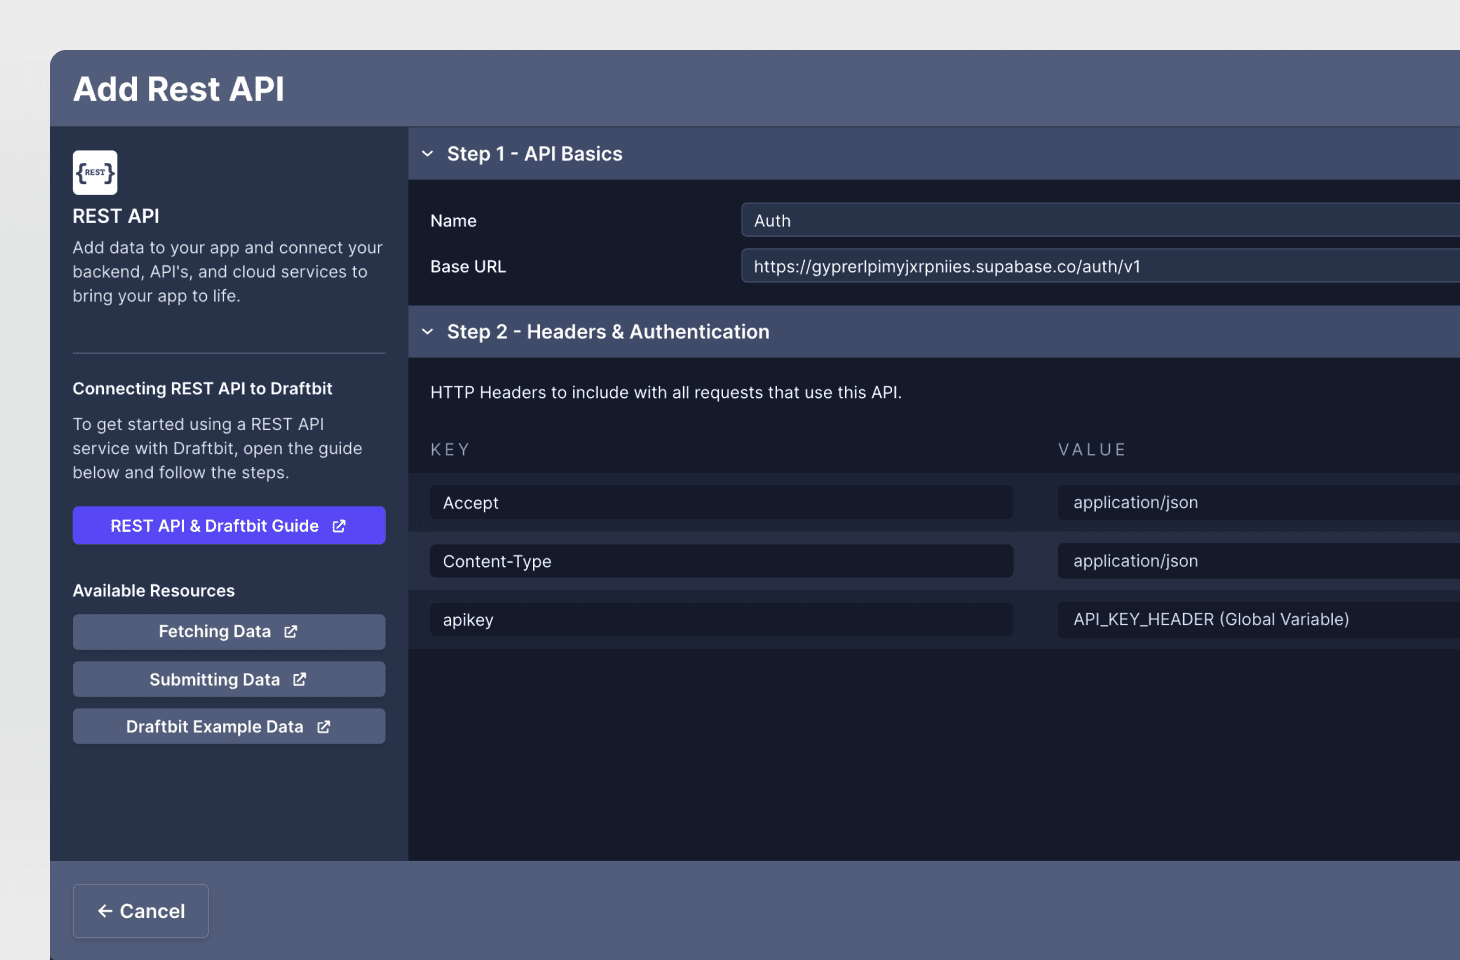
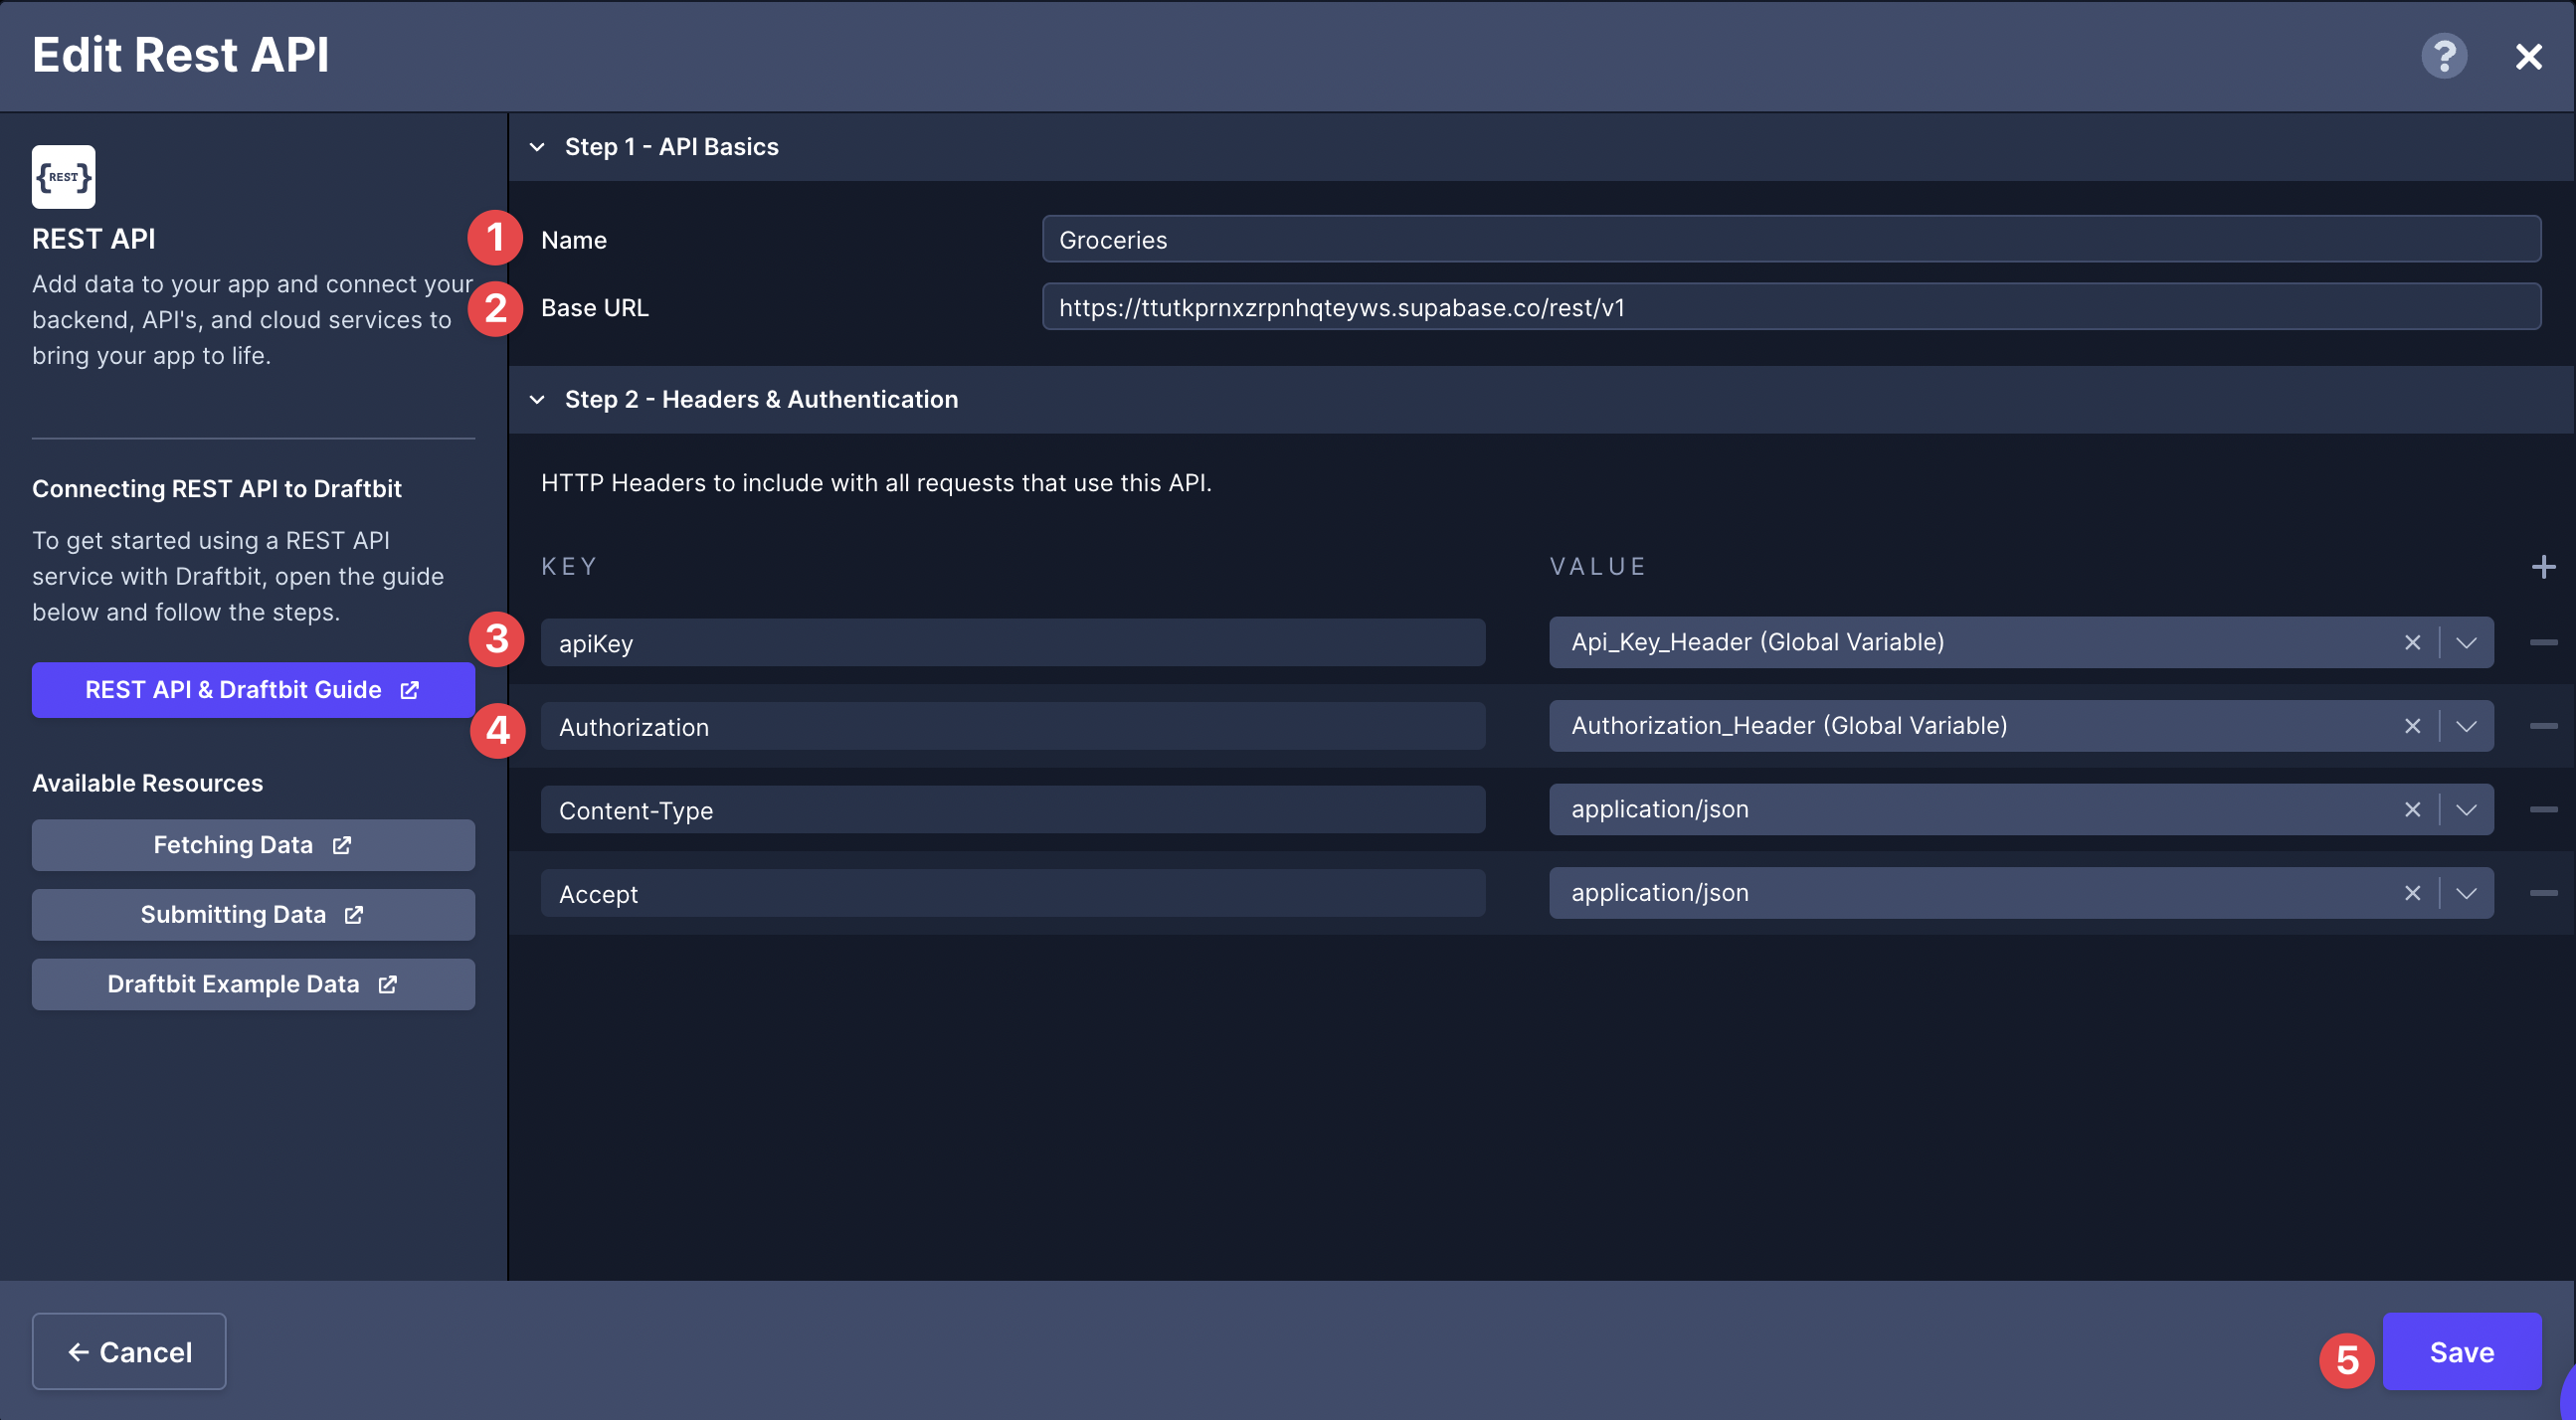
Step 3: Add Supabase RESTful endpoint in Draftbit
In your Draftbit builder interface:
-
Open the API & Cloud Services modal from the top menu bar.
-
From the Connect a service menu, click on Rest API.
-
In Step 1: Enter a name for your REST API. Then, paste your
Base URL(from the first section) into the Base URL field. -
In Step 2: Under Key add
Authorizationandapikey. Then, under Value, select the global variables (from the previous section) to add the actual values for both keys. -
Click Save.
Making API requests with Supabase & Draftbit
GET request to Fetch all records
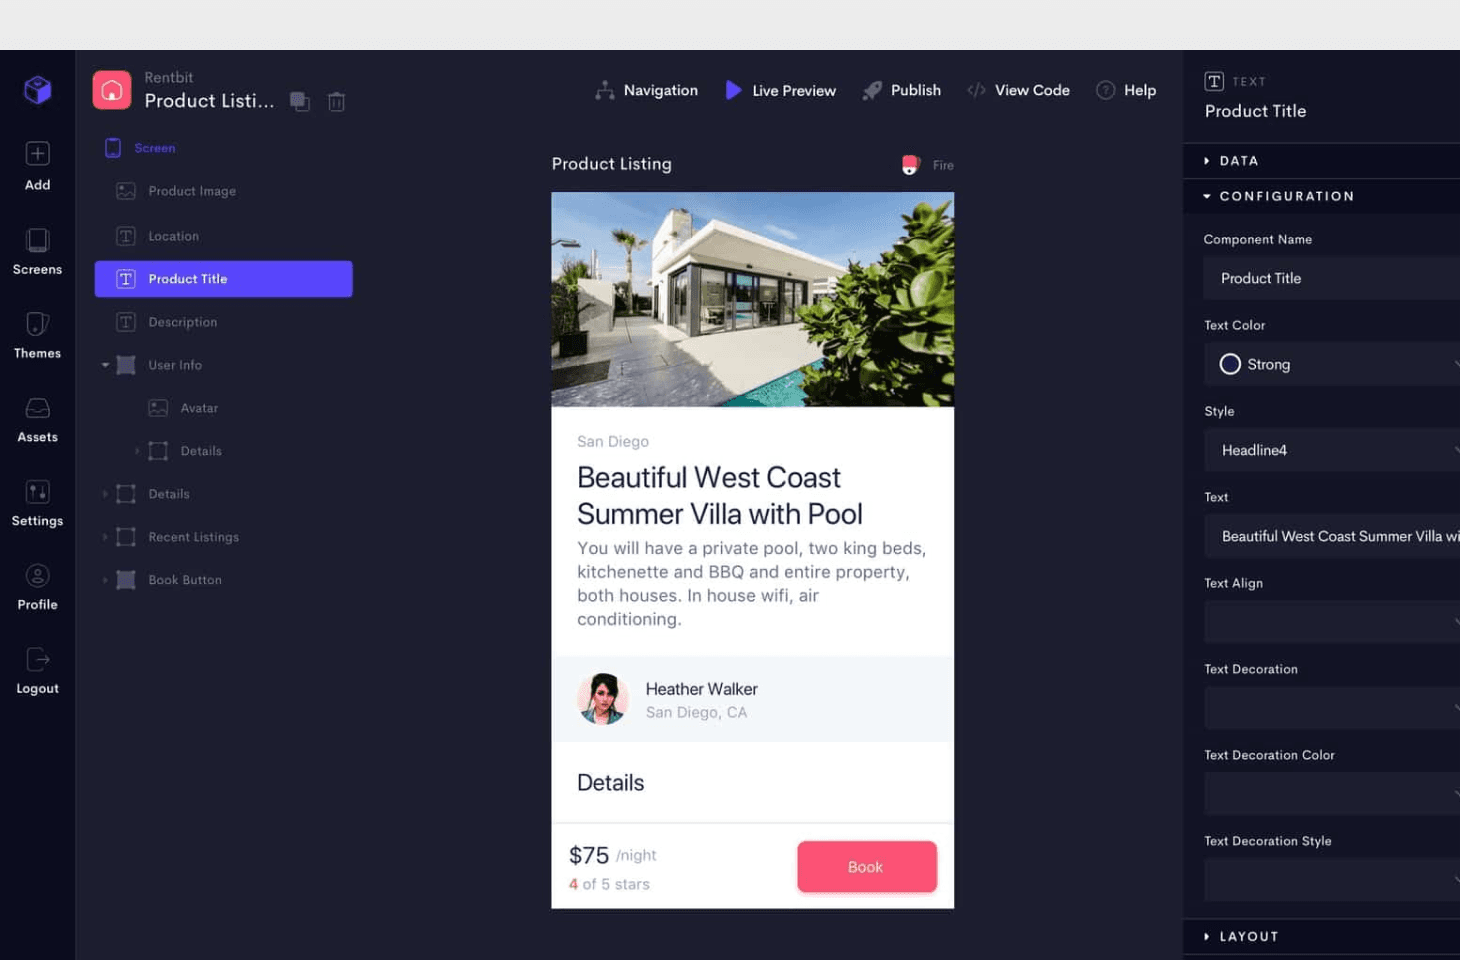
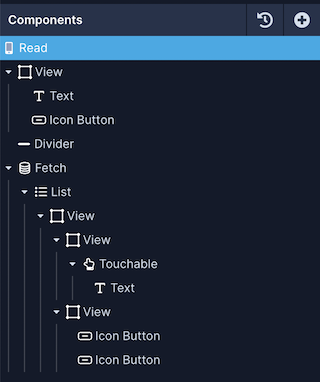
In this section, let's populate a Fetch component with all the data from a simple Supabase and then display the data fetched from the Supabase data table in a List component.
For reference, here is a how the Components tree looks like for this screen:
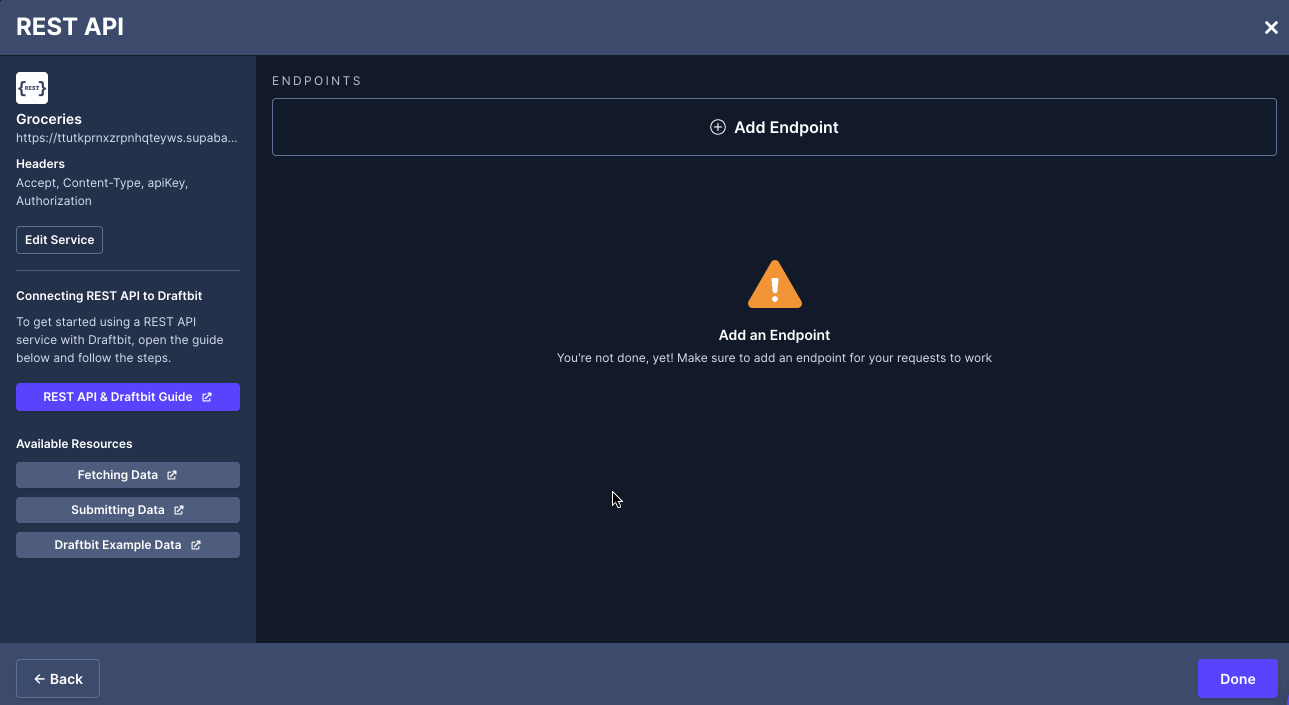
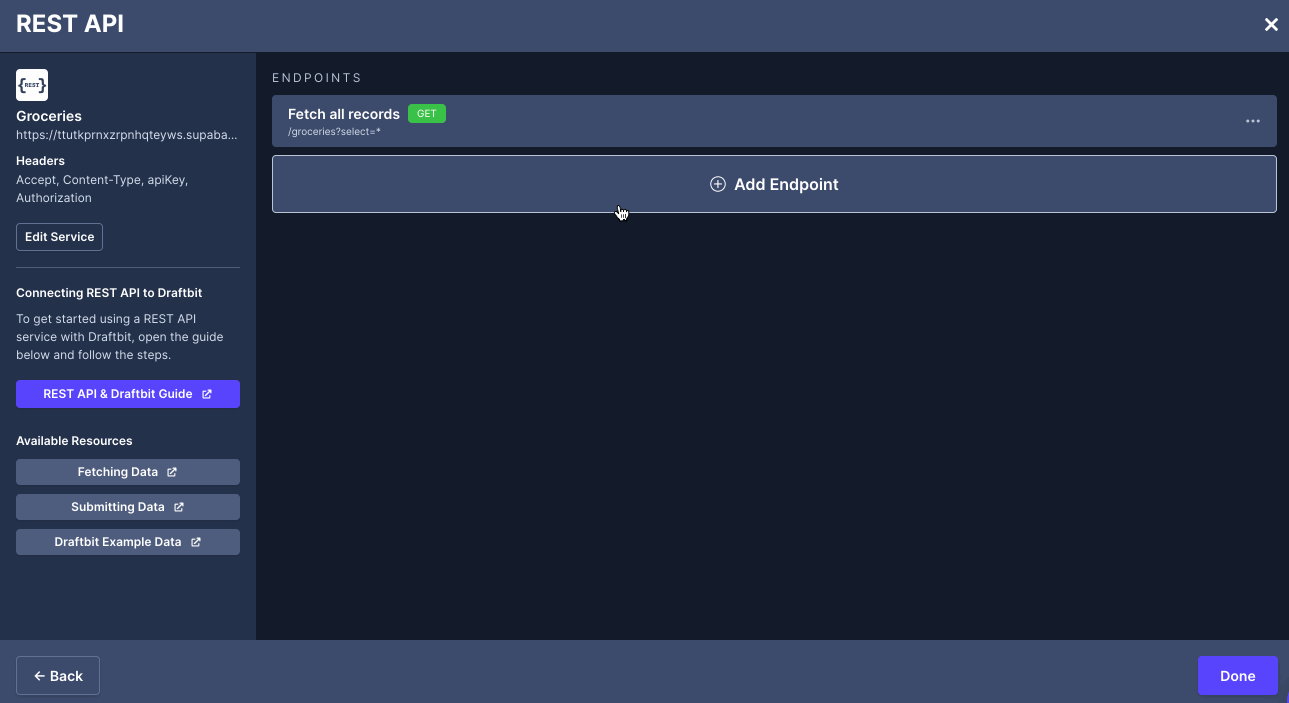
The next step is to create an endpoint. Let's try fetching all the data using a GET HTTP request. Select the Supabase service in the API & Cloud Services modal, and then:
- Click Add endpoint.
- In Step 1: enter the name for the endpoint. Make sure the Method select is
GET. - In Step 2: add the base name path:
/groceries/select=*, wheregroceriesis the table name in Supabase. - In Step 4: click the Test button next to the Endpoint input to verify the response coming from the Supabase.
- Click Save.
In the Builder, on the app screen:
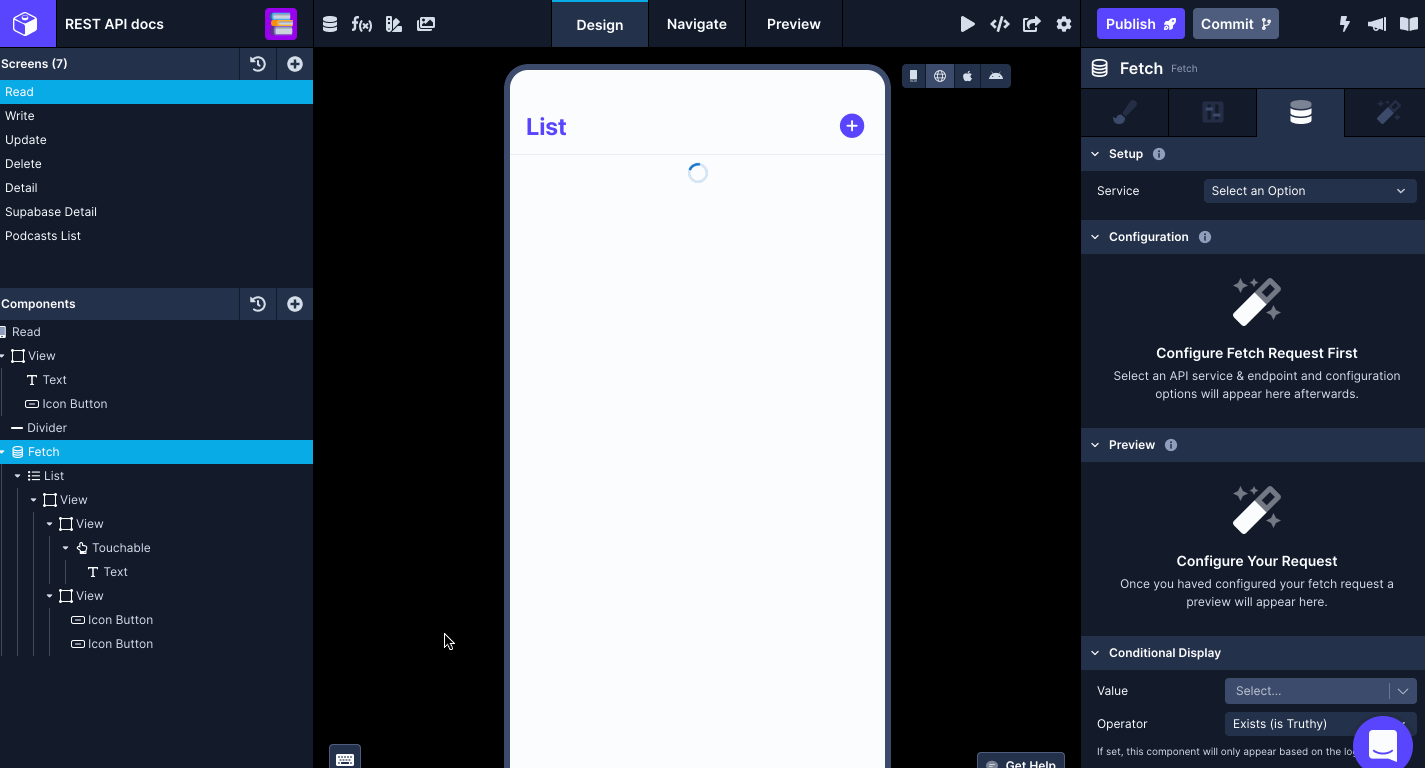
- Select the Fetch component in the Components tree and go to the Data tab from Properties Panel.
- For Service, select the name of the Supabase Service.
- For Endpoint, select the endpoint you want to fetch the data from.
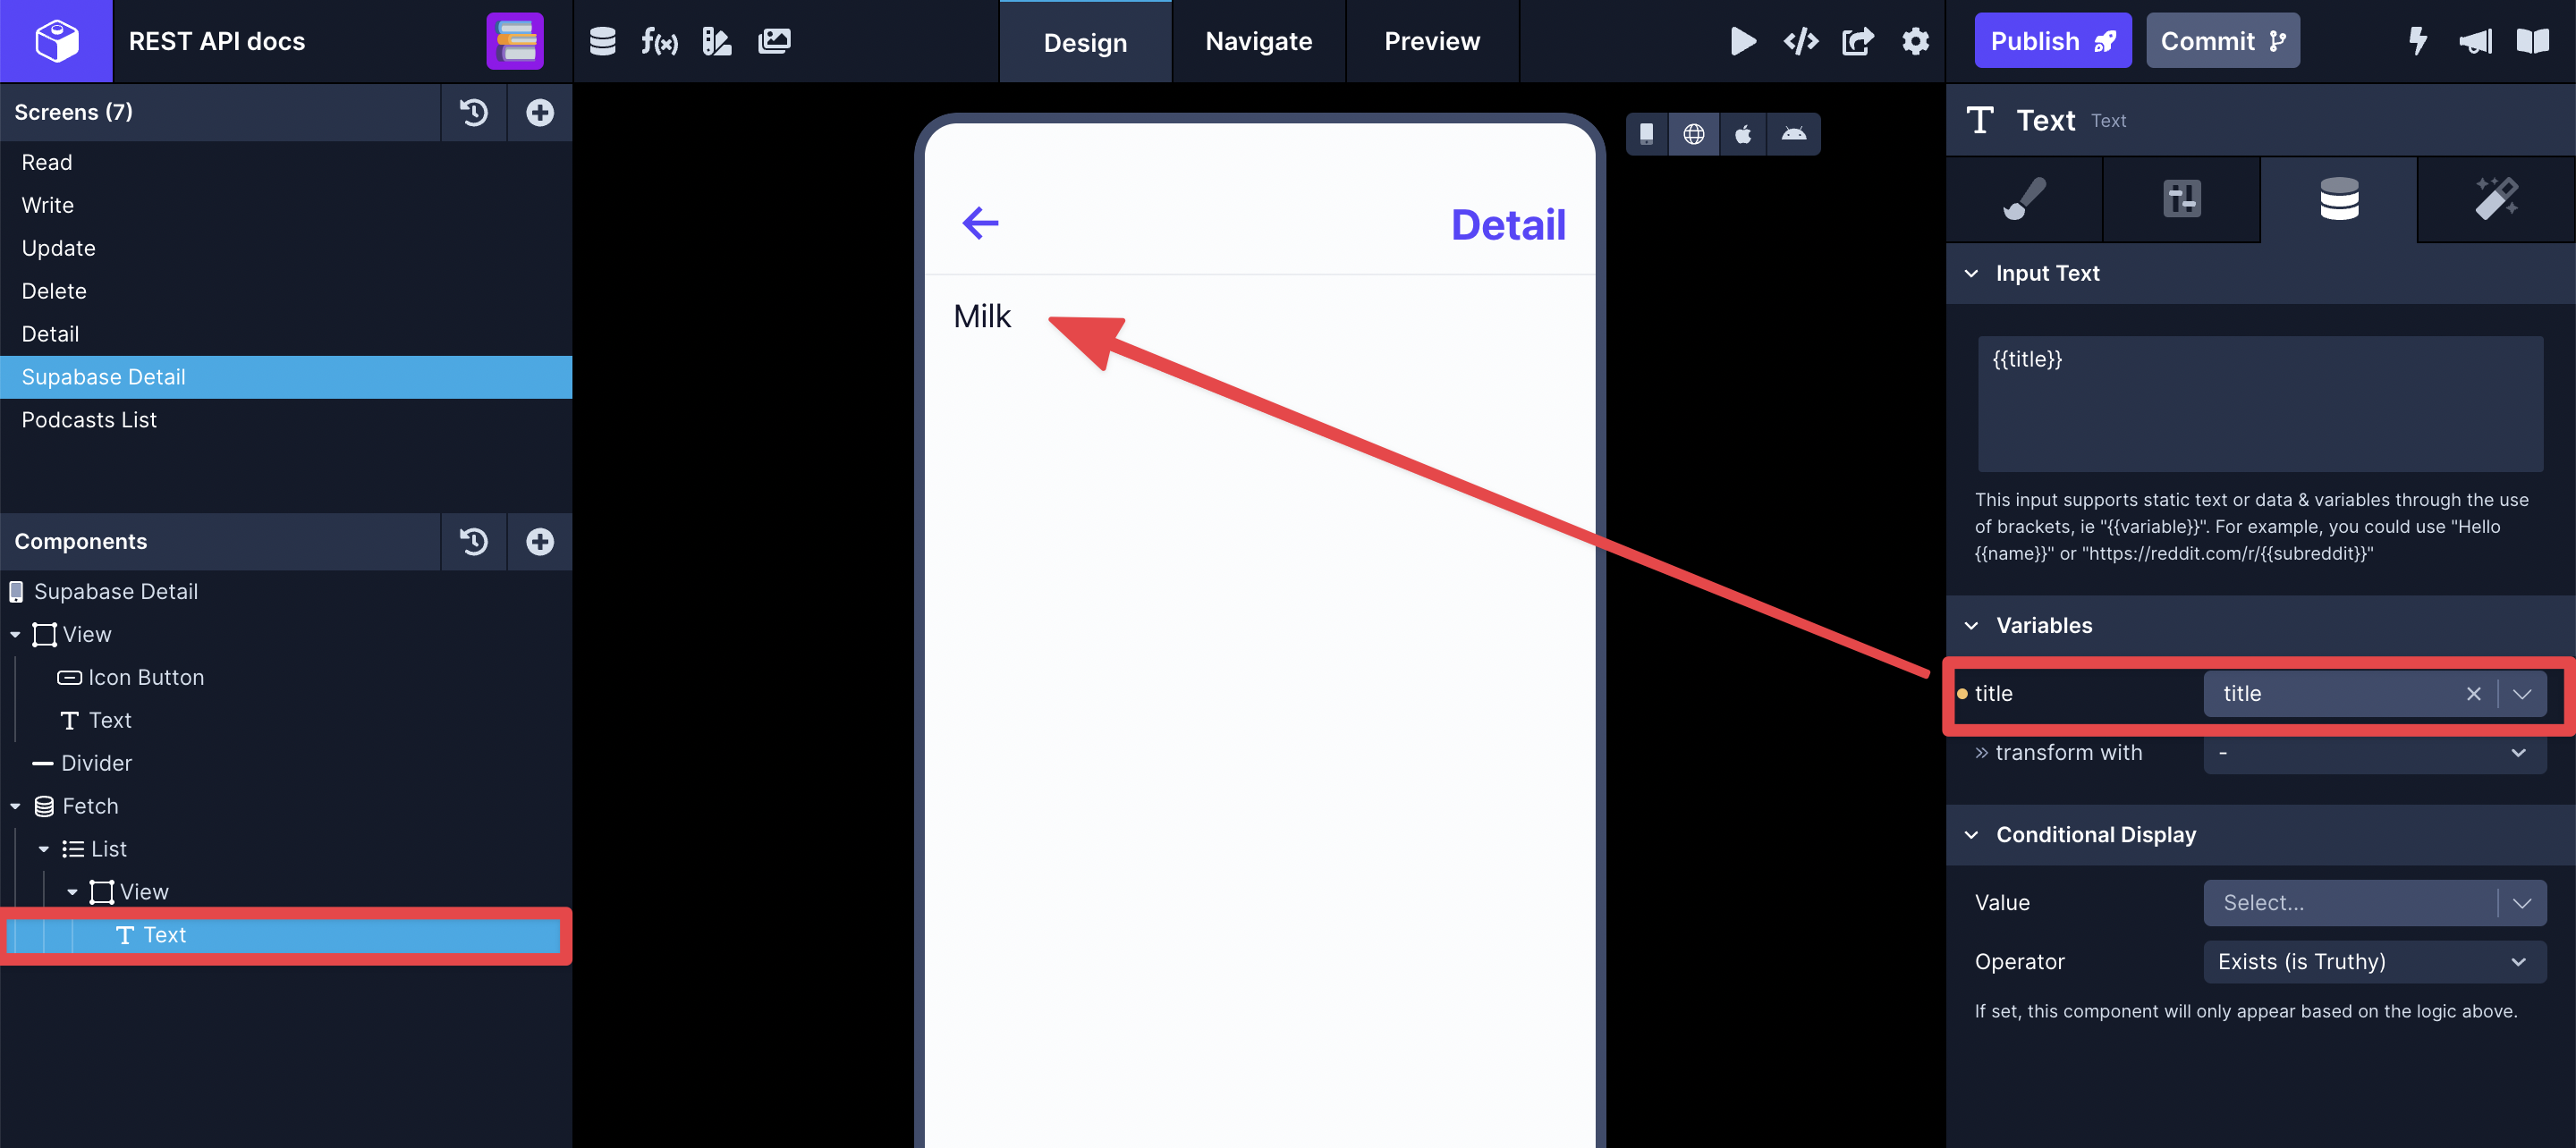
- Select the List component in the Components and go to the Data tab from Properties Panel. In Data, select
Top-Level Responsefrom the dropdown menu. - Then, select the Text component in the Components and then go to the Data tab from the Properties Panel.
- Add a
{{varName}}value (inside the curly braces) to represent a column field from the Supabase. For example, add{{title}}to represent the column name from the Supabase Base. - Under Variables, you will see the variable name defined in the previous step. From the dropdown menu, select the appropriate field that represents the data field.
GET request to fetch single row
Open the API & Cloud services modal from the top menu, select the Supabase service, and then:
- Click Add endpoint.
- In Step 1: enter a name for the endpoint.
- In Step 2: add the
/groceries/column-name=eq.{{column-name}}variable. Then, add a Test value for the{{column-name}}. For example, it can be thetitleor theid. - In Step 4: click the Test button next to the Endpoint input to verify the response coming from the Supabase.
- Click Save.
On app screen:
- Select the Fetch component in the Components tree and go to the Data tab from Properties Panel
- For Service, select the name of the Supabase Service.
- For endpoint, select the endpoint you want to fetch the data from.
- Set the value for the
idin the Configuration > URL Structure section to Navigation > id. - Select the List component in the Components and go to the Data tab from Properties Panel. In Data, select
Top-Level Responsefrom the dropdown menu. - Then, select the Text component in the Components and then go to the Data tab from the Properties Panel.
- Add a
{{varName}}value (inside the curly braces) to represent the column field from the Supabase. For example, add{{title}}to represent the field and value from the Supabase data table. - Under Variables, you will see the variable name defined in the previous step. From the dropdown menu, select the appropriate field that represents the data field.
POST request to submit a new row
Submitting new Data from the Draftbit app to Supabase's REST API requires the request to be sent using the HTTP POST method.
For this section, you need to use at least one component that accepts user input and has a Field Name prop to POST data using Supabase REST API.
You can use one of the following components in Draftbit:
- Text Input
- Text Area/Text Field
- Checkbox
- Slider
- Radio Button Group
- Radio Button
In addition, you need a Touchable component like a Button to attach the POST action. After you have created these components, we will create the POST endpoint:
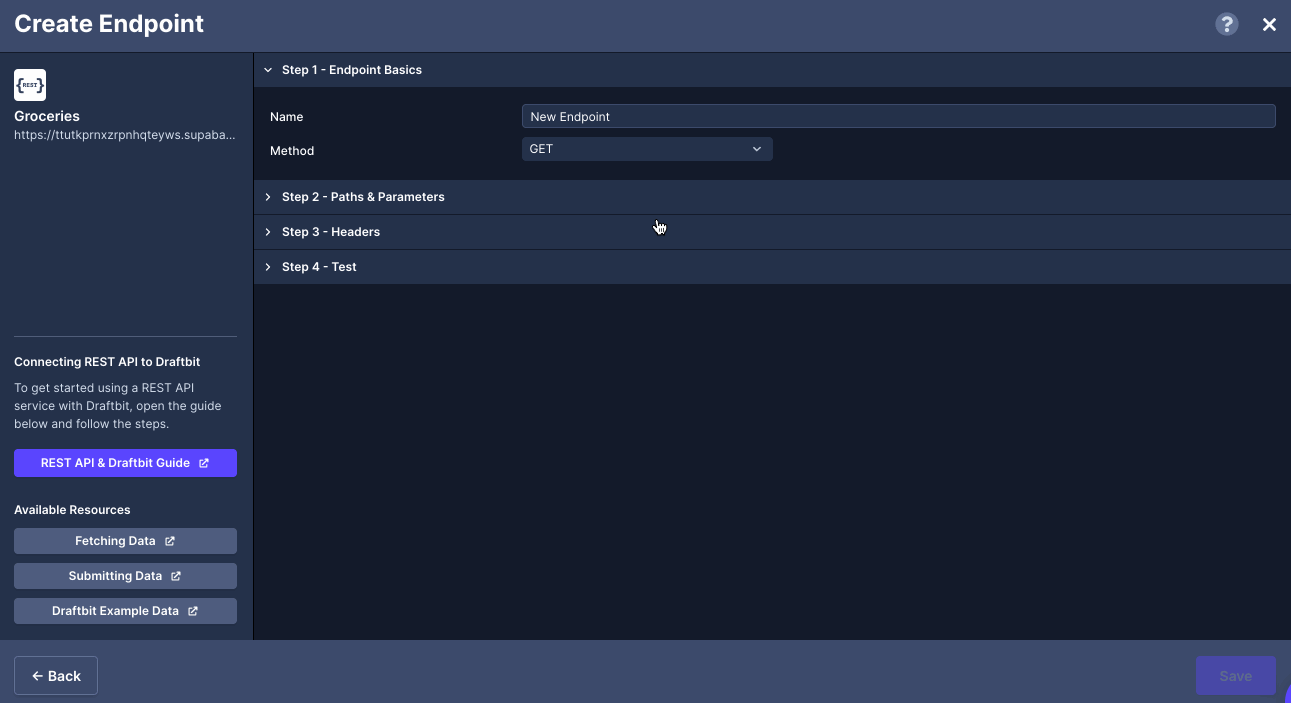
- Click Add endpoint.
- In Step 1: enter a name for the endpoint and select the Method to
POST. - In Step 2: enter the base name as path:
/groceries. - In Step 3: add a valid Body structure to submit a POST request. Add one or many
{{variable}}for test values. Click Body Preview to validate the structure of the Body in the request. For the example, let's create a variable called{{inputValue}}. - In Step 4: to see the new row added to the Supabase data table as JSON response inside the Builder, you have to pass a new header called
Preferwith its value asreturn=representation. - In Step 5: click the Test button next to the Endpoint input to verify the response coming from the Supabase and click Save.

Once you follow the above steps, you should get a 200 OK response with exactly the new record as a JSON you have entered for your schema.
An example of how Body in a request will look like:
_10{_10 "title": {{inputValue}}_10}
Where title is the column name in your Supabase database table.
In Draftbit, using a Touchable or a Button component, you can trigger the action API Request to submit the data to the endpoint.
Now, there is a working POST request in Draftbit. Map its response to the components on your screen in Draftbit.
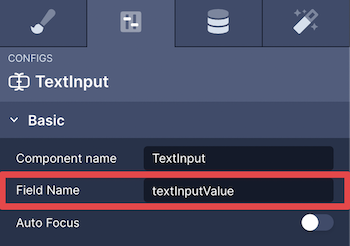
First, for each input component, make sure you have set the Field Names (found in the Configs tab, second from the left) to unique values. For example, in the screen below, there is one TextInput field component with the value of the Field Name prop of textInputValue.
Next, on your Button component, go to the Interactions tab in the Properties panel located on the far-right-hand side. Select an Action called API request.
In the API request action:
- In Service, select the name to Supabase API Service.
- In Endpoint, select the name of the Endpoint.
- Then add the configuration for the body request to be sent by selecting the values for
{{inputValue}}.
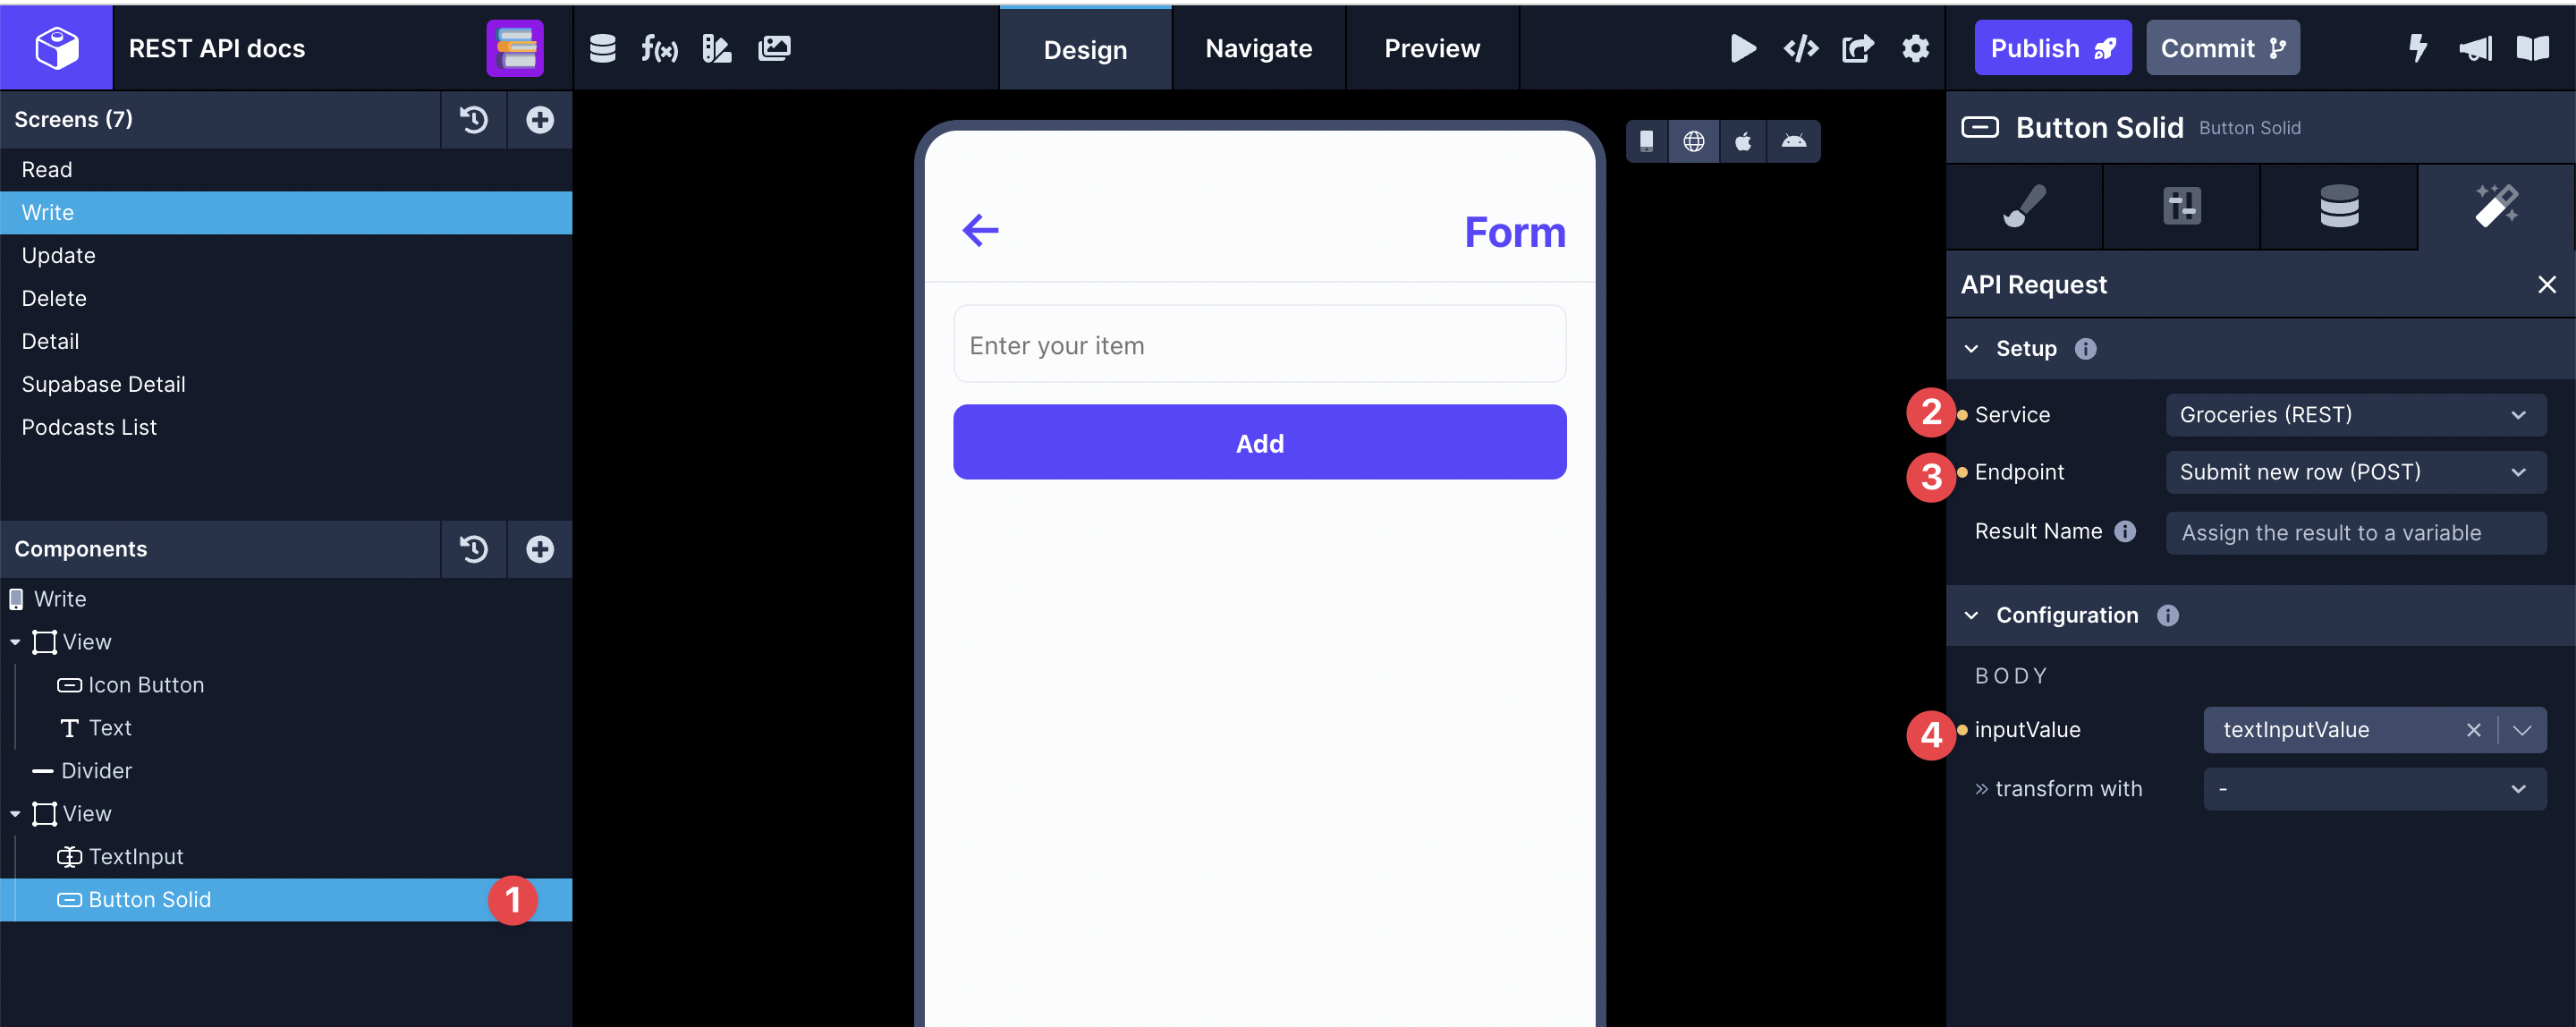
After completing the above steps, you can trigger the API request to submit new data to the Supabase database.
PATCH request to Update a new record
Updating an existing record from the Draftbit app to Supabase's REST API requires the request to be sent using the HTTP PATCH method.
After you have created your screen components in the Draftbit builder, open the Supabase service and make the PATCH endpoint:
- Click Add endpoint.
- In Step 1: enter a name for the endpoint and select the Method to
PATCH. - In Step 2: enter the base name as path:
/groceries?id=eq.{{id}}, whereidis the value of an existing record in the database. - In Step 3: add a valid Body structure to submit a PATCH request. Add one or many
{{variable}}for test values depending on the structure of your app. Click Body Preview to validate the structure of the Body in the request. For the example, let's create a variable called{{inputValue}}. - In Step 5: click the Test button next to the Endpoint input to verify the response coming from the Supabase and click Save.
Next, on your Button component, go to the Interactions tab in the Properties panel located on the far-right-hand side. Select an Action called API request.
In the API request action:
- In Service, select the name to Supabase API Service.
- In Endpoint, select the name of the Endpoint.
- Then add the configuration for the query param, and the body request to be sent by selecting the values for
{{inputValue}}.
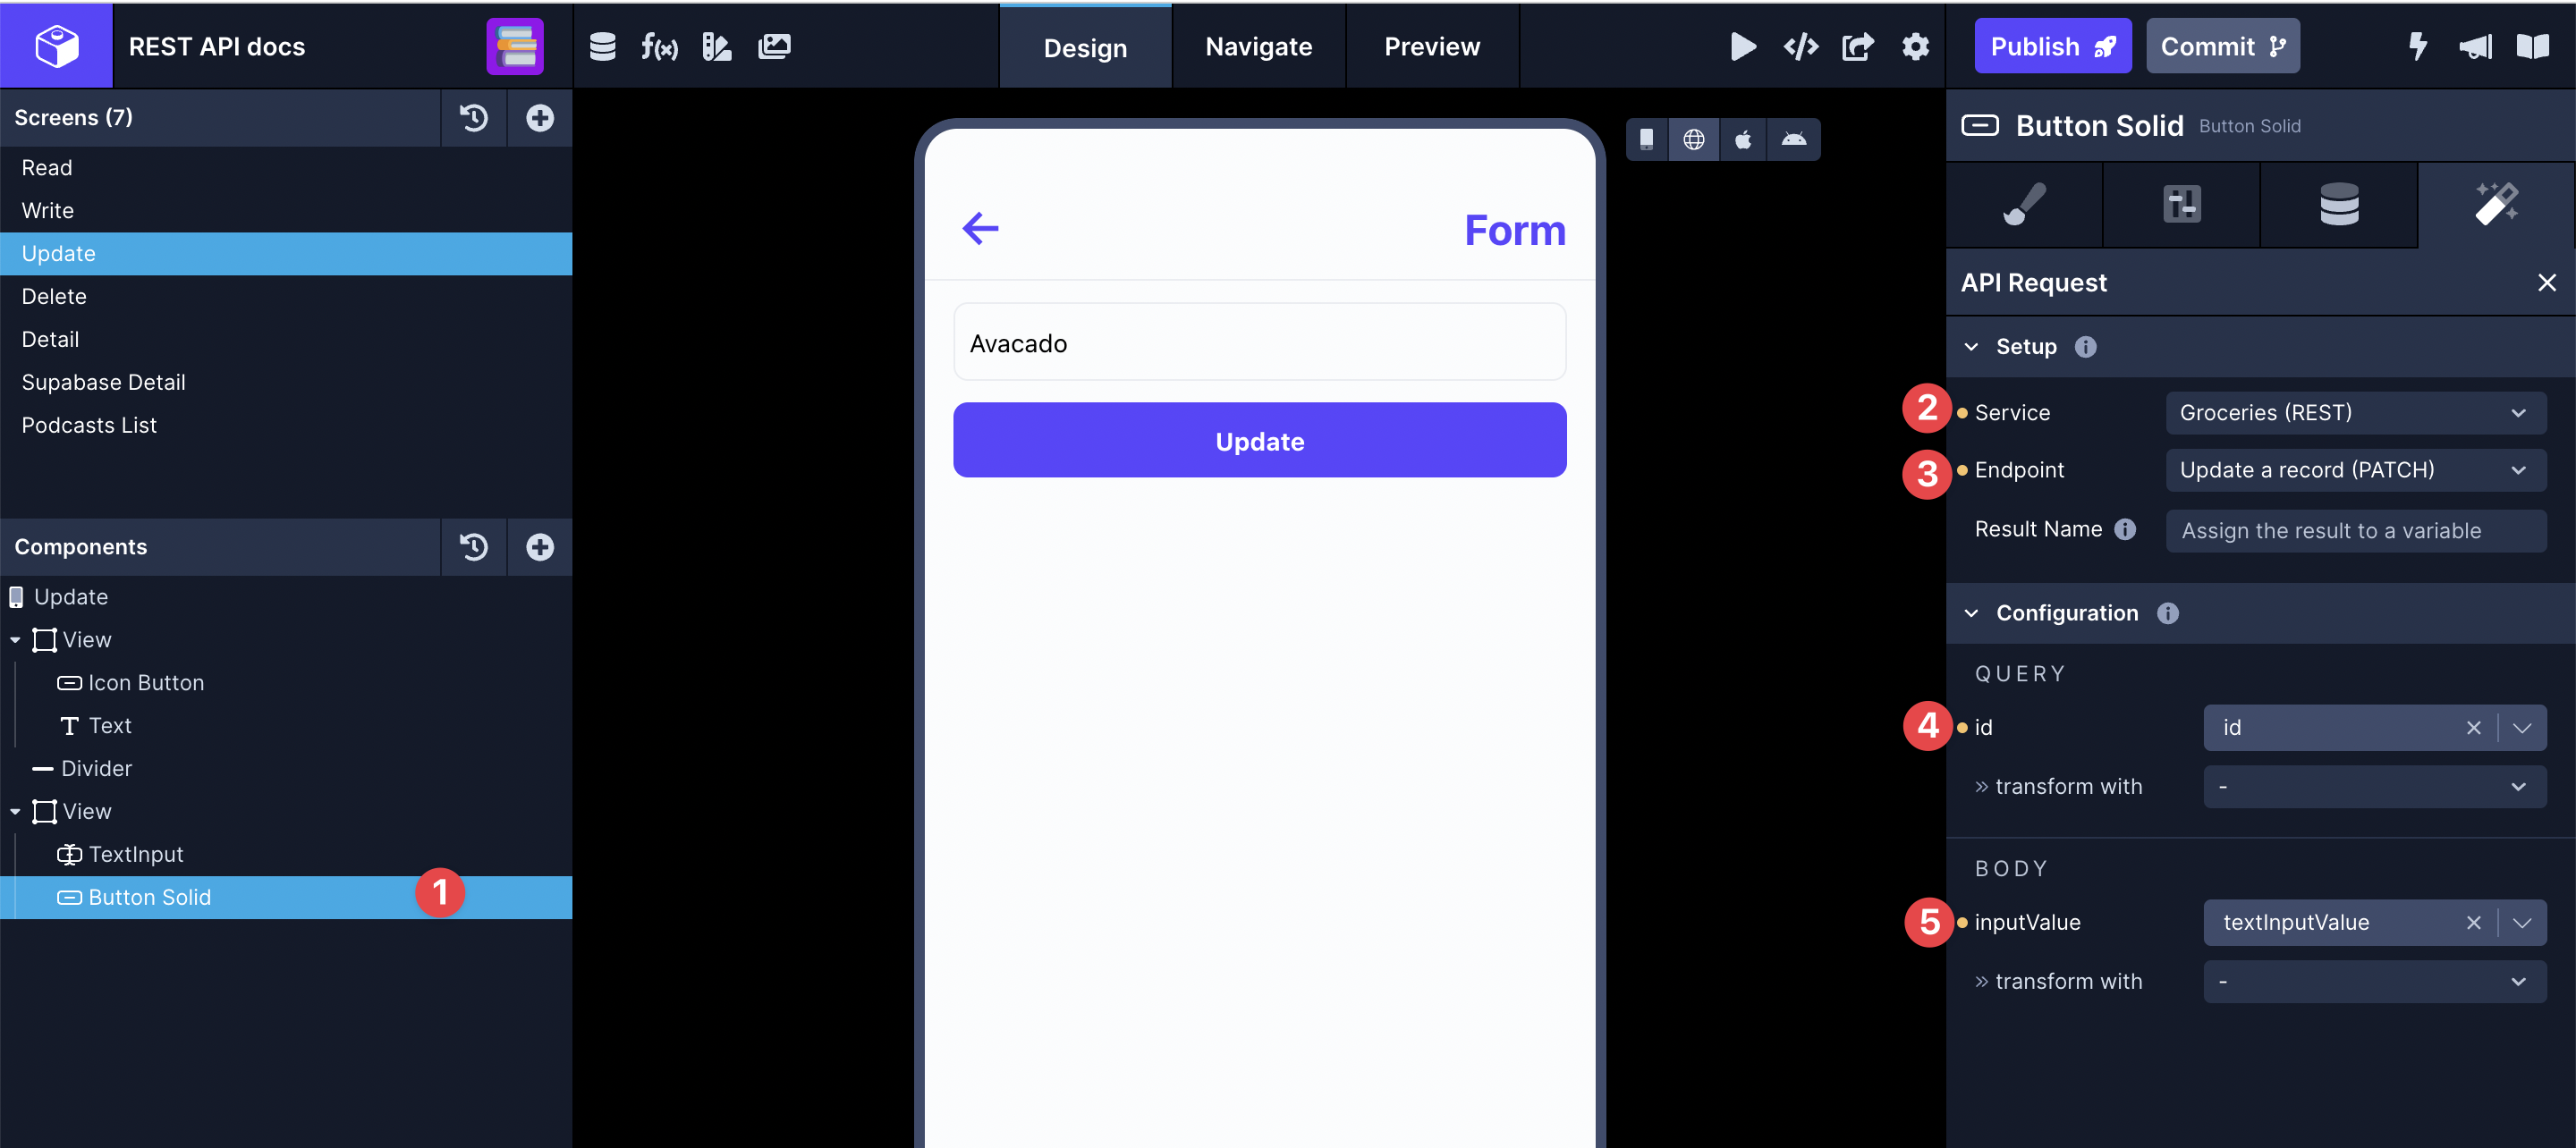
After completing the above steps, you can trigger the API request to update existing data in the Supabase database.
DELETE request to remove an existing record
The DELETE request is to the Supabase with an item's column-name to remove that particular record from the table. You can use a filter from Supabase to filter the value of a specific column-name.
After you have created your screen components in the Draftbit builder, open the Supabase service and create the DELETE endpoint:
- Click Add endpoint.
- In Step 1: enter a name for the endpoint and select the Method to
DELETE. - In Step 2: add
/groceries/columnName=eq.{{columnName}}. Then, add a Test value for the{{columnName}}. For example, the{{columnName}}here can beidof the record. - In Step 4: click the Test button next to the Endpoint input to verify the response from the Supabase.
- Click Save.

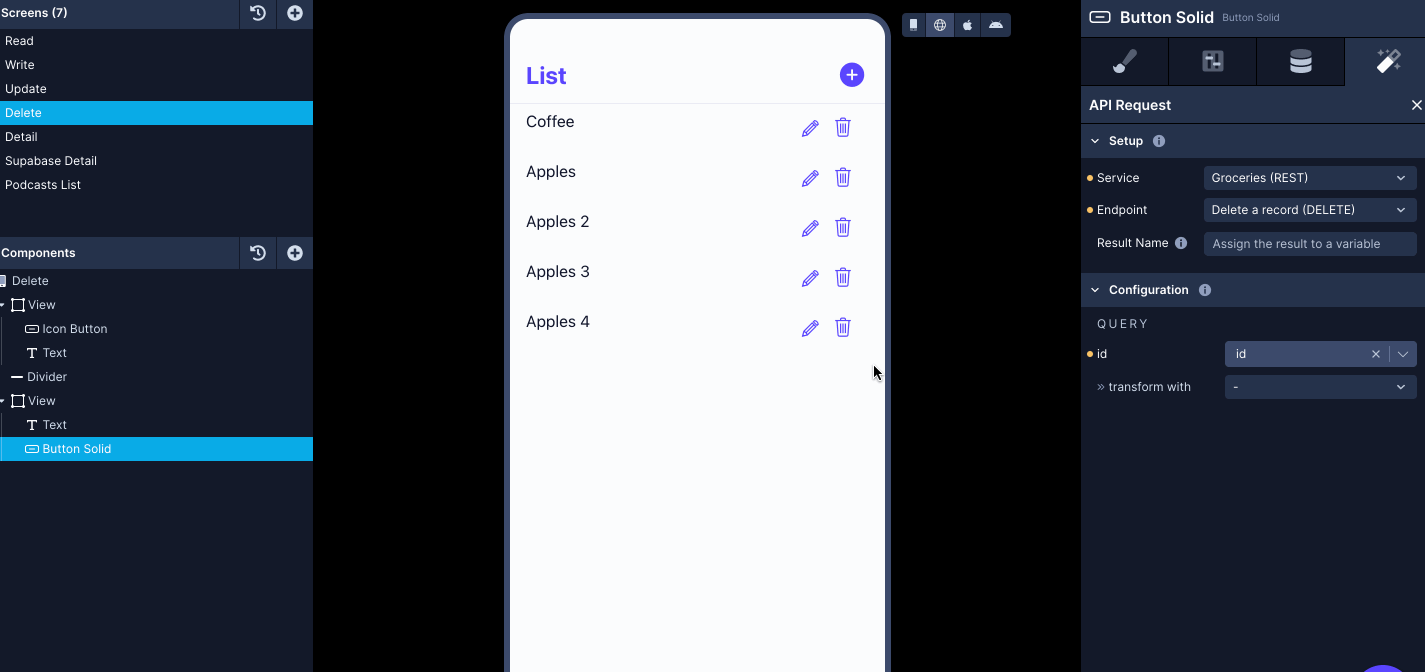
Next, on your Button component, go to the Interactions tab in the Properties panel located on the far-right-hand side. Select an Action called API request.
In the API Request action:
- In Service, select the name to Supabase API Service.
- In Endpoint, select the name of the Endpoint.
- Then, add the configuration for the query request to be sent by selecting a value. For example, in this case it will be the
idof the record coming from the Navigation parameter.
Resources
- Draftbit official website.
- Draftbit Community.
- Draftbit documentation.
Details
Third-party integrations and docs are managed by Supabase partners.