Enable SSO for Your Organization
Looking for docs on how to add Single Sign-On support in your Supabase project? Head on over to Single Sign-On with SAML 2.0 for Projects.
Supabase offers single sign-on (SSO) as a login option to provide additional account security for your team. This allows company administrators to enforce the use of an identity provider when logging into Supabase. SSO improves the onboarding and offboarding experience of the company as the employee only needs a single set of credentials to access third-party applications or tools which can also be revoked by an administrator.
Supabase currently provides SAML SSO for Team and Enterprise Plan customers. If you are an existing Team or Enterprise Plan customer, continue with the setup below.
Supported providers#
Supabase supports practically all identity providers (IdP) that support the SAML 2.0 SSO protocol. These guides cover commonly used identity providers to help you get started. If you use a different provider, contact support.
Once configured, you can update your settings anytime from the SSO section of the dashboard under Organization Settings.
Testing your SSO configuration
After configuring your SSO provider, thorough testing is essential. See our SSO Testing and Best Practices guide for:
- Step-by-step testing instructions
- Troubleshooting common issues
- Security best practices
- Pre-launch checklist
Choosing your login flow#
Supabase supports two SSO login flows: IdP-initiated and SP-initiated. You can enable one or both depending on your organization's needs.
IdP-initiated login (recommended)#
Users start their login from your identity provider (Okta, Azure AD, Google Workspace) by clicking an app tile or bookmark. This is the simplest and most common configuration - it requires no domain configuration and works automatically once SSO is enabled.
Best for:
- Organizations with established IdP workflows
- Multiple SAML apps per domain (Dev, Staging, Prod)
- Simplest user experience
SP-initiated login#
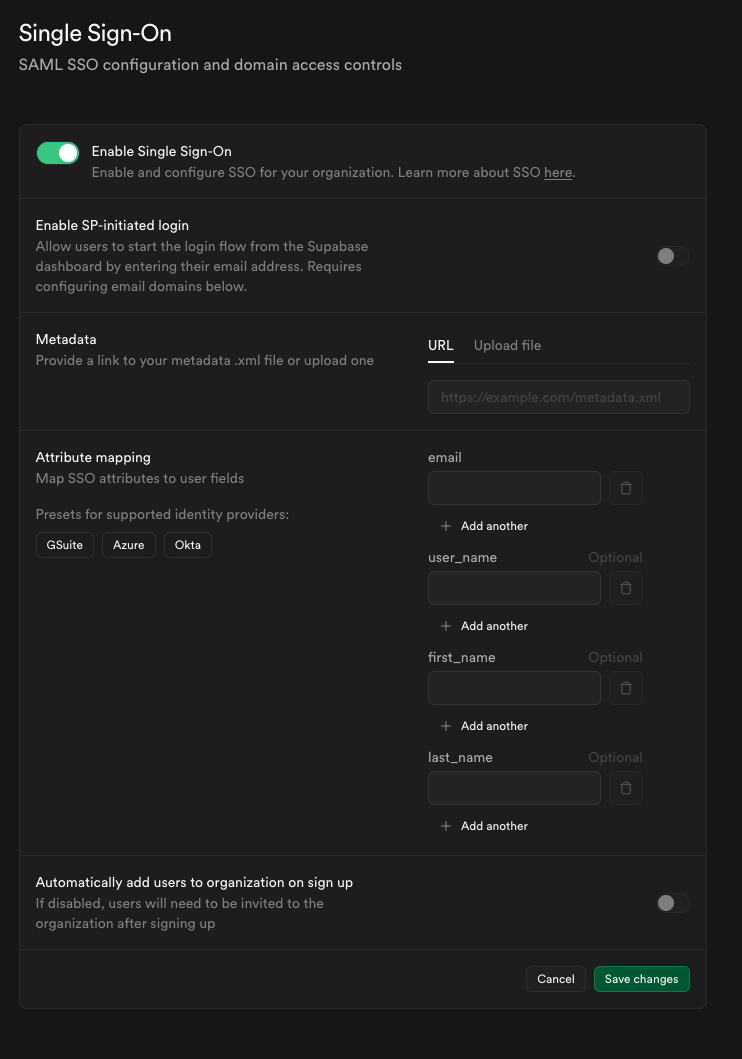
Users start their login at supabase.com by entering their email address, then are redirected to your identity provider. This flow requires configuring email domains to route users to the correct IdP.
Best for:
- Users who bookmark supabase.com directly
- Organizations migrating from password authentication
- Supporting domain-based automatic IdP routing
Need help choosing?#
- Quick decision: Start with IdP-initiated only (the default). It works for 90% of use cases.
- Detailed guidance: See Choosing the Right Login Flow for scenario-based recommendations.
- Technical details: Read Understanding SSO Login Flows for in-depth explanations.
Key configuration options#
- Login flows - Choose between IdP-initiated (users start from identity provider), SP-initiated (users start at supabase.com), or both. IdP-initiated is recommended for most organizations and requires no domain configuration. See Choosing the Right Login Flow for guidance.
- Email domains - Required only if you enable SP-initiated login. You can associate one or more email domains with your SSO provider. Users with matching email addresses can sign in via SSO at supabase.com. Not required for IdP-initiated flow.
- Auto-join - Optionally allow users with a matching domain to join your organization automatically when they sign in via SSO. This applies on every login, not only on first signup.
- Default role for auto-joined users - Choose the role (e.g.,
Read-only,Developer,Administrator,Owner) that automatically joined users receive. We recommend usingDeveloperas the default (principle of least privilege) and promoting users individually as needed. Refer to access control for more information about roles. - Invitation types - When inviting users to your organization, you can explicitly choose whether the invitation requires SSO authentication or allows non-SSO login (password/social). This enables mixed authentication organizations with both SSO and non-SSO users.
How SSO works in Supabase#
When SSO is enabled for an organization:
- Organization invites are restricted to company members belonging to the same identity provider.
- Every user has an organization created by default. They can create as many projects as they want.
- An SSO user will not be able to update or reset their password since the company administrator manages their access via the identity provider.
- If an SSO user with the following email of
alice@foocorp.comattempts to sign in with a GitHub account that uses the same email, a separate Supabase account is created and will not be linked to the SSO user's account. - SSO users will only see organizations/projects they've been invited to or auto-joined into. See access control for more details.
Enabling SSO for an organization#
Recommended workflow:
- Create or verify at least one non-SSO owner account exists (required for safety)
- Configure your SSO provider following one of our provider-specific guides
- Start with auto-join disabled to test the configuration
- Test SSO login with your own account
- Once confirmed working, enable auto-join if desired
- Thoroughly test using our SSO Testing and Best Practices guide
- Invite users to the organization or let them auto-join on login
Non-SSO Accounts
If a user is already a member of the organization under a non-SSO account, they will need to be removed and invited again with an SSO-required invitation to join under their SSO account. SSO and non-SSO accounts with the same email are treated as separate accounts.
No identity linking
Each user account verified using an SSO identity provider will not be legible for identity linking to existing user accounts in the system. That is, if a user valid.email@supabase.io had signed up with a password, and then uses their company SSO login with your project, there will be two valid.email@supabase.io user accounts in the system.
Users will need to ensure they are logged in with the correct account when accessing organizations/projects.
Disabling SSO for an organization#
If you disable or delete the SSO provider for an organization, all SSO users will immediately be unable to sign in.
Safety requirement
The system requires at least one non-SSO owner account before allowing SSO provider deletion. This prevents complete organization lockout. When you delete an SSO provider, all SSO members are automatically removed from the organization.
Before disabling or deleting SSO:
- Verify a non-SSO owner account exists and can log in
- Communicate to affected users in advance
- Consider whether disabling is better than deleting if the change is temporary
Removing an individual SSO user's access#
To revoke access for a specific SSO user without disabling the provider entirely you may:
- Remove or disable the user's account in your identity provider
- Downgrade or remove their permissions for any organizations in Supabase.
Testing and best practices#
Before rolling out SSO to your organization, we strongly recommend thorough testing and following security best practices. Our comprehensive guide covers:
- Step-by-step testing procedures for SSO login, auto-join, and invitations
- Troubleshooting common issues (many of which previously required support intervention)
- Security best practices including certificate monitoring and domain configuration
- Operational guidance for making SSO changes safely
- Pre-launch verification checklist
Visit the SSO Testing and Best Practices guide for complete details.
Advanced scenarios#
Most organizations use a single SSO provider for all users. However, Supabase supports multiple SSO providers within an organization for advanced use cases such as:
- Separate providers for development, staging, and production environments
- Different providers for different teams or business units
- Gradual migration from one identity provider to another
If you need to configure multiple SSO providers, refer to the Multiple SSO Providers guide for detailed configuration steps, and contact your Supabase support representative if you need additional guidance.