Login with Azure (Microsoft)
To enable Azure (Microsoft) Auth for your project, you need to set up an Azure OAuth application and add the application credentials to your Supabase Dashboard.
Overview#
Setting up OAuth with Azure consists of four broad steps:
- Create an OAuth application under Azure Entra ID.
- Add a secret to the application.
- Add the Supabase Auth callback URL to the allowlist in the OAuth application in Azure.
- Configure the client ID and secret of the OAuth application within the Supabase Auth dashboard.
Access your Azure Developer account#
- Go to portal.azure.com.
- Login and select Microsoft Entra ID under the list of Azure Services.
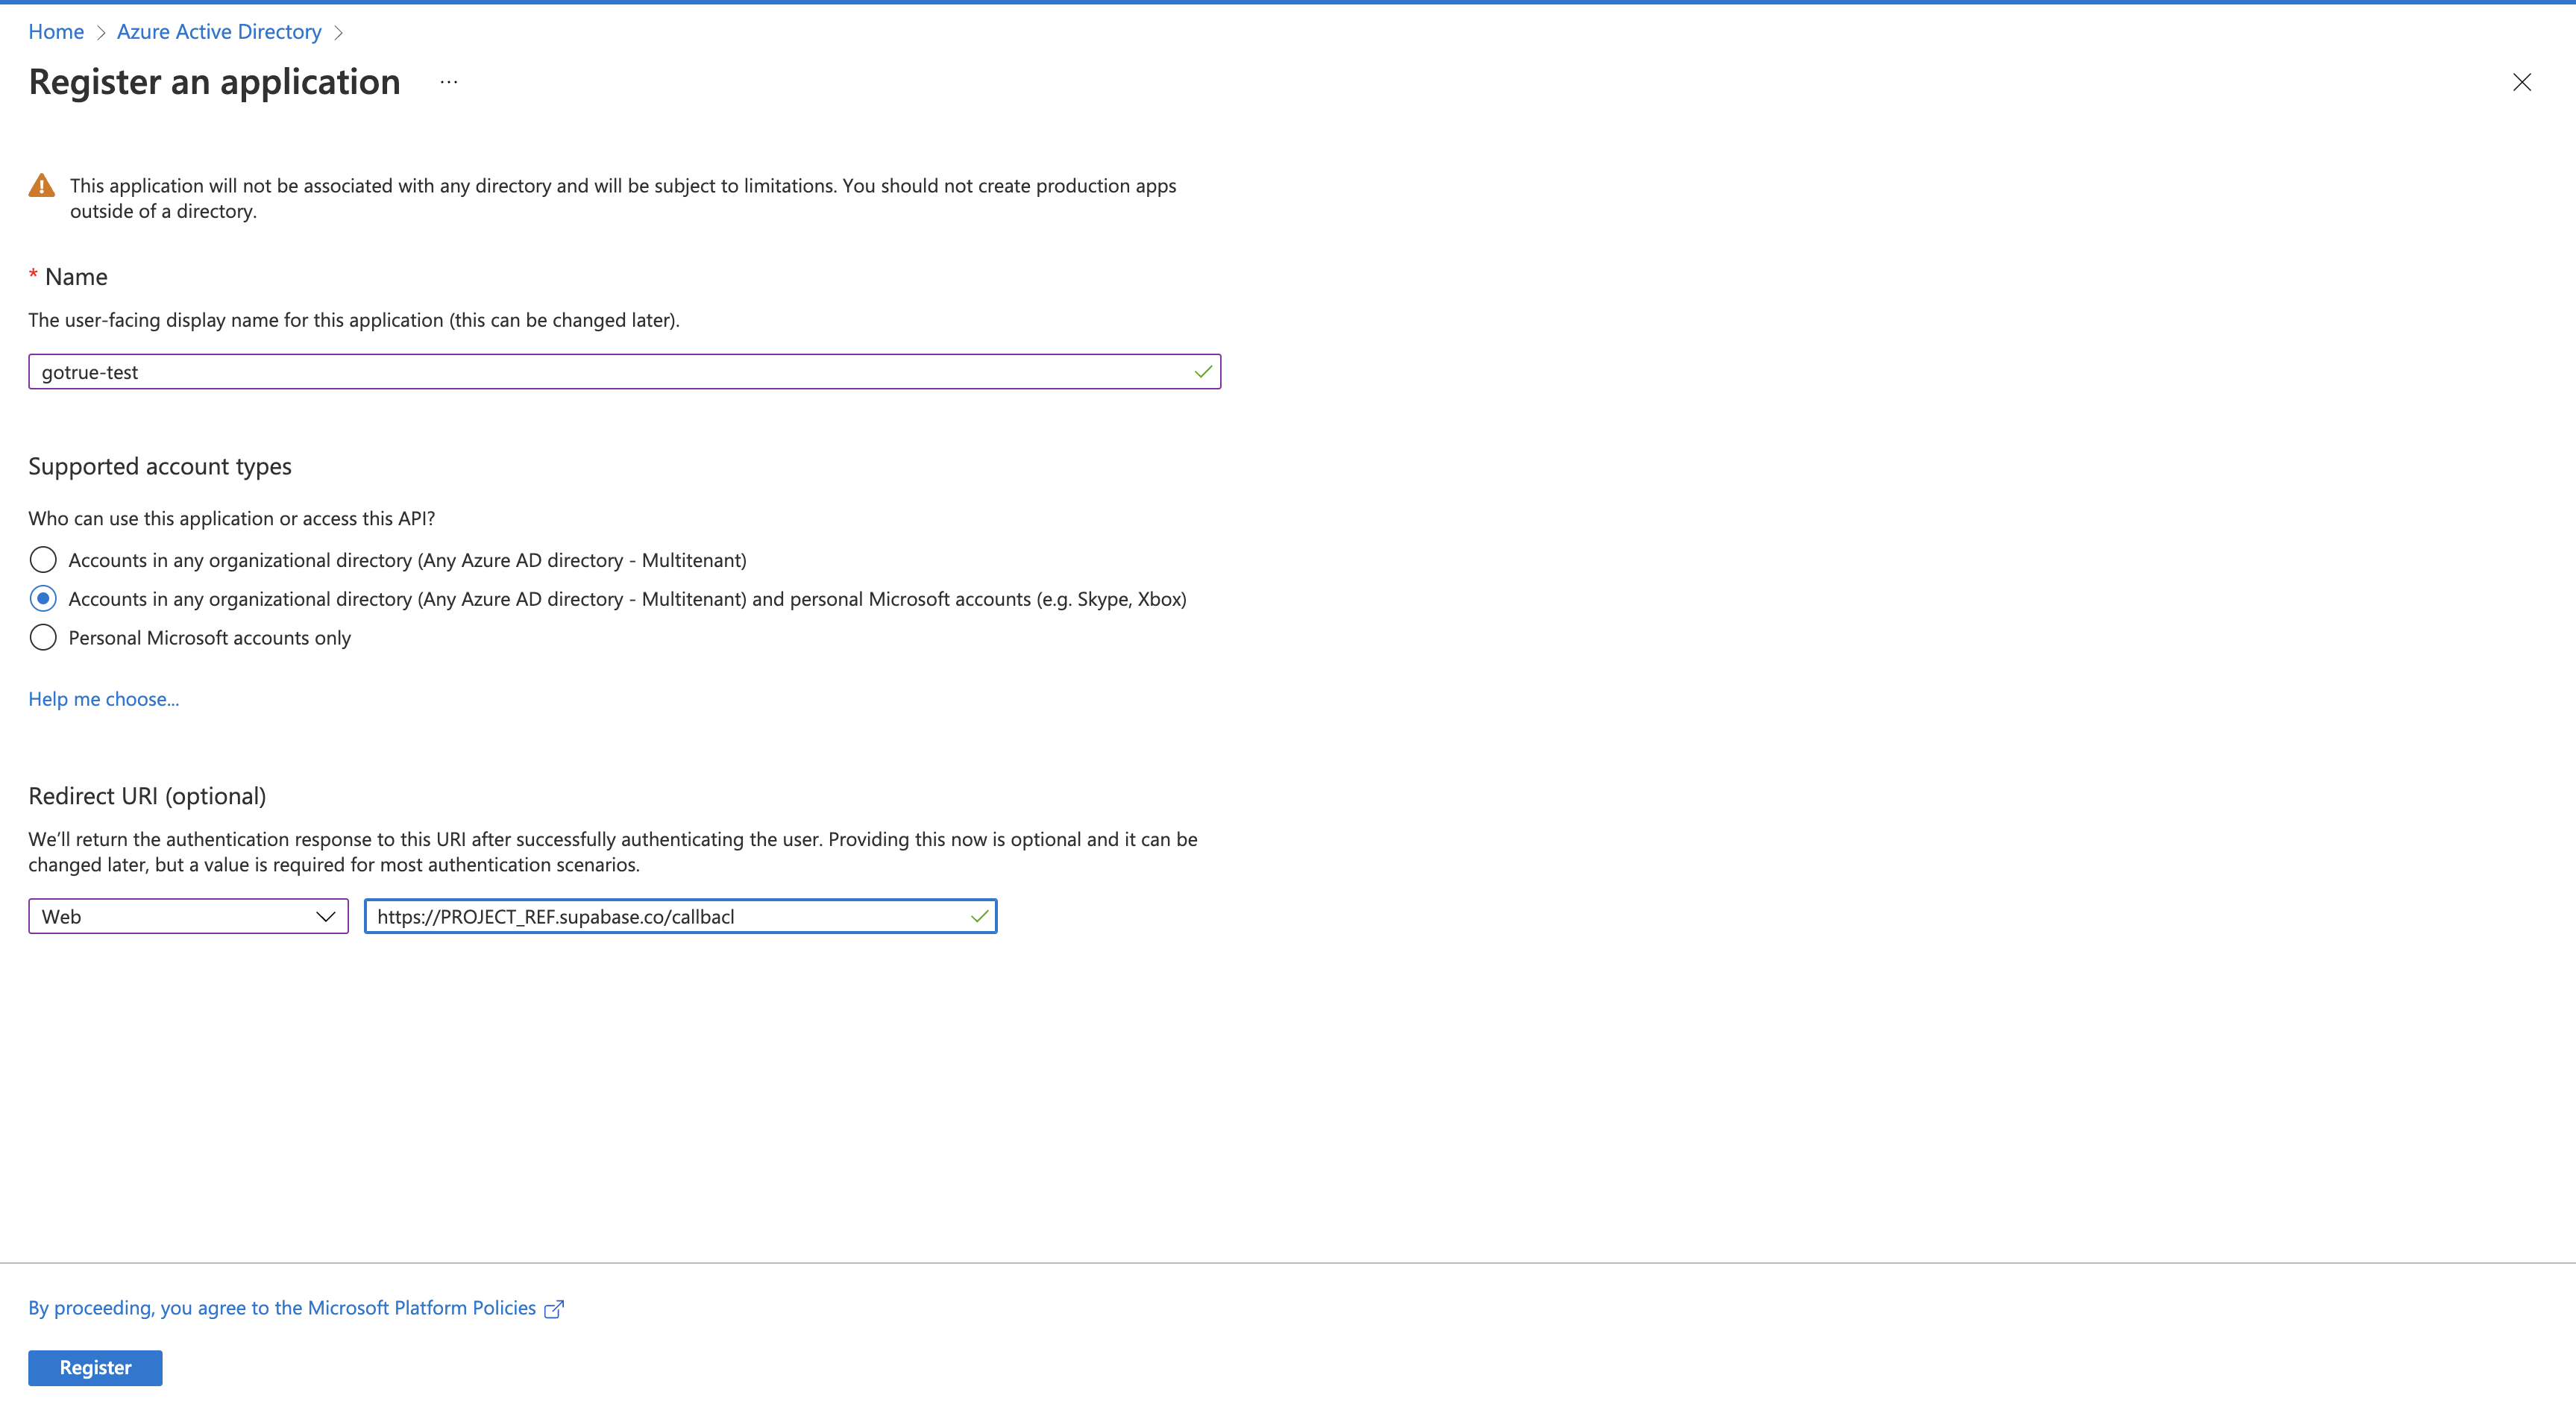
Register an application#
- Under Microsoft Entra ID, select App registrations in the side panel and select New registration.
- Choose a name and select your preferred option for the supported account types.
- Specify a Web Redirect URI. It should look like this:
https://<project-ref>.supabase.co/auth/v1/callback - Finally, select Register at the bottom of the screen.
Obtain a client ID and secret#
Local development with Azure OAuth#
Azure does not allow 127.0.0.1 as a redirect URI hostname and requires
the use of localhost.
To enable Azure OAuth during local Supabase development, configure the
Supabase API external URL in your config.toml:
1[api]2external_url = "http://localhost:54321"- Once your app has been registered, the client ID can be found under the list of app registrations under the column titled Application (client) ID.
- You can also find it in the app overview screen.
- Place the Client ID in the Azure configuration screen in the Supabase Auth dashboard.

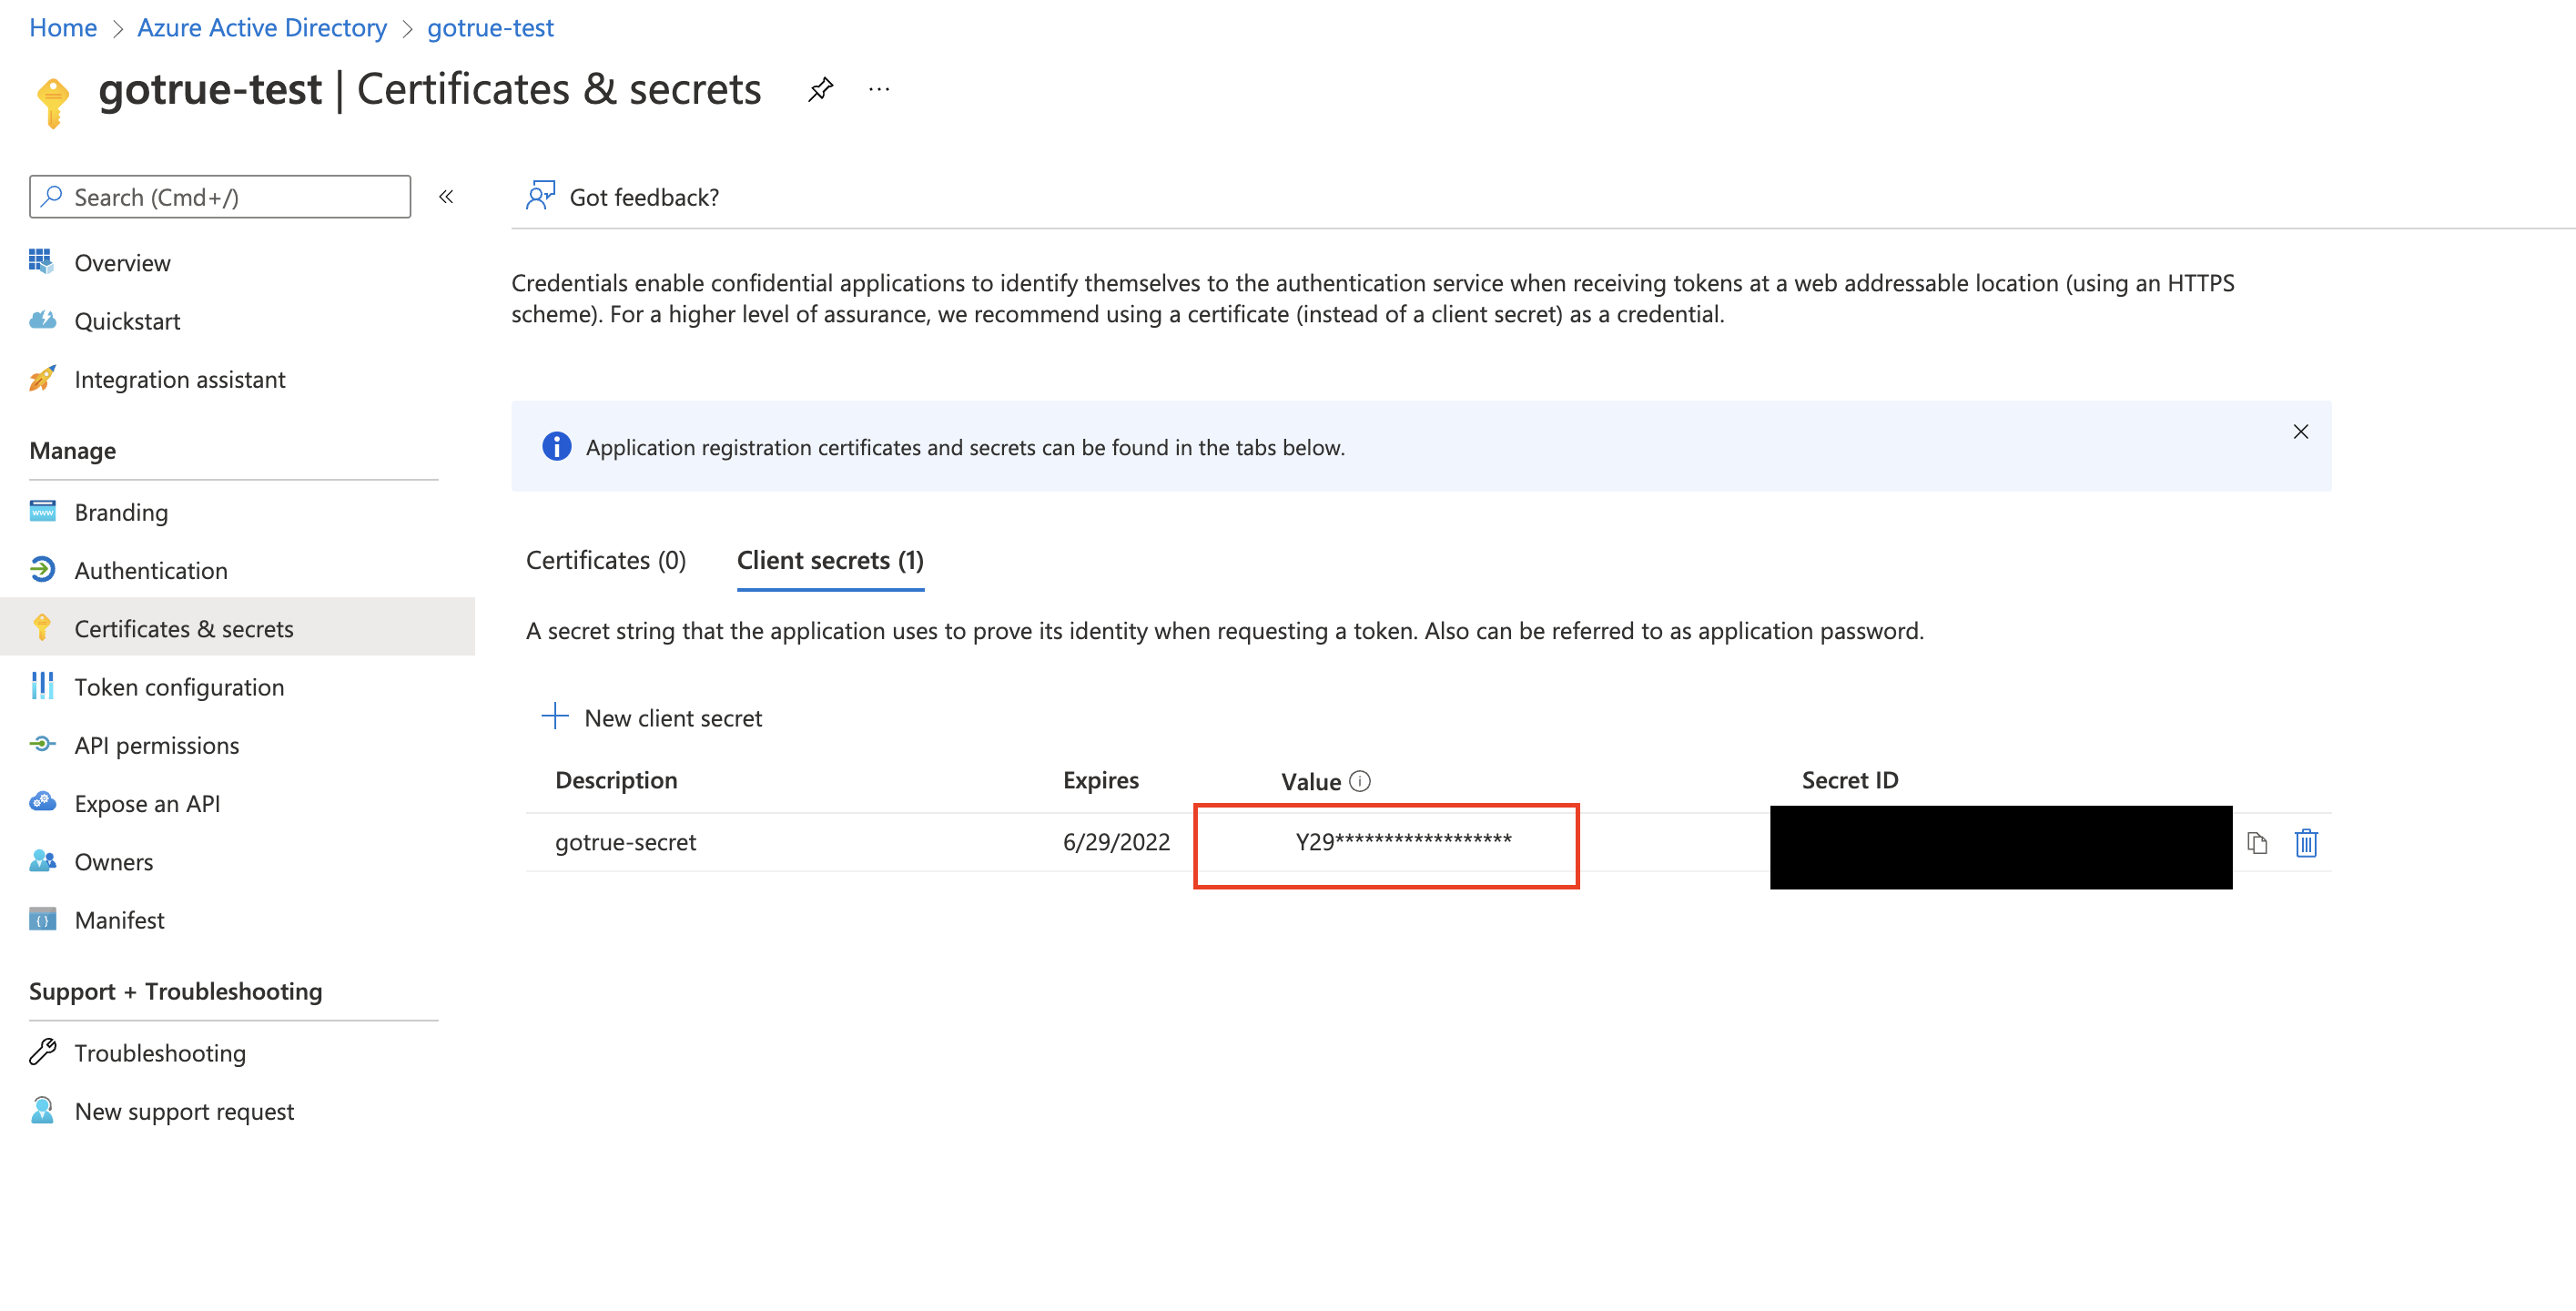
- Select Add a certificate or secret in the app overview screen and open the Client secrets tab.
- Select New client secret to create a new client secret.
- Choose a preferred expiry time of the secret. Make sure you record this in your calendar days in advance so you have enough time to create a new one without suffering from any downtime.
- Once the secret is generated place the Value column (not Secret ID) in the Azure configuration screen in the Supabase Auth dashboard.
You can also configure the Azure auth provider using the Management API:
1# Get your access token from https://supabase.com/dashboard/account/tokens2export SUPABASE_ACCESS_TOKEN="your-access-token"3export PROJECT_REF="your-project-ref"45# Configure Azure auth provider6curl -X PATCH "https://api.supabase.com/v1/projects/$PROJECT_REF/config/auth" \7 -H "Authorization: Bearer $SUPABASE_ACCESS_TOKEN" \8 -H "Content-Type: application/json" \9 -d '{10 "external_azure_enabled": true,11 "external_azure_client_id": "your-azure-client-id",12 "external_azure_secret": "your-azure-client-secret",13 "external_azure_url": "your-azure-url"14 }'Guarding against unverified email domains#
Microsoft Entra ID can send out unverified email domains in certain cases. This may open up your project to a vulnerability where a malicious user can impersonate already existing accounts on your project.
This only applies in at least one of these cases:
- You have configured the
authenticationBehaviorssetting of your OAuth application to allow unverified email domains - You are using an OAuth app configured as single-tenant in the supported account types
- Your OAuth app was created before June 20th 2023 after Microsoft announced this vulnerability, and the app had used unverified emails prior
This means that most OAuth apps are not susceptible to this vulnerability.
Despite this, we recommend configuring the optional xms_edov claim on the OAuth app. This claim allows Supabase Auth to identify with certainty whether the email address sent over by Microsoft Entra ID is verified or not.
Configure this in the following way:
- Select the App registrations menu in Microsoft Entra ID on the Azure portal.
- Select the OAuth app.
- Select the Manifest menu in the sidebar.
- Make a backup of the JSON in case you need it later.
- Identify the
optionalClaimskey. - Edit it by specifying the following object:
1"optionalClaims": {2"idToken": [3{4"name": "xms_edov",5"source": null,6"essential": false,7"additionalProperties": []8},9{10"name": "email",11"source": null,12"essential": false,13"additionalProperties": []14}15],16"accessToken": [17{18"name": "xms_edov",19"source": null,20"essential": false,21"additionalProperties": []22}23],24"saml2Token": []25},
- Select Save to apply the new configuration.
Configure a tenant URL (optional)#
A Microsoft Entra tenant is the directory of users who are allowed to access your project. This section depends on what your OAuth registration uses for Supported account types.
By default, Supabase Auth uses the common Microsoft tenant (https://login.microsoftonline.com/common) which generally allows any Microsoft account to sign in to your project. Microsoft Entra further limits what accounts can access your project depending on the type of OAuth application you registered.
If your app is registered as Personal Microsoft accounts only for the Supported account types set Microsoft tenant to consumers (https://login.microsoftonline.com/consumers).
If your app is registered as My organization only for the Supported account types you may want to configure Supabase Auth with the organization's tenant URL. This will use the tenant's authorization flows instead, and will limit access at the Supabase Auth level to Microsoft accounts arising from only the specified tenant.
Configure this by storing a value under Azure Tenant URL in the Supabase Auth provider configuration page for Azure that has the following format https://login.microsoftonline.com/<tenant-id>.
Add login code to your client app#
Supabase Auth requires that Azure returns a valid email address. Therefore you must request the email scope in the signInWithOAuth method.
Make sure you're using the right supabase client in the following code.
If you're not using Server-Side Rendering or cookie-based Auth, you can directly use the createClient from @supabase/supabase-js. If you're using Server-Side Rendering, see the Server-Side Auth guide for instructions on creating your Supabase client.
When your user signs in, call signInWithOAuth() with azure as the provider:
1import { createClient } from '@supabase/supabase-js'23const supabase = createClient('https://your-project-id.supabase.co', 'sb_publishable_...')45// ---cut---6async function signInWithAzure() {7 const { data, error } = await supabase.auth.signInWithOAuth({8 provider: 'azure',9 options: {10 scopes: 'email',11 },12 })13}For a PKCE flow, for example in Server-Side Auth, you need an extra step to handle the code exchange. When calling signInWithOAuth, provide a redirectTo URL which points to a callback route. This redirect URL should be added to your redirect allow list.
In the browser, signInWithOAuth automatically redirects to the OAuth provider's authentication endpoint, which then redirects to your endpoint.
1import { createClient, type Provider } from '@supabase/supabase-js';2const supabase = createClient('https://your-project-id.supabase.co', 'sb_publishable_...')3const provider = 'provider' as Provider45// ---cut---6await supabase.auth.signInWithOAuth({7 provider,8 options: {9 redirectTo: `http://example.com/auth/callback`,10 },11})At the callback endpoint, handle the code exchange to save the user session.
Create a new file at app/auth/callback/route.ts and populate with the following:
app/auth/callback/route.ts
1import { NextResponse } from 'next/server'23// The client you created from the Server-Side Auth instructions4import { createClient } from '@/utils/supabase/server'56export async function GET(request: Request) {7 const { searchParams, origin } = new URL(request.url)8 const code = searchParams.get('code')9 // if "next" is in param, use it as the redirect URL10 let next = searchParams.get('next') ?? '/'11 if (!next.startsWith('/')) {12 // if "next" is not a relative URL, use the default13 next = '/'14 }1516 if (code) {17 const supabase = await createClient()18 const { error } = await supabase.auth.exchangeCodeForSession(code)19 if (!error) {20 const forwardedHost = request.headers.get('x-forwarded-host') // original origin before load balancer21 const isLocalEnv = process.env.NODE_ENV === 'development'22 if (isLocalEnv) {23 // we can be sure that there is no load balancer in between, so no need to watch for X-Forwarded-Host24 return NextResponse.redirect(`${origin}${next}`)25 } else if (forwardedHost) {26 return NextResponse.redirect(`https://${forwardedHost}${next}`)27 } else {28 return NextResponse.redirect(`${origin}${next}`)29 }30 }31 }3233 // return the user to an error page with instructions34 return NextResponse.redirect(`${origin}/auth/auth-code-error`)35}When your user signs out, call signOut() to remove them from the browser session and any objects from localStorage:
1import { createClient } from '@supabase/supabase-js'23const supabase = createClient('https://your-project-id.supabase.co', 'sb_publishable_...')45// ---cut---6async function signOut() {7 const { error } = await supabase.auth.signOut()8}Obtain the provider refresh token#
Azure OAuth2.0 doesn't return the provider_refresh_token by default. If you need the provider_refresh_token returned, you will need to include the following scope:
1import { createClient } from '@supabase/supabase-js'23const supabase = createClient('https://your-project-id.supabase.co', 'sb_publishable_...')45// ---cut---6async function signInWithAzure() {7 const { data, error } = await supabase.auth.signInWithOAuth({8 provider: 'azure',9 options: {10 scopes: 'offline_access',11 },12 })13}