Login with Kakao
To enable Kakao Auth for your project, you need to set up a Kakao OAuth application and add the application credentials to your Supabase Dashboard.
Overview#
Kakao OAuth consists of six broad steps:
- Create and configure your app in the Kakao Developers Portal.
- Obtain a
REST API key- this serves as theclient_id. - Obtain a
Kakao Login Client Secret code- this serves as theclient_secret. - Configure additional settings in the Kakao Developers Portal.
- Add your
client idandclient secretkeys to your Supabase Project. - Add the login code to your Supabase JS Client App.
Access your Kakao Developer account#
- Go to Kakao Developers Portal.
- Click on Login at the top right to log in.
Create and configure your app#
- Go to App.
- Click on Create app at the top.
- Fill out your app information:
- App icon.
- App name.
- Company name.
- Category.
- App primary domain.
- Click Save at the bottom right.
Obtain a REST API key#
This serves as the client_id when you make API calls to authenticate the user.
- Go to App.
- Click on your app.
- Go to App Settings > App > Platform Key.
- In the Platform Key section is
REST API key. This will become yourclient_idlater.
Find your callback URL#
The next step requires a callback URL, which looks like this: https://<project-ref>.supabase.co/auth/v1/callback
- Go to your Supabase Project Dashboard
- Click on the
Authenticationicon in the left sidebar - Click on
Sign In / Providersunder the Configuration section - Click on Kakao from the accordion list to expand and you'll find your Callback URL, you can click
Copyto copy it to the clipboard
Local development#
When testing OAuth locally with the Supabase CLI, ensure your OAuth provider is configured with the local Supabase Auth callback URL:
http://localhost:54321/auth/v1/callback
If this callback URL is missing or misconfigured, OAuth sign-in may fail or not redirect correctly during local development.
See the local development docs for more details.
For testing OAuth locally with the Supabase CLI see the local development docs.
- To add a callback URL on Kakao, go to App Settings > App > Platform Key.
- Click on the REST API key you want to use.
- In the edit page, enter your callback URL in the Kakao Login Redirect URI field.
- Click Save in the bottom right.
Obtain a client secret#
- Go to App Settings > App > Platform Key.
- Click on the REST API key you want to use.
- Note the Kakao Login Client Secret code. This serves as a
client_secretfor your Supabase project. - Make sure you activate Kakao Login Client Secret.
Additional configurations on Kakao Developers portal#
- Go to Product Settings > Kakao Login > General.
- Set State to "ON" in the Usage settings section to enable Kakao Login.
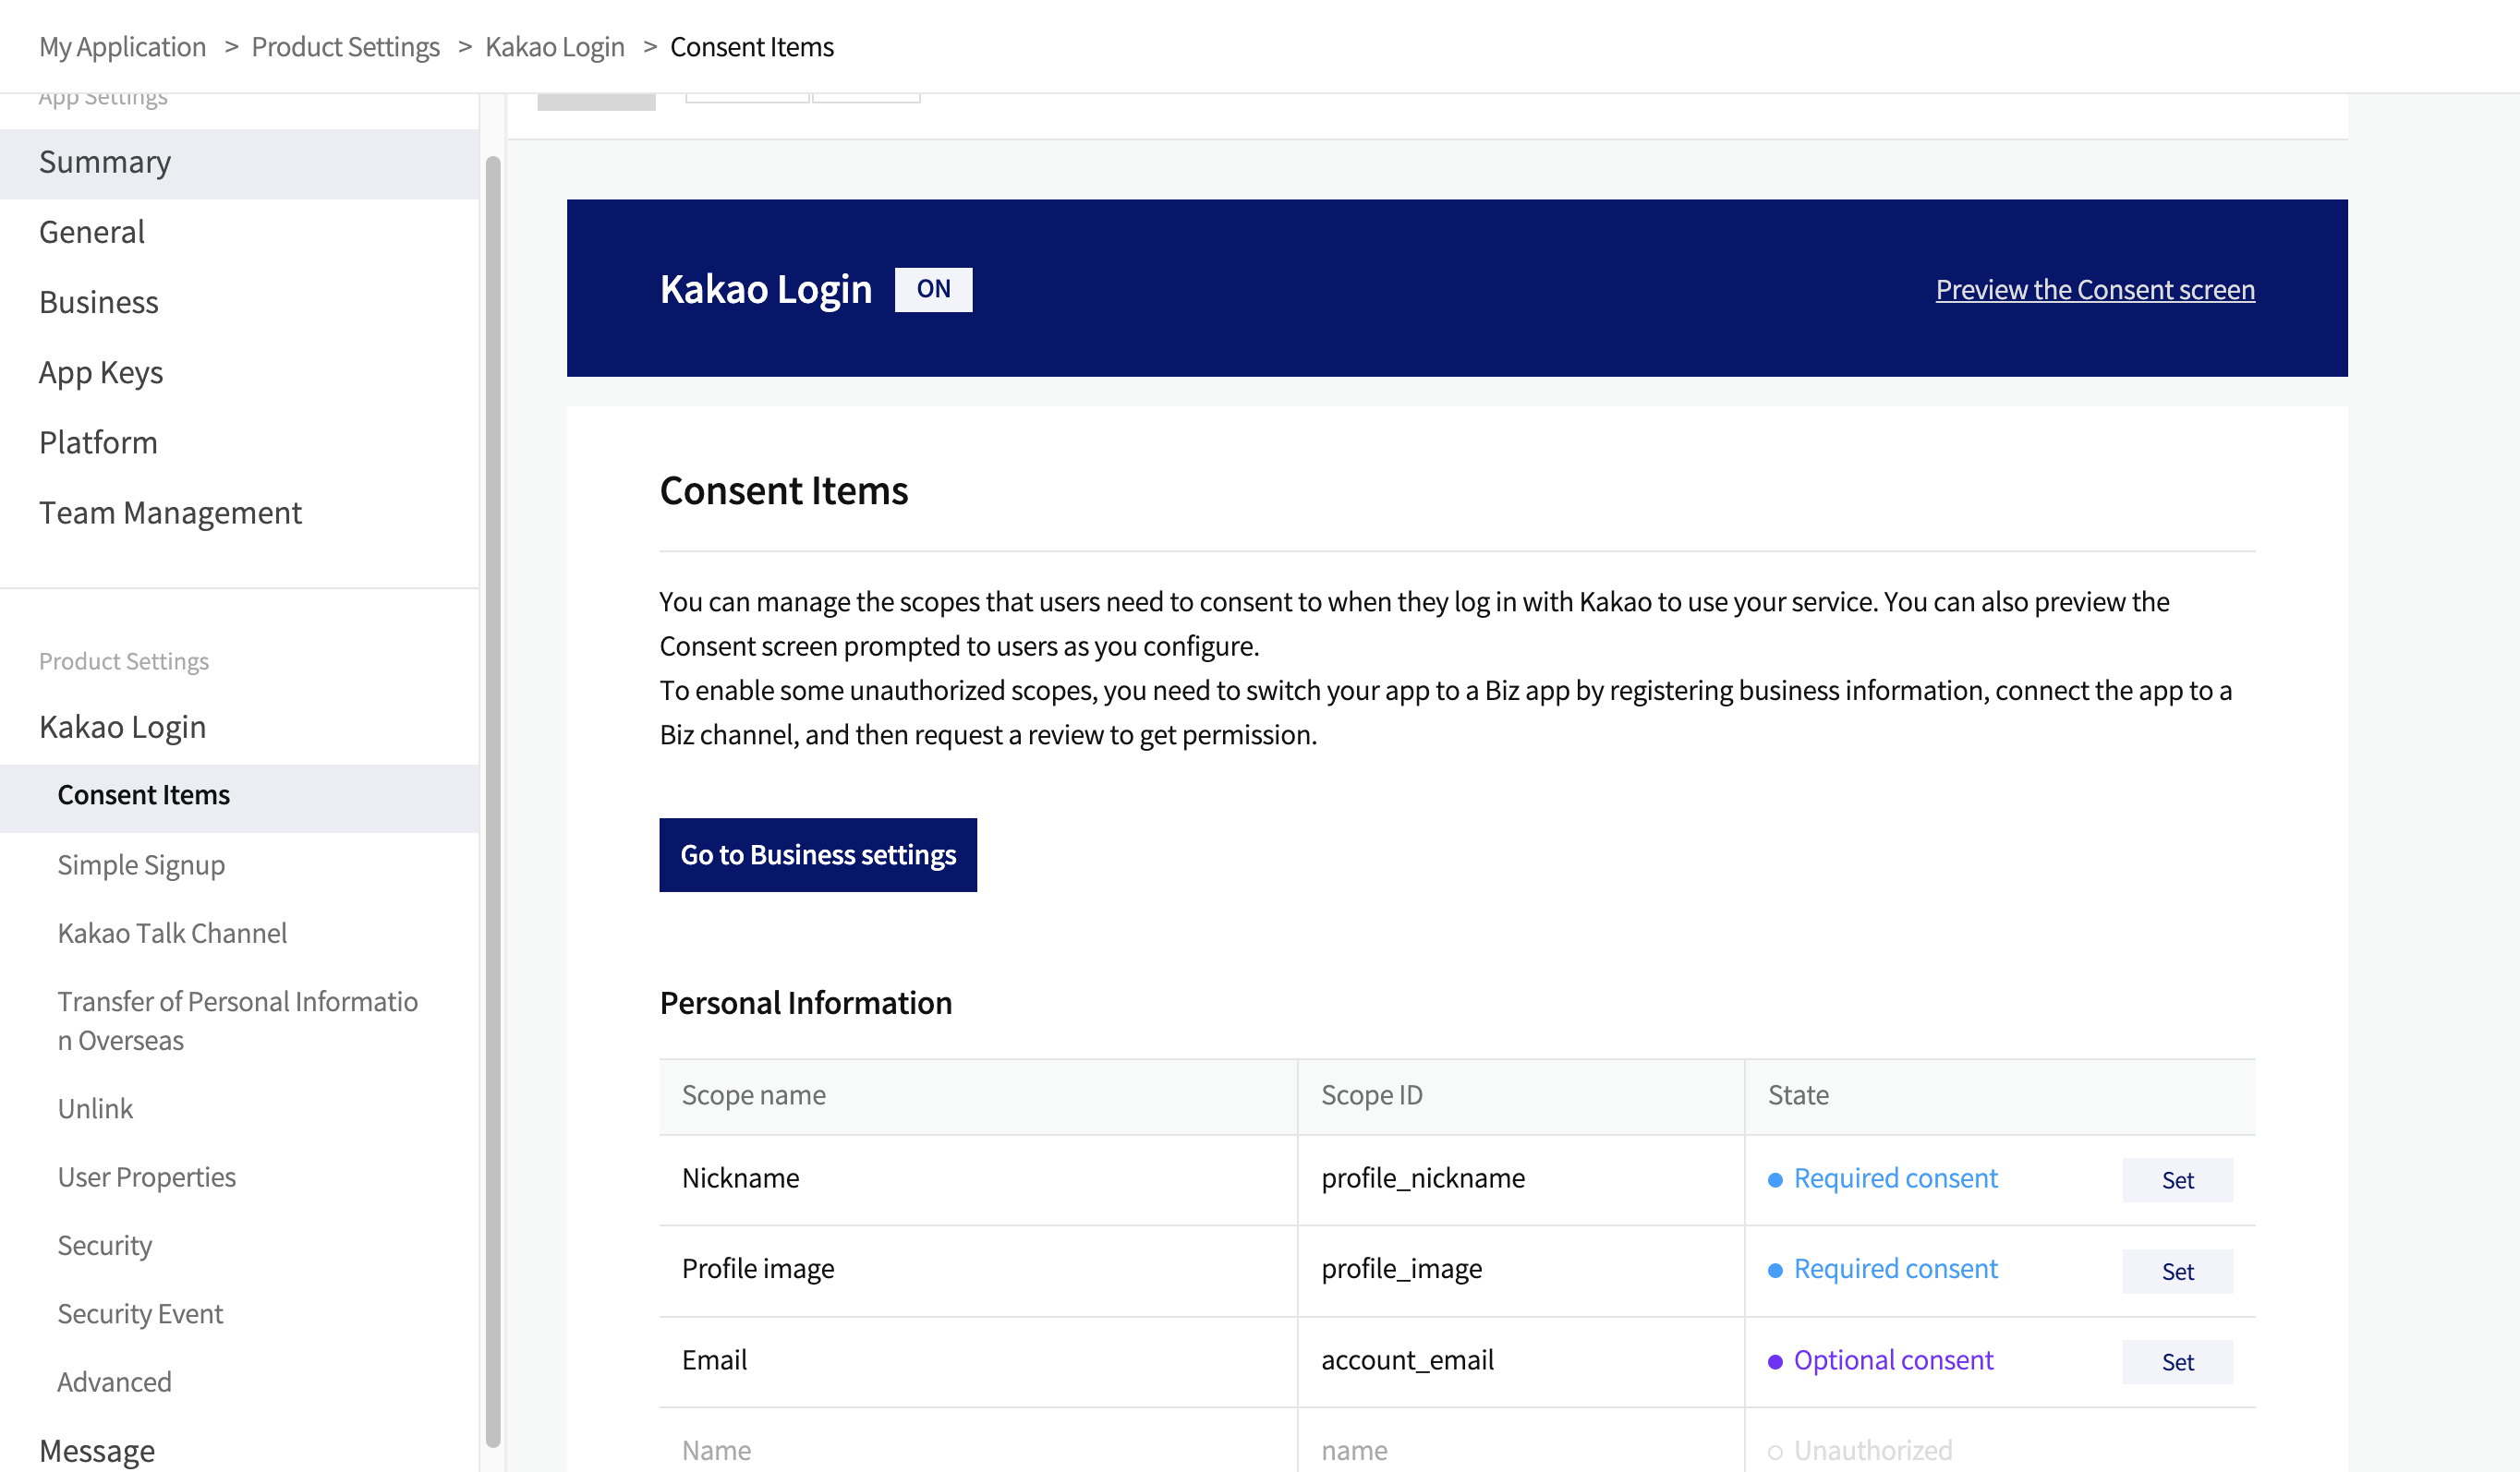
- Go to Product Settings > Kakao Login > Consent Items.
- Set the following scopes under the Consent Items:
- account_email (optional)
- profile_image
- profile_nickname
If you don't need an email address (or account_email isn't available for your app), you can omit account_email and enable Allow users without an email in the Supabase Kakao provider settings.
In the Kakao Developers Portal, the "account_email" consent item is only available for apps that are registered as "Biz App". To convert your app to a "Biz App", go to App Settings > App > General, and complete the required fields in the Business Information section.
Add your OAuth credentials to Supabase#
- Go to your Supabase Project Dashboard
- In the left sidebar, click the
Authenticationicon (near the top) - Click on
Providersunder the Configuration section - Click on Kakao from the accordion list to expand and turn Kakao Enabled to ON
- Enter your Kakao Client ID and Kakao Client Secret saved in the previous step
- Click
Save
If you did not request account_email in Kakao, enable Allow users without an email in the Kakao provider settings.
Add login code to your client app#
Make sure you're using the right supabase client in the following code.
If you're not using Server-Side Rendering or cookie-based Auth, you can directly use the createClient from @supabase/supabase-js. If you're using Server-Side Rendering, see the Server-Side Auth guide for instructions on creating your Supabase client.
When your user signs in, call signInWithOAuth() with kakao as the provider:
1import { createClient } from '@supabase/supabase-js'23const supabase = createClient('https://your-project-id.supabase.co', 'sb_publishable_...')45// ---cut---6async function signInWithKakao() {7 const { data, error } = await supabase.auth.signInWithOAuth({8 provider: 'kakao',9 })10}For a PKCE flow, for example in Server-Side Auth, you need an extra step to handle the code exchange. When calling signInWithOAuth, provide a redirectTo URL which points to a callback route. This redirect URL should be added to your redirect allow list.
In the browser, signInWithOAuth automatically redirects to the OAuth provider's authentication endpoint, which then redirects to your endpoint.
1import { createClient, type Provider } from '@supabase/supabase-js';2const supabase = createClient('https://your-project-id.supabase.co', 'sb_publishable_...')3const provider = 'provider' as Provider45// ---cut---6await supabase.auth.signInWithOAuth({7 provider,8 options: {9 redirectTo: `http://example.com/auth/callback`,10 },11})At the callback endpoint, handle the code exchange to save the user session.
Create a new file at app/auth/callback/route.ts and populate with the following:
app/auth/callback/route.ts
1import { NextResponse } from 'next/server'23// The client you created from the Server-Side Auth instructions4import { createClient } from '@/utils/supabase/server'56export async function GET(request: Request) {7 const { searchParams, origin } = new URL(request.url)8 const code = searchParams.get('code')9 // if "next" is in param, use it as the redirect URL10 let next = searchParams.get('next') ?? '/'11 if (!next.startsWith('/')) {12 // if "next" is not a relative URL, use the default13 next = '/'14 }1516 if (code) {17 const supabase = await createClient()18 const { error } = await supabase.auth.exchangeCodeForSession(code)19 if (!error) {20 const forwardedHost = request.headers.get('x-forwarded-host') // original origin before load balancer21 const isLocalEnv = process.env.NODE_ENV === 'development'22 if (isLocalEnv) {23 // we can be sure that there is no load balancer in between, so no need to watch for X-Forwarded-Host24 return NextResponse.redirect(`${origin}${next}`)25 } else if (forwardedHost) {26 return NextResponse.redirect(`https://${forwardedHost}${next}`)27 } else {28 return NextResponse.redirect(`${origin}${next}`)29 }30 }31 }3233 // return the user to an error page with instructions34 return NextResponse.redirect(`${origin}/auth/auth-code-error`)35}When your user signs out, call signOut() to remove them from the browser session and any objects from localStorage:
1async function signOut() {2 const { error } = await supabase.auth.signOut()3}Using Kakao Login JS SDK#
Kakao Login JS SDK is an official Kakao SDK for authenticating Kakao users on websites.
Exchange the authorization code returned by Kakao API for an ID Token.
For example, this code shows a how to get ID Token:
1const requestUrl = new URL(request.url);2const code = requestUrl.searchParams.get('code');34if (code) {5 const res = await fetch('https://kauth.kakao.com/oauth/token', {6 method: 'POST',7 headers: {8 'Content-Type': 'application/x-www-form-urlencoded;charset=utf-8',9 },10 body: new URLSearchParams({11 grant_type: 'authorization_code',12 client_id: '<CLIENT_ID>',13 redirect_uri: '<url>/api/auth/kakao/oidc',14 code,15 client_secret: '<CLIENT_SECRET>',16 }),17 });1819 const {id_token} = await res.json();20}Use the ID Token to sign in:
1const res = await auth.signInWithIdToken({2 provider: 'kakao',3 token: id_token,4});Configuration#
- Set State to "ON" under OpenID Connect Activation on the Kakao Developers portal.
- Add
openidto scope along with the scope values you wish to obtain consent for.