Build a User Management App with Ionic Vue
This tutorial demonstrates how to build a basic user management app. The app authenticates and identifies the user, stores their profile information in the database, and allows the user to log in, update their profile details, and upload a profile photo. The app uses:
- Supabase Database - a Postgres database for storing your user data and Row Level Security so data is protected and users can only access their own information.
- Supabase Auth - allow users to sign up and log in.
- Supabase Storage - allow users to upload a profile photo.
If you get stuck while working through this guide, refer to the full example on GitHub.
Project setup#
Before you start building you need to set up the Database and API. You can do this by starting a new Project in Supabase and then creating a "schema" inside the database.
Create a project#
- Create a new project in the Supabase Dashboard.
- Enter your project details.
- Wait for the new database to launch.
Set up the database schema#
Now set up the database schema. You can use the "User Management Starter" quickstart in the SQL Editor, or you can copy/paste the SQL from below and run it.
- Go to the SQL Editor page in the Dashboard.
- Click User Management Starter under the Community > Quickstarts tab.
- Click Run.
You can pull the database schema down to your local project by running the db pull command. Read the local development docs for detailed instructions.
1supabase link --project-ref <project-id>2# You can get <project-id> from your project's dashboard URL: https://supabase.com/dashboard/project/<project-id>3supabase db pullGet API details#
Now that you've created some database tables, you are ready to insert data using the auto-generated API.
To do this, you need to get the Project URL and key from the project Connect dialog.
Read the API keys docs for a full explanation of all key types and their uses.
Changes to API keys
Supabase has changed the way keys work to improve project security and developer experience. You can read the full announcement on GitHub.
They will be deprecated by the end of 2026, and you should now use the publishable (sb_publishable_xxx) and secret (sb_secret_xxx) keys instead.
In most cases, you can get keys from the Project's Connect dialog, but if you want a specific key, you can find them in the Settings > API Keys section of the Dashboard.
- For new keys, open the API Keys tab, if you don't have a publishable key already, click Create new API Keys, and copy the value from the Publishable key section for client-side operations. For server-side operations, copy the value from the Secret keys section.
- For legacy keys, copy the
anonkey for client-side operations and theservice_rolekey for server-side operations from the Legacy API Keys tab.
Building the app#
Start by building the Vue app from scratch.
Initialize an Ionic Vue app#
Use the Ionic CLI to initialize an app called supabase-ionic-vue:
1npm install -g @ionic/cli2ionic start supabase-ionic-vue blank --type vue3cd supabase-ionic-vueInstall the only additional dependency: supabase-js
1npm install @supabase/supabase-jsSave the environment variables in a .env file, including the API URL and key that you copied earlier.
1VUE_APP_SUPABASE_URL=YOUR_SUPABASE_URL2VUE_APP_SUPABASE_KEY=YOUR_SUPABASE_KEYWith the API credentials in place, create a helper file to initialize the Supabase client. These variables will be exposed on the browser, and that's fine since Supabase enables Row Level Security on Databases by default.
src/supabase.ts
1import { createClient } from '@supabase/supabase-js'23const supabaseUrl = process.env.VUE_APP_SUPABASE_URL4const supabaseKey = process.env.VUE_APP_SUPABASE_KEY56if (!supabaseUrl) {7 throw new Error(8 'Environment variable VUE_APP_SUPABASE_URL is not set. Please define it before starting the application.'9 )10}1112if (!supabaseKey) {13 throw new Error(14 'Environment variable VUE_APP_SUPABASE_KEY is not set. Please define it before starting the application.'15 )16}1718export const supabase = createClient(supabaseUrl, supabaseKey)Set up a login route#
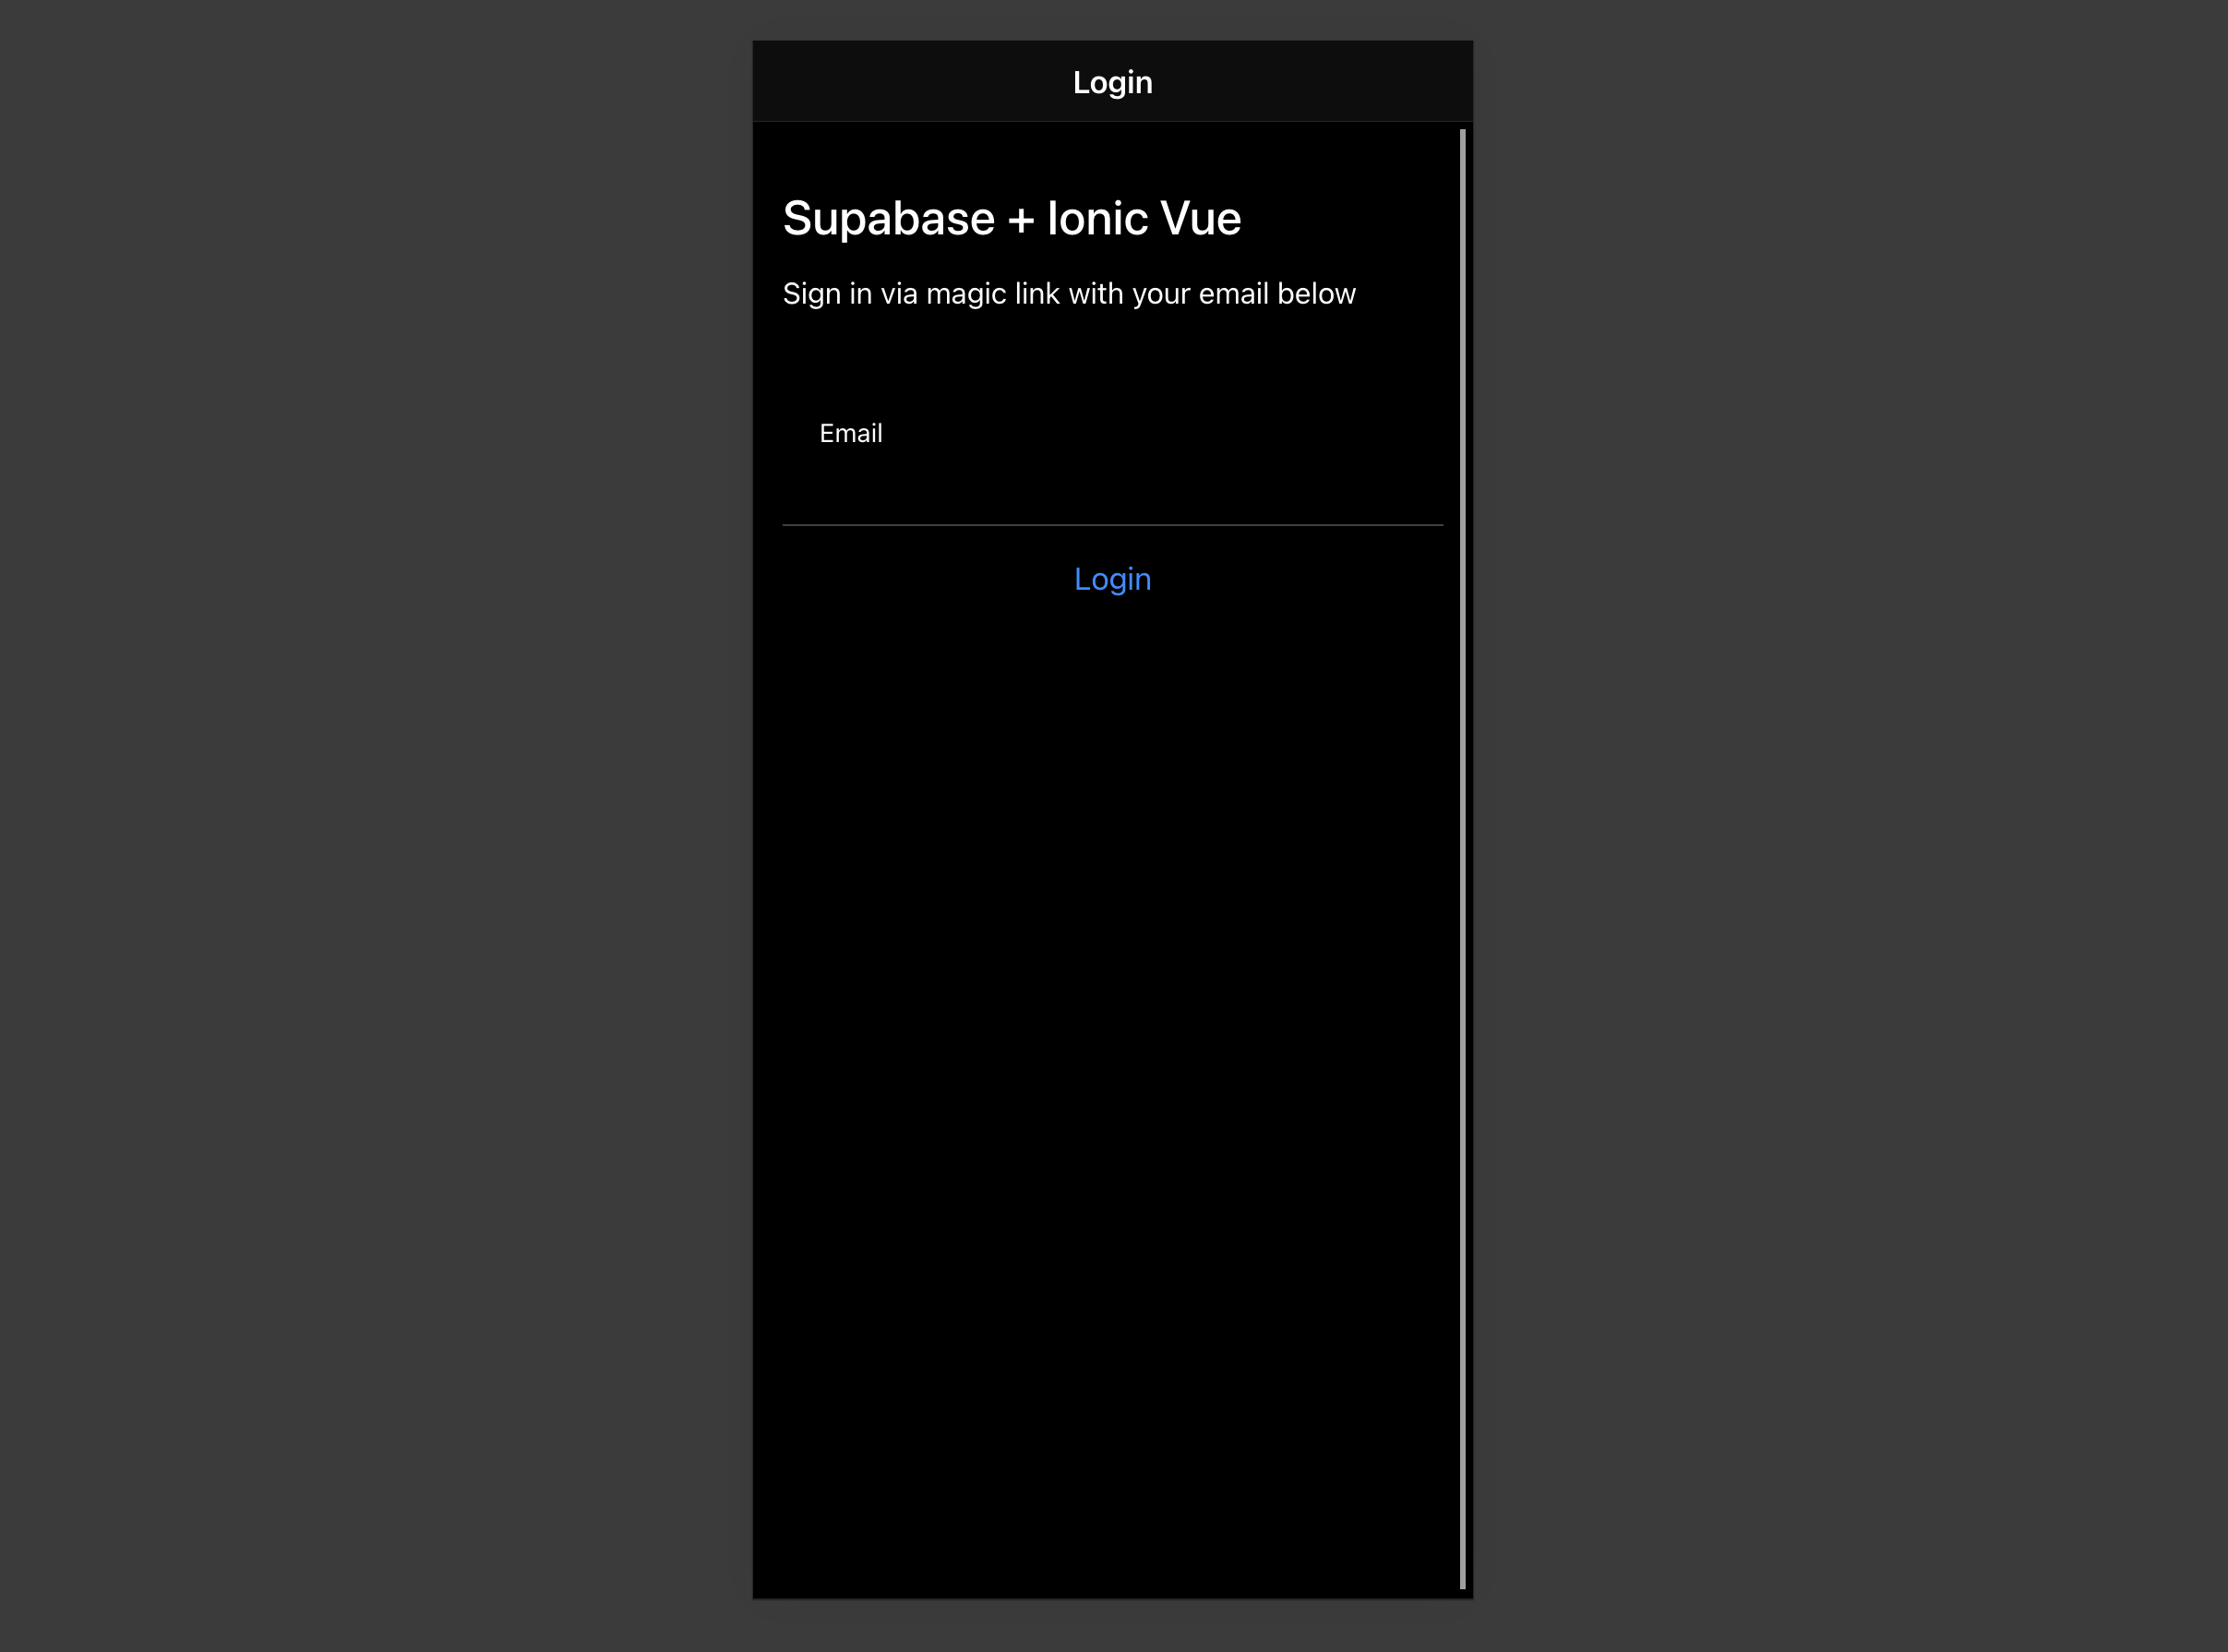
Create a Vue component to manage logins and sign ups that uses Magic Links, so users can sign in with their email without using passwords.
src/views/Login.vue
1<template>2 <ion-page>3 <ion-header>4 <ion-toolbar>5 <ion-title>Login</ion-title>6 </ion-toolbar>7 </ion-header>89 <ion-content>10 <div class="ion-padding">11 <h1>Supabase + Ionic Vue</h1>12 <p>Sign in via magic link with your email below</p>13 </div>14 <ion-list inset="true">15 <form @submit.prevent="handleLogin">16 <ion-item>17 <ion-input18 v-model="email"19 label="Email"20 label-placement="stacked"21 name="email"22 autocomplete="email"23 type="email"24 ></ion-input>25 </ion-item>26 <div class="ion-text-center">27 <ion-button type="submit" fill="clear">Login</ion-button>28 </div>29 </form>30 </ion-list>31 </ion-content>32 </ion-page>33</template>3435<script setup lang="ts">36import { supabase } from '../supabase';37import {38 IonContent,39 IonHeader,40 IonPage,41 IonTitle,42 IonToolbar,43 IonList,44 IonItem,45 IonInput,46 IonButton,47 toastController,48 loadingController,49} from '@ionic/vue';50import { ref } from 'vue';5152const email = ref('');5354const handleLogin = async () => {55 const loader = await loadingController.create({});56 const toast = await toastController.create({ duration: 5000 });5758 try {59 await loader.present();60 const { error } = await supabase.auth.signInWithOtp({ email: email.value });6162 if (error) throw error;6364 toast.message = 'Check your email for the login link!';65 await toast.present();66 } catch (error: any) {67 toast.message = error.error_description || error.message;68 await toast.present();69 } finally {70 await loader.dismiss();71 }72};73</script>Account page#
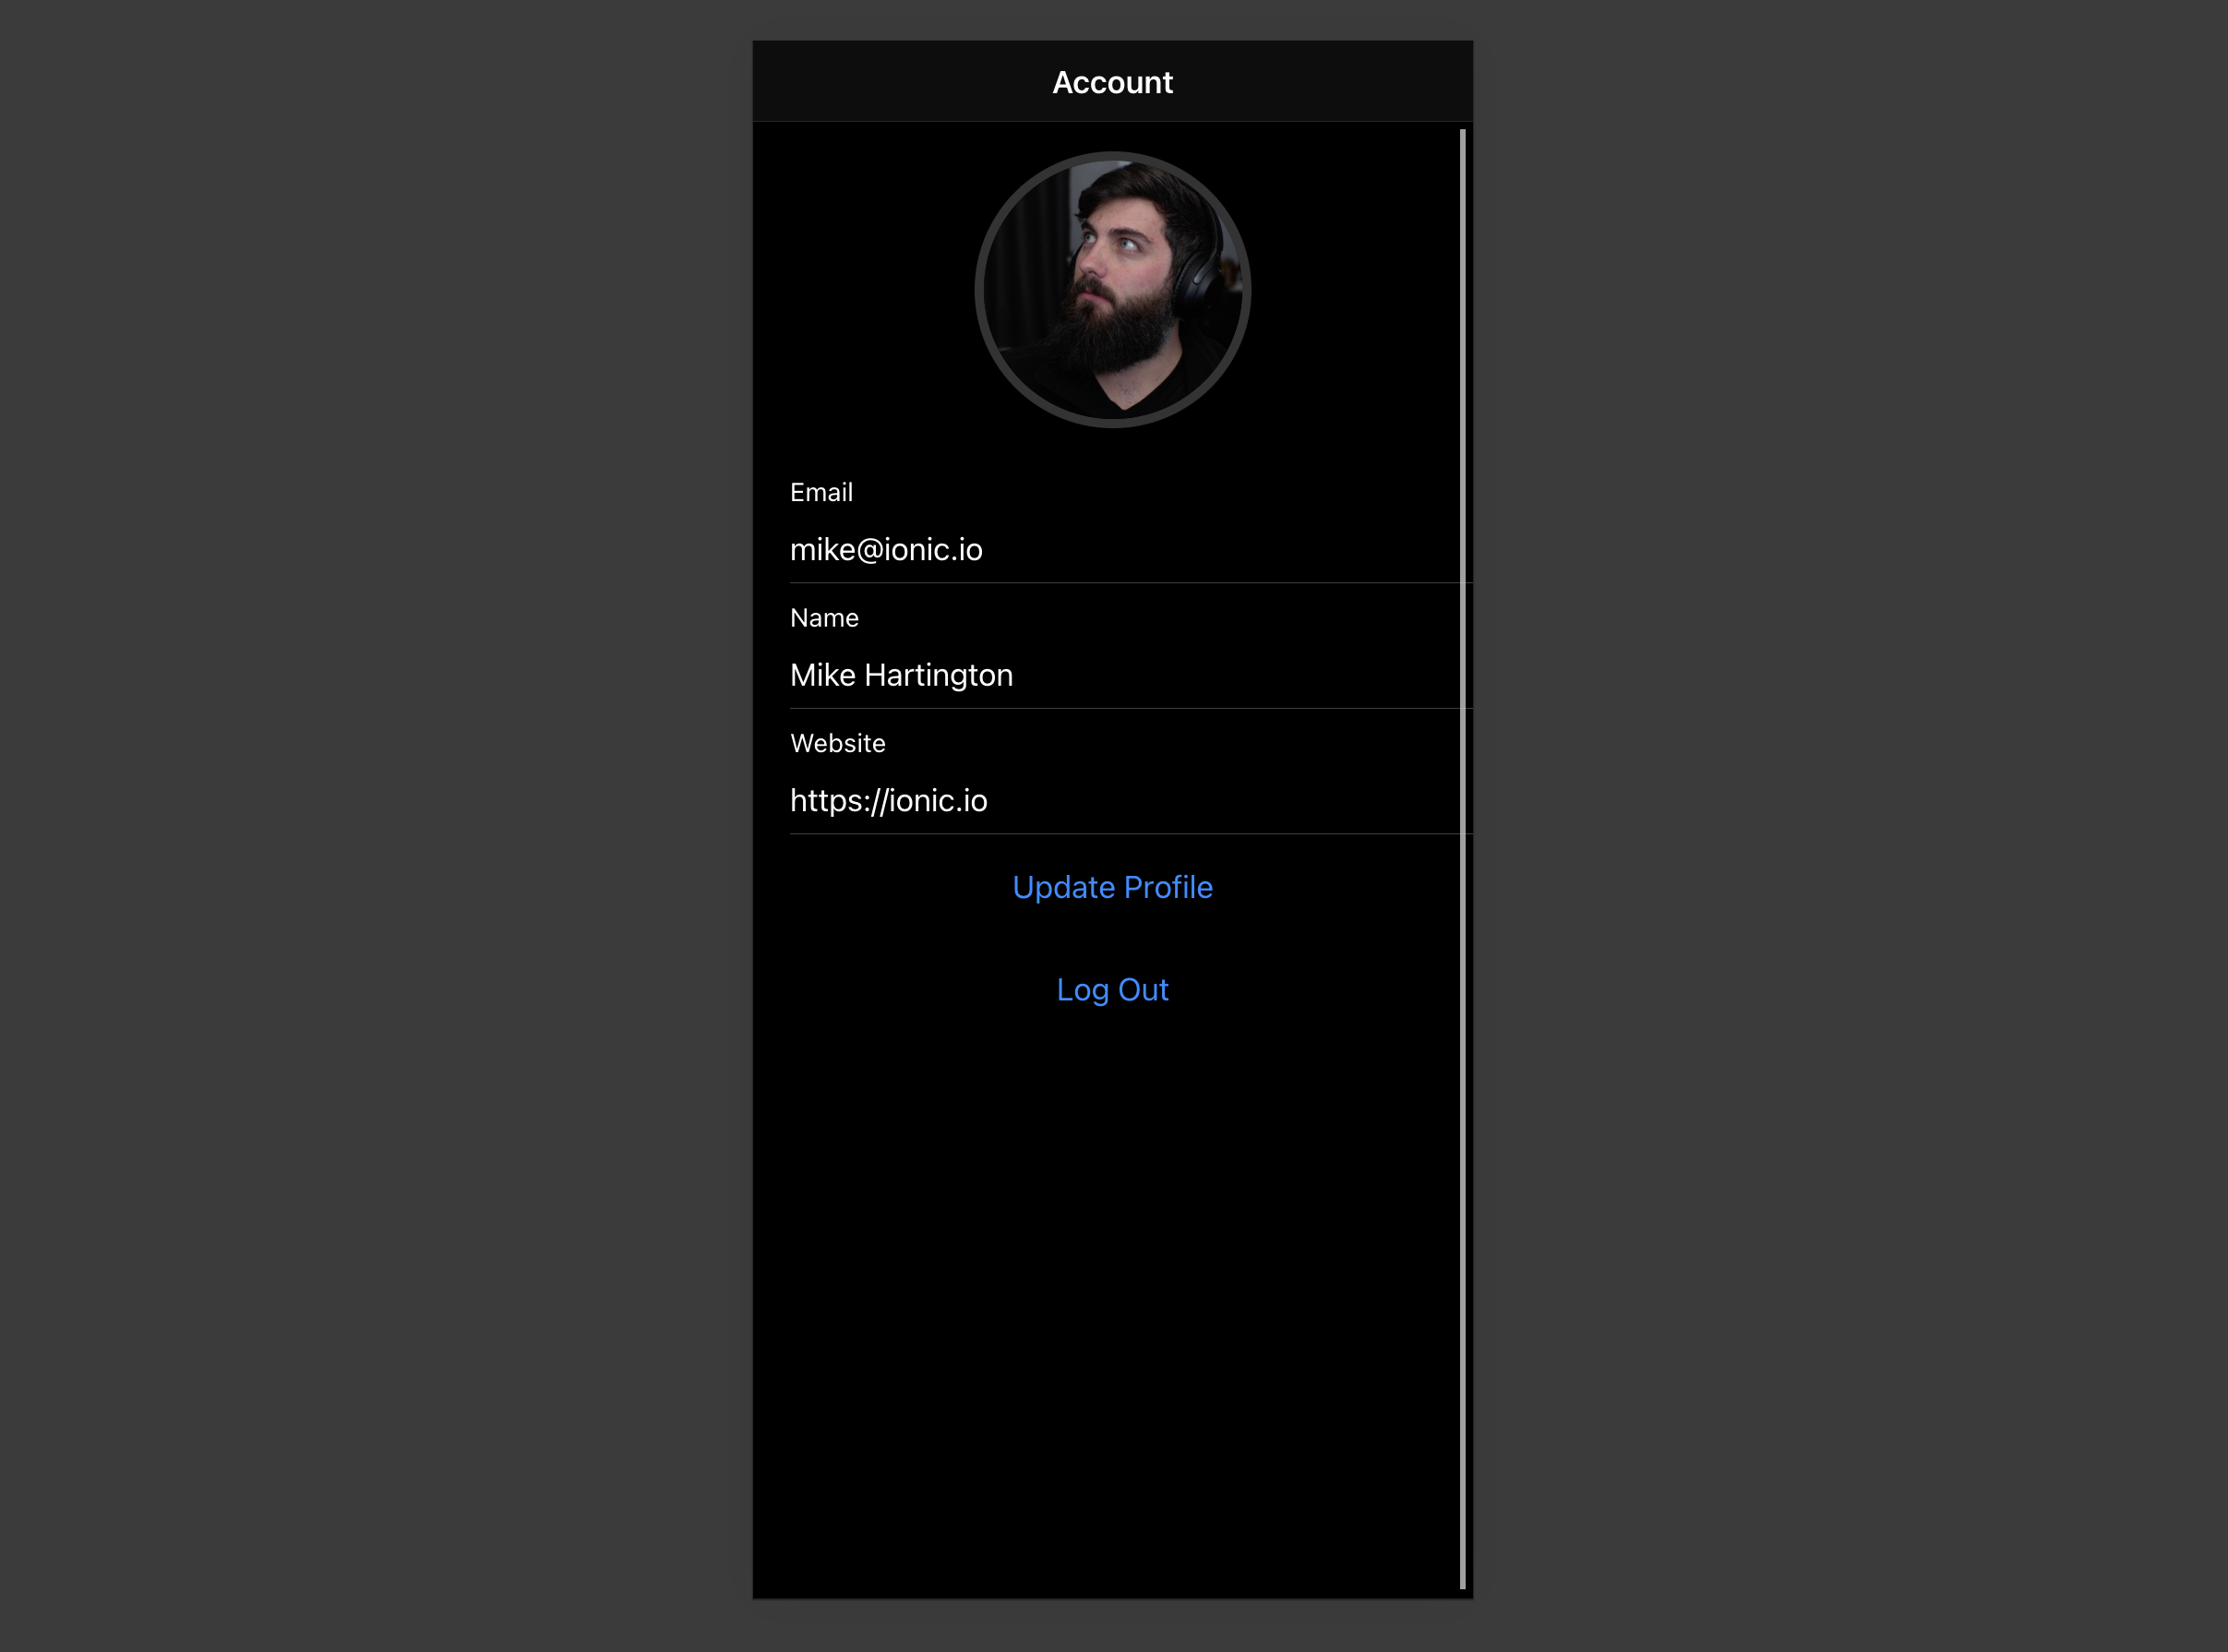
After a user has signed in, let them edit their profile details and manage their account with a new component called Account.vue.
src/views/Account.vue
1<template>2 <ion-page>3 <ion-header>4 <ion-toolbar>5 <ion-title>Account</ion-title>6 </ion-toolbar>7 </ion-header>89 <ion-content>1011 // ...1213 <form @submit.prevent="updateProfile">14 <ion-item>15 <ion-label>16 <p>Email</p>17 <p>{{ email }}</p>18 </ion-label>19 </ion-item>2021 <ion-item>22 <ion-input23 type="text"24 name="username"25 label="Name"26 label-placement="stacked"27 v-model="profile.username"28 ></ion-input>29 </ion-item>3031 <ion-item>32 <ion-input33 type="text"34 name="website"35 label="Website"36 label-placement="stacked"37 v-model="profile.website"38 ></ion-input>39 </ion-item>40 <div class="ion-text-center">41 <ion-button fill="clear" type="submit">Update Profile</ion-button>42 </div>43 </form>4445 <div class="ion-text-center">46 <ion-button fill="clear" @click="signOut">Log Out</ion-button>47 </div>48 </ion-content>49 </ion-page>50</template>5152<script setup lang="ts">53import { supabase } from '@/supabase';54import {55 IonContent,56 IonHeader,57 IonPage,58 IonTitle,59 IonToolbar,60 toastController,61 loadingController,62 IonInput,63 IonItem,64 IonButton,65 IonLabel,66 useIonRouter,67} from '@ionic/vue';68import { onMounted, ref } from 'vue';69import Avatar from '../components/Avatar.vue';7071// ...7273const router = useIonRouter();74const email = ref('');7576const profile = ref({77 username: '',78 website: '',79 avatar_url: '',80});8182async function getProfile() {83 const loader = await loadingController.create({});84 const toast = await toastController.create({ duration: 5000 });85 await loader.present();86 try {87 const { data: { claims } } = await supabase.auth.getClaims();88 if (!claims) throw new Error('No user logged in');8990 email.value = (claims.email as string) ?? '';9192 const { data, error, status } = await supabase93 .from('profiles')94 .select(`username, website, avatar_url`)95 .eq('id', claims.sub)96 .single();9798 if (error && status !== 406) throw error;99100 if (data) {101 profile.value = {102 username: data.username,103 website: data.website,104 avatar_url: data.avatar_url,105 };106 }107 } catch (error: any) {108 toast.message = error.message;109 await toast.present();110 } finally {111 await loader.dismiss();112 }113}114115const updateProfile = async () => {116 const loader = await loadingController.create({});117 const toast = await toastController.create({ duration: 5000 });118 try {119 await loader.present();120 const { data: { claims } } = await supabase.auth.getClaims();121 if (!claims) throw new Error('No user logged in');122123 const updates = {124 id: claims.sub,125 ...profile.value,126 updated_at: new Date(),127 };128129 const { error } = await supabase.from('profiles').upsert(updates);130131 if (error) throw error;132 } catch (error: any) {133 toast.message = error.message;134 await toast.present();135 } finally {136 await loader.dismiss();137 }138};139140async function signOut() {141 const loader = await loadingController.create({});142 const toast = await toastController.create({ duration: 5000 });143 await loader.present();144 try {145 const { error } = await supabase.auth.signOut();146 if (error) throw error;147 router.push('/', 'forward', 'replace');148 } catch (error: any) {149 toast.message = error.message;150 await toast.present();151 } finally {152 await loader.dismiss();153 }154}155156onMounted(() => {157 getProfile();158});159</script>Launch!#
With all the components in place, update App.vue and the app routes:
The Supabase Auth SDK contains three different functions for authenticating user access to applications:
Summary of the methods#
- Use
getClaimsto protect pages and user data. It reads the access token from storage and verifies it. Locally via the WebCrypto API and a cached JWKS endpoint when the project uses asymmetric signing keys (the default for new projects), or by callinggetUsersolely to validate when symmetric keys are in use. The returned claims always come from decoding the JWT, not from a user lookup. getUsermakes a network call to the project's Auth instance to get the user record, which includes the most up-to-date information about the user at the cost of a network call.getSessionwhen you need the raw session (the access token, refresh token, and expiry). For example to forward the access token to another service. The session is loaded directly from local storage and isn't re-validated against the Auth server, so the embedded user object shouldn't be trusted on its own when storage is shared with the client (cookies, request headers). To verify identity, validate the access token withgetClaims, or callgetUserfor a fresh, server-confirmed user record.
In summary: use getClaims to verify identity (typically for protecting pages and data), getUser when you need an up-to-date user record from the Auth server, and getSession when you need the access or refresh token directly, but don't rely on the user object it returns for authorization decisions.
src/router/index.ts
1import { createRouter, createWebHistory } from '@ionic/vue-router'2import { RouteRecordRaw } from 'vue-router'3import LoginPage from '../views/Login.vue'4import AccountPage from '../views/Account.vue'5import { supabase } from '../supabase'67const routes: Array<RouteRecordRaw> = [8 {9 path: '/',10 name: 'Login',11 component: LoginPage,12 },13 {14 path: '/account',15 name: 'Account',16 component: AccountPage,17 },18]1920const router = createRouter({21 history: createWebHistory(process.env.BASE_URL),22 routes,23})2425router.beforeEach(async (to, _from, next) => {26 const { data } = await supabase.auth.getClaims()27 const claims = data?.claims2829 if (to.path === '/account' && !claims) {30 next('/')31 return32 }3334 if (to.path === '/' && claims) {35 next('/account')36 return37 }3839 next()40})4142export default routersrc/App.vue
1<template>2 <ion-app>3 <ion-router-outlet />4 </ion-app>5</template>67<script setup lang="ts">8import { IonApp, IonRouterOutlet } from '@ionic/vue';9import { onUnmounted } from 'vue';10import router from './router';11import { supabase } from './supabase';1213async function syncAuthRedirect() {14 const { data } = await supabase.auth.getClaims();15 const claims = data?.claims;16 const path = router.currentRoute.value.path;1718 if (claims && path === '/') {19 router.replace('/account');20 } else if (!claims && path === '/account') {21 router.replace('/');22 }23}2425const {26 data: { subscription },27} = supabase.auth.onAuthStateChange(() => {28 syncAuthRedirect();29});3031onUnmounted(() => {32 subscription.unsubscribe();33});34</script>Once that's done, run this in a terminal window:
1ionic serveAnd then open the browser to localhost:8100 and you should see the completed app.
Bonus: Profile photos#
Every Supabase project is configured with Storage for managing large files like photos and videos.
Create an upload widget#
First install two packages to interact with the user's camera.
1npm install @ionic/pwa-elements @capacitor/cameraCapacitor is a cross-platform native runtime from Ionic that enables you to deploy web apps to app stores and provides access to native device API.
Ionic PWA elements is a companion package that polyfills certain browser APIs that provide no user interface with custom Ionic UI.
With those packages installed, update main.ts to include an additional bootstrapping call for the Ionic PWA Elements.
src/main.ts
1import { createApp } from 'vue'2import App from './App.vue'3import router from './router'45import { IonicVue } from '@ionic/vue'6/* Core CSS required for Ionic components to work properly */7import '@ionic/vue/css/ionic.bundle.css'89/* Theme variables */10import './theme/variables.css'1112import { defineCustomElements } from '@ionic/pwa-elements/loader'13defineCustomElements(window)14const app = createApp(App).use(IonicVue).use(router)1516router.isReady().then(() => {17 app.mount('#app')18})Then create an AvatarComponent.
src/components/Avatar.vue
1<template>2 <div class="avatar">3 <div class="avatar_wrapper" @click="uploadAvatar">4 <img v-if="avatarUrl" :src="avatarUrl" />5 <ion-icon v-else :icon="person" class="no-avatar"></ion-icon>6 </div>7 </div>8</template>910<script setup lang="ts">11import { ref, toRef, watch } from 'vue';12import { supabase } from '../supabase';13import { Camera, CameraResultType } from '@capacitor/camera';14import { IonIcon } from '@ionic/vue';15import { person } from 'ionicons/icons';1617const props = defineProps<{ path?: string }>();18const emit = defineEmits<{19 upload: [];20 'update:path': [value: string];21}>();2223const path = toRef(props, 'path');24const avatarUrl = ref('');2526const downloadImage = async () => {27 try {28 const { data, error } = await supabase.storage29 .from('avatars')30 .download(path.value!);31 if (error) throw error;32 avatarUrl.value = URL.createObjectURL(data!);33 } catch (error: any) {34 console.error('Error downloading image: ', error.message);35 }36};3738const uploadAvatar = async () => {39 try {40 const photo = await Camera.getPhoto({41 resultType: CameraResultType.DataUrl,42 });4344 if (photo.dataUrl) {45 const file = await fetch(photo.dataUrl)46 .then((res) => res.blob())47 .then(48 (blob) =>49 new File([blob], 'my-file', { type: `image/${photo.format}` })50 );5152 const fileName = `${Math.random()}-${new Date().getTime()}.${53 photo.format54 }`;55 const { error: uploadError } = await supabase.storage56 .from('avatars')57 .upload(fileName, file);58 if (uploadError) {59 throw uploadError;60 }61 emit('update:path', fileName);62 emit('upload');63 }64 } catch (error) {65 console.log(error);66 }67};6869watch(path, () => {70 if (path.value) downloadImage();71});72</script>7374<style>75.avatar {76 display: block;77 margin: auto;78 min-height: 150px;79}80.avatar .avatar_wrapper {81 margin: 16px auto 16px;82 border-radius: 50%;83 overflow: hidden;84 height: 150px;85 aspect-ratio: 1;86 background: var(--ion-color-step-50);87 border: thick solid var(--ion-color-step-200);88}89.avatar .avatar_wrapper:hover {90 cursor: pointer;91}92.avatar .avatar_wrapper ion-icon.no-avatar {93 width: 100%;94 height: 115%;95}96.avatar img {97 display: block;98 object-fit: cover;99 width: 100%;100 height: 100%;101}102</style>Add the new widget#
And then add the widget to the Account page:
src/views/Account.vue
1<template>2 <ion-page>3 <ion-header>4 <ion-toolbar>5 <ion-title>Account</ion-title>6 </ion-toolbar>7 </ion-header>89 <ion-content>10 <avatar v-model:path="profile.avatar_url" @upload="updateProfile"></avatar>11 <form @submit.prevent="updateProfile">12 <ion-item>13 <ion-label>14 <p>Email</p>15 <p>{{ email }}</p>16 </ion-label>17 </ion-item>1819 <ion-item>20 <ion-input21 type="text"22 name="username"23 label="Name"24 label-placement="stacked"25 v-model="profile.username"26 ></ion-input>27 </ion-item>2829 <ion-item>30 <ion-input31 type="text"32 name="website"33 label="Website"34 label-placement="stacked"35 v-model="profile.website"36 ></ion-input>37 </ion-item>38 <div class="ion-text-center">39 <ion-button fill="clear" type="submit">Update Profile</ion-button>40 </div>41 </form>4243 <div class="ion-text-center">44 <ion-button fill="clear" @click="signOut">Log Out</ion-button>45 </div>46 </ion-content>47 </ion-page>48</template>4950<script setup lang="ts">51import { supabase } from '@/supabase';52import {53 IonContent,54 IonHeader,55 IonPage,56 IonTitle,57 IonToolbar,58 toastController,59 loadingController,60 IonInput,61 IonItem,62 IonButton,63 IonLabel,64 useIonRouter,65} from '@ionic/vue';66import { onMounted, ref } from 'vue';67import Avatar from '../components/Avatar.vue';6869const router = useIonRouter();70const email = ref('');7172const profile = ref({73 username: '',74 website: '',75 avatar_url: '',76});7778async function getProfile() {79 const loader = await loadingController.create({});80 const toast = await toastController.create({ duration: 5000 });81 await loader.present();82 try {83 const { data: { claims } } = await supabase.auth.getClaims();84 if (!claims) throw new Error('No user logged in');8586 email.value = (claims.email as string) ?? '';8788 const { data, error, status } = await supabase89 .from('profiles')90 .select(`username, website, avatar_url`)91 .eq('id', claims.sub)92 .single();9394 if (error && status !== 406) throw error;9596 if (data) {97 profile.value = {98 username: data.username,99 website: data.website,100 avatar_url: data.avatar_url,101 };102 }103 } catch (error: any) {104 toast.message = error.message;105 await toast.present();106 } finally {107 await loader.dismiss();108 }109}110111const updateProfile = async () => {112 const loader = await loadingController.create({});113 const toast = await toastController.create({ duration: 5000 });114 try {115 await loader.present();116 const { data: { claims } } = await supabase.auth.getClaims();117 if (!claims) throw new Error('No user logged in');118119 const updates = {120 id: claims.sub,121 ...profile.value,122 updated_at: new Date(),123 };124125 const { error } = await supabase.from('profiles').upsert(updates);126127 if (error) throw error;128 } catch (error: any) {129 toast.message = error.message;130 await toast.present();131 } finally {132 await loader.dismiss();133 }134};135136async function signOut() {137 const loader = await loadingController.create({});138 const toast = await toastController.create({ duration: 5000 });139 await loader.present();140 try {141 const { error } = await supabase.auth.signOut();142 if (error) throw error;143 router.push('/', 'forward', 'replace');144 } catch (error: any) {145 toast.message = error.message;146 await toast.present();147 } finally {148 await loader.dismiss();149 }150}151152onMounted(() => {153 getProfile();154});155</script>At this stage you have a fully functional application!